はじめに
Claude Desktopは MCP (Model Context Protocol) で、ローカルファイルシステムやGitHubといった外部との連携ができます。
公開されているMCPサーバーを利用するほか、MCPサーバー自作するといった方法がありますが、この記事では、より簡易的な手段として、openapi-mcp-serverを用いて、Honoで作ったAPIをClaude Desktopに組み込んでみます。
環境
- MacBook Air M3
- Claude Desktop 0.7.8
サンプルコード
openapi-mcp-serverとは
一言で言えば、OpenAPI (v3.1)準拠のAPIをClaude Desktopから利用できるようにするプロキシサーバーです。OpenAPIで記述されたAPI定義を読み込み、Claude Desktopが理解できる形式に変換します。
MCPサーバーを自作せずとも、OpenAPIのスキーマがあるAPIを作れば、Claude DesktopのMCPツールとして使えるようになります。
作ってみる
HonoはZod OpenAPIを使えば簡単にOpenAPIのスキーマを生成できます。
これを使って、簡易的なお天気APIを作成し、Claude Desktopから呼ぶことを目標とします。
プロジェクト作成
$pnpm create hono@latest claude-weather-api
❯ cloudflare-workers
$cd claude-weather-api
@hono/zod-openapiの導入
$pnpm install zod @hono/zod-openapi
API作成
locationをパラメータに取るお天気APIを作成します。
筆者はHonoの定型的なAPIの作り方をKnowledgeにまとめてClaudeに与えているので、以下のプロンプトを与えるだけでほぼ完成しました。天気は定数を返すだけの仕様です。
Documents/GitHub/cloudflare/claude-weather-api にHonoプロジェクトを作成中です。以下のAPIを作ってください。

- get /weather
    - param: location. tokyo またはlondonのみ

Zod OpenAPIを使った所定の方法で作成してください。
import { OpenAPIHono } from "@hono/zod-openapi";
import { logger } from "hono/logger";
import { secureHeaders } from "hono/secure-headers";
import { weatherAPI } from "./routes/weather";

const app = new OpenAPIHono();

// ミドルウェアの追加
app.use(logger());
app.use(secureHeaders());

// ルートの登録
weatherAPI(app);

// OpenAPI ドキュメントの設定
app.doc("/doc", {
  openapi: "3.1.0",
  info: {
    title: "Weather API",
    version: "1.0.0",
  },
  servers: [
    {
      url: "http://localhost:8787",
    },
  ],
});

export default app;
import type { OpenAPIHono } from "@hono/zod-openapi";
import { WeatherRoute } from "../schema/routes/weather";

export const weatherAPI = (app: OpenAPIHono) => {
  app.openapi(WeatherRoute, async (c) => {
    try {
      const { location } = c.req.valid("query");

      // モックデータを返します
      const weatherData = {
        tokyo: {
          temperature: 25,
          description: "Sunny",
        },
        london: {
          temperature: 15,
          description: "Cloudy",
        },
      }[location];

      return c.json({
        location,
        ...weatherData,
      }, 200);
    } catch (e) {
      return c.json({ message: e instanceof Error ? e.message : String(e) }, 400);
    }
  });
};
import { createRoute, z } from "@hono/zod-openapi";

const LocationEnum = z.enum(["tokyo", "london"]);

const WeatherResponseSchema = z.object({
  location: LocationEnum,
  temperature: z.number(),
  description: z.string(),
});

export const WeatherRoute = createRoute({
  method: "get",
  operationId: "getWeather",
  summary: "Get weather information",
  description: "Get weather information. The location parameter can be either 'tokyo' or 'london'.",
  path: "/weather",
  request: {
    query: z.object({
      location: LocationEnum.openapi({
        param: {
          name: "location",
          in: "query",
        },
        example: "tokyo",
      }),
    }),
  },
  responses: {
    200: {
      content: {
        "application/json": {
          schema: WeatherResponseSchema,
        },
      },
      description: "Successfully retrieved weather information",
    },
    400: {
      content: {
        "application/json": {
          schema: z.object({
            message: z.string(),
          }),
        },
      },
      description: "Bad request",
    },
  },
});
下記がポイントです。
-
index.tsでserversを指定すること - スキーマに
operationIdを必ず指定すること
APIのチェック
$pnpm dev
http://localhost:8787/doc にアクセスします。
以下のschemaが表示されます。
{
  "openapi": "3.1.0",
  "info": {
    "title": "Weather API",
    "version": "1.0.0"
  },
  "components": {
    "schemas": {

    },
    "parameters": {

    }
  },
  "paths": {
    "/weather": {
      "get": {
        "parameters": [
          {
            "schema": {
              "type": "string",
              "enum": [
                "tokyo",
                "london"
              ],
              "example": "tokyo"
            },
            "required": true,
            "name": "location",
            "in": "query"
          }
        ],
        "responses": {
          "200": {
            "description": "Successfully retrieved weather information",
            "content": {
              "application/json": {
                "schema": {
                  "type": "object",
                  "properties": {
                    "location": {
                      "type": "string",
                      "enum": [
                        "tokyo",
                        "london"
                      ]
                    },
                    "temperature": {
                      "type": "number"
                    },
                    "description": {
                      "type": "string"
                    }
                  },
                  "required": [
                    "location",
                    "temperature",
                    "description"
                  ]
                }
              }
            }
          },
          "400": {
            "description": "Bad request",
            "content": {
              "application/json": {
                "schema": {
                  "type": "object",
                  "properties": {
                    "message": {
                      "type": "string"
                    }
                  },
                  "required": [
                    "message"
                  ]
                }
              }
            }
          }
        }
      }
    }
  }
}
MCPの設定
ローカルサーバーを動かしたままClaude Desktopの設定ファイルに下記を追加します。
  "mcpServers": {
    [...]
    "weather": {
      "command": "npx",
      "args": [
        "openapi-mcp-server",
        "http://localhost:8787/doc"
      ]
    }
  }
Claude Desktopを再起動。
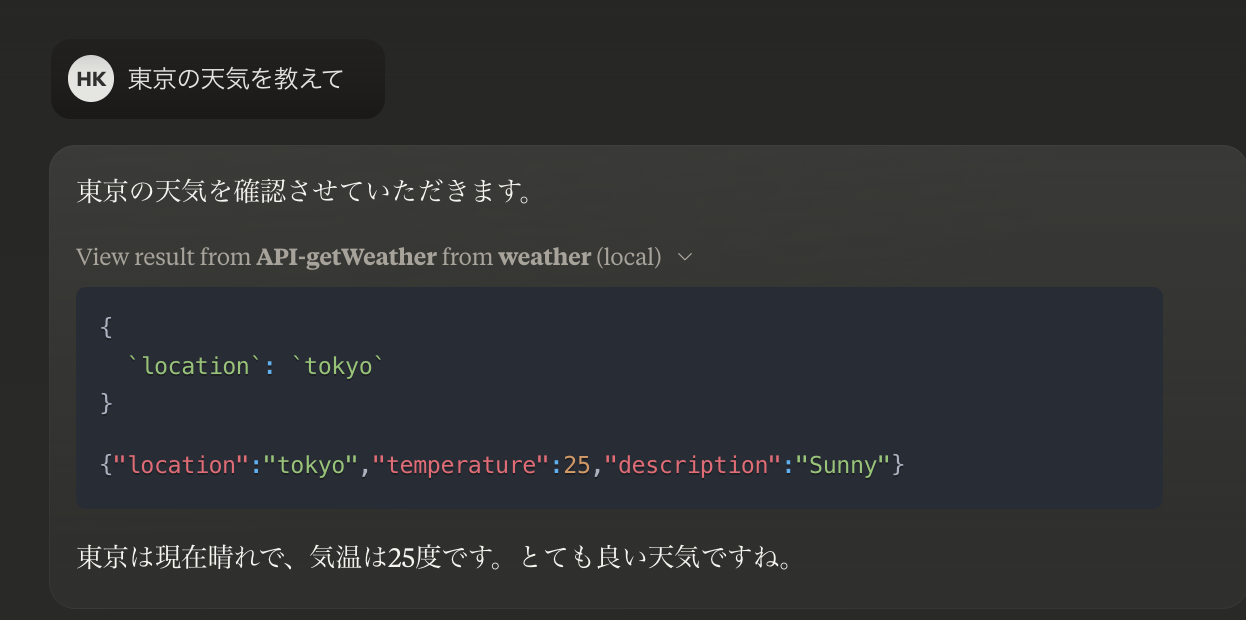
「東京の天気を教えて」と聞いてみます。
ツールがcallされます。

このようになりました。

せっかくなのでロンドンも聞いてみましょう。

受け付けない都市の場合は以下のようになります。

これでツールが完成しました。
おまけ: ツールを認証付きにする
デプロイして使いたい場合、これだとツール用のAPIが公開されてしまうので、Bearer Authを実装します。
.dev.varsを作成し、secretを設定し、以下のようにします。
import { bearerAuth } from "hono/bearer-auth";

// Bearer認証の追加
app.use("*", async (c, next) => {
  if (c.req.path === "/doc") return next();
  const auth = bearerAuth({ token: c.env.BEARER_TOKEN });
  return auth(c, next);
});
/docエンドポイントは開けておかないとエラーになりました。
これで
http://localhost:8787/weather?location=tokyo
に対してUnauthorizedが返ってくるようになりました。.dev.varsに設定した値をAuthorization Bearer <secret>で設定すればレスポンスが返ります。
この時点でClaudeはツールを使えなくなります。

見つけにくいのですが、下記のIssueに記載がある通り、openapi-mcp-serverはOPENAPI_MCP_HEADERSの環境変数を取ります。
設定ファイルを変更します。
  "mcpServers": {
    [...]
    "weather": {
      "command": "npx",
      "args": [
        "openapi-mcp-server",
        "http://localhost:8787/doc"
      ],
      "env": {
        "OPENAPI_MCP_HEADERS": "{\"Authorization\": \"Bearer <secret>\"}"
      }
    }
  }
これでClaudeを再起動してみます。
呼べるようになりました。
おわりに
このようにopenapi-mcp-serverを組み合わせることで、Honoで作った自作APIを即Claudeでアクセス可能にできます。
Zod OpenAPIを使えば実装もシンプルになるので、この記事の手順をClaudeに渡しておけば、Claude自身でツールが作れるようになります。(今回は型エラーの解消などの手伝いが必要でした。)やろうと思えば、Cloudflare WorkersのMCPと組み合わせてデプロイまでできるでしょう。
サクッと自作ツールを作りたくなった時にいかが。