はじめに
公式ドキュメント
意外と公式ドキュメント通りにやってる手順がなかったので、やってみた。
下準備
検証用インスタンス立ち上げ
今回はGCPでCentOS7のGCEインスタンスを立ち上げて、Gitlabインストールする。
(諸事情によりバージョン11.11.8で試しています)
$ sudo yum update
$ sudo yum install -y curl policycoreutils-python openssh-server
$ sudo systemctl enable sshd
$ sudo systemctl start sshd
$ sudo firewall-cmd --permanent --add-service=http
$ sudo systemctl reload firewalld
$ sudo yum install postfix
$ sudo systemctl enable postfix
$ sudo systemctl start postfix
$ curl https://packages.gitlab.com/install/repositories/gitlab/gitlab-ce/script.rpm.sh | sudo bash
$ sudo yum --showduplicates search gitlab-ce | grep 11.11.8
gitlab-ce-11.11.8-ce.0.el7.x86_64 : GitLab Community Edition (including NGINX, Postgres, Redis)
$ sudo yum install gitlab-ce-11.11.8-ce.0.el7.x86_64
$ sudo vi /etc/gitlab/gitlab.rb
(external_url 'http://xxx.xxx.xxx.xxx/' GIPを設定)
$ sudo gitlab-ctl reconfigure
とりあえず、アクセスできる事を確認。
Gitlab Pagesプロジェクト作成
お試しプロジェクトを作成する。
-
New Projectボタンをポチッと押す。 -
Create from templateからPagesPlain HTMLのUse templateをポチる。
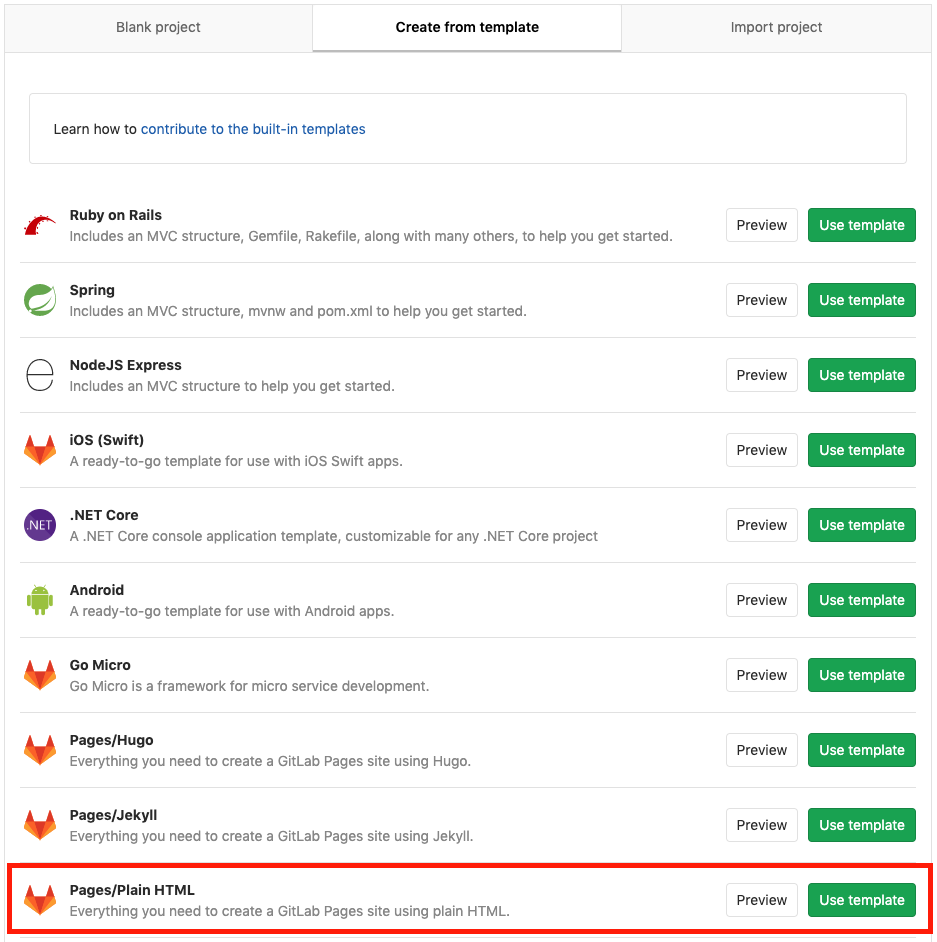
3. 適当に名前をつけてCreate projectを押す。

できた。
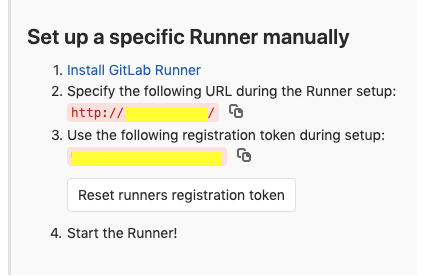
Gitlab Runner有効化
CI環境が必須なので有効化する。
- Gitlabプロジェクトの設定から
CI/CDを選択。 -
Runnersセクションを広げる。 -
URLとtokenを控える。
4. CentOSにてもう一台GCEインスタンスを作成。
$ sudo yum update
$ curl -L https://packages.gitlab.com/install/repositories/runner/gitlab-runner/script.rpm.sh | sudo bash
$ sudo yum install gitlab-runner
$ sudo yum install docker

$ sudo systemctl start docker
$ sudo systemctl enable docker
$ sudo systemctl start gitlab-runner
$ sudo systemctl enable gitlab-runner

$ sudo gitlab-runner register
Runtime platform                                    arch=amd64 os=linux pid=6360 revision=de7731dd version=12.1.0
Running in system-mode.

Please enter the gitlab-ci coordinator URL (e.g. https://gitlab.com/):
http://xxx.xxx.xxx.xxx/ ← 控えたURL
Please enter the gitlab-ci token for this runner:
xxxxxxxxxxxxxxxxxxxx ← 控えたtoken
Please enter the gitlab-ci description for this runner:
[hori-test-gitlab-runner]:
Please enter the gitlab-ci tags for this runner (comma separated):
          ← とりあえずタグは未指定(そのままEnter)
Registering runner... succeeded                     runner=UhtBLpGi
Please enter the executor: custom, docker, docker-ssh, shell, virtualbox, parallels, ssh, docker+machine, docker-ssh+machine, kubernetes:
docker
Please enter the default Docker image (e.g. ruby:2.6):
centos:latest
Runner registered successfully. Feel free to start it, but if it's running already the config should be automatically reloaded!
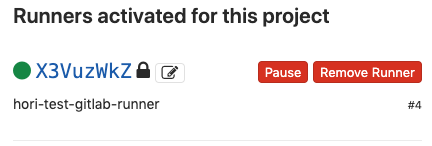
Gitlabコンソールで確認すると追加されてる。
Pages有効化
DNSの設定
お使いのDNSにて、先ほど作ったGitlabのGIPとドメインのAレコードを追加。
- ワイルドカードドメインとGIPの例
- *.pages.hogehoge.work
- 35.241.261.50
設定ファイル変更
Gitlabインスタンスでの作業。
-
/etc/gitlab/gitlab.rbの下記のみ編集pages_external_url "http://pages.hogehoge.work/"gitlab_pages['enable'] = true
sudo gitlab-ctl reconfiguresudo gitlab-ctl restart
デプロイ
Gitlabコンソールのプロジェクト内で作業。
-
CI/CDのPipelinesを開く。 -
Run Pipelineを押す。 - もういちど
Run Pipelineを押す。 - 少し待つと
passed表示になり、デプロイ成功。 -
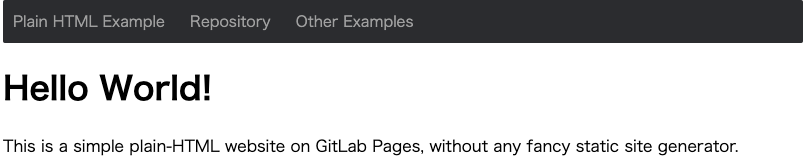
SettingsのPagesにURLがあるのでクリック。 - Pages表示される!!
SSL対応
専用にワイルドカード証明書が必要。(お高い)
ここの例だと、*.pages.hogehoge.workを買ってください。
設定方法
Gitlabインスタンスでの作業。
- 証明書
hoge.crtを用意。 - 中間証明書
intermediate.crtを用意。 -
cat hoge.crt intermediate.crt >> /etc/gitlab/ssl/hogehoge.crtを実行。 - 秘密鍵
hoge.keyを/etc/gitlab/ssl/以下にコピー。 -
/etc/gitlab/gitlab.rbの下記のみ編集-
pages_external_url "https://pages.hogehoge.work/"←httpsに変更した。 pages_nginx['enable'] = truepages_nginx['redirect_http_to_https'] = truepages_nginx['ssl_certificate'] = "/etc/gitlab/ssl/hogehoge.crt"pages_nginx['ssl_certificate_key'] = "/etc/gitlab/ssl/hoge.key"
-
sudo gitlab-ctl reconfiguresudo gitlab-ctl restart
おわりに
お金がなくて証明書買えなかったので、次回は12にバージョンアップしてLet's EncryptでSSL化を試したい。