再発明シリーズ第二弾。
前回のパクリ元は、node.js モジュールの google-tts-api でしたが、今回も 同じく node.js モジュールの google-home-notifier を全力でパクります。
horihiro/esp8266-google-home-notifier
できること
処理内容もオリジナルとほぼ同じで、
- mDNS で同じネットワークにある Google Home を探す
- esp8266-google-tts でテキストから mp3 の URL を作る
- mp3 の URL を Google Home に投げつける
これだけです。
最後の「投げつけ」が castv2 というプロトコルが必要なので、ここの実装は必要でしたが、オリジナルの google-home-notifier に同梱されている cast_channel.proto という castv2 プロトコルの定義ファイルと nanopb のおかげで、ゼロから頑張る必要がありませんでした。
作例集
# 全部自分じゃないですが。。。
- Debashish Sahu @ YouTube
- mgo-tec電子工作
- DSAS開発者の部屋 @ KLabBlog
注意事項
EPS32 では動作しません。依存ライブラリの関係上、コンパイルに失敗します。
バージョン 1.0.2 (2018/06/08 公開) 以降で ESP32 に対応しました。
インストール
今回も調子に乗って、ライブラリ マネージャーに**登録申請しました**。
申請が通れば、Arduino IDE からインストール可能です。
GitHub リポジトリから zip 形式でダウンロードし、[スケッチ] - [ライブラリをインクルード] - [.ZIP形式のライブラリをインストール...] からインストーるすることもできると思います。
試してませんが。

上記の通り、esp8266-google-tts を使っているので、このライブラリもライブラリ マネージャーからインストールしてください。
----(2018/05/11 追記)----
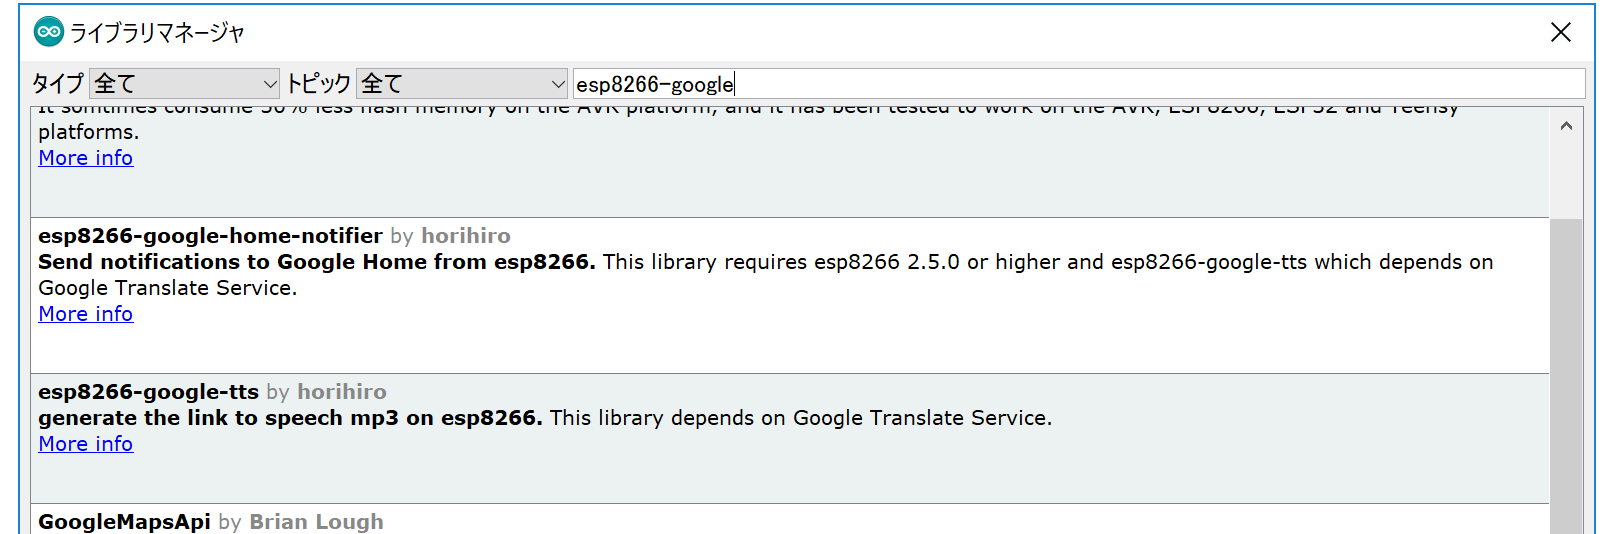
申請が通ったので、Arduino IDE からインストール可能になりました。
検索ボックスに「esp8266-google」と入力すると出てきます。
esp8266-google-tts も併せてどうぞ。
----(追記ここまで)----
※以下の手順は、バージョン 1.0.2 (2018/06/08 公開) 以降では不要です。
また、ESP8266 のボード ライブラリのバージョン 2.4.1 以前に同梱されている mDNS では、指定の Google Home を特定するために使っている TXT レコードが取得できないので、mDNS の最新版 (ESP8266mDNS.cpp/ESP8266mDNS.h) を、このライブラリをインストール後に、src ディレクトリ 1 に保存してください。
以下のような配置になります。
$LIBRARIES_DIR
  └── esp8266-google-home-notifier/
      ├── LICENSE
      ├── README.md
      :
      └── src/
          ├── ESP8266mDNS.cpp  # <- これを追加
          ├── ESP8266mDNS.h    # <- これも追加
          :
          ├── esp8266-google-home-notifier.cpp
          └── esp8266-google-home-notifier.h
この ESP8266mDNS は、ESP8266 のボード ライブラリのバージョン 2.5.0 でマージされる予定なので、2.5.0 がリリースされれば、この追加作業は不要です。
使い方
オリジナルとほぼ同じにしています。
-
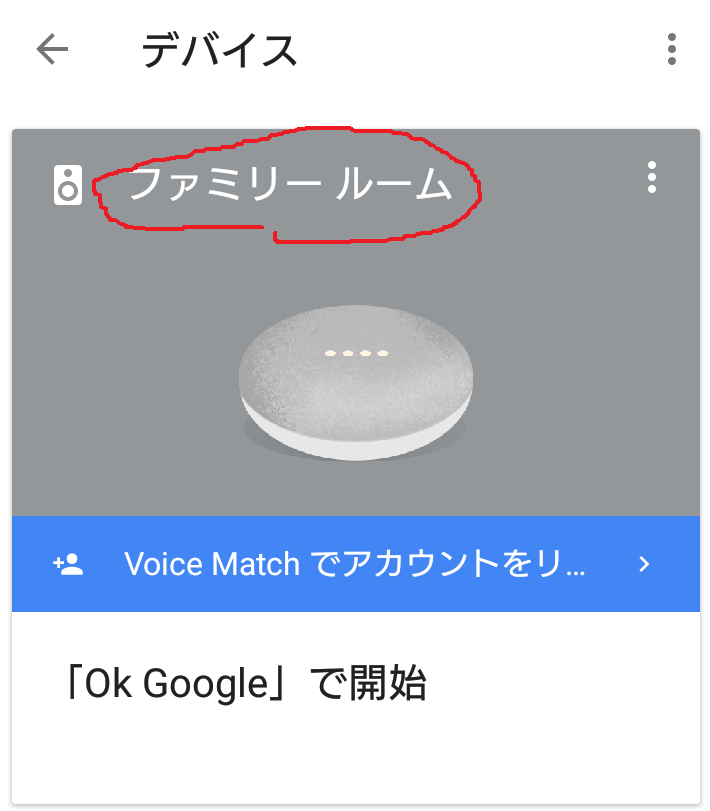
deviceで Google Home を探す
※第一引数に Google Home の名前
※第二引数に TTS 用の言語情報
日本語をしゃべらせたい場合はja
省略した場合はen -
notifyで、喋らせたいテキストを指定して実行
という感じです。
失敗した時は getLastError をすると、何かわかるかもしれません。
サンプル
# 上記の 作例集 の方が実践的で参考になります。
一言喋るだけのサンプル
# include <ESP8266WiFi.h>
# include <ESP8266WebServer.h>
# include <esp8266-google-home-notifier.h>

const char* ssid     = "<REPLASE_YOUR_WIFI_SSID>";
const char* password = "<REPLASE_YOUR_WIFI_PASSWORD>";

GoogleHomeNotifier ghn;

void setup() {
  // put your setup code here, to run once:
  Serial.begin(115200);
  Serial.println("");
  Serial.print("connecting to Wi-Fi");
  WiFi.mode(WIFI_STA);
  WiFi.begin(ssid, password);

  while (WiFi.status() != WL_CONNECTED) {
    delay(250);
    Serial.print(".");
  }
  Serial.println("");
  Serial.println("connected.");
  Serial.print("IP address: ");
  Serial.println(WiFi.localIP());  //Print the local IP

  const char displayName[] = "ファミリー ルーム";

  Serial.println("connecting to Google Home...");
  if (ghn.device(displayName , "ja") != true) {
    Serial.println(ghn.getLastError());
    return;
  }
  Serial.print("found Google Home(");
  Serial.print(ghn.getIPAddress());
  Serial.print(":");
  Serial.print(ghn.getPort());
  Serial.println(")");

  if (ghn.notify("Hello, World!") != true) {
    Serial.println(ghn.getLastError());
    return;
  }
  Serial.println("Done.");
}

void loop() {
  // put your main code here, to run repeatedly:

}
Web フォームからテキストを指定して喋らせるサンプル
# Web フォームはおまけなので、全く力を入れていません。
# include <ESP8266WiFi.h>
# include <ESP8266WebServer.h>
# include <esp8266-google-home-notifier.h>

const char* ssid     = "<REPLASE_YOUR_WIFI_SSID>";
const char* password = "<REPLASE_YOUR_WIFI_PASSWORD>";

ESP8266WebServer server(80);
GoogleHomeNotifier ghn;

void setup() {
  // put your setup code here, to run once:
  Serial.begin(115200);
  Serial.println("");
  Serial.print("connecting to Wi-Fi");
  WiFi.mode(WIFI_STA);
  WiFi.begin(ssid, password);

  while (WiFi.status() != WL_CONNECTED) {
    delay(250);
    Serial.print(".");
  }
  Serial.println("");
  Serial.println("connected.");
  Serial.print("IP address: ");
  Serial.println(WiFi.localIP());  //Print the local IP

  const char displayName[] = "ファミリー ルーム";

  Serial.println("connecting to Google Home...");
  if (ghn.device(displayName , "ja") != true) {
    Serial.println(ghn.getLastError());
    return;
  }
  Serial.print("found Google Home(");
  Serial.print(ghn.getIPAddress());
  Serial.print(":");
  Serial.print(ghn.getPort());
  Serial.println(")");

  server.on("/speech", handleSpeechPath);
  server.on("/", handleRootPath);
  server.begin();
 }

void handleSpeechPath() {
  String phrase = server.arg("phrase");
  if (phrase == "") {
    server.send(401, "text / plain", "query 'phrase' is not found");
    return;
  }
  if (ghn.notify(phrase.c_str()) != true) {
    Serial.println(ghn.getLastError());
    server.send(500, "text / plain", ghn.getLastError());
    return;
  }
  server.send(200, "text / plain", "OK");
}

void handleRootPath() {
  server.send(200, "text/html", "<html><head></head><body><input type=\"text\"><button>speech</button><script>var d = document;d.querySelector('button').addEventListener('click',function(){xhr = new XMLHttpRequest();xhr.open('GET','/speech?phrase='+encodeURIComponent(d.querySelector('input').value));xhr.send();});</script></body></html>");
}

void loop() {
  // put your main code here, to run repeatedly:
  server.handleClient();
}
今後
とりあえず、ESP8266 と Google Home で任意(多分)の音声出力が可能になりました。
さて、これで何ができるやら。
-
Windows : %USERPROFILE%\Documents\Arduino\libraries\esp8266-google-home-notifier\src
macOS : ~/Documents/Arduino/libraries/esp8266-google-home-notifier/src ↩