本記事では、ブラウザへのプッシュ通知を最短距離で実装する。
本記事で使う言語・サービス・ライブラリ
- Google Chrome
(Firefoxでは、うまくいったりうまくいかなかったりしたのでChromeをおすすめします。) - HTML / Javascript(フロントエンド)
- npm
- webserver (http-server)
(Push通知設定は、file://からできない) - Web-Push (プッシュ通知送信用)
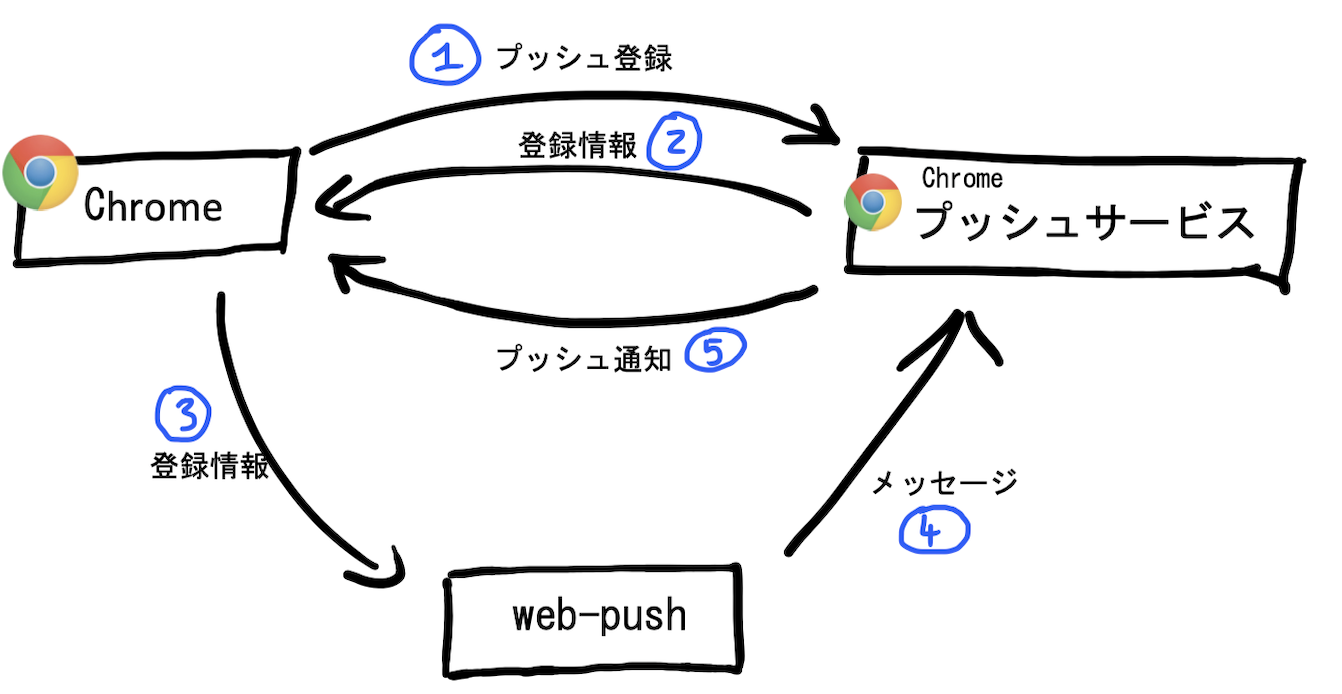
プッシュ通知の仕組み
基本的な仕組み

留意点:
- プッシュサービスは、ブラウザ作成者が提供する。独自サービスを使うことができない。
- 本記事では、アプリケーションサーバを使わない。人力と
web-pushツールを使う。
今回の仕組み
以下の図は、本記事で使う仕組みを表す。
詳しい流れ
以下の図は、処理の詳しい流れを表す。
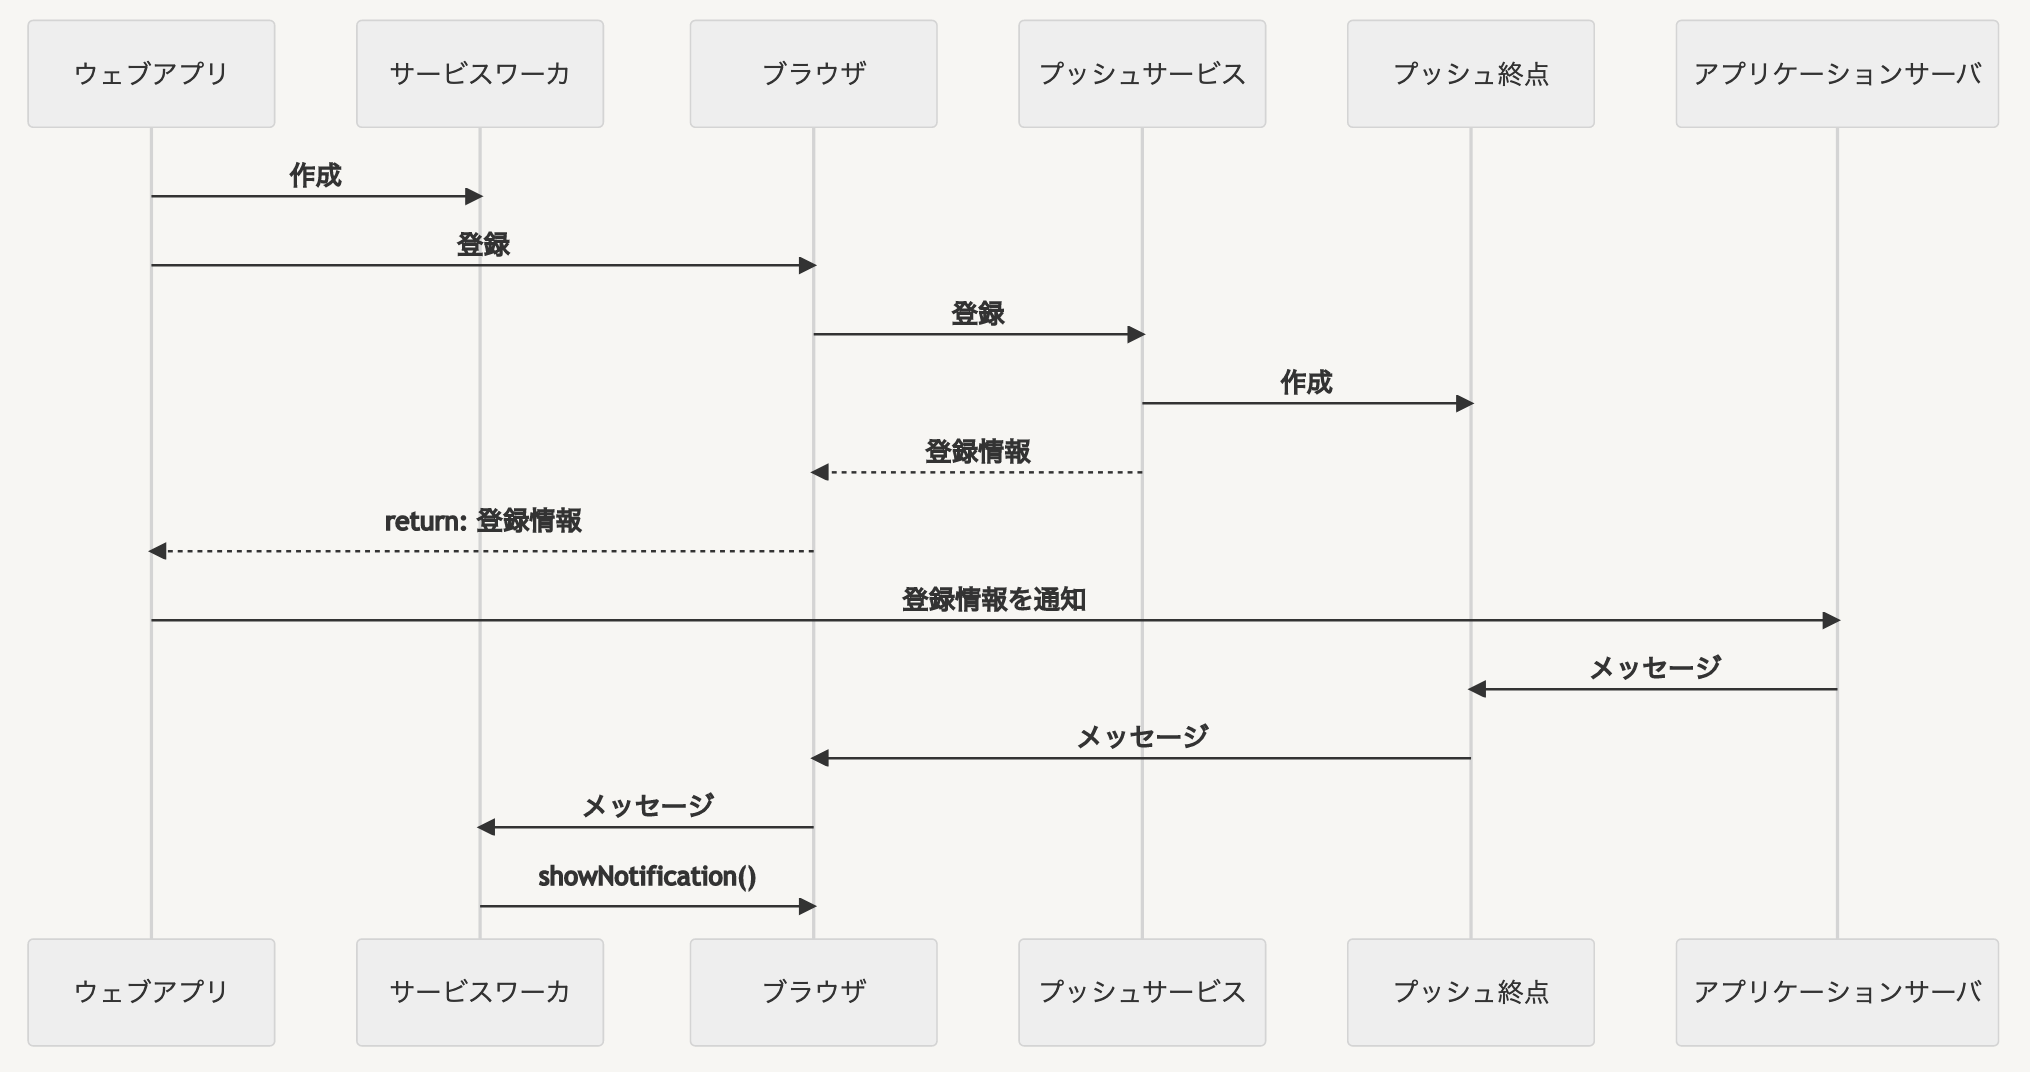
- ウェブアプリ:ブラウザで開いているサイト。
- サービスワーカ:ブラウザで実行するワーカスレッド。
- プッシュサービス:ブラウザメーカが固定で指定するサービスのことです。
- 登録情報:登録(ブラウザ)を識別するための情報そのうち、終点URLも含まれている。
- アプリケーションサーバ:プッシュ通知の発送を起動するサーバ
実装
ウェブサーバ
通常、Push通知の利用には、SSLが必須ですが、サバーは、LocalhostであればSSLがなくても使えます。
インストール
http-serverが使いたいのでnpmプロジェクトを作成する。ただし、ウェブサーバは、ほとんど関係ないのでお好みのもので良い。
npm init
npm install http-server
実行
npx http-server ./ --port 4040
= サーバ ルート ディレクトリー:現在のディレクトリー
ファイル作成
以下の三つのファイルを作成し、サーバのルートディレクトリーに置く。
index.html
<!DOCTYPE html>
<html lang="jp">
  <head>
    <meta charset="utf-8" />
    <style>
      div{ margin: 8px;}
      button {padding: 8px;}
    </style>
    <script src="./push.notification.helper.js"  type="text/javascript" ></script>
  </head>

  <body>
    <div style="padding-top: 20px;padding-left: 30%;">
      <div>
        <button onClick="javascript: notification_isSupported()">
          (1)Push通知は、使えるかを確認
        </button>
      </div>
      <div>
        <button onClick="javascript: notification_askForPermission()">
          (2)Push通知権限を求める
        </button>
      </div>

      <div>
        <button onClick="javascript: notification_startServiceWorker()">
          (3)サービスワーカを起動
        </button>
      </div>

      <div>
        <button onClick="javascript: notification_test_showNotification()">
          (4)試しにプッシュ通知を表示<br>
        </button>
        (何も表示されな場合、ブラウザはOS上「通知権限」を持つかを確認する)
      </div>

      <div>
        <button onClick="javascript: notification_subscribe()">
          (5)プッシュサービスに登録
        </button>
      </div>

      <div>
        (6)web-pushを使ってプッシュ通知を送信する。
      </div>

    </div>
  </body>
</html>
push.notification.helper.js
/**
* プッシュ通知が使えるかを確認
*/
function notification_isSupported() {
const isSupported = "serviceWorker" in navigator && "PushManager" in window;
if(isSupported){
console.log("✅(1)プッシュ通知機能が使える");
} else {
console.log("❌(1)プッシュ通知機能が使えない");
}
}
/**
* ブラウザ上のプッシュ通知の許可を得る
*/
function notification_askForPermission() {
// request user grant to show notification
Notification.requestPermission(function(result) {
return result;
}).then(
(success) => {
console.log("✅ (2)プッシュ通知の権限がある");
},
(fail) => {
console.log("❌ (2)プッシュ通知の権限がない");
});
}
/**
* プッシュ通知を処理する「サービスワーカ」を立ち上げる。
*/
function notification_startServiceWorker() {
return navigator.serviceWorker.register("push.notification.worker.js").then(
(registration) => {
console.log("✅ (3)サービスワーカを立ち上げた");
},
(error) => {
console.log("❌ (3)サービスワーカを立ち上げることができなかった。プッシュ通知を授受できない");
console.log(error);
});
}
/**
* 通知表示機能を試す(通知を送信しない)
* 条件:notification_startServiceWorkerが成功した
*/
function notification_test_showNotification() {
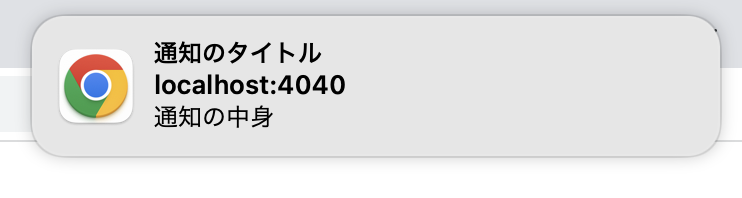
const title = "通知のタイトル";
const options = {
body: "通知の中身",
};
navigator.serviceWorker.ready.then((serviceWorker) => {
serviceWorker.showNotification(title, options).then(
(success) => {
console.log("✅ (4)通知を表示できた(つもり)");
},
(error) => {
console.log("❌ (4)通知を表示できません");
console.log(error);
});
});
}
/**
* ブラウザのプッシュサービスに登録する
* 条件:notification_startServiceWorkerが成功した
*/
function notification_subscribe() {
const pushServerPublicKey = 'BIN2Jc5Vmkmy-S3AUrcMlpKxJpLeVRAfu9WBqUbJ70SJOCWGCGXKY-Xzyh7HDr6KbRDGYHjqZ06OcS3BjD7uAm8';
return navigator.serviceWorker.ready.then(
(serviceWorker) => {
// subscribe and return the subscription
return serviceWorker.pushManager
.subscribe({
userVisibleOnly: true,
applicationServerKey: pushServerPublicKey
}).then(
(subscription) => {
// TODO: send subscription.endpoint to server
console.log ("✅ (5)登録が成功した。次の情報を使ってプッシュ通知を送れる")
console.log (subscription.toJSON())
_showWebPushCommand (subscription.toJSON());
return subscription;
},
(error) => {
console.log("❌ (5)プッシュサービスに登録できなかった");
console.log(error);
});
}
);
}
/**
* プッシュ通信をを送信する多面おweb-pushコマンドコマンドを表示
**/
function _showWebPushCommand(subscriptionInfo)
{
const command = ["npx", "web-push",
"send-notification",
"--endpoint=" + subscriptionInfo.endpoint,
"--auth=" + subscriptionInfo.keys.auth,
"--key=" + subscriptionInfo.keys.p256dh,
"--payload=hello",
"--vapid-pubkey=BIN2Jc5Vmkmy-S3AUrcMlpKxJpLeVRAfu9WBqUbJ70SJOCWGCGXKY-Xzyh7HDr6KbRDGYHjqZ06OcS3BjD7uAm8",
"--vapid-pvtkey=bdSiNzUhUP6piAxLH-tW88zfBlWWveIx0dAsDO66aVU",
"--vapid-subject=mailto:asdf@gmail.com",
];
console.log("これでプッシュ通信を送ってみてください。");
console.log(command.join(" "));
}
push.notification.worker.js
function receivePushNotification(event) {
  const options = {
    data: "some data",
    body: "some body",
  };
  event.waitUntil(this.registration.showNotification("some title", options));
}
this.addEventListener("push", receivePushNotification);

function openPushNotification(event) {
  event.notification.close();
  event.waitUntil(clients.openWindow(event.notification.data));
}
this.addEventListener("notificationclick", openPushNotification);
プッシュ通知を送信
-
npm install web-pushでweb-pushをインストールする。- web-pushは、「Web Push API」に沿ってプッシュサービスと連絡が取れる。他のツールやライブラリも使用可能。
- ブラウザで
http://localhost:4040を開く。 - ブラウザのコンソールを開く。
- ボタン(1)〜(5)をクリックする。
- ボタン(5)をクリックしたらコンソールにweb-pushの命令が出力されます。
- web-pushコマンドをターミナルで実行する。
- メッセージが届く。
ここからは?
-
push.notification.helper.jsのnotification_subscribeでは、サーバの公開鍵を使う。ここは、自分のサーバの公開鍵を使うべき。 -
_showWebPushCommandでは、vapid-pubkeyとvapid-pvtkeyを使う。ここは、自分が生成した公開鍵と秘密鍵を使う。 - ステップ(5)で受け取ったデータを使ってプッシュ通知を送信した。本番では、受け取ったデータをプッシュサーバに送る。
- 今回は、プッシュ通知を手動で送信した。本番では、自動的にメッセージを通信したい。
- 今回は、固定の通知内容をブラウザに表示した(
push.notification.worker.js)。本番では、プッシュサービスから受け取ったデータを表示したい。