はじめに
React をなんとなく理解してきたが、仕事で Angular のコードを理解する必要も出てきたので勉強してみる。JavaScript 3大フレームワークの1つなので React との違いを感じながら勉強できればと思う。公式ドキュメントを参考に進めた。
基本事項
まず Angular の基本的なアイデアを理解する。現段階で公式ドキュメント Angularとは何か? を読んでの理解なので、誤解があればぜひ訂正を。
-
コンポーネント
アプリの構成要素。@Component()デコレータをつけた TypeScript クラス、HMTL テンプレート、スタイルが含まれる。カプセル化でき、直感的なアプリ構造にできる。 -
テンプレート
コンポーネントに必要となる HTML テンプレート。コンポーネントから動的な値を受け取り、状態変化に合わせて自動更新できる。値だけでなく、HTML や CSS、イベントもコンポーネントから渡すことができる。ディレクティブという機能もあるらしいが、これは現状正確には理解できていない。フラグによって表示を変えられるngIfなど、多数のディレクティブがあらかじめ用意されている。 -
依存性の注入(DI; Dependency Injection)
コンポーネントで使用したいサービスを注入できる。インスタンス化を明示的に行わなくてもサービスを扱えるため、簡単かつ柔軟にサービスをコンポーネント内で使用できる。
React と比較するとコンポーネントの概要は同じ(ただし関数コンポーネントかクラスコンポーネントかという違いはある)であるが、ディレクティブや依存性の注入という用語が React には存在していないので理解が浅い。(知らないだけで React にもあるのかもしれないが。)
ドキュメントを読んだだけでの理解はここまでとして、以下で実際に手を動かして理解を深めていく。
Angular チュートリアル
基本的な Angular アプリケーションをはじめるにしたがって、サンプルコードを元に修正・追加をしながら進めていく形式になっている。React との比較もしながら進めていく。
商品リストを作成
1. *ngFor ディレクティブ
以下コードでは *ngFor ディレクティブを用いて、商品リストを表示させている。
<h2>Products</h2>

<div *ngFor="let product of products">
  <h3>
    {{ product.name }}
  </h3>
</div>
products は products.ts で定義されている配列で、product-list.component.ts で読み込まれて product-list.component.html テンプレートに渡されている。書いている感じ、*ngFor は React で用いていた map 関数に近いイメージかもしれない。(以下 React コード例、実行未確認)
{products.map((product, index) => {
  return (
    <div key={index}>
      <h3>{product.name}</h3>
    </div>
  )
})}
React から入った身としては <div *ngFor="let product of products"> のように "" で囲っているのは少し違和感がある。
2. プロパティバインディング
さらに以下で a タグを追加し、title 属性にプロバティバインディング [ ] 構文を用いて商品名を渡す。[ ] で囲ったものにはプロパティを渡すことができるらしい。たしかに [ ] を消した場合にはカーソルを合わせても文字は見えなかった。
<h2>Products</h2>

<div *ngFor="let product of products">
  <h3>
    <a [title]="product.name + ' details'">
      {{ product.name }}
    </a>
  </h3>
</div>
3. *ngIf ディレクティブ
続いて *ngIf ディレクティブを使用する。product が description をもつ場合にのみ p タグを表示させるようになっている。
<h2>Products</h2>

<div *ngFor="let product of products">
  <h3>
    <a [title]="product.name + ' details'">
      {{ product.name }}
    </a>
  </h3>

  <p *ngIf="product.description">
    Description: {{ product.description }}
  </p>
</div>
これは React の && や三項演算子のイメージに近いかもしれない。(以下 React コード例、実行未確認)
{product.description && <p>Description: {product.description}</p>}
4. イベントバインディング
最後に、ボタンを追加して click イベントを product-list.component.ts の share() メソッドにバインドする。イベントバインディングでは ( ) をイベントの周りで使用する。イベントバインディング ( ) とプロパティバインディング [ ] が混同してしまいそう。
<h2>Products</h2>

<div *ngFor="let product of products">
  <h3>
    <a [title]="product.name + ' details'">
      {{ product.name }}
    </a>
  </h3>

  <p *ngIf="product.description">
    Description: {{ product.description }}
  </p>

  <button (click)="share()">
    Share
  </button>
</div>
現段階では、__「React で用いていた JSX (TSX) の方が簡単」__な気がしている。Angular は明確に html ファイルと ts ファイルを分けているため小さな規模だとファイルの行き来がめんどくさい気がするが、規模が大きくなるとそれぞれのファイルの役割が明確になって可読性が向上したり修正が容易なのかもしれない。
子コンポーネントにデータを渡す
1. 子コンポーネントの作成
ここでは子コンポーネントとなる ProductAlertsComponent を作成し、親コンポーネントである ProductListComponent からデータを受け取る。コンポーネント作成時には以下のようなコードとなっている。(constructor および ngOnInit は本記事内では必要ないので、以降省略する。)
import { Component, OnInit } from '@angular/core';

@Component({
  selector: 'app-product-alerts',
  templateUrl: './product-alerts.component.html',
  styleUrls: ['./product-alerts.component.css']
})
export class ProductAlertsComponent implements OnInit {
  constructor() { }

  ngOnInit() {
  }

}
@Component() デコレータは定義したクラスがコンポーネントであることを示し、セレクタ、テンプレート、スタイルなど、コンポーネントに関するメタデータを指定している。
2. @Input デコレータ
親コンポーネントから商品データを受け取るために、まず @angular/core から Input をインポートし、product という名前のプロパティに @Input() デコレータをつけて定義する。ここで product! のように ! が使用されているのは __non-null であること__を明示している。
import { Component, OnInit } from '@angular/core';
import { Input } from '@angular/core';
import { Product } from '../products';

@Component({
  selector: 'app-product-alerts',
  templateUrl: './product-alerts.component.html',
  styleUrls: ['./product-alerts.component.css']
})
export class ProductAlertsComponent {
  @Input() product!: Product;
}
上記により、プロパティの値を親コンポーネント ProductListComponent から受け取ることができる。親コンポーネントからデータを受け取ったデータを活用するために、価格が $700以上の場合のみ表示される Notify Me ボタンを product-alerts.component.html にて作成する。
<p *ngIf="product && product.price > 700">
  <button>Notify Me</button>
</p>
3. Module での宣言
あとは product-list.component.html にてセレクタ <app-product-alerts [product]="product"></app-product-alerts> を追加すれば適用されるとのことだったが、プレビューには以下エラーが出た。
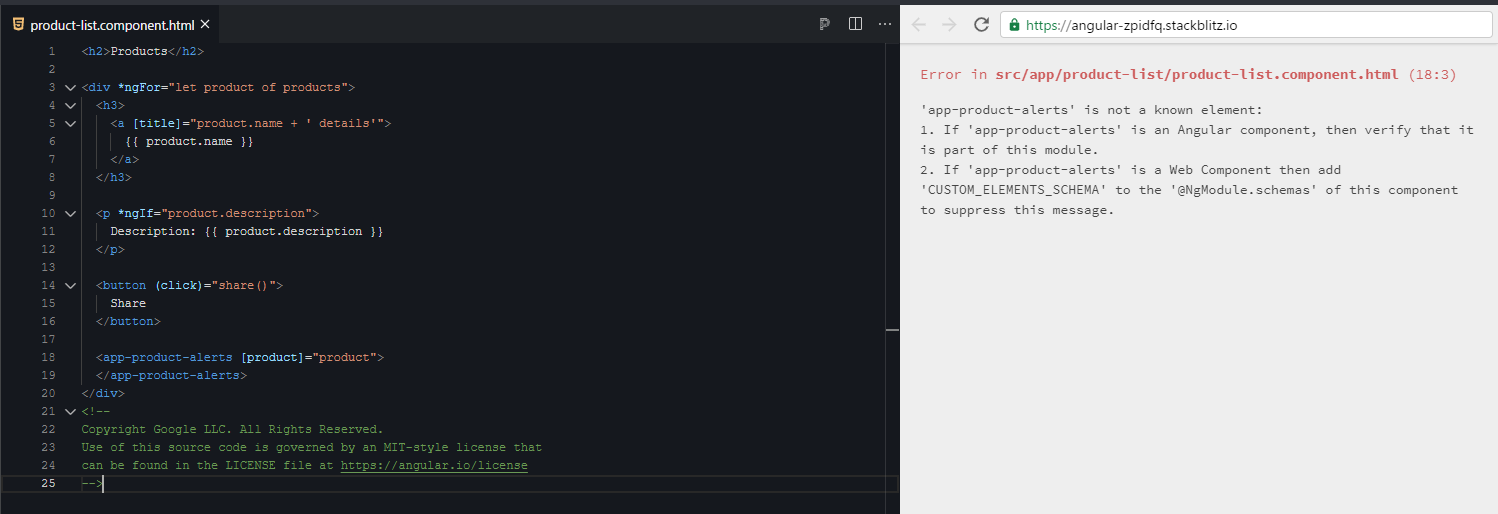
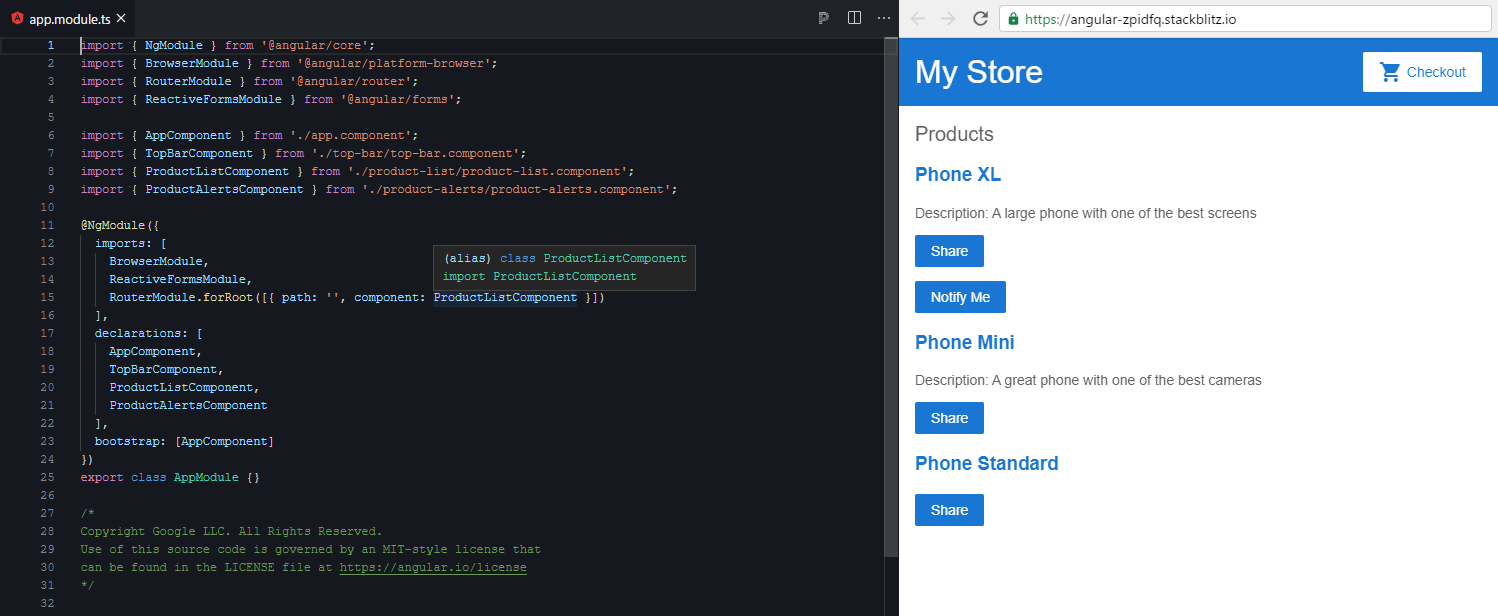
公式ドキュメントには書いていなかったが、新たに作成したコンポーネントを適用するには app.module.ts にてインポートし、declarations にて宣言する必要があるようだ。追記したところ、無事適用され $700以上である Phone XL のみ Notify Me ボタンが表示された。
親コンポーネントにデータを渡す
1. @Output デコレータ
子コンポーネントがもつ Notify Me ボタンを動作させるには、子コンポーネントが親コンポーネントにクリックされたことを通知し、親コンポーネントがそのイベントに応答する必要がある。そのために子コンポーネント ProductAlertsComponent の product-alerts.component.ts で @angular/core から Output と EventEmitter をインポートし、nofify という名前のプロパティを @Output() デコレータと EventEmitter() のインスタンスで定義する。この設定により、notify プロパティの値が変更されたときにイベントを発生させることができる。
import { Component, OnInit } from '@angular/core';
import { Input } from '@angular/core';
import { Output, EventEmitter } from '@angular/core';
import { Product } from '../products';

@Component({
  selector: 'app-product-alerts',
  templateUrl: './product-alerts.component.html',
  styleUrls: ['./product-alerts.component.css']
})
export class ProductAlertsComponent {
  @Input() product!: Product;
  @Output() notify = new EventEmitter();
}
2. 子コンポーネントでのイベント発生
Notify Me ボタンが押下された場合にイベントを発生させるよう、イベントバインディングを用いてコードを修正する。
<p *ngIf="product && product.price > 700">
  <button (click)="notify.emit()">Notify Me</button>
</p>
EventEmitter のインスタンスである notify はイベントを放出する emit() メソッドをもっている。このメソッドは、イベントを発生させ親コンポーネントにデータを転送することができる。(ここでの例では emit() は引数をもっていないので、イベントを発生させているだけでデータは転送していない。本記事最後で、おまけとしてデータ転送をした場合も試している。)
3. 親コンポーネントでのイベント応答
子コンポーネント ProductAlertsComponent がイベントを発生させたときに、親コンポーネント ProductListComopnent が行う動作を product-list.component.ts で onNotify() メソッドとして定義する。
export class ProductListComponent {
  products = products;

  share() {
    window.alert('The product has been shared!');
  }

  onNotify() {
    window.alert('You will be notified when the product goes on sale');
  }
}
最後に子コンポーネントからデータを受け取るよう product-list.component.html にて以下のように修正。product を子コンポーネントに渡し、notify を子コンポーネントから受け取っている。
<h2>Products</h2>

<div *ngFor="let product of products">
  <h3>
    <a [title]="product.name + ' details'">
      {{ product.name }}
    </a>
  </h3>

  <p *ngIf="product.description">
    Description: {{ product.description }}
  </p>

  <button (click)="share()">
    Share
  </button>

  <app-product-alerts [product]="product" (notify)="onNotify()">
  </app-product-alerts>
</div>
4. (おまけ)EventEmitter()
上記までで公式ドキュメントは終わりだが、EventEmitter() でイベントを発生させるだけでなく、合わせてデータも転送してみる。Nofify Me ボタンなので、the product と通知している内容を商品名に変更して通知するように修正した。修正部分は以下3点。
- notify.emit() にて product.name を転送
<p *ngIf="product && product.price > 700">
  <button (click)="notify.emit(product.name)">Notify Me</button>
</p>
- onNitify() で name を引数にとり、アラートに表示
  ...
  onNotify(name: string) {
    window.alert(
      'Your will be notified when ' + name + ' product goes on sale'
    );
  }
}
- onNotify() メソッドに対して $event を渡す
  ...
  <app-product-alerts [product]="product" (notify)="onNotify($event)">
  </app-product-alerts>
</div>
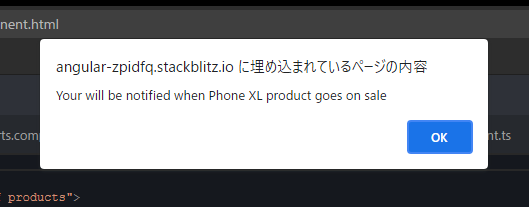
変更した後の結果が以下。Phone XL の Notify Me ボタンを押すと、商品名が通知に出てくれていることが確認できる。
おわりに
Angular を公式ドキュメントに沿って勉強した。React との違いが多く見られておもしろく、またその他の機能も気になるので引き続き進めていく。React では Hooks を使ってすべて関数コンポーネントで書いているので、Angular を通してクラスに関する理解も深めていきたい。(もちろん TypeScript も。)