はじめに
Djangoチュートリアル④(テンプレート)に続いて、はじめての Django アプリ作成、その 4に沿ってチュートリアルを進めていく。補助的に現場で使える Django の教科書(基礎編)も使う。理解が深まるいい本なのでおすすめ。
フォーム
detail テンプレートを更新して、HTML の <form> 要素を追加する。HTML に詳しければわかるのだろうが、あまり知らないため合わせて調べる。
<h1>{{ question.question_text }}</h1>

{% if error_message %}<p><strong>{{ error_message }}</strong></p>{% endif %}

<form action="{% url 'polls:vote' question.id %}" method="post">
{% csrf_token %}
{% for choice in question.choice_set.all %}
    <input type="radio" name="choice" id="choice{{ forloop.counter }}" value="{{ choice.id }}">
    <label for="choice{{ forloop.counter }}">{{ choice.choice_text }}</label><br>
{% endfor %}
<input type="submit" value="Vote">
</form>
上記コードの説明をする。このテンプレートは question と error_message というコンテキストを受け取る(詳細は vote() 関数を定義する際に記述)。それらを用いて、h1 タグで question_text を、受け取った question に紐づく choice をラジオボタンとして表示し、提出ボタンを設けている。エラー発生時(vote() 関数内の except 時)には error_message を表示する。
form タグが出てくるが、どういうものか知らなかったため調査。formタグのaction,method属性の使い方と特性〜html,slimでの記述方法〜を参考にした。参考記事によると、action 属性ではデータの送信先を指定し、method 属性では転送方法として get または post を指定する。ざっくりと言うと、get はサーバー側にあるデータの取得に適していて、post はユーザー側が情報を送信するのに適しているとのこと。はじめての Django アプリ作成、その 4でもサーバー側のデータを更新するフォームを作成する場合は post を指定するように書かれている。ただし __post フォームはデータ改ざんされる恐れがあるため__クロスサイトリクエストフォージェリ(CSRF)を気にする必要があるとのこと。CSRF はウェブアプリケーションの脆弱性を意味しており対策する必要があるが、Django はこれに対応する {% csrf_token %} というテンプレートタグを提供しているため、自サイト内を URL に指定した post フォームには {% csrf_token %} テンプレートタグを使う必要がある。
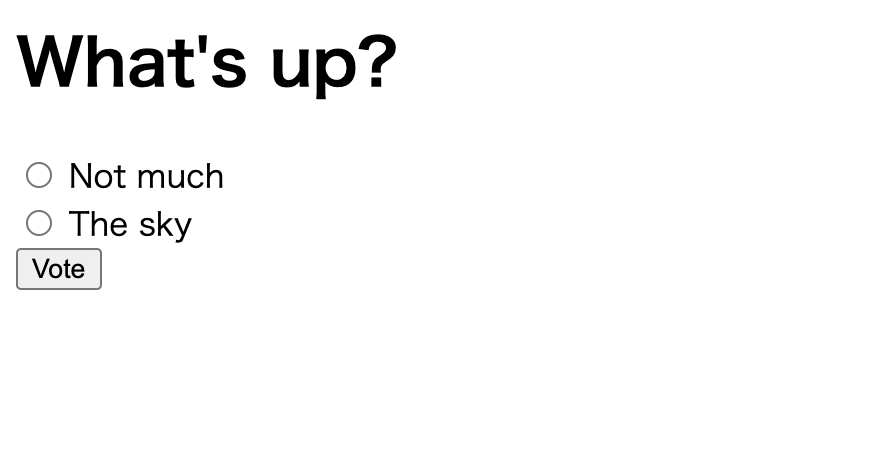
長々と書いたが、上記コードで実行していることは各質問の選択肢をラジオボタンで表示し、それを選択してフォームを送信すると、vote() 関数ビューに選択した choice の id が送信されるというものである。実際の画面は以下のようになる。
続いて vote() 関数を実装する。
from django.http import HttpResponse, HttpResponseRedirect
from django.shortcuts import get_object_or_404, render
from django.urls import reverse

from .models import Choice, Question
# ...
def vote(request, question_id):
    question = get_object_or_404(Question, pk=question_id)
    try:
        selected_choice = question.choice_set.get(pk=request.POST['choice'])
    except (KeyError, Choice.DoesNotExist):
        # Redisplay the question voting form.
        return render(request, 'polls/detail.html', {
            'question': question,
            'error_message': "You didn't select a choice.",
        })
    else:
        selected_choice.votes += 1
        selected_choice.save()
        # Always return an HttpResponseRedirect after successfully dealing
        # with POST data. This prevents data from being posted twice if a
        # user hits the Back button.
        return HttpResponseRedirect(reverse('polls:results', args=(question.id,)))
上記コードの説明をする。templates/polls/detail.html のフォームから送信された post データに choice がある場合は、request.POST により選択した choice のアトリビュートである votes をインクリメントする。choice がない場合、templates/polls/detail.html に question と error_message を返す。このビューでは、HttpResponse ではなく HttpResponseRedirect を返している。HttpResponseRedirect を返したほうがよい理由は、__フォームデータの二重送信が防げる__ためとのこと。(その他にもなにかあれば詳しい人ぜひコメントください。)
リダイレクト先の URL には reverse() 関数を用いている。これはビュー関数の URL を逆引きする関数で、今回の場合は '/polls/1/results/' へとリダイレクトするようになっている。'1' は question.id である。
上記でリダイレクト先に指定されている results ビューと templates/polls/results.html テンプレートを作成する。
from django.shortcuts import get_object_or_404, render


def results(request, question_id):
    question = get_object_or_404(Question, pk=question_id)
    return render(request, 'polls/results.html', {'question': question})
<h1>{{ question.question_text }}</h1>

<ul>
{% for choice in question.choice_set.all %}
    <li>{{ choice.choice_text }} -- {{ choice.votes }} vote{{ choice.votes|pluralize }}</li>
{% endfor %}
</ul>

<a href="{% url 'polls:detail' question.id %}">Vote again?</a>
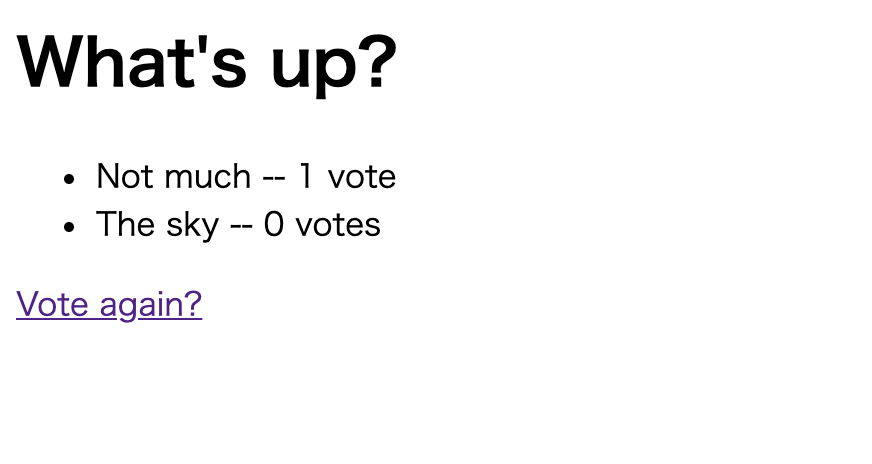
選択肢を送信すると、以下のような画面が表示される。
汎用ビュー
これまでに作成した detail() ビュー(Djangoチュートリアル④(テンプレート)参照)と results() ビュー は非常に似たものとなっている。
def detail(request, question_id):
    question = get_object_or_404(Question, pk=question_id)
    return render(request, 'polls/detail.html', {'question': question})

def results(request, question_id):
    question = get_object_or_404(Question, pk=question_id)
    return render(request, 'polls/results.html', {'question': question})
Django ではこのようなよくあるパターンに対応した__汎用ビュー__というショートカットを提供しており、それらを利用することで短いコードで書くことができる。以下では汎用ビューを用いて冗長なコードを削る。まず URLconf を変換する。
from django.urls import path

from . import views

app_name = 'polls'
urlpatterns = [
    path('', views.IndexView.as_view(), name='index'),
    path('<int:pk>/', views.DetailView.as_view(), name='detail'),
    path('<int:pk>/results/', views.ResultsView.as_view(), name='results'),
    path('<int:question_id>/vote/', views.vote, name='vote'),
]
# 元のコード
# urlpatterns = [
#     path('', views.index, name='index'),
#     path('<int:question_id>/', views.detail, name='detail'),
#     path('<int:question_id>/results/', views.results, name='results'),
#     path('<int:question_id>/vote/', views.vote, name='vote'),
# ]
<question_id> が <pk> に変更されていることに注意する。また as.view() はクラスをビュー関数化するメソッドである。ここで使用しているクラスは、以下で views.py 内の index、detail、results 関数を変換したものである。
from django.http import HttpResponseRedirect
from django.shortcuts import get_object_or_404, render
from django.urls import reverse
from django.views import generic

from .models import Choice, Question


class IndexView(generic.ListView):
    template_name = 'polls/index.html'
    context_object_name = 'latest_question_list'

    def get_queryset(self):   # リクエストに対して、表示するデータをオーバーライドするメソッド
        """Return the last five published questions."""
        return Question.objects.order_by('-pub_date')[:5]
# 元のコード
# def index(request):
#     latest_question_list = Question.objects.order_by('-pub_date')[:5]
#     context = {'latest_question_list': latest_question_list}
#     return render(request, 'polls/index.html', context)

class DetailView(generic.DetailView):
    model = Question
    template_name = 'polls/detail.html'
# 元のコード
# def detail(request, question_id):
#     question = get_object_or_404(Question, pk=question_id)
#     return render(request, 'polls/detail.html', {'question': question})

class ResultsView(generic.DetailView):
    model = Question
    template_name = 'polls/results.html'
# 元のコード
# def results(request, question_id):
#     question = get_object_or_404(Question, pk=question_id)
#     return render(request, 'polls/results.html', {'question': question})

def vote(request, question_id):
    ... # same as above, no changes needed.
これまで関数ベースで書かれていたものがクラスベースで書かれている。クラスベースでは、汎用ビュー(generic.ListView や generic.DetailView)を継承したビューを作成することができるため、その恩恵を受けることができる。上記の generic.ListView
では template_name 属性に使用するテンプレートを指定し、context_object_name 属性にコンテキスト変数を指定することで「オブジェクトのリストを表示する」ビューを作成できる。また generic.DetailView では model 属性に使用するモデルを指定し、template_name 属性に使用するテンプレートを指定することで「オブジェクトの詳細ページを表示する」ビューを作成できる。クラスベースビューに汎用ビューの詳細がある。
これらすでに提供されている汎用ビューを継承して利用していくことで、見通しがよく応用がきくビューを作成できる。
おわりに
汎用ビューが便利なことはわかったが、慣れるまで時間がかなりかかりそうだ。引き続き、はじめての Django アプリ作成、その 5を進めていく。
関連記事のリンクは以下。