TL;DR 「putText() with STBはもっと頑張れる」
- putText()関数で、日本語表示もできるようになります!
- getTextSize()関数の仕様が微妙に変わるので、お気を付けください!Rectになります。
はじめに
putText()関数でtruetype fontを使ったテキスト描画ができるようになりました! という記事を公開したところ、日本語表示もできるぞ!というコメントをいただいたので、まじめにそこらへんまで頑張ってみました。
サンプルソースコード
下記サンプルコードは、NotoFontとM-Plusでの描画する例です。
# include <opencv2/imgproc.hpp> // cv::FONT*, cv::LINE*, cv::FILLED
# include <opencv2/highgui.hpp> // imwrite
# include <iostream>

using namespace cv;

int main(int argc, char *argv[])
{
    if (argc < 2) {
        std::cerr << "Filename required" << std::endl;
        return 1;
    }

    Mat img(600, 800, CV_8UC3, Scalar::all(0));

    // フォントファイルの指定
    // ttf/otfそのものを指定する以外に、gz圧縮したのを指定もできる
    // postfix".gz"は必須になります
    FontFace fface("./mplus-1p-medium.otf.gz");
    // FontFace fface("/usr/share/fonts/truetype/noto/NotoMono-Regular.ttf");
    int fontHeight = 40;
    Point textOrg( 50, 200 ) ;

    String textList[] = {
                       u8"こんにちは、STB putText()さん",
                       u8"",
                       u8"Funny Text inside the box",
                       u8"",
                       u8"iiiiiiiiiiiiiiiii",
                       u8"WWWWWWWWWWWWWWWWW",
                       u8"",
                       u8"_qgjyp - under baseline",
                       u8"qgjyp - under baseline",
    };

    for ( const auto& text : textList ) {

        // Get the drawing boundary box
        Rect textRect = getTextSize(img.size(),text, textOrg,
                                    fface, fontHeight );
        // draw the box
        rectangle(img, textRect, Scalar(0,0,255) );

        // ... and the baseline first
        line(img,
            textOrg + Point(0, 0),
            textOrg + Point(textRect.width, 0),
            Scalar(0, 255, 255));

        // then put the text itself
        putText(img,
            text,
            textOrg,
            Scalar::all(255),
            fface,
            fontHeight);

        // Update textOrg
# if 0
        // (1) Same line height
        textOrg += Point( 0, fontHeight );
# else
        // (2)
        textOrg += Point( 0, textRect.height );
# endif
    }

    cv::imwrite(argv[1], img);
    return 0;
}
出力結果
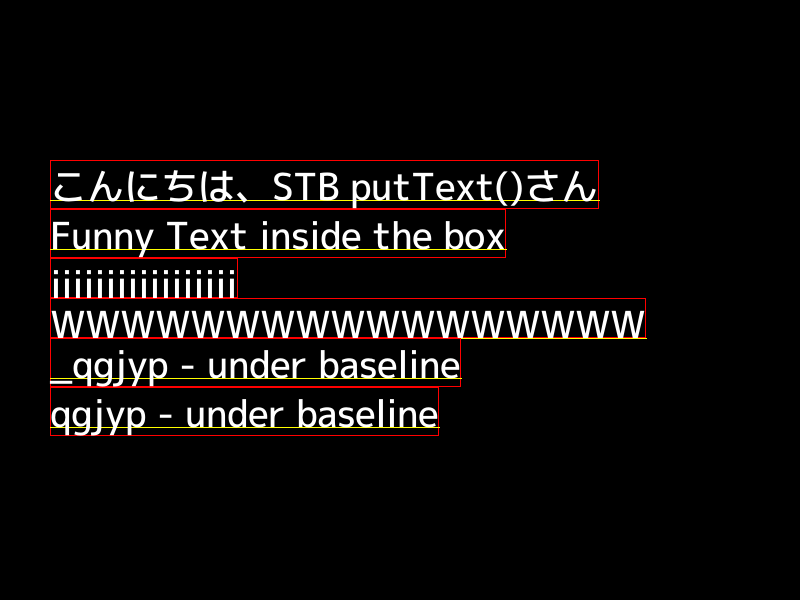
ちょっと補足説明
FontFaceでフォントファイル指定
フォントファイルの指定には、新しく定義されたFontFaceを使います。
    // フォントファイルの指定
    // ttf/otfそのものを指定する以外に、gz圧縮したのを指定もできる
    // postfix".gz"は必須になります
    FontFace fface("./mplus-1p-medium.otf.gz");
    // FontFace fface("/usr/share/fonts/truetype/noto/NotoMono-Regular.ttf");
このように、普通のttfファイル以外に、gz圧縮したファイルを突っ込むこともできるし、otfを突っ込むこともできます。
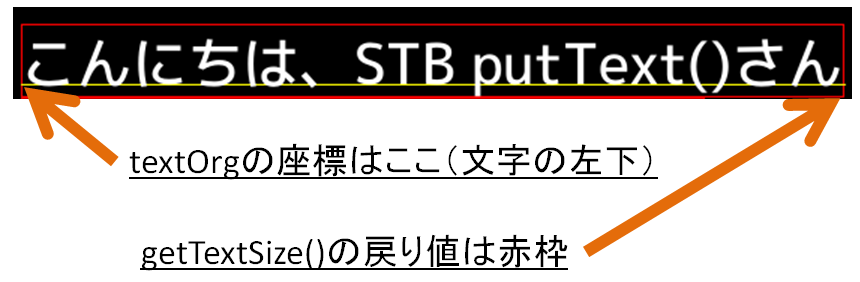
getTextSize()※名前と振る舞いが違うよー
        // Get the drawing boundary box
        Rect textRect = getTextSize(img.size(),text, textOrg,
                                    fface, fontHeight );
「getTextSize()なんだから、文字列のサイズを返す関数」と思いきや、それがちがうと……「getTextRect()」が正しいですね。赤枠のBoundary Boxを取得できます。
次の行、はどうやって定義する?
        // Update textOrg
# if 0
        // (1) Same line height
        textOrg += Point( 0, fontHeight );
# else
        // (2)
        textOrg += Point( 0, textRect.height );
# endif
次の行の移動方法は、(1)fontHeightに従って、全部同じ高さ分ずつずらす、 (2)赤枠分だけずらす、という2つの方法がある。
基本的には(1)でいいと思うけど、文字を絶対被るリスクはある。
(2)ならば文字が重なることはないけど、空行の高さは消えます(""しかないところのheightは0になる)。
まとめ(再掲)「putText() with STBはもっと頑張れる」
- putText()関数で、日本語表示もできるようになります!
- getTextSize()関数の仕様が微妙に変わるので、お気を付けください!Rectになります。
以上になります。ご精読、ありがとうございました。