はじめに
前回の記事では、ユーザー情報を一覧で表示し、ユーザー情報の作成についてお話をしてきました。今回はバリデーションの追加とパスワードをデータベースに登録する際に暗号化する処理についてお話をしたいと思います。ファイル構成
.
├── .gradle
├── .idea
├── build
├── gradle
└── src
     ├── main
     │    ├── java
     │    │    └── com
     │    │         └── example
     │    │              └── practice
     │    │                  ├── config
     │    │                  │    ├── PasswordEncoderConfig.java
     │    │                  │    └── SecurityConfig.java
     │    │                  ├── web
     │    │                  │    ├── user
     │    │                  │    │    ├── UserController.java
     │    │                  │    │    └── userForm.java
     │    │                  │    ├── order
     │    │                  │    │    ├── OrderController.java
     │    │                  │    │    └── OrderForm.java
     │    │                  │    └── IndexController.java
     │    │                  └── domain
     │    │                      ├── authentication
     │    │                      │    ├── CustomUserDetails.java
     │    │                      │    ├── CustomUserDetailsService.java
     │    │                      │    ├── User.java
     │    │                      │    ├── UserService.java
     │    │                      │    └── UserRepository
     │    │                      └── order
     │    │                           ├── OrderEntity.java
     │    │                           ├── OrderService.java
     │    │                           └── OrderRepository.java
     │    │
     │    └── resources
     │         ├── static
     │         ├── templates
     │         │    ├── users
     │         │    │    ├── creationForm.html
     │         │    │    └── list.html
     │         │    ├── order
     │         │    │    ├── delete_confirmation.html
     │         │    │    ├── detail.html
     │         │    │    ├── form.html
     │         │    │    └── list.html
     │         │    ├── login.html
     │         │    └── index.html
     │         ├── schema.sql
     │         ├── data.sql
     │         └── application.properties
     └── test
.gitignore
build.gradle
gradlew.bat
HELP.md
settings.gradle
バリデーションの追加
ユーザー名が重複したときの対処法
ユーザー情報テーブルの「username」は主キー制約がかかっているので、バリデーションを追加していない状態だと、エラーページに遷移してしまいます。
それを防ぐために、以下の画面のようにエラーメッセージを表示するようにしましょう。

UserService
まずはユーザー名の重複をチェックためのメソッドを追加していきます。
package com.example.practice.domain.authentication;

import lombok.RequiredArgsConstructor;
import org.slf4j.Logger;
import org.slf4j.LoggerFactory;
import org.springframework.stereotype.Service;

import java.util.List;
import java.util.Optional;

@Service
@RequiredArgsConstructor
public class UserService {
    private final Logger logger = LoggerFactory.getLogger(UserService.class); // ロガーのインスタンスを取得
    // UserRepositoryのインスタンスを注入
    private final UserRepository userRepository;
    // ユーザー一覧を取得するメソッド
    public List<User> findAll() {
        // userRepositoryを使ってデータベースからユーザー一覧を取得し、返す
        return userRepository.findAll();
    }
    public void create(String username, String password) {
        userRepository.insert(username,password);
    }
    // ユーザー名の重複をチェックするメソッド
    public boolean isUsernameTaken(String username) {
        // ユーザー名が重複しているかをチェック
        logger.debug("isUsernameTaken_username:" + username); // ユーザー名をログ出力
        Optional<User> existingUser = userRepository.findByUsername(username); // 既存のユーザーを取得
        logger.debug("isUsernameTaken_existingUser:" + existingUser); // 既存のユーザーをログ出力
        return existingUser.isPresent(); // 既存のユーザーが存在するかを返す
    }
}
UserController
次に、ユーザー名の重複が確認できたら「?error」というエラーパラメータを追加するようにControllerに処理を追加します。
package com.example.practice.web.user;

import com.example.practice.domain.authentication.UserRepository;
import com.example.practice.domain.authentication.UserService;
import com.example.practice.web.order.OrderForm;
import lombok.RequiredArgsConstructor;
import org.springframework.stereotype.Controller;
import org.springframework.ui.Model;
import org.springframework.validation.BindingResult;
import org.springframework.validation.annotation.Validated;
import org.springframework.web.bind.annotation.GetMapping;
import org.springframework.web.bind.annotation.ModelAttribute;
import org.springframework.web.bind.annotation.PostMapping;
import org.springframework.web.bind.annotation.RequestMapping;

import java.util.Collections;

@Controller
@RequestMapping("/users")
@RequiredArgsConstructor
public class UserController {

    // UserServiceのインスタンスを注入
    private final UserService userService;

    // ユーザーリストを表示するGETリクエスト
    @GetMapping
    public String showList(Model model) {
        // UserServiceを使って全てのユーザー情報を取得し、"userList"という名前でモデルに追加
        model.addAttribute("userList", userService.findAll());
        return "users/list"; // "users/list" テンプレートを返す
    }

    // ユーザー作成フォームを表示するGETリクエスト
    @GetMapping("/creationForm")
    public String showCreationForm(@ModelAttribute UserForm form) {
        return "users/creationForm"; // "users/creationForm" テンプレートを返す
    }

    // ユーザーを作成するPOSTリクエスト
    @PostMapping
    public String create(@Validated UserForm form, BindingResult bindingResult) {
        if (bindingResult.hasErrors()) {
            return showCreationForm(form);
        }
        // ユーザー名の重複をチェック
        if (userService.isUsernameTaken(form.getUsername())) {
            bindingResult.rejectValue("username", "duplicate", "ユーザー名が既に使用されています");
            return "redirect:/users/creationForm?error"; // エラーパラメータを追加
        }
        userService.create(form.getUsername(), form.getPassword());
        return "redirect:/users";
    }
}
creationForm.html
最後に、「error」のパラメータに遷移したときのVIEWの処理を追加していきたいと思います。
<!DOCTYPE html>
<html lang="en" xmlns:th="http://www.thymeleaf.org">
<head>
    <meta charset="UTF-8">
    <meta name="viewport" content="width=device-width, initial-scale=1.0">
    <title>ユーザー作成 |  業務用アプリケーション</title>
    <!-- Bootstrap CSS link -->
    <link rel="stylesheet" href="https://maxcdn.bootstrapcdn.com/bootstrap/4.5.2/css/bootstrap.min.css">
</head>
<body>
<div class="container mt-4">
    <!-- ヘッダー部分 -->
    <header class="mb-4 bg-light p-3 rounded">
        <div class="d-flex justify-content-between align-items-center">
            <h1 class="mb-0"><a href="../index.html" th:href="@{/}" class="text-dark text-decoration-none">業務管理アプリケーション</a></h1>
            <a href="#" th:href="@{/logout}" th:attr="data-method='post'" class="btn btn-dark" style="font-size: 18px;">ログアウト</a>
        </div>
    </header>
    <form action="#" th:action="@{/users}" method="post" th:object="${userForm}"  style="width: 500px; margin: 0 auto;">
    <div class="mt-3">
            <label for="usernameInput" class="form-label">ユーザー名</label>
            <input type="text" id="usernameInput" class="form-control" th:field="*{username}">
        </div>
        <div class="mt-3">
            <label for="passwordInput" class="form-label">パスワード</label>
            <input type="password" id="passwordInput" class="form-control" th:field="*{password}">
        </div>
        <div class="mt-3">
            <button type="submit" class="btn btn-primary">作成</button>
            <a href="./list.html" th:href="@{/users}" class="btn btn-secondary">取消</a>
        </div>
    </form>
    <!-- パラメータ error が存在する場合のみ表示 -->
    <div th:if="${param.error}" class="alert alert-danger mt-3" style="width: 500px; margin: 0 auto;">
        ユーザー名はすでに使われています。
    </div>
</div>
</body>
</html>
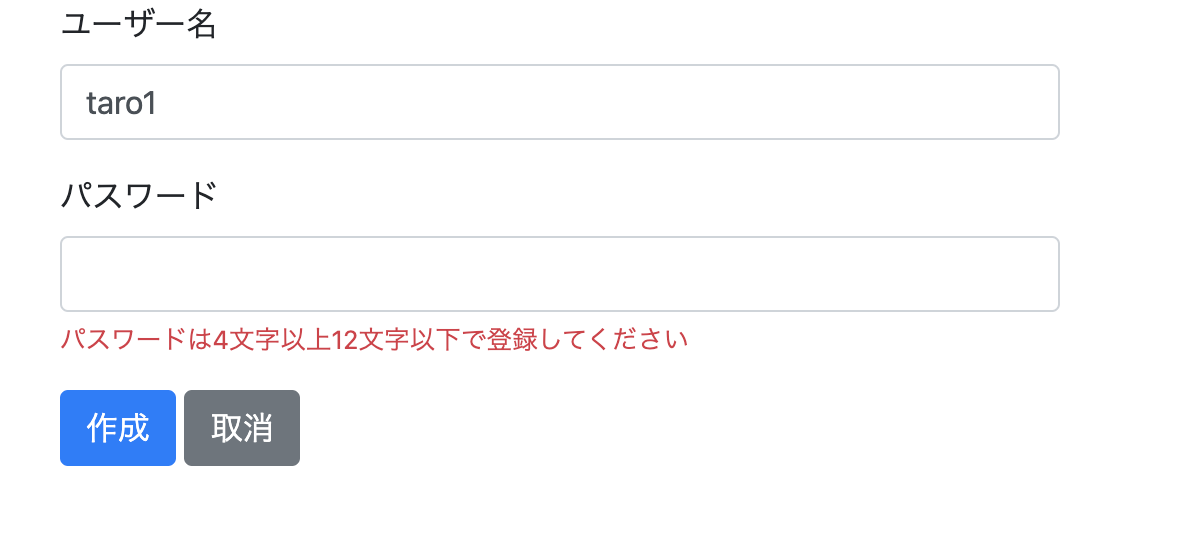
パスワードの文字数の制限によるバリデーション
パスワードを最小の文字数に制限することは、ユーザーのアカウントを保護するためにとても大切なことです。
そのため、今回の実装ではパスワードを「4文字以上12文字以下」でバリデーションを設定していきます。
UserForm
まずは、UserFormでバリデーションの設定をしていきましょう。package com.example.practice.web.user;
import lombok.AllArgsConstructor;
import lombok.Data;
import javax.validation.constraints.NotBlank;
import javax.validation.constraints.Size;
@Data
@AllArgsConstructor
public class UserForm {
@NotBlank(message = "ユーザー名を入力してください")
private String username;
@NotBlank(message = "パスワードを入力してください")
@Size(min = 4, max = 12, message = "パスワードは4文字以上12文字以下で登録してください")
private String password;
}
次に、バリデーションに引っかかった場合、エラーメッセージを表示するようにしていきます。
<!DOCTYPE html>
<html lang="en" xmlns:th="http://www.thymeleaf.org">
<head>
    <meta charset="UTF-8">
    <meta name="viewport" content="width=device-width, initial-scale=1.0">
    <title>ユーザー作成 |  業務用アプリケーション</title>
    <!-- Bootstrap CSS link -->
    <link rel="stylesheet" href="https://maxcdn.bootstrapcdn.com/bootstrap/4.5.2/css/bootstrap.min.css">
</head>
<body>
<div class="container mt-4">
    <!-- ヘッダー部分 -->
    <header class="mb-4 bg-light p-3 rounded">
        <div class="d-flex justify-content-between align-items-center">
            <h1 class="mb-0"><a href="../index.html" th:href="@{/}" class="text-dark text-decoration-none">業務管理アプリケーション</a></h1>
            <a href="#" th:href="@{/logout}" th:attr="data-method='post'" class="btn btn-dark" style="font-size: 18px;">ログアウト</a>
        </div>
    </header>
    <form action="#" th:action="@{/users}" method="post" th:object="${userForm}"  style="width: 500px; margin: 0 auto;">
    <div class="mt-3">
            <label for="usernameInput" class="form-label">ユーザー名</label>
            <input type="text" id="usernameInput" class="form-control" th:field="*{username}">
        <small class="form-text text-danger" th:if="${#fields.hasErrors('username')}" th:errors="*{username}"></small>
        </div>
        <div class="mt-3">
            <label for="passwordInput" class="form-label">パスワード</label>
            <input type="password" id="passwordInput" class="form-control" th:field="*{password}">
            <small class="form-text text-danger" th:if="${#fields.hasErrors('password')}" th:errors="*{password}"></small>
        </div>
        <div class="mt-3">
            <button type="submit" class="btn btn-primary">作成</button>
            <a href="./list.html" th:href="@{/users}" class="btn btn-secondary">取消</a>
        </div>
    </form>
    <!-- パラメータ error が存在する場合のみ表示 -->
    <div th:if="${param.error}" class="alert alert-danger mt-3" style="width: 500px; margin: 0 auto;">
        ユーザー名はすでに使われています。
    </div>
</div>
</body>
</html>
パスワードの暗号化
次にデータベースに登録しているパスワードの値を暗号化したいと思います。
まずは、h2-consoleを使えるようにするために、SecurityConfigに以下の設定を追加しましょう。
package com.example.practice.config;

import lombok.RequiredArgsConstructor;
import org.springframework.context.annotation.Bean;
import org.springframework.context.annotation.Configuration;
import org.springframework.security.config.annotation.authentication.builders.AuthenticationManagerBuilder;
import org.springframework.security.config.annotation.web.builders.HttpSecurity;
import org.springframework.security.config.annotation.web.configuration.EnableWebSecurity;
import org.springframework.security.config.annotation.web.configuration.WebSecurityConfigurerAdapter;
import org.springframework.security.core.userdetails.UserDetailsService;
import org.springframework.security.crypto.bcrypt.BCryptPasswordEncoder;
import org.springframework.security.crypto.password.NoOpPasswordEncoder;
import org.springframework.security.crypto.password.PasswordEncoder;

@Configuration
@EnableWebSecurity
@RequiredArgsConstructor
public class SecurityConfig extends WebSecurityConfigurerAdapter {
    private final UserDetailsService userDetailsService;

    @Override
    protected void configure(HttpSecurity http) throws Exception {
        http
                .authorizeRequests().antMatchers("/h2-console/**").permitAll()
                .and()
                .csrf().ignoringAntMatchers("/h2-console/**")
                .and()
                .headers().frameOptions().disable();

        http
                .authorizeRequests()
                .mvcMatchers("/login/**").permitAll()
                .anyRequest().authenticated()
                .and()
                .formLogin()
                .loginPage("/login");
    }

    @Override
    protected void configure(AuthenticationManagerBuilder auth) throws Exception {
        auth.userDetailsService(userDetailsService)
                .passwordEncoder(NoOpPasswordEncoder.getInstance());
    }
}
次に、「http://localhost:8080/h2-console/」にログインをして、今、現時点でどのようにデータベースで登録されているかを確認してみましょう。
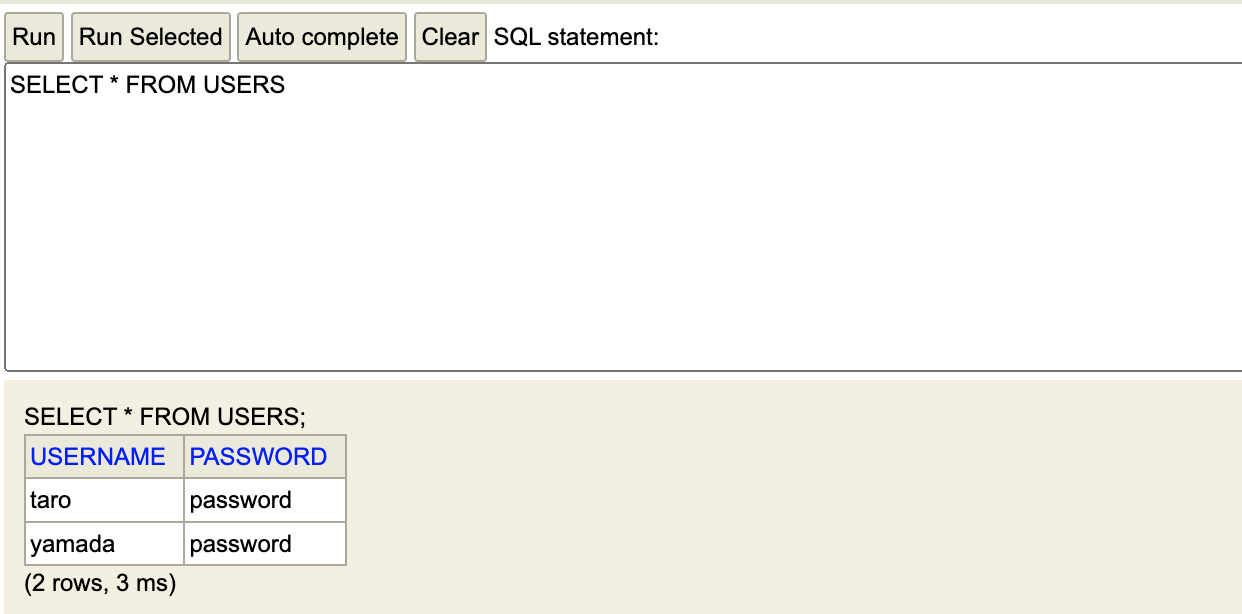
この画像のように、現時点ではpasswordの値がそのまま代入されており、データの流出の恐れがあります。
今回は、パスワードをハッシュ化することで、パスワードを安全に保存する方法について説明をしていきます。
SecurityConfig
次に、SecurityConfigにPasswordEncoderを追加します。
package com.example.practice.config;

import org.springframework.context.annotation.Bean;
import org.springframework.context.annotation.Configuration;
import org.springframework.security.crypto.password.PasswordEncoder;
import org.springframework.security.crypto.password.Pbkdf2PasswordEncoder;

@Configuration
public class PasswordEncoderConfig {
    //パスワードをエンコード化する
    @Bean
    public PasswordEncoder passwordEncoder() {
        return new Pbkdf2PasswordEncoder();
    }
}
次に、Security Configは、現状「何もしない」ように設定をしていますが、passwordEncodingに変更をしていきます。
package com.example.practice.config;

import lombok.RequiredArgsConstructor;
import org.springframework.context.annotation.Configuration;
import org.springframework.security.config.annotation.authentication.builders.AuthenticationManagerBuilder;
import org.springframework.security.config.annotation.web.builders.HttpSecurity;
import org.springframework.security.config.annotation.web.configuration.EnableWebSecurity;
import org.springframework.security.config.annotation.web.configuration.WebSecurityConfigurerAdapter;
import org.springframework.security.core.userdetails.UserDetailsService;
import org.springframework.security.crypto.password.PasswordEncoder;

@Configuration
@EnableWebSecurity
@RequiredArgsConstructor
public class SecurityConfig extends WebSecurityConfigurerAdapter {
    private final UserDetailsService userDetailsService;
    private final PasswordEncoder passwordEncoder;

    @Override
    protected void configure(HttpSecurity http) throws Exception {
        http
                .authorizeRequests().antMatchers("/h2-console/**").permitAll()
                .and()
                .csrf().ignoringAntMatchers("/h2-console/**")
                .and()
                .headers().frameOptions().disable();

        http
                .authorizeRequests()
                .mvcMatchers("/login/**").permitAll()
                .anyRequest().authenticated()
                .and()
                .formLogin()
                .loginPage("/login");
    }

    @Override
    protected void configure(AuthenticationManagerBuilder auth) throws Exception {
        auth.userDetailsService(userDetailsService)
                .passwordEncoder(passwordEncoder);
    }
}
UserService
次にUserServiceで先ほどのpasswordEncoderの処理を追加していきます。
package com.example.practice.domain.authentication;

import lombok.RequiredArgsConstructor;
import org.slf4j.Logger;
import org.slf4j.LoggerFactory;
import org.springframework.security.crypto.password.PasswordEncoder;
import org.springframework.stereotype.Service;

import java.util.List;
import java.util.Optional;

@Service
@RequiredArgsConstructor
public class UserService {
    private final Logger logger = LoggerFactory.getLogger(UserService.class); // ロガーのインスタンスを取得
    // UserRepositoryのインスタンスを注入
    private final UserRepository userRepository;
    private final PasswordEncoder passwordEncoder;
    // ユーザー一覧を取得するメソッド
    public List<User> findAll() {
        // userRepositoryを使ってデータベースからユーザー一覧を取得し、返す
        return userRepository.findAll();
    }
    public void create(String username, String password) {
        var encodedPassword = passwordEncoder.encode(password);
        logger.debug("encodedPassword:" + encodedPassword); // パスワードをエンコードしたものをログで出力
        userRepository.insert(username,encodedPassword);
    }
    // ユーザー名の重複をチェックするメソッド
    public boolean isUsernameTaken(String username) {
        // ユーザー名が重複しているかをチェック
        logger.debug("isUsernameTaken_username:" + username); // ユーザー名をログ出力
        Optional<User> existingUser = userRepository.findByUsername(username); // 既存のユーザーを取得
        logger.debug("isUsernameTaken_existingUser:" + existingUser); // 既存のユーザーをログ出力
        return existingUser.isPresent(); // 既存のユーザーが存在するかを返す
    }
}
以上の処理を追加して、h2コンソールを開いて、パスワードを「password」にすると、ハッシュ化され、ハッシュ化されている状態でログインできるようになります。
