- 2020/10/3 11:04、2.4.に
rootFileId書き換えについて追記 - 2022/2/22 22:33、Google Drive から json を取得する際に StatusCode=303 が返ってエラーになるようになったため、
getJson()の if 文に|| res.statusCode === 303を追加
今回の実装機能
- 発話により再生するプレイリストを指定する
- 指定されたプレイリスト (json 形式) に記載された曲を記載順に 1 回ずつ再生する
はじめに
Google Play Music が終了し、YouTube Music に完全移行するまで残り僅かになりました。
Google Play Music では無料版でもスマートスピーカーでプレイリストやアルバム、曲を指定して再生することができましたが、移行先の YouTube Music では Premium 会員にならないと指定再生ができません。曲指定のためだけに Premium 会員になるほどの情熱はありませんので、Google Home は諦めて Amazon Echo (Dot) で Google Drive 上の mp3 を再生するスキルを作ります。
プレイヤーの要件
手持ちの音楽ファイルに対して Google Home + Google Play Music でできていたことができれば良いのですが、列挙すると以下の感じです。
- 無料であること
- スマートスピーカーに話しかけるだけで再生できること(スマホを使って良いなら YouTube Music で済みます)
- プレイリストを再生できること
- (できれば)次の曲や前の曲への再生指示、シャッフル再生、曲名の問合せができること
手持ちの曲を置いておく場所には AWS Lambda から HTTPS アクセスできるという条件があり、自前で用意できる人でなければクラウドストレージが必要です。Amazon S3 が一番楽に実装できますが容量が 5GB と少ないので、無料でも 15GB の容量がある Google Drive を使うことにしました。
今回の仕組み上 mp3 がどのアカウントのドライブに置いてあるかは関係ないので、自分なり家族なりで複数アカウントあればその分たくさんの容量が使えます。
1. Google Drive 側の準備
1.1. mp3 をアップロードして共有設定する
どのアカウントのどのフォルダでも良いので Google Drive に mp3 をアップロードします。
フォルダ単位でもファイル単位でも良いので共有設定を行い、アップロードした mp3 がリンクを知っている全員が閲覧可能なようにします。
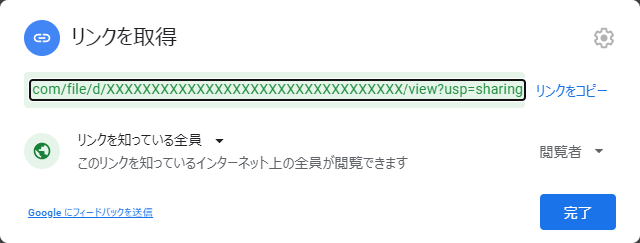
リンクの XXXXXXXXXXXXXXXXXXXXXXXXXXXXXXXXX の部分がファイル ID です。
説明の便宜上、2 つのファイルをアップロードし、ファイル ID がそれぞれ
mp3fileId1XXXXXXXXXXXXXXXXXXXXXXX と mp3fileId2XXXXXXXXXXXXXXXXXXXXXXX であるとします。
1.2. プレイリストを作成してアップロードする
下記形式の json ファイルを utf-8(BOMなし) で作成して Google Drive にアップロードし、共有設定を行います。
ファイル名はなんでも良いですが、後の説明で favorite というプレイリスト ID に対応するファイルのため favorite.json とします。
[
  { "id": "mp3fileid1xxxxxxxxxxxxxxxxxxxxxxx", "info": "曲1の説明文" },
  { "id": "mp3fileid2xxxxxxxxxxxxxxxxxxxxxxx", "info": "曲2の説明文" }
]
1.3. プレイリストを管理する root.json を作成してアップロードする
プレイリストファイルをリストする root.json を作成して Google Drive にアップロードし、共有設定を行います。
例によって名前は何でも良いです。favorite というプロパティ名で先ほどの favorite.json のファイル ID を記述します。
{
  "playlists": {
    "favorite": "favorite.json.fileIdxxxxxxxxxxxxx"
  }
}
2. Alexa のスキルを作成する
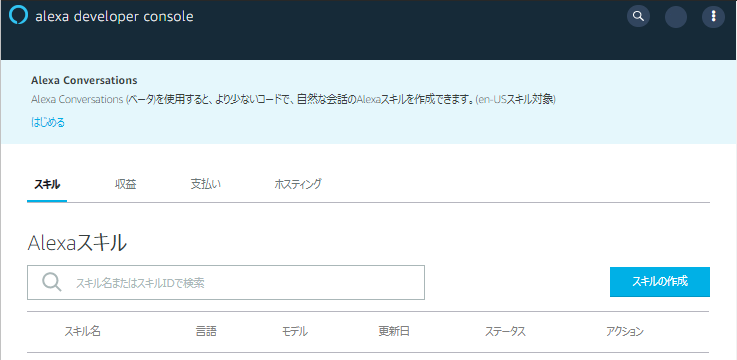
2.1. AlexaSkillsKit 開発者コンソールを開く
Amazon Developer にログインし、amazon alexa のページに行って左上の「Alexa Skills Kit (ASK)」から「開発者コンソール」を選びます。
Developer アカウントが無い場合はログインフォームの下側に「Amazon Developerアカウントを作成」というボタンがあるのでアカウントを作成してください。
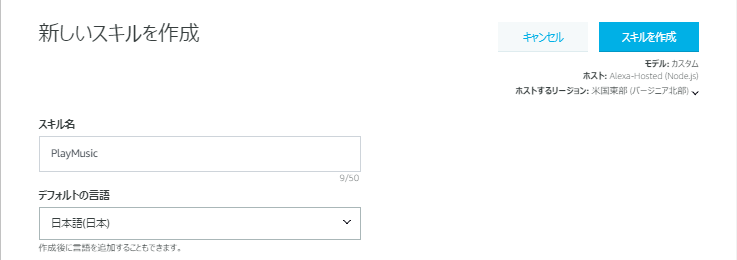
2.2. 新しいスキルを作る
- デフォルトの言語 : 日本語
- スキルに追加するモデルを選択 : カスタム
- スキルのバックエンドリソースをホスティングする方法を選択 : Alexa-Hosted (Node.js)
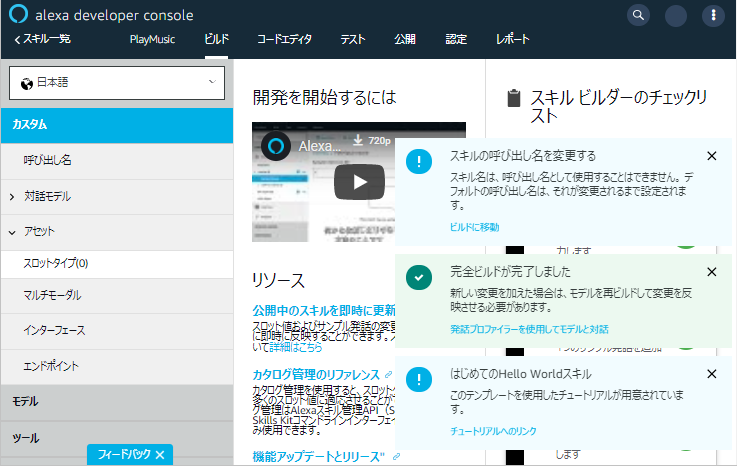
- 画面が変わりますので、初期状態(下記参照)のまま「テンプレートで続ける」をクリックします。
- スキルに追加するテンプレートを選択 : Hello World スキル
2.3. スキルの設定を行う
2.3.1. 呼び出し名
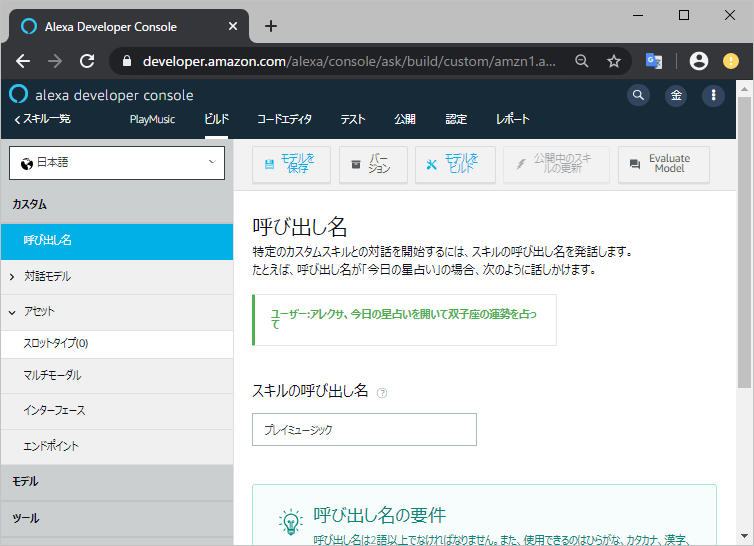
左側のメニューから「呼び出し名」を選択し、スキルの呼び出し名に好きな名前(ここではプレイミュージック)を入力し、「モデルを保存」をクリックします。
この名前を使って「Alexa、プレイミュージックを開いて」とか「Alexa、プレイミュージックでお気に入りの曲を再生して」とか指示することになるのでしっくりくる名前にしてください。このスキルは公開しないので名前の衝突を気にする必要はありません。
2.3.2. インターフェース
左側のメニューから「インターフェース」を選択し「Audio Player」のスイッチを ON にし、「インターフェースを保存」をクリックします。

2.3.3. スロットタイプ
- 左側のメニューから「アセット」を展開して「スロットタイプ(0)」を選択し、「+スロットタイプ」をクリックします。
- 「Create a custom slot type with values」を選び(初期選択済み)テキストボックスに「Playlist」と入力して「Next」をクリックします。すぐ後に出てくるスロット名と紛らわしいので「PlaylistName」の方が混乱しないかも知れません。

- 続いて「このスロットタイプの新しい値を入力」に「お気に入り」と入力して「+」をクリックし、「ID」に「favorite」を入力、「同義語を追加」に「お気に入りの曲」と入力して「+」をクリックします。
- 下の画面イメージのようになったら「モデルを保存」をクリックします。
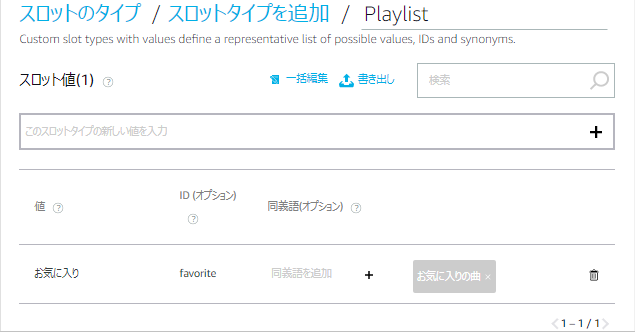
ここで「値」や「同義語」として設定されたワードに対し、その「ID」を root.json のプロパティ名とマッチングしてプレイリストの曲を再生します。値や同義語は Amazon Echo が発話の結果認識したワードになるため、例えば「お気に」のような同義語を設定しても、Echo が「起きに」とか「沖に」とかの認識しかしなければ再生できません。
2.3.4. インテント
- 左側のメニューから「対話モデル」を展開して「インテント」を選択し、インテント一覧から「HelloWorldIntent」を探して削除します。
- 「+インテントを追加」をクリックします。
- 「カスタムインテントを作成」を選び(初期選択済み)テキストボックスに「PlayMusicIntent」と入力して「カスタムインテントを作成」をクリックします。

- 「サンプル発話」を一旦無視した画面一番下までスクロールし、インテントスロットの「名前」に「playlist」を入力、「スロットタイプ」に「Playlist」を選択する

- 画面一番上に戻りってサンプル発話を入力します。「{プレイリスト名}を再生して」という意図でどんな言い方をするか考え、それを全て入力します。一番下の「{playlist}」のみのサンプルは、「Alexa、プレイミュージックを開いて」などスキルの起動だけを発話した際に「プレイリスト名を教えてください。」と返答させるので、その時にプレイリスト名だけの発話で再生するためです。

- 「モデルを保存」をクリックし、「モデルをビルド」をクリックします。
インテントやインターフェースなどの設定を変更した場合は「モデルをビルド」するまでスキルに反映されません。
2.4. 再生機能を実装する
- 上側のメニューバー(ナビバー)で「コードエディタ」を選択すると、コードエディタ画面に遷移し、
index.jsが開いた状態になります。 - 以下のコードを貼り付け、
rootFileIdの値をroot.jsonのファイル ID に書き換えます。 - 「保存」をクリックして「デプロイ」もクリックします。
index.js の全文(折り畳み)
/* *
 * This sample demonstrates handling intents from an Alexa skill using the Alexa Skills Kit SDK (v2).
 * Please visit https://alexa.design/cookbook for additional examples on implementing slots, dialog management,
 * session persistence, api calls, and more.
 * */
const Alexa = require('ask-sdk-core');
const Https = require('https');

const rootFileId = 'xxxxxxxxxxxxxxxxxxxxxxxxxxxxxxxxx'; // ★★ここを書き換える★★

const getRequestTypeOrIntentName = handlerInput => {
  return Alexa.getRequestType(handlerInput.requestEnvelope) === 'IntentRequest'
    ? Alexa.getIntentName(handlerInput.requestEnvelope)
    : Alexa.getRequestType(handlerInput.requestEnvelope);
};

const LaunchRequestHandler = {
    canHandle(handlerInput) {
        return Alexa.getRequestType(handlerInput.requestEnvelope) === 'LaunchRequest';
    },
    handle(handlerInput) {
        const speakOutput = 'プレイリスト名を教えてください。';
        return handlerInput.responseBuilder
            .speak(speakOutput)
            .reprompt(speakOutput)
            .getResponse();
    }
};

const PlayMusicHandler = {
    canHandle(handlerInput) {
        return [
            'PlayMusicIntent', 'AudioPlayer.PlaybackNearlyFinished'
        ].includes(getRequestTypeOrIntentName(handlerInput));
    },
    async handle(handlerInput) {
        const requestTypeOrIntentName = getRequestTypeOrIntentName(handlerInput);
        let behavior = 'REPLACE_ALL';
        let playlistId = '';
        let seed = 0;
        let track = 0;
        let loop = '';
        let repeat = '';
        let offset = 0;
        switch(requestTypeOrIntentName){
            case('PlayMusicIntent'): {
                // intent.slots.{スロット}.resolutions 配下にユーザーが選択したスロットが格納される
                // ユーザーが発話したプレイリスト名に対応する Google Drive 上の json ファイルを取得するが、
                // スロット値の ID を利用することで、発話の揺らぎに対応しつつ対象ファイルを一意にしている
                const resolvedSlot = handlerInput.requestEnvelope.request.intent.slots.playlist.resolutions.resolutionsPerAuthority[0].values;
                if (resolvedSlot === undefined) {
                    const speakOutput = 'プレイリストを認識できませんでした。もう一度お願いします。';
                    return handlerInput.responseBuilder
                        .speak(speakOutput)
                        .reprompt(speakOutput)
                        .getResponse();
                }
                const rootjson = await getJson(makeDriveUrl(rootFileId));
                playlistId = rootjson.playlists[resolvedSlot[0].value.id];
                break;
            }
            case('AudioPlayer.PlaybackNearlyFinished'): {
                // 曲の終了間際の場合は再生中の曲をそのままにするため REPLACE_ENQUEUED でキューを置き換える
                behavior = 'REPLACE_ENQUEUED';
                const audioPlayer = handlerInput.requestEnvelope.context.AudioPlayer;
                [playlistId, seed, track, loop, repeat, ] = audioPlayer.token.split(':');
                track = (+track) + 1;
                break;
            }
        }

        // token から切り出したままだと string になっているので数値型に直す
        [seed, track] = [+seed, +track];

        // 全て再生したら終了する
        const playlist = await getJson(makeDriveUrl(playlistId));
        if (track >= playlist.length) {
            return handlerInput.responseBuilder
                .addAudioPlayerClearQueueDirective('CLEAR_ALL')
                .withShouldEndSession(true)
                .getResponse();
        }

        // addAudioPlayerPlayDirective を利用して AudioPlayer に音楽再生の指示を応答する
        const idx = track;
        const url = makeDriveUrl(playlist[idx].id);
        const token = `${playlistId}:${seed}:${track}:${loop}:${repeat}:${playlist[idx].info}`;
        return handlerInput.responseBuilder
            .addAudioPlayerPlayDirective(behavior, url, token, offset, null)
            .getResponse();
    }
};

const CancelAndStopIntentHandler = {
    canHandle(handlerInput) {
        return [
            'AMAZON.StartOverIntent', 'AMAZON.NextIntent', 'AMAZON.PreviousIntent',
            'AMAZON.ShuffleOnIntent', 'AMAZON.ShuffleOffIntent',
            'AMAZON.LoopOnIntent', 'AMAZON.LoopOffIntent', 'AMAZON.RepeatIntent',
            'AMAZON.PauseIntent', 'AMAZON.ResumeIntent', 'AMAZON.HelpIntent',
            'AMAZON.CancelIntent', 'AMAZON.StopIntent', 'SessionEndedRequest'
        ].includes(getRequestTypeOrIntentName(handlerInput));
    },
    handle(handlerInput) {
        const speakOutput = '再生を終了します。';
        return handlerInput.responseBuilder
            .speak(speakOutput)
            .addAudioPlayerClearQueueDirective('CLEAR_ALL')
            .withShouldEndSession(true)
            .getResponse();
    }
};
/* *
 * FallbackIntent triggers when a customer says something that doesn’t map to any intents in your skill
 * It must also be defined in the language model (if the locale supports it)
 * This handler can be safely added but will be ingnored in locales that do not support it yet
 * */
const FallbackIntentHandler = {
    canHandle(handlerInput) {
        return Alexa.getRequestType(handlerInput.requestEnvelope) === 'IntentRequest'
            && Alexa.getIntentName(handlerInput.requestEnvelope) === 'AMAZON.FallbackIntent';
    },
    handle(handlerInput) {
        const speakOutput = 'よく分かりませんでした。もう一度お願いします。';
        return handlerInput.responseBuilder
            .speak(speakOutput)
            .reprompt(speakOutput)
            .getResponse();
    }
};
/* *
 * The intent reflector is used for interaction model testing and debugging.
 * It will simply repeat the intent the user said. You can create custom handlers for your intents
 * by defining them above, then also adding them to the request handler chain below
 * */
const IntentReflectorHandler = {
    canHandle(handlerInput) {
        return Alexa.getRequestType(handlerInput.requestEnvelope) === 'IntentRequest';
    },
    handle(handlerInput) {
        const intentName = Alexa.getIntentName(handlerInput.requestEnvelope);
        const speakOutput = `${intentName} がトリガーされました。`;

        return handlerInput.responseBuilder
            .speak(speakOutput)
            .getResponse();
    }
};
const PlaybackHandler = {
    canHandle(handlerInput) {
        return [
            'AudioPlayer.PlaybackStarted', 'AudioPlayer.PlaybackFinished', 'AudioPlayer.PlaybackStopped'
        ].includes(Alexa.getRequestType(handlerInput.requestEnvelope));
    },
    handle(handlerInput) {
        return handlerInput.responseBuilder.getResponse();
    }
};
/**
 * Generic error handling to capture any syntax or routing errors. If you receive an error
 * stating the request handler chain is not found, you have not implemented a handler for
 * the intent being invoked or included it in the skill builder below
 * */
const ErrorHandler = {
    canHandle() { return true; },
    handle(handlerInput, error) {
        const speakOutput = 'エラーが発生しました。再生を終了します。';
        console.log(`~~~~ Error handled: ${JSON.stringify(error)}`);

        return handlerInput.responseBuilder
            .speak(speakOutput)
            .addAudioPlayerClearQueueDirective('CLEAR_ALL')
            .withShouldEndSession(true)
            .getResponse();
    }
};

const makeDriveUrl = (fileId) => `https://drive.google.com/uc?export=download&id=${fileId}`;

const getJson = (url) => new Promise((resolve, reject) => {
    Https.get(url, (res) => {
        res.setEncoding('utf8');
        let json = '';

        if(res.statusCode === 301 || res.statusCode === 302 || res.statusCode === 303) {
            resolve(getJson(res.headers.location));
        } else {
            let bufs = [];
            res.on('data', (chunk) => json += chunk);
            res.on("end", () => {
                try {
                    resolve(JSON.parse(json));
                } catch (err) {
                    console.log(err);
                    reject(err);
                }
            });
            res.on('error', (e) => {
                console.log(e.message);
                reject(e);
            });
        }
    });
});

/**
 * This handler acts as the entry point for your skill, routing all request and response
 * payloads to the handlers above. Make sure any new handlers or interceptors you've
 * defined are included below. The order matters - they're processed top to bottom
 * */
exports.handler = Alexa.SkillBuilders.custom()
    .addRequestHandlers(
        LaunchRequestHandler,
        PlayMusicHandler,
        CancelAndStopIntentHandler,
        FallbackIntentHandler,
        IntentReflectorHandler,
        PlaybackHandler)
    .addErrorHandlers(ErrorHandler)
    .lambda();
2.5. テストを有効にする
スキルを公開しないと Amazon Echo でそのスキルを有効にして使えるようになりませんが、スキルのテストモードを開発中にすると、実機でテストできるようになりますので、これを利用して公開せずに作成したスキルを実機で動作させます。
上側のメニューバー(ナビバー)で「テスト」を選択、「非公開」となっているリストボックスを「開発中」に変更するだけです。
2.6. 実際に再生する
「Alexa、プレイミュージックでお気に入りの曲を再生して」と発話し、再生されれば成功です。
発話を受けても「お気に入りの曲を再生します」のような返答をするように作っていないので、曲が流れ始めるまで若干不安になりますが耐えてください。
2.7. プレイリストを追加する
例として favorite プレイリストのみ作成しましたが、追加する場合は下記の手順となります。開発コンソールを触る必要がある点がイケてないですが、事前に登録しておいても悪さはしないので、あらかじめ登録しておく手もあります。
- mp3 をアップロードする
-
favorite.jsonに倣って新しいプレイリストファイルを作成してアップロードする - 上記ファイルの情報を
root.jsonに追記する。行末のカンマの有無に注意 - 開発コンソールの「アセット>スロットタイプ」を選択し、「Playlist」をクリックしてスロット値として新しいプレイリスト名と、ID に
root.jsonに追記した際のプロパティ名を指定して、モデルをビルドする
おわりに
Google や Amazon に抹殺されないか心配ですが、今回は単純な音楽再生機能を実装しました。
Google Drive 上の mp3 の共有リンクが漏洩すると問題ですので実践する方は自己責任でお願いします。
その2 では今回のコードについて説明し、曲を進める/戻す、シャッフル再生する、などの機能実装についてはその3 以降で投稿する予定です。
