Intro
Fork して clone したらすぐに Azure を Terraform できる devcontainer を作りました。 VS Code の Remote Development (Remote - Containers) 機能を使っているので、ローカルに VS Code と Docker Desktop の環境があれば、以下のようなことがほんの少しの準備で実行できます。
- Terraform で Azure を管理する
-
terraformや Azure CLIazコマンドがすでに Docker コンテナ上のインストールされています。
-
- GitHub Actions で Push された内容を自動で反映する
GitHub レポジトリは以下です。
https://github.com/hoisjp/terraform-azure-ghactions-devcontainer
手順
事前に必要なもの
以下を準備してください。たったこれだけです!
- Visual Studio Code : https://code.visualstudio.com/download
- VS Code Extension : VS Code Remote Development (Remote - Containers)
- Docker Desktop : https://www.docker.com/get-started
Windows/Mac/Linux、いずれの OS でも大丈夫なはずです。
いざ!Remote Development!
-
ローカル環境で、Docker Desktop が実行中であることを確認してください。
-
以下の GitHub リポジトリを Fork してください。あやまって秘密キーなどをプッシュしてしまわないよう、まずはプライベートレポジトリにしておくことをおすすめします。
https://github.com/hoisjp/terraform-azure-ghactions-devcontainer
※ fork せずに直接 git clone も可能ですが、後続の GitHub Actions を利用するためにはご自身のリポジトリに fork していただく必要があります。 -
fork したリポジトリを clone します。リポジトリ名は置き換えてください。
git clone <your repository> -
VS Code を clone したディレクトリで開いて、左下にある、Remote Development アイコンをクリックします。(コマンドパレットから実行しても構いません。)
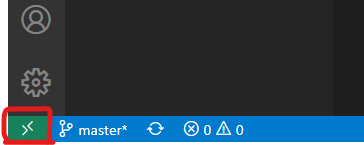
-
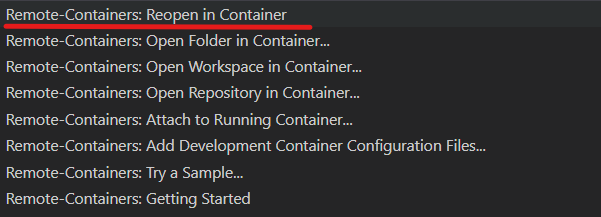
メニューから、
Remote-Containers: Reopen in Containers...を選択します。
-
ウィンドウが開き直りました。これは、ローカルの Docker コンテナ上で VS Code を開いている形になります。
VS Code のターミナルで以下を実行してみましょう。$ terraform -v Terraform v0.12.29 $ az --version azure-cli 2.9.1 ...できました!準備OKです!
FYI: ちなみに、
tflintやterragruntコマンドもすでにインストールされています。くわしくは、Dockerfile を見てください。
Azure を Terraform で操作
Terraform backends 用の Azure Storage
まず、Terraform backends 用の Azure Storage を作ってみます。この Storage は Terraform のステートを管理するために必要なものです。
-
VS Code のターミナルを開きます。レポジトリのホームディレクトリにいるはずです。
$ pwd /workspace/<your repository name> -
Azure にログインします。ログイン用のページを開いて、指定されたコードを入力するよう求められます。以下、
************の部分は置き換えてください。$ az login To sign in, use a web browser to open the page https://microsoft.com/devicelogin and enter the code ************ to authenticate.ログイン成功したら、所有している Azure サブスクリプションの一覧が JSON フォーマットでずらっと返されます。
-
適切なサブスクリプションを選んで、以下のコマンドを実行します。ご自身のサブスクリプションの GUID で置き換えてください。先ほどの JSON 結果の
idプロパティのものです。$ az account set --subscription <your subscription GUID> -
では、以下のディレクトリに移動します。
$ cd 00-create-azurerm-backend -
Terraform を実行するために状態を初期化する必要があります。
以下のようにterraform initを実行します。$ terraform init Initializing the backend... Initializing provider plugins... Terraform has been successfully initialized! You may now begin working with Terraform. Try running "terraform plan" to see any changes that are required for your infrastructure. All Terraform commands should now work. If you ever set or change modules or backend configuration for Terraform, rerun this command to reinitialize your working directory. If you forget, other commands will detect it and remind you to do so if necessary. -
初期化が成功しました。次に、
terraform planを実行します。
ストレージアカウント名の入力を求められます。これはグローバルでユニークである必要があります。他と重複しないよう入力します。$ terraform plan var.backend_storage_account_name Storage account name for terraform backend Enter a value: ****以下のような terraform plan 結果が出力されればOKです。
...
...
Plan: 3 to add, 0 to change, 0 to destroy.
注意: もし Azure にログインしていないと、以下のようなエラーメッセージが出ます。戻って
az loginから進めてください。Error: Error building AzureRM Client: Authenticating using the Azure CLI is only supported as a User (not a Service Principal). -
では
terraform applyを実行してリソースを作成します。ストレージアカウント名をもう一度求められますので、先ほど terraform plan で確認した名前を入力します。$ terraform apply var.backend_storage_account_name Storage account name for terraform backend Enter a value: ****確認メッセージを求められますので、確認OKであれば
yesを入力します。... ... Plan: 3 to add, 0 to change, 0 to destroy. Do you want to perform these actions? Terraform will perform the actions described above. Only 'yes' will be accepted to approve. Enter a value: yes作成されていますね。少し待ちましょう。
azurerm_resource_group.rg: Creating...
azurerm_resource_group.rg: Creation complete after 0s [id=/subscriptions/****GUID****/resourceGroups/terraform-rg]
azurerm_storage_account.strg: Creating...
azurerm_storage_account.strg: Still creating... [10s elapsed]
azurerm_storage_account.strg: Still creating... [20s elapsed]
azurerm_storage_account.strg: Creation complete after 20s [id=/subscriptions/****GUID****/resourceGroups/terraform-rg/providers/Microsoft.Storage/storageAccounts/****your storage account name****]
azurerm_storage_container.strg-container: Creating...
azurerm_storage_container.strg-container: Creation complete after 0s [id=https://********.blob.core.windows.net/tfstate]
以下のメッセージが表示されたら完了です!

Apply complete! Resources: 3 added, 0 changed, 0 destroyed. -
念のため、ストレージアカウントが作成されているか確認してみましょう。
$ az group show --name terraform-rg --out table
(result)

$ az storage account show --name '<replace by yours>' --out table
(result)
Go for GitHub Actions
(仕組みをご存じのかたは以下のファイルを見ていただくのが早いです)
https://github.com/hoisjp/terraform-azure-ghactions-devcontainer/blob/master/.github/workflows/01-hello-azure.yml
Blob ストレージに、リモートの state ファイルを準備
-
GitHub シークレットに、Azure 認証情報であるサービスプリンシパルを格納します。
は置き換えてください。az ad sp create-for-rbac --name "<yourServicePrincipalName>" --role contributor --sdk-auth
上記のコマンドを実行すると、以下の JSON 結果が返されます。以降の手順で使います。
```json
{
  "clientId": "XXXXXXX-XXXX-XXXX-XXXX-XXXXXXXXXXXXX",
  "clientSecret": "XXXXXXXXXXXXXXXXXXXXXXXXXXXXX",
  "subscriptionId": "XXXXXXXXX-XXXXX-XXXX-XXXX-XXXXXXXXXXXXX",
  "tenantId": "XXXXXXXX-XXXXX-XXXX-XXXX-XXXXXXXXXXX",
  ...
}
```
- GitHub のレポジトリページのメニューから、
Settings⇒Secretsを選択します。
以下のシークレット名で、4つのシークレットを追加します。
ARM_CLIENT_IDARM_CLIENT_SECRETARM_SUBSCRIPTION_IDARM_TENANT_ID
-
リポジトリ上の 01-hello-azure.yml のワークフローファイルの一部を抜粋します。
以下のように、env の変数に4つを追加します。env: tf_version: 'latest' tf_working_dir: '01-hello-azure' GITHUB_TOKEN: ${{ secrets.GITHUB_TOKEN }} # add below 4 lines from the result of "az ad sp create-for-rbac ..." ARM_SUBSCRIPTION_ID: ${{ secrets.ARM_SUBSCRIPTION_ID }} ARM_CLIENT_ID: ${{ secrets.ARM_CLIENT_ID }} ARM_CLIENT_SECRET: ${{ secrets.ARM_CLIENT_SECRET }} ARM_TENANT_ID: ${{ secrets.ARM_TENANT_ID }}
あとは、terraform コマンドに前に、 hashicorp/setup-terraform@v1 を uses して、
```
- name: "Terraform Setup"
  uses: hashicorp/setup-terraform@v1
  with:
    terraform_version: ${{ env.tf_version }}
```
各種 terraform コマンドを実行します。e.g. init, plan, apply
terraform apply するときに、push 条件を指定すると pull request 時には apply されず、マージされて push されたときに構成が反映されます。また、 -auto-approve オプションを付けておくことも重要です。これがないとワークフロー実行時に、yes 入力を待ってしまいます。
```
- if: github.event_name == 'push'
  name: 'Terraform Apply'
  run: terraform apply -auto-approve
  working-directory: ${{ env.tf_working_dir }}
```
state ファイルを指定
次から、terraform init 時に、state ファイルの指定をする。
state ファイルの指定を hcl ファイルで定義する。
resource_group_name  = "terraform-rg"
storage_account_name = "tfstatehoisjp" # replace here by yours
container_name       = "tfstate"
key                  = "terraform.tfstate.00-hello-azure"
terraform init でファイルパスを指定。
$ terraform init -backend-config=backend-prod.hcl

Initializing the backend...

Successfully configured the backend "azurerm"! Terraform will automatically
use this backend unless the backend configuration changes.

Initializing provider plugins...
- Finding hashicorp/azurerm versions matching "~> 2.71.0"...
- Installing hashicorp/azurerm v2.71.0...
- Installed hashicorp/azurerm v2.71.0 (signed by HashiCorp)

Terraform has created a lock file .terraform.lock.hcl to record the provider
selections it made above. Include this file in your version control repository
so that Terraform can guarantee to make the same selections by default when
you run "terraform init" in the future.

Terraform has been successfully initialized!

You may now begin working with Terraform. Try running "terraform plan" to see
any changes that are required for your infrastructure. All Terraform commands
should now work.

If you ever set or change modules or backend configuration for Terraform,
rerun this command to reinitialize your working directory. If you forget, other
commands will detect it and remind you to do so if necessary.
ワークフローファイル上は以下のように init する
    - name: 'Terraform Init'
      run: terraform init -backend-config=backend-prod.hcl
      working-directory: ${{ env.tf_working_dir }}
カスタマイズ
一度動いたらばいろいろと環境をカスタマイズしたくなってきますね。以下のファイルたちを変更するとカスタマイズできます。
詳しくは、VS Code のドキュメント も参考にしてください。
- .devcontainer/devcontainer.json
-
.devcontainer/Dockerfile
- Azure CLI のイメージ
mcr.microsoft.com/azure-cli:latestをベースに、Terraform 各種をインストールしています。
- Azure CLI のイメージ
dotfiles で各自のお好み味付け
このリポジトリをチームで利用すると便利ですが、シェルの設定などお好みのものがあるかもしれません。そんなときは利用者それぞれがご自身の dotfiles でコンテナ上の設定をパーソナライズできます。以下のファイルの該当箇所を見てみましょう。
.devcontainer/devcontainer.json
    "settings": {
        // ...
        // dotfiles
        "dotfiles.repository": "hoisjp/terraform-azure-ghactions-devcontainer", // change here to your repository.
        "dotfiles.targetPath": "~/.devcontainer/dotfiles",
        "dotfiles.installCommand": "~/.devcontainer/dotfiles/install.sh"
    },
ここで dotfiles リポジトリの参照先を変更するとコンテナ作成時に適用してくれます。
仕組みはこのドキュメントを参考にしてください。 Personalizing with dotfile repositories
まとめ
VS Code の Remote Development 機能は非常に強力です。このように、チームメンバーで全く同じコンテナ環境を、特別な手間なく自然に(ここが大事)共有することができます。
従来、Azure CLI をインストールして、Terraform をインストールして、、、といった準備を、チームの全員が各自それぞれで行う必要がありましたが、devcontainer の仕組みを使うことで、もう「環境準備手順書」のようなものは必要ありません。環境設定はすべて git 上で管理されています。誰かが環境を改善すれば、たたちにチーム全員に反映されます。
これで Azure と Terraform に集中できますね!
参考
VS Code ドキュメント
- Developing inside a Container : https://code.visualstudio.com/docs/remote/containers
- VS Code 本を書きましたのでよかったら!
 : https://www.amazon.co.jp/dp/4839970920/
Terraform for Azure ドキュメント
- https://docs.microsoft.com/en-us/azure/developer/terraform/
- Terraform - Azure Provider : https://www.terraform.io/docs/providers/azurerm/index.html
- Terraform - Azure Provider - GitHub Repos
- Terraform - Azure Provider - GitHub Repos - Examples