7セグLEDドライバICのMAX7219を手に入れたので、Arduinoから試してみました。いままで7セグLEDをArduinoから直接さわっていましたが、ドライバICがあると本当に楽チンですね。ビックリしました。
MAX7219の特徴
7セグLEDドライバとしてのMAX7219の特徴は次のようなものです(8x8ドットマトリクスLEDドライバとして使う方がメジャーかもしれませんが、それは別記事で紹介します)。
- IC1個で、カソードコモンの7セグLEDを最大8桁までドライブできる
- IC側でLEDのダイナミック点灯をしてくれる
- マイコン側でタイマー割り込みなどを考えなくて済む
- 動作電圧5V(Min 4V/Max 6V)
- スキャンレート800Hz
- VCC/GNDを除けばデジタル出力ピン3本で駆動できる
- 複数のMAX7219をカスケード接続できる
- ピン数が節約できる
- 電流制限抵抗を8個用意しなくても済む
- 代わりにセグメント最大電流を伝えるための抵抗RSET
(10-50kΩ程度)が1個必要
- 代わりにセグメント最大電流を伝えるための抵抗RSET
- 16段階で輝度調整ができる
- IC側でデューティ比を変更する
Arduinoだけだと面倒なこと(タイマー割り込みでダイナミック点灯を実現したり、PWMで輝度調整をしたり)をICに任せられるのは嬉しいですね。
このMAX7219は国内で買うとボチボチの値段になりますが、eBayなどで買えば1個あたり50-100円ほどで入手できます。
MAX7219利用キット
ちなみに筆者はMAX7219が表面実装されている8桁7セグLEDキットを購入しました。eBayで2個セット400円でした。
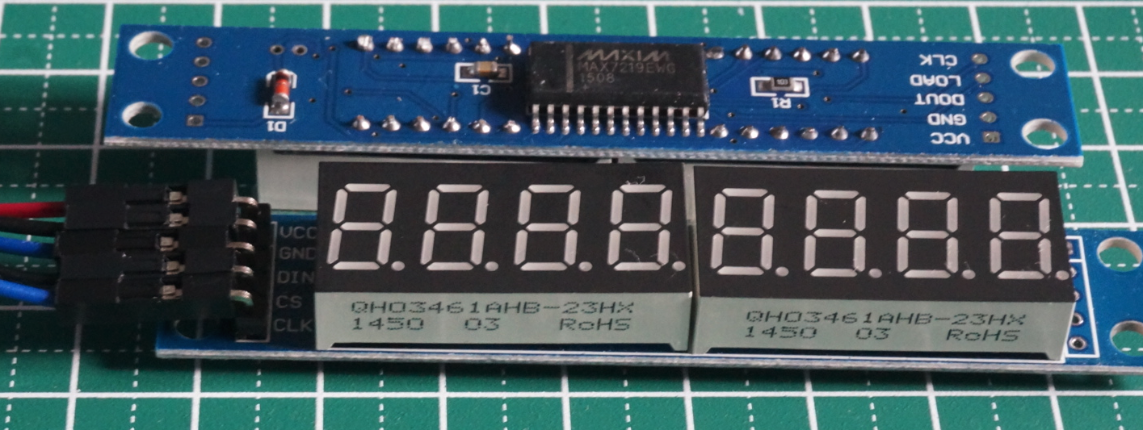
このキットにはRSETの10kΩ抵抗が最初から実装されています。つまり、セグメント電流は約40mAで固定です。
ArduinoのMAX7219ライブラリ
ArduinoのMAX7219/MAX7221用のライブラリとしてメジャーなものにLedControlがあります。
古くからあるライブラリなのですが、さいきん作者の人がGitHubで活動を再開したようですね。
実装例
LedControlのexamplesにあったものをベースに、目に付いたメソッドを試してみた程度です。
//We always have to include the library
# include "LedControl.h"

/*
 Now we need a LedControl to work with.
 ***** These pin numbers will probably not work with your hardware *****
 pin 12 is connected to the DataIn
 pin 11 is connected to the CLK
 pin 10 is connected to LOAD
 We have only a single MAX72XX.
 */
LedControl lc=LedControl(12,11,10,1);

/* we always wait a bit between updates of the display */
unsigned long delaytime=250;

void setup() {
  /*
   The MAX72XX is in power-saving mode on startup,
   we have to do a wakeup call
   */
  lc.shutdown(0,false);
  /* Set the brightness to a medium values */
  lc.setIntensity(0,8);
  /* and clear the display */
  lc.clearDisplay(0);
}


/*
 This method will display the characters for the
 word "Arduino" one after the other on digit 0.
 */
void writeArduinoOn7Segment() {
  lc.setChar(0,6,'a',false);
  delay(delaytime);
  lc.setRow(0,5,0x05);
  delay(delaytime);
  lc.setChar(0,4,'d',false);
  delay(delaytime);
  lc.setRow(0,3,0x1c);
  delay(delaytime);
  lc.setRow(0,2,B00010000);
  delay(delaytime);
  lc.setChar(0,1,'n',false);
  delay(delaytime);
  lc.setChar(0,0,'o',false);
  delay(delaytime);
  for (int i = 15; i >= 0; --i) {
    lc.shutdown(0, true);
    delay(delaytime);
    lc.setIntensity(0, i);
    lc.shutdown(0, false);
    delay(delaytime);
  }
  lc.clearDisplay(0);
  lc.setIntensity(0, 8);
  delay(delaytime);
}

/*
  This method will scroll all the hexa-decimal
 numbers and letters on the display. You will need at least
 four 7-Segment digits. otherwise it won't really look that good.
 */
void scrollDigits() {
  for(int i=0;i<9;i++) {
    lc.setDigit(0,7,i,false);
    lc.setDigit(0,6,i+1,false);
    lc.setDigit(0,5,i+2,false);
    lc.setDigit(0,4,i+3,false);
    lc.setDigit(0,3,i+4,false);
    lc.setDigit(0,2,i+5,false);
    lc.setDigit(0,1,i+6,false);
    lc.setDigit(0,0,i+7,false);
    delay(delaytime);
  }
  lc.clearDisplay(0);
  delay(delaytime);
}

void loop() {
  writeArduinoOn7Segment();
  scrollDigits();
}
ライブラリもそれほど大きいものではありません。不満点は次の点くらいです。
-
LedControl::setChar()の対応文字が少なすぎる。-
'u'などは出せてもいい気がする。
-
- 数値表示用のメソッドが1桁表示に対応する
LedControl::setDigit()しか用意されていない。- 大きな整数や浮動小数点数を表示したい場合は自前実装する必要がある。