DS18B20(デジタル温度センサー)を買ったのでArduinoで動かしてみました。これは1-Wireインターフェースで接続する電子部品です。
- DS18B20 公式データシート (PDF)
- その和訳
準備
まず、下記2つのライブラリをインストールします。
前者はTeensy(Arduinoと互換性の高い独自の開発ボード)を開発しているPJRC社でメンテしているようなので、1-Wireを扱うなら鉄板のライブラリと言えそうです。後者はDS18B20専用のライブラリのようで、前者のライブラリに依存しています。かなり活発にメンテされているようですから、選択肢としては悪くなさそうです。
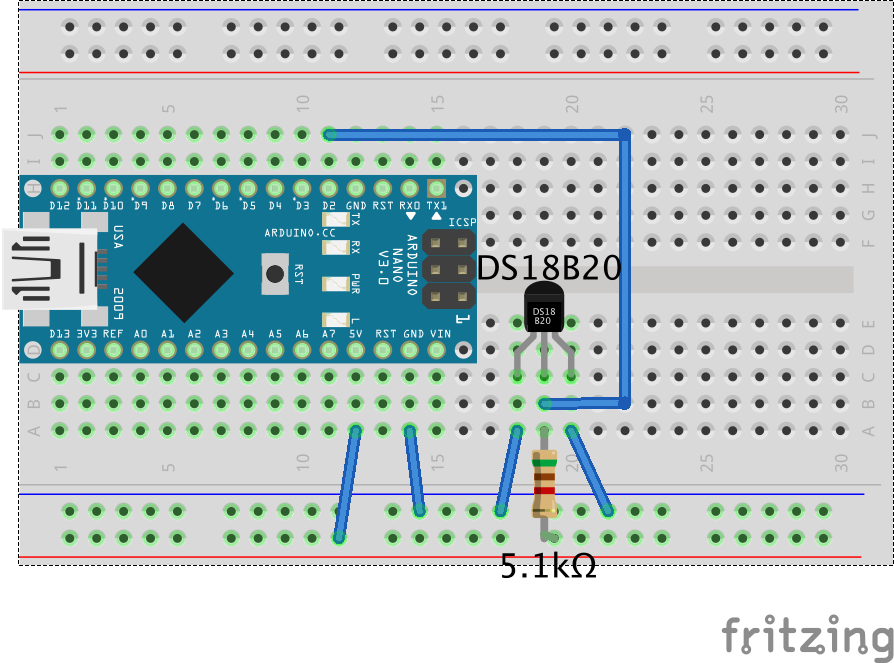
配線
Arduino側は2番ピンとVCC、GNDだけしか使いません。
データシートの図ではDS18B20のDQピンを4.7kΩ抵抗でプルアップしているのですが、手元になかったので5.1kΩを使いました。また、「パラサイトパワー」モードを試したかったので、DS18B20のGNDピンVDDピンともにGNDに接続しています。
動作確認
milesburton/Arduino-Temperature-Control-Libraryのexamples/Simple/Simple.pdeを試しました。
# include <OneWire.h>
# include <DallasTemperature.h>

// Data wire is plugged into port 2 on the Arduino
# define ONE_WIRE_BUS 2

// Setup a oneWire instance to communicate with any OneWire devices (not just Maxim/Dallas temperature ICs)
OneWire oneWire(ONE_WIRE_BUS);

// Pass our oneWire reference to Dallas Temperature.
DallasTemperature sensors(&oneWire);

void setup(void)
{
  // start serial port
  Serial.begin(9600);
  Serial.println("Dallas Temperature IC Control Library Demo");

  // Start up the library
  sensors.begin();
}

void loop(void)
{
  // call sensors.requestTemperatures() to issue a global temperature
  // request to all devices on the bus
  Serial.print("Requesting temperatures...");
  sensors.requestTemperatures(); // Send the command to get temperatures
  Serial.println("DONE");

  Serial.print("Temperature for the device 1 (index 0) is: ");
  Serial.println(sensors.getTempCByIndex(0));

  delay(500);
}
これでシリアルコンソールに温度が延々表示されます。
Requesting temperatures...DONE
Temperature for the device 1 (index 0) is: 29.50
Requesting temperatures...DONE
Temperature for the device 1 (index 0) is: 29.50
Requesting temperatures...DONE
Temperature for the device 1 (index 0) is: 30.00
Requesting temperatures...DONE
Temperature for the device 1 (index 0) is: 30.00
複数個のDS18B20をバス接続する
次に、別のDS18B20を並列に接続してみましょう。

この状態で、sensors.getTempCByIndex(1)とすれば2個目のDS18B20の値が取り出せます。
複数個のDS18B20を識別する
ところで、上のやりかたでは2つのセンサーのうちどちらが0番でどちらが1番なのかわかりません。区別できるならしたいですよね。
実は、DS18B20にはそれぞれ個別の「アドレス」が割り振られています。これがわかれば、特定のDS18B20の値を取ることが可能になります。
# include <OneWire.h>
# include <DallasTemperature.h>

# define ONE_WIRE_BUS 2

OneWire oneWire(ONE_WIRE_BUS);
DallasTemperature sensors(&oneWire);
DeviceAddress temp0 = { 0x28, 0xFF, 0xE0, 0x2E, 0x61, 0x15, 0x03, 0x08 };
DeviceAddress temp1 = { 0x28, 0xFF, 0x70, 0x13, 0x61, 0x15, 0x03, 0x6a };

void setup(void)
{
  Serial.begin(9600);
  sensors.begin();
}

void loop(void)
{
  sensors.requestTemperatures();

  Serial.println(sensors.getTempC(temp0));
  Serial.println(sensors.getTempC(temp1));

  delay(500);
}
このアドレスを利用するには、実際のデバイスに対してDallasTemperature::getAddress()メソッドで取得した値をメモっておく必要があります。
精度を上げる
DS18B20のデフォルトでは0.5℃刻みで温度が取れますが、DallasTemperature::setResolution()メソッドの指定により0.25℃、0.125℃、0.0625℃刻みの温度も取ることができます。
試しに、センサー5個の温度を0.0625℃刻みで表示してみました。
Requesting temperatures...DONE
Temperature for the device 0 is: 29.62
Temperature for the device 1 is: 29.81
Temperature for the device 2 is: 29.87
Temperature for the device 3 is: 29.50
Temperature for the device 4 is: 29.62
Requesting temperatures...DONE
Temperature for the device 0 is: 29.62
Temperature for the device 1 is: 29.81
Temperature for the device 2 is: 29.87
Temperature for the device 3 is: 29.50
Temperature for the device 4 is: 29.62
Requesting temperatures...DONE
Temperature for the device 0 is: 29.56
Temperature for the device 1 is: 29.81
Temperature for the device 2 is: 29.87
Temperature for the device 3 is: 29.50
Temperature for the device 4 is: 29.56
思ったより値が固まっていますし、測定ごとのブレもほとんどありません。
データシート上は±0.5℃の誤差があるので精度を上げても意味がないと思っていましたが、予想以上に正確な値が取れているのかもしれません。