はじめに
先日Python 初学者のための Ibis 100 本ノックが公開された。「いいね」や「ストック」も200を超える勢いであり、影響度の高い著者の投稿により ibis の存在が広まったであろうことを嬉しく感じる。
この記事の目的
さて、この記事では、100 本ノック で触れられていない内容や、私の個人的に気になる点をいくつか挙げ、ここを読む方のibisへのさらなる理解を深めてもらいたいと考える。なお、以下のコードの実行には100本ノックのnotebook上のコードの変数等を使うため、それらを読み込んでおく必要がある。または100本ノックのcolab上のセルで実行すると良い。
Prerequisite
厳密にはこの記事の実行環境は100本ノックと同一ではない。100本ノックのcolab環境はpandas==1.5.3と古いが、ibisでの操作にはほぼ影響ないと考える。
python -V
# Python 3.11.6

pip install "pandas==2.1.4"
pip install "duckdb==0.9.2"
pip install "polars==0.20.3"
pip install "ibis-framework[duckdb,pandas,polars]==7.2.0"
import pandas as pd
import polars as pl
import ibis
import ibis.selectors as s
from ibis import _
UnderscoreによるChain Expression
ibis は chain method で処理を繋げていく書き方が好ましいと個人的に感じている。ibisでは underscore _ を使うことにより文脈に応じて前の情報を参照できる。pandas では lambda式で書く必要があった部分に対応する。詳細は公式ドキュメントを参照するとよい。なお interactive console 上で最後の実行結果の取得 _ を使う人は importせずにibis._ と記述するようにすればよい。
from ibis import _
1. 直前のTableオブジェクトを参照するケース
下の例では filter の例だが、 mutate, join系 などでも当然使える。
100本ノック[25]
# before
t.filter(t["age"] >= 30)
t[t["age"] >= 30]

# after
t.filter(_.age >= 30)
t[_.age > 30.0]
なお、[25]の 参考のpandas記法について、変数参照を避ける書き方もある。(私はafterの書き方にしている)
# before
df[df['age'] >= 30]

# after
df[lambda _df: _df["age"] >= 30]
2. Column selectorsにて各列を参照するケース
across(...) 内部で使う。(それ以外は今の所ない?)。acrossの第一引数に指定した column を参照することになる。
100本ノック[37]
# before
t.mutate(
    s.across(["age", "fare"], {"zscore": lambda x: ((x - x.mean()) / x.std()) * 10 + 50})
)

# after
t.mutate(
    s.across(["age", "fare"], {"zscore": ((_ - _.mean()) / _.std()) * 10 + 50})
)
across を使おう
列に対して任意の処理を実行する場合、Rのdplyrユーザーには馴染みのあるacrossが便利だ。その際には前述の underscore表記を使うとより記述がシンプルになる。
100本ノック[12]
# before
t2.mutate(
    **{col: t2[col].cast('string') for col in t2.columns}
)
# after
t2.select(s.across(s.all(), _.cast("string")))

# lambda式も使える。が、記述が長くなるので underscore が好ましいと考える
t2.select(s.across(s.all(), lambda col: col.cast("string")))
100本ノック[50]
こちらもすっきり
# before
t.aggregate(
    t[col].isnull().sum().name(col) for col in t.columns
)

# after
t.aggregate(
    s.across(s.all(), _.isnull().sum())
)
100本ノック[71]
カラム名はbefore afterで同一とならないことに注意する。 across(names=...) を使うことにより {col} と {fn} を指定することができる
# before
t2.aggregate(
    t2[col].sum() for col in ["English","Mathematics","History"]
)

# after
t2.agg(
    s.across(["English","Mathematics","History"], _.sum())
)

## カラム名を同一にする場合
t2.agg(
    s.across(["English","Mathematics","History"], {"Sum": _.sum()}, names="{fn}({col})")
)
100本ノック[73]
だいぶスッキリする。
# before
t2 = initialize2() # 初期化
t2 = t2.drop('name')
t2.group_by('class').aggregate(
    english_max=t2["English"].max(),
    mathematics_max=t2["Mathematics"].max(),
    history_max=t2["History"].max(),
    english_min=t2["English"].min(),
    matehmatics_min=t2["Mathematics"].min(),
    history_min=t2["History"].min(),
    english_mean=t2["English"].mean(),
    matehmatics_mean=t2["Mathematics"].mean(),
    history_mean=t2["History"].mean()
)

# after
t2 = initialize2()
(
    t2
    .group_by("class")
    .agg(
        s.across(
            s.numeric(),
            {"max": _.max(), "min": _.min(), "mean": _.mean()},
            names="{col}_{fn}",
        )
    )
    .drop(s.matches("class_.*"))
)
ちなみにpandas記法はaggでNamedTupleを使う方法もおすすめ。(multi-column は滅びるべきという信念)ibisの書き方にちょっと近くなる。詳しくはpandas公式ドキュメントを参照するとよい。
# [参考] pandas記法

## before
t2 = initialize2() # 初期化
df2 = t2.execute()
df2.drop(['name'],axis=1, inplace=True)
pd.concat([df2.groupby('class').mean().add_suffix('_mean'),
           df2.groupby('class').mean().add_suffix('_max'),
           df2.groupby('class').mean().add_suffix('_min')],
          axis=1
         )

## after
t2 = initialize2() # 初期化
df2 = t2.execute()
(
    df2
    .groupby("class", as_index=False)
    .agg(
        english_max=("English", "max"),
        mathematics_max=("Mathematics", "max"),
        history_max=("History", "max"),
        english_min=("English", "min"),
        mathematics_min=("Mathematics", "min"),
        history_min=("History", "min"),
        english_mean=("English", "mean"),
        mathematics_mean=("Mathematics", "mean"),
        history_mean=("History", "mean"),
    )
)

## afterその2
t2 = initialize2() # 初期化
df2 = t2.execute()
(
    df2
    .groupby("class", as_index=False)
    .agg(
        **{
            col.lower() + "_" + fn: (col, fn)
            for fn in ["max", "min", "mean"]
            for col in ["English", "Mathematics", "History"]
        }
    )
)
その他
100本ノック[23]
実は selectorに Slisableというクラスがあり s.r を使うことで可能。
# before
t[t.columns[2:10]]

# after
t[s.r['name':'cabin']]
100本ノック[38]
pandas (polarsも) backend には window function の row_number() が存在しない。
この場合backendを duckdb としてpandas連番index処理を行うと簡単である。(これがibisの柔軟さとも言える)
ibis.ifelse(...) のトップレベル関数を使うと良い。
なお、 ibis.row_number() は SQL と異なり 0 starting であることに注意する。
# before
t = ibis.memtable(t.execute().reset_index()) # index 列の作成
t = t.mutate(
    age=(t['index'] == 3).ifelse(40, t["age"])
)
t.head()

# after

ibis.set_backend("duckdb")
(
    t
    .mutate(age=ibis.ifelse(ibis.row_number() == 3, 40, _.age))
    .head()
)
もしくは case(...).when(...).else_(...).end() を使う。
ibis.set_backend("duckdb")
(
    t.mutate(
        age=ibis.case()
            .when(ibis.row_number() == 3, 40)
            .else_(_.age)
            .end()
    ).head()
)
一時的にindex列を作成する場合は次のような書き方となるが、非効率なためメリットは少ない。
# after
ibis.set_backend("duckdb")
(
    t
    .mutate(
        index=ibis.row_number()
    )
    .mutate(
        age=(_.index == 3).ifelse(40, _.age),
    )
    .head()
)
(2024-01-17 追記)なお、mutateで定義した変数を同一mutate内で参照することはできない。したがって、次のような記述はエラーになる
# エラーで実行できない
ibis.set_backend("duckdb")
(
    t
    .mutate(
        index=ibis.row_number(),
        age=(_.index == 3).ifelse(40, _.age),
    )
    .head()
)
一方で次のような書き方は可能
ibis.set_backend("duckdb")
(
    t
    .mutate(
        age=(ibis.row_number() == 3).ifelse(40, t.age),
        # _.age はなぜかエラー
        # そのエラーは ibis 8.0.0 以前のバグだったことが判明
        # https://github.com/ibis-project/ibis/issues/8300
    )
    .head()
)
100本ノック[42]
ノック[43]ではそうしているように、数値や文字列の場合はibis.literalを使う必要性はない。
100本ノック[48]~
relabel は deprecated のため rename を使う
100本ノック[62]
join は inner 以外で *_right というkeyで選択した列が残るので、不要ならば .drop(s.matches(".*_right") の実行が必要。Pandasと挙動が異なるので注意する。
100本ノック[70]
行方向の合計は次の書き方でできなくもない。別途importが必要なので、ここまでする必要はなさそうだが。
t2 = t2.drop("class")
t2 = t2.mutate(
    row_sum=sum([t2[col] for col in t2.select(s.numeric()).columns])
)

# after
from functools import reduce
from operator import add

(
    t2
    .drop("class")
    .mutate(
        row_sum=reduce(add, s.across(s.numeric(), _).expand(t2))
        # ここは .expand(_) と書けない(バグ?)
    )
)
おそらくミス
100本ノック[24]
to_csv() などのファイルフォーマット書き出しメソッドは存在する。もちろんbackend依存。
t_copy.to_csv('./output/sample2.csv')
その他留意点
Window関数について
100本ノックには存在していないが、window関数は次の2通りの記述方法がある。記述量が多くなるが、後者の方法2のほうがSQL指向の脳には window_fn() over(partition by ... order by ...) に対応するのでわかりやすい。個人的に from ibis import window as _w として使っている。
import pandas as pd
# ibis.set_backend("pandas") # pandas でも動く
t0 = ibis.memtable(
    pd.DataFrame({
        "a": ["x", "x", "y", "x", "y"],
        "t": [2, 1, 2, 3, 1],
        "b": [5, 12, 13, 9, 100]
    })
)
display(t0)

# 方法1
t0.group_by("a").order_by("t").mutate(l=_.b.lag()).pipe(display)
# 方法2
t0.mutate(l=_.b.lag().over(ibis.window(group_by="a", order_by="t"))).pipe(display)

from ibis import window as _w
t0.mutate(l=_.b.lag().over(_w(group_by="a", order_by="t"))).pipe(display)
┏━━━━━━━━┳━━━━━━━┳━━━━━━━┓
┃ a      ┃ t     ┃ b     ┃
┡━━━━━━━━╇━━━━━━━╇━━━━━━━┩
│ string │ int64 │ int64 │
├────────┼───────┼───────┤
│ x      │     2 │     5 │
│ x      │     1 │    12 │
│ y      │     2 │    13 │
│ x      │     3 │     9 │
│ y      │     1 │   100 │
└────────┴───────┴───────┘
┏━━━━━━━━┳━━━━━━━┳━━━━━━━┳━━━━━━━┓
┃ a      ┃ t     ┃ b     ┃ l     ┃
┡━━━━━━━━╇━━━━━━━╇━━━━━━━╇━━━━━━━┩
│ string │ int64 │ int64 │ int64 │
├────────┼───────┼───────┼───────┤
│ x      │     2 │     5 │    12 │
│ x      │     1 │    12 │  NULL │
│ y      │     2 │    13 │   100 │
│ x      │     3 │     9 │     5 │
│ y      │     1 │   100 │  NULL │
└────────┴───────┴───────┴───────┘
SQL文での表現を確認できる。
ibis.to_sql(...) に table Expression を渡すと実行できる。dialect引数でSQLエンジンの指定も可能
ibis.set_backend("duckdb")
t0 = ibis.memtable(
    pd.DataFrame({
        "a": ["x", "x", "y", "x", "y"],
        "t": [2, 1, 2, 3, 1],
        "b": [5, 12, 13, 9, 100]
    })
)
t1 = t0.mutate(l=_.b.lag().over(ibis.window(group_by="a", order_by="t")))
ibis.to_sql(t1)
SELECT
  t0.a,
  t0.t,
  t0.b,
  LAG(t0.b, 1) OVER (PARTITION BY t0.a ORDER BY t0.t ASC ROWS BETWEEN UNBOUNDED PRECEDING AND UNBOUNDED FOLLOWING) AS l
FROM ibis_pandas_memtable_v2cqhmktajgjladl2nbupu2cba AS t0
.pipe() が使える。
上記で使っているように pandasではお馴染みの pipe(f, ...) が使える。.pipe(display) の記述の方が display(...) と入力するよりキーボードの行き来が少なくなることと削除のし易さについて便利に感じる。なお公式リファレンスを検索してもどこにも無いのが謎である。github codeにexampleがある。
pivot_longer, pivot_widerが使える
R tidyrユーザーにはお馴染みの pivot_longer, pivot_wider が使える。縦持ち横持ち変換をSQL文で書くと苦労するので積極的に使っていきたい。詳細はリンク先のexampleを。
mutateの引数の注意点
Polarsの場合、名前付き引数ではない時も任意数の引数で動くが、ibisは動かない。listにする必要がある。
t0 = ibis.memtable(
    pd.DataFrame({
        "a": ["x","x","y","x","y"],
        "t": [2,1,2,3,1],
        "b": [5, 12, 13, 9, 100]
    })
)

# リストでくくる
t0.mutate([
    (_.b * 10).name("b10"),
    (_.b / 2).name("b_half"),
])


# これはエラー
t0.mutate(
    (_.b * 10).name("b10"),
    (_.b / 2).name("b_half"),
)
TimestampInterval は注意が必要
時間の引き算はbackendの実装対応状況が異なるのでduckdbを使うのが安全。pandas, polars backend にてもっと簡単な方法があれば教えてください。
d0 = pd.DataFrame({
    "a": [1,2],
    "start": pd.to_datetime(["2023-01-23 10:00:00", "2023-04-01 09:00:00"]),
    "finish": pd.to_datetime(["2023-01-25 10:00:00", "2023-04-30 09:00:00"])})
i0 = ibis.memtable(d0)

ibis.set_backend("duckdb")

## 以下二つはエラー
# i0.mutate(diff=(_.finish - _.start).days)
# i0.mutate(diff=(_.finish - _.start).cast("int"))

# delta method の利用がシンプル
i0.mutate(diff=(_.finish.delta(_.start, "day")))
i0.mutate(diff=(_.finish.cast("date") - _.start.cast("date")).cast("int"))

# この書き方しかうまくいかない今のところ。
# pandas backend
# date -> int は ナノ秒(ns)
ibis.set_backend("pandas")
DAY_TO_NANO_SEC = 60 * 60 * 24 * 1e9
i0.mutate(diff=((_.finish.cast("date") - _.start.cast("date")).cast("int") // DAY_TO_NANO_SEC))

# polars backend
# date -> int はミリ秒(ms)
ibis.set_backend("polars")
DAY_TO_MILLI_SEC = 60 * 60 * 24 * 1e3
i0.mutate(diff=((_.finish.cast("date") - _.start.cast("date")).cast("int") // DAY_TO_MILLI_SEC))
余談: 変数の使い回しを避ける
これはibisというより jupyter の使い方だが、同じ変数名に代入を使い回すと、jupyter cellの実行順序により結果が変わってしまうことがあり、デバッグ等に過大な時間がかかることが多い。なので変数の使い回しを避ける。(100本ノックはセルごとにinitializeを実行しているので問題ない)
ibis で method chain 記法を使う場合は、一時変数の作成自体の機会が少なくなるため上記の問題も起こりにくくなるかもしれない。
最後に
duckdb以外のbackendは実装カバー率が必ずしも高くないので、プロダクション利用には十分気をつけること。特にInterval, Timestamp操作系が弱いので十分なチェックが必要である。
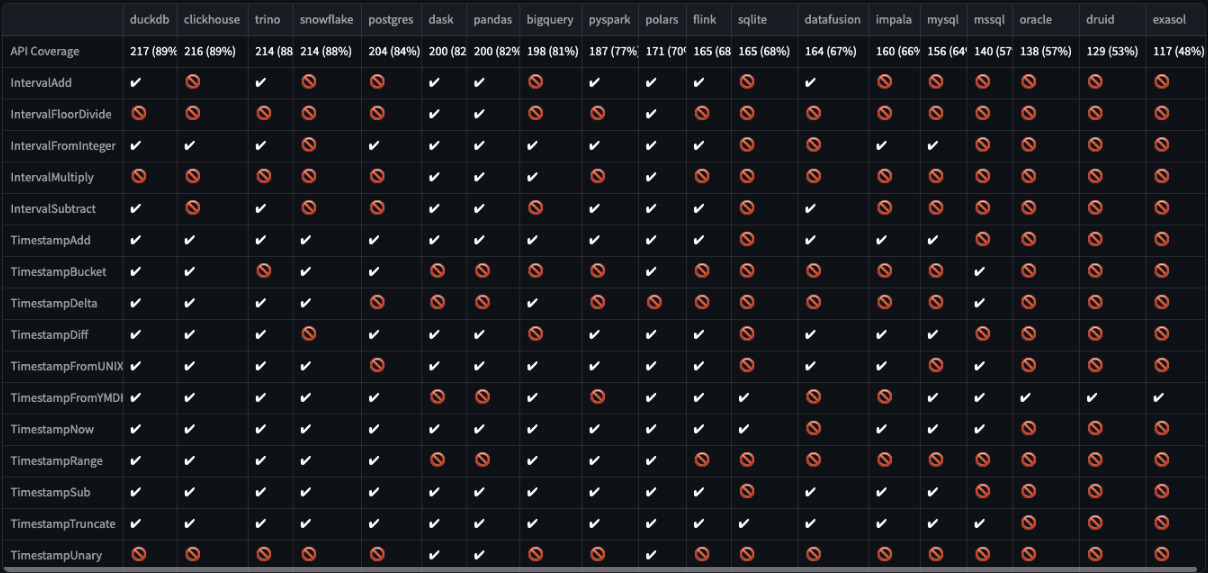
出所: support matrix の実行コードを一部改変し2024-10-13にローカルで実行したもの
なので私はEDAでのbackendはデフォルトバックエンドでありかつカバー率が最も高いduckdbとしている。
Apache License Version 2.0 のOSSなので、issue報告、pull request 作成なので貢献すると、きっと機能はより充実していくととなるでしょう。