はじめに
2022年3月に発表された画像アニメーション用のスプラインモーションモデルである「Thin-Plate Spline Motion Model for Image Animation」を紹介します。
顔写真から話す顔、人体、ピクセルアニメーションなどのアニメーション化を試してみましょう。
Google colabを使用して簡単に実装することができますので、ぜひ最後までご覧ください。
(詳細)
Thin-Plate Spline Motion Model forとは
Thin-Plate Spline Motion Model for Image Animationは2022年3月に発表された画像アニメーション用のスプラインモーションモデルです。
下記のように上段の入力画像と左端の動画を合成して出力します。
(引用:https://github.com/yoyo-nb/Thin-Plate-Spline-Motion-Model)
※↓動画の方がわかりやすいと思います
Thin-Plate Spline Motion Model for Image Animationは以下のように構成されています。
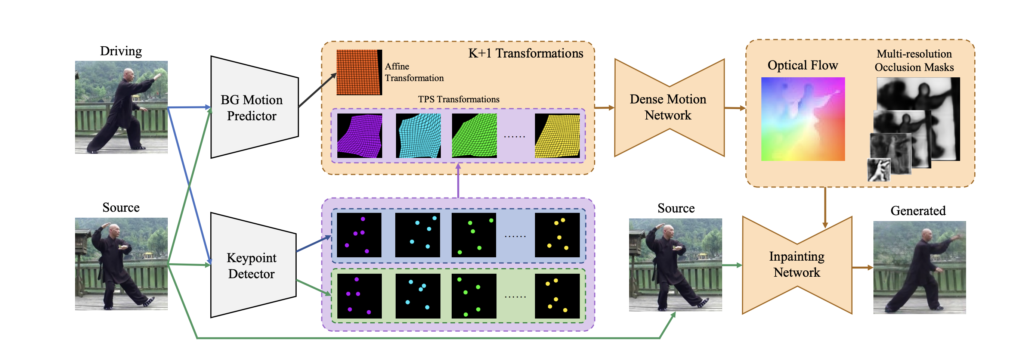
入力画像からドライブ画像への背景の動きを表すアフィン変換を予測する同時に、キーポイント検出器を用いてK組のキーポイントを推定し、各キーポイントがTPS変換を生成します。
デンスモーションネットワークは、K+1個の変換(K個のTPS変換と1個のアフィン変換)を組み合わせます。
さらにオプティカルフローと多重解像度オクルージョンマスクを推定するために、1つのアフィン変換を組み合わせます。
最後に、元画像を入力して、エンコーダで抽出した特徴マップをオプティカルフローでワープし、対応する解像度のオクルージョンマスクのオクルージョンマスクでマスクします。
生成された画像はInpainting Networkの最後のレイヤーで出力されます。
公式実装は以下のリンクからご確認いただけます。
論文: https://arxiv.org/abs/2203.14367
公式実装コード: https://github.com/yoyo-nb/Thin-Plate-Spline-Motion-Model
導入
以下、Google colab環境で進めていきます。
まずはGPUを使用できるように設定をします。
(「ランタイムのタイプを変更」→「ハードウェアアクセラレータ」をGPUに変更)
from google.colab import drive
drive.mount('/content/drive')
%cd ./drive/MyDrive
公式よりcloneしてきます。
!git clone https://github.com/yoyo-nb/Thin-Plate-Spline-Motion-Model
%cd Thin-Plate-Spline-Motion-Model
!pip install -r requirements.txt
以上で導入が完了しました。
サンプルデータでデモ
まずは学習済モデルをダウンロードしましょう。
「checkpoints」というフォルダを作成して、そこにモデルをダウンロードします。
!mkdir checkpoints
!wget -c https://cloud.tsinghua.edu.cn/f/da8d61d012014b12a9e4/?dl=1 -O checkpoints/vox.pth.tar
!wget -c https://cloud.tsinghua.edu.cn/f/483ef53650b14ac7ae70/?dl=1 -O checkpoints/ted.pth.tar
!wget -c https://cloud.tsinghua.edu.cn/f/9ec01fa4aaef423c8c02/?dl=1 -O checkpoints/taichi.pth.tar
!wget -c https://cloud.tsinghua.edu.cn/f/cd411b334a2e49cdb1e2/?dl=1 -O checkpoints/mgif.pth.tar
サンプル画像はすでに用意されていますので、チュートリアルに沿って進めていきます。
import torch

# edit the config
device = torch.device('cuda:0')
dataset_name = 'vox' # ['vox', 'taichi', 'ted', 'mgif']
source_image_path = './assets/source.png'
driving_video_path = './assets/driving.mp4'
output_video_path = './generated.mp4'
config_path = 'config/vox-256.yaml'
checkpoint_path = 'checkpoints/vox.pth.tar'
predict_mode = 'relative' # ['standard', 'relative', 'avd']
find_best_frame = False # when use the relative mode to animate a face, use 'find_best_frame=True' can get better quality result

pixel = 256 # for vox, taichi and mgif, the resolution is 256*256
if(dataset_name == 'ted'): # for ted, the resolution is 384*384
    pixel = 384

if find_best_frame:
  !pip install face_alignment
まずは入力画像と動画を確認してみましょう。
import imageio
import numpy as np
import matplotlib.pyplot as plt
import matplotlib.animation as animation
from skimage.transform import resize
from IPython.display import HTML
import warnings
import os

warnings.filterwarnings("ignore")

source_image = imageio.imread(source_image_path)
reader = imageio.get_reader(driving_video_path)

source_image = resize(source_image, (pixel, pixel))[..., :3]

fps = reader.get_meta_data()['fps']
driving_video = []
try:
    for im in reader:
        driving_video.append(im)
except RuntimeError:
    pass
reader.close()

driving_video = [resize(frame, (pixel, pixel))[..., :3] for frame in driving_video]

def display(source, driving, generated=None):
    fig = plt.figure(figsize=(8 + 4 * (generated is not None), 6))

    ims = []
    for i in range(len(driving)):
        cols = [source]
        cols.append(driving[i])
        if generated is not None:
            cols.append(generated[i])
        im = plt.imshow(np.concatenate(cols, axis=1), animated=True)
        plt.axis('off')
        ims.append([im])

    ani = animation.ArtistAnimation(fig, ims, interval=50, repeat_delay=1000)
    plt.close()
    return ani


HTML(display(source_image, driving_video).to_html5_video())
入力画像に対して処理を実行しましょう。
from demo import load_checkpoints
inpainting, kp_detector, dense_motion_network, avd_network = load_checkpoints(config_path = config_path, checkpoint_path = checkpoint_path, device = device)
from demo import make_animation
from skimage import img_as_ubyte

if predict_mode=='relative' and find_best_frame:
    from demo import find_best_frame as _find
    i = _find(source_image, driving_video, device.type=='cpu')
    print ("Best frame: " + str(i))
    driving_forward = driving_video[i:]
    driving_backward = driving_video[:(i+1)][::-1]
    predictions_forward = make_animation(source_image, driving_forward, inpainting, kp_detector, dense_motion_network, avd_network, device = device, mode = predict_mode)
    predictions_backward = make_animation(source_image, driving_backward, inpainting, kp_detector, dense_motion_network, avd_network, device = device, mode = predict_mode)
    predictions = predictions_backward[::-1] + predictions_forward[1:]
else:
    predictions = make_animation(source_image, driving_video, inpainting, kp_detector, dense_motion_network, avd_network, device = device, mode = predict_mode)

#save resulting video
imageio.mimsave(output_video_path, [img_as_ubyte(frame) for frame in predictions], fps=fps)

HTML(display(source_image, driving_video, predictions).to_html5_video())
結果が出力されました。
詳細は以下の動画をご覧下さい。
まとめ
最後までご覧いただきありがとうございました。
今回は画像アニメーション用のスプラインモーションモデルである「Thin-Plate Spline Motion Model for Image Animation」を紹介しました。
顔合成の技術はさまざまなシーンで活用できそうですね。