備忘録のために投稿。
前提知識が乏しい中で試行錯誤しながら書いた記事なので一部間違った表現や解釈があるかもしれません。
前知識
OSM (OpenStreetMap)
誰でも自由に地図を使えるように、みんなでオープンデータの地理情報を作るプロジェクト。誰でも自由に参加し、地図を編集し、利用することができる
PostGIS
PostgreSQLデータベースに対して空間地図を扱うための拡張
QGIS
地理情報を閲覧、編集、分析を行うことができるGIS(Geographic Information System)ソフトウエア
OSMデータを取得する
OSMデータは以下のサイトから日本全体、または各地方毎にOSMデータをダウンロードすることができる
今回は、関西データを利用してみた。
「 Kansai region (a.k.a. Kinki region) 」
ダウンロードは複数選択肢があるが
-
osm.pbf,osm.bz2はいわゆる osm データ であり圧縮形式の違いと思われる。 -
shp.zipは shape データ
であり、shapeデータをダウンロードしてQGISでそのまま可視化すれば目的はタイトルの目的は達することができるが、今回は OSM データにふれ合ってみたいという目的なので kansai-latest.osm.pbf (189MB (2020.12現在))をダウンロードする
さらに限定した地域のOSMデータを取得する場合
この先は、上記の関西データのOSMを利用する前提で記事は続くが、正直、非力なPCの場合、さまざまな処理で時間を要する。特に最後のQGISを利用した可視化の際にはデータ量が多すぎて操作にストレスに感じることがあると思う。
もっと小さなサイズ(地域を限定した)のOSMを扱えばこの問題は解消する。その方法も記載しておく。前知識のOSMで記載したサイトを開き、上部メニューの「エクスポート」を選択することでエリアを限定したosmを取得できる
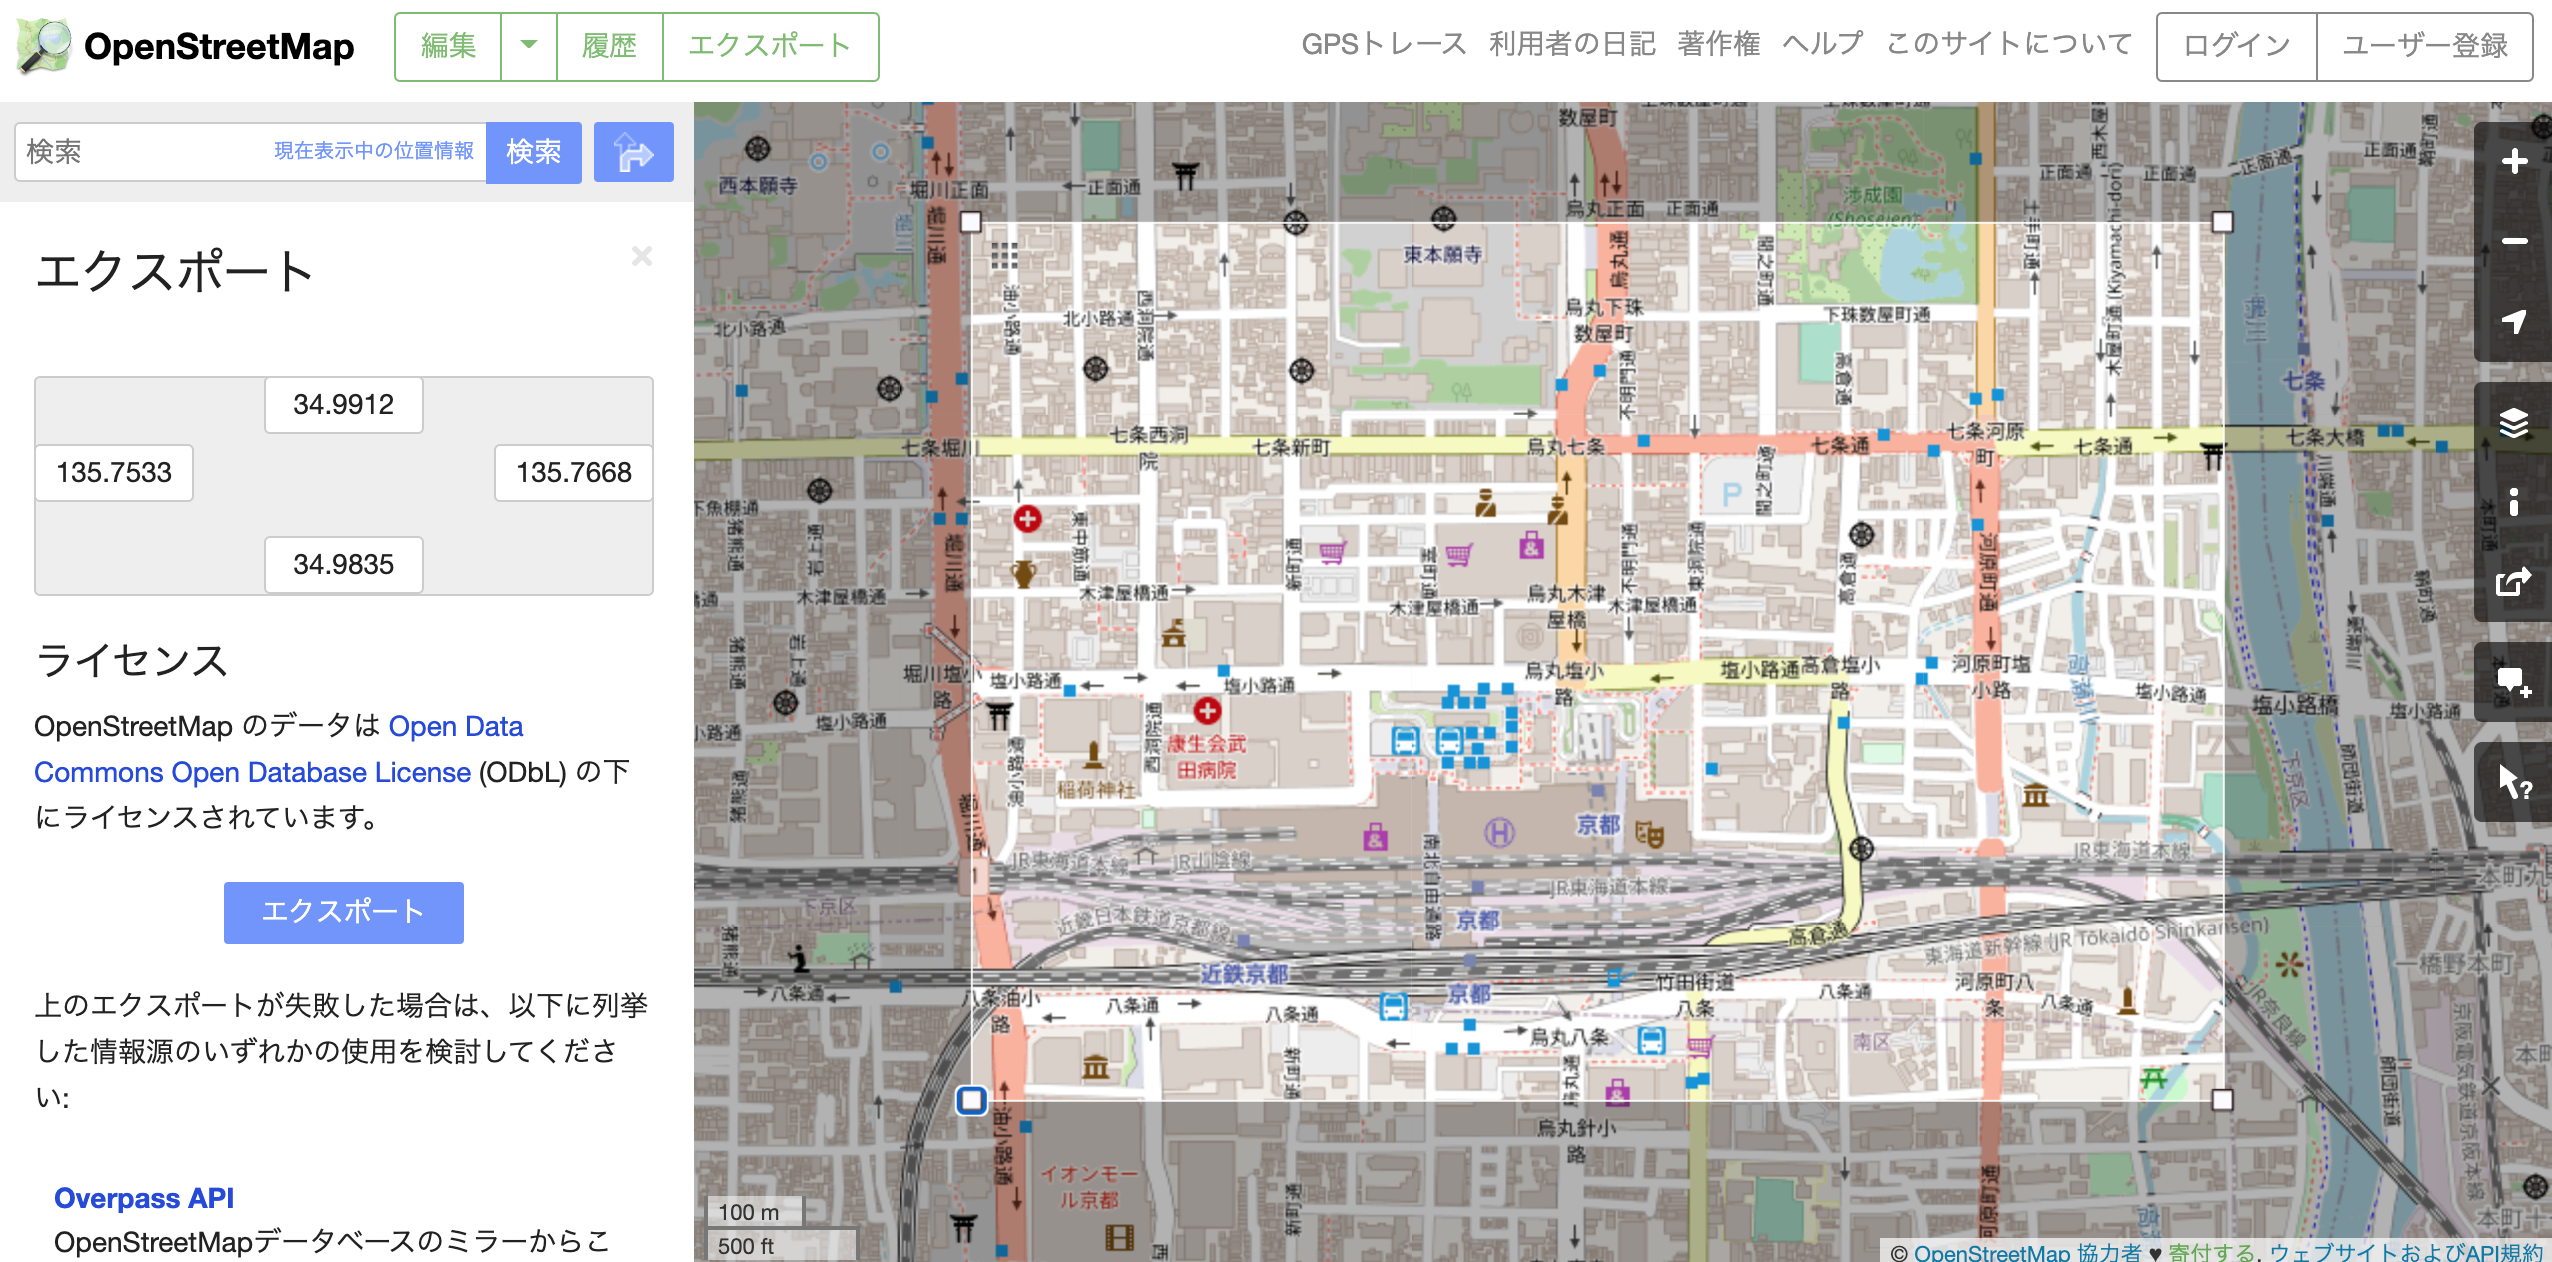
ただし、少しでも広いエリアを選択すると You requested too many nodes (limit is 50000). Either request a smaller area, or use planet.osm とエラーになるので
都心部では現実的に徒歩数分範囲内ぐらいしか実質選択ができない。
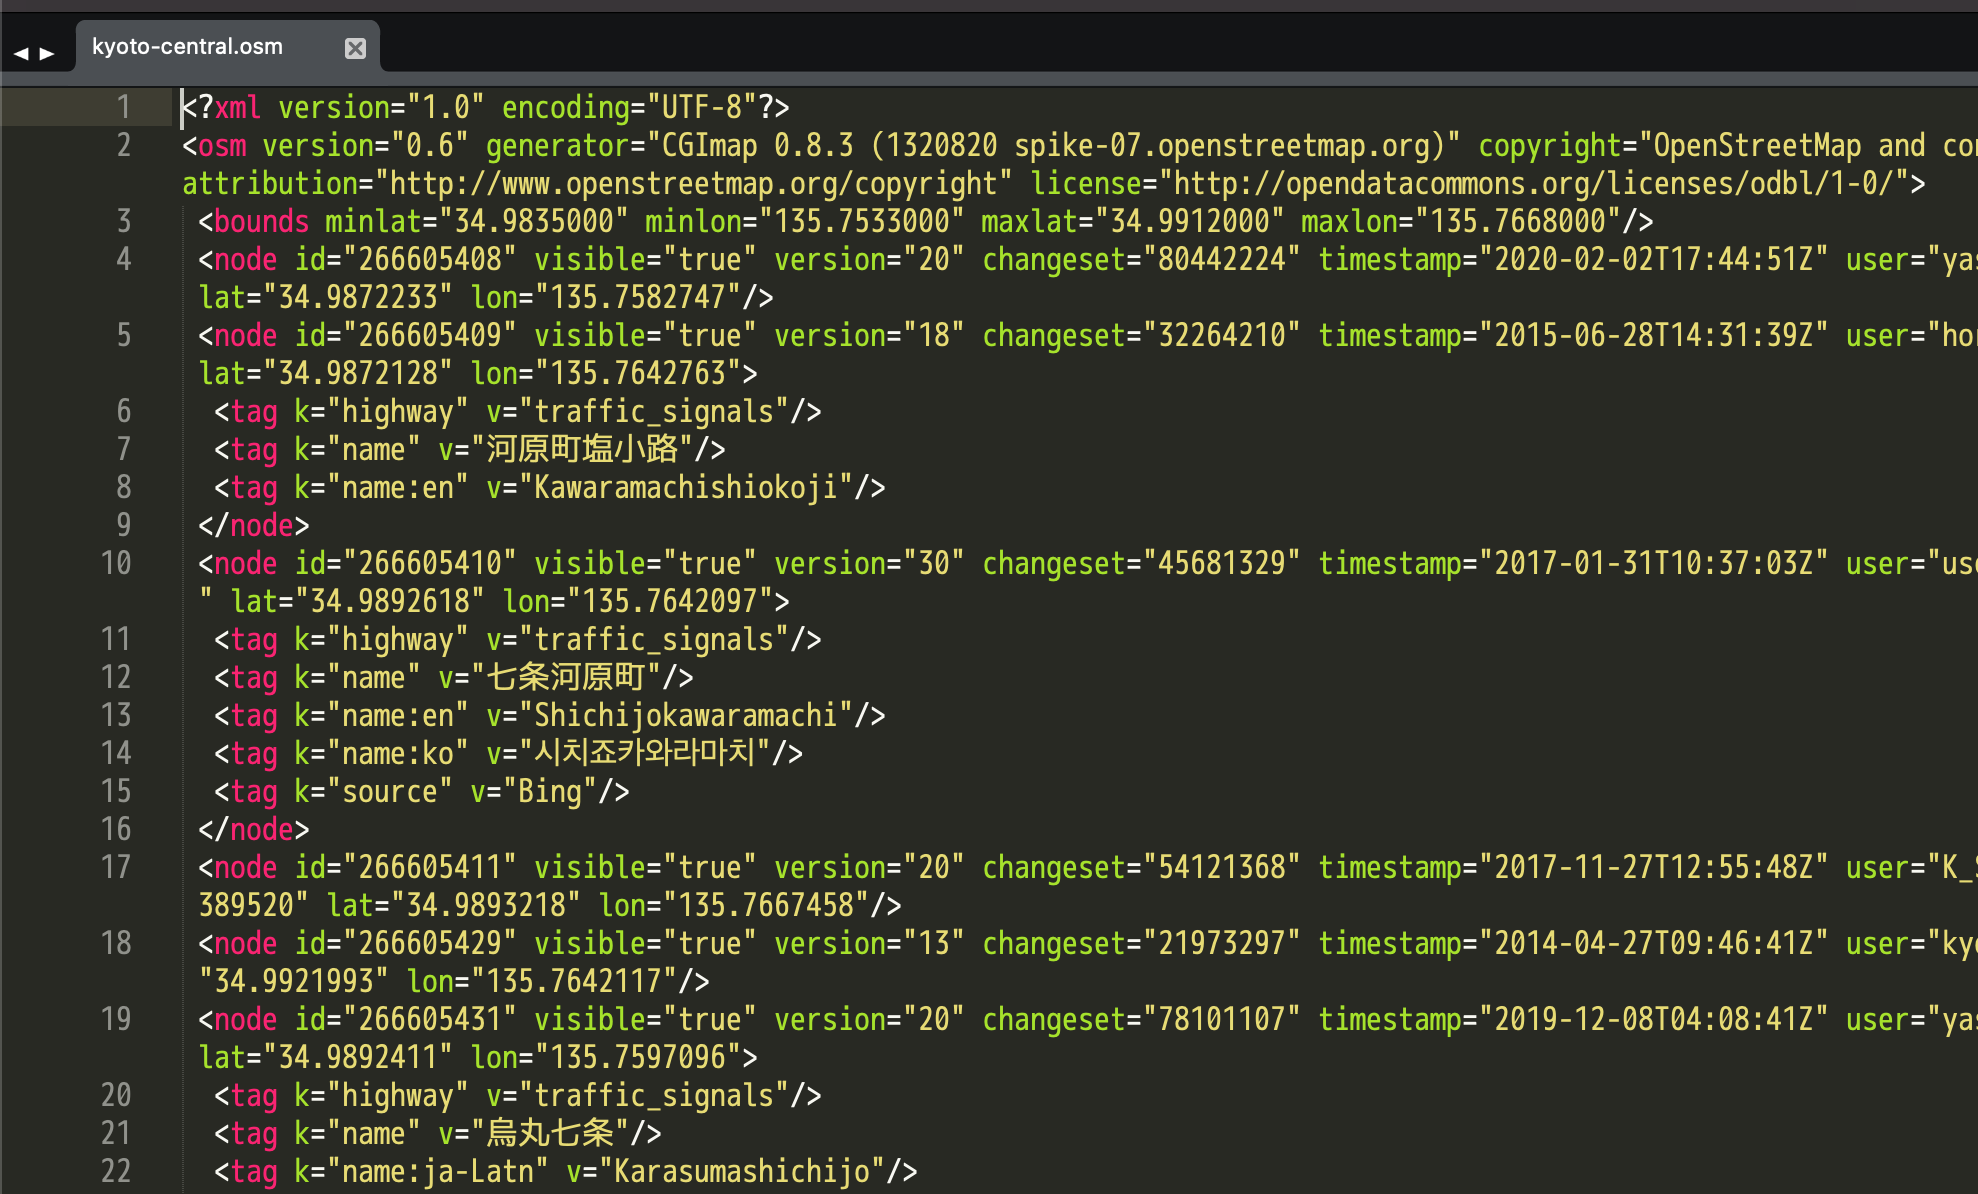
上は京都駅北側のエリアを選択したがこのぐらいで上限を超えるギリギリの範囲内です。これでダウンロードしたosmファイルは非圧縮7MB。 非圧縮なので中身を確認することができる。中身はXMLデータであることがわかる。
PostGISの準備
今回、PostGISのサーバはDocker内で構築する。Dockerの基本を知りたい方は以前に書いた記事が参考になると思う。
PostGISは DockerHub にすでに準備されているのでこれを利用する
$ cd (適当なローカル作業ディレクトリ)

# PostGISデータのローカル保存用
$ mkdir postgis_data

# Docker起動. Postgresqlデータディレクトリはローカルにマウント. Portマッピングも. パスワードは設定しないと起動が失敗するので適当にセットしとく
$ docker run -v `pwd`/postgis_data:/var/lib/postgresql/data -p 5432:5432 -e POSTGRES_PASSWORD=password -d postgis/postgis

# 起動確認
$ docker ps
CONTAINER ID   IMAGE             COMMAND                  CREATED          STATUS          PORTS                    NAMES
07588ca07dd0   postgis/postgis   "docker-entrypoint.s…"   24 seconds ago   Up 23 seconds   0.0.0.0:5432->5432/tcp   objective_golick

# Postgresqlデータがローカルに保存されている
$ ls postgis_data/
PG_VERSION		pg_multixact		pg_tblspc
base			pg_notify		pg_twophase
global			pg_replslot		pg_wal
pg_commit_ts		pg_serial		pg_xact
pg_dynshmem		pg_snapshots		postgresql.auto.conf
pg_hba.conf		pg_stat			postgresql.conf
pg_ident.conf		pg_stat_tmp		postmaster.opts
pg_logical		pg_subtrans		postmaster.pid

# コンテナ内に侵入
$ docker exec -it 07588ca07dd0 /bin/bash
root@07588ca07dd0:/#

# PostGIS接続
root@07588ca07dd0:/# psql -U postgres
psql (12.5 (Debian 12.5-1.pgdg100+1))
Type "help" for help.
postgres=#

# 動作確認
postgres=# select VERSION();
                                                     version

-----------------------------------------------------------------------------------------------
-------------------
 PostgreSQL 12.5 (Debian 12.5-1.pgdg100+1) on x86_64-pc-linux-gnu, compiled by gcc (Debian 8.3.
0-6) 8.3.0, 64-bit
(1 row)

# Postgresql切断
postgres=# \q
# Docker離脱 (ローカル復帰)
root@07588ca07dd0:/# exit
$
PostGISにOSMデータをインポート
osm2pgsqlの準備
インポートには osm2pgsql というソフトウエアを利用する
- https://github.com/openstreetmap/osm2pgsql
- https://learnosm.org/ja/ (osm2pgsqlだけでなくOSM全般についてわかりやすい説明がされているので参考になった)
先に準備したPostGISのDockerはDebianベースであり、apt コマンドでインストール可能なのでPostGISコンテナ内にインストールして利用する
# コンテナ内に侵入
$ docker exec -it 07588ca07dd0 /bin/bash

# 以下で簡単に導入することができる
$ root@07588ca07dd0:/# apt update
$ root@07588ca07dd0:/# apt install osm2pgsql

# インストール完了
root@07588ca07dd0:/# which osm2pgsql
/usr/bin/osm2pgsql
root@07588ca07dd0:/# osm2pgsql --version
osm2pgsql version 0.96.0 (64 bit id space)

# Docker離脱 (ローカル復帰)
root@07588ca07dd0:/# exit
$
ここで一旦、osm2pgsqlが導入済みのPostGISというイメージを自作しておく
# dockerプロセス確認
$ docker ps
CONTAINER ID   IMAGE             COMMAND                  CREATED          STATUS          PORTS                    NAMES
07588ca07dd0   postgis/postgis   "docker-entrypoint.s…"   21 minutes ago   Up 21 minutes   0.0.0.0:5432->5432/tcp   objective_golick

# docker停止
$ docker stop 07588ca07dd0
07588ca07dd0

# イメージの作成
$ docker commit 07588ca07dd0 postgis_with_osm2pgsql
sha256:63aa984c42a530615618d971d64bcc9a1c18fb91a4274325e747fcd5df1a09f3

# イメージ確認
$ docker images
REPOSITORY               TAG       IMAGE ID       CREATED          SIZE
postgis_with_osm2pgsql   latest    63aa984c42a5   14 seconds ago   513MB
...

# 起動中のコンテナは一旦破棄しておく
$ docker rm 07588ca07dd0
07588ca07dd0
osm2pgsqlを利用してOSMデータをPostGISへインポート
Docker起動
先にダウンロードしたOSMデータを作業ディレクトリに保存
$ ls -F
kansai-latest.osm.pbf	postgis_data/
新しく作ったイメージで起動する。(その際にOSMデータ用のマウントポイントを追加する)
# マウントオプション追加で起動
$ docker run -v `pwd`/postgis_data:/var/lib/postgresql/data -v `pwd`:/work -p 5432:5432 -d postgis_with_osm2pgsql

# 起動確認
$ docker ps
CONTAINER ID   IMAGE                    COMMAND                  CREATED          STATUS          PORTS                    NAMES
55f0d5aec9a0   postgis_with_osm2pgsql   "docker-entrypoint.s…"   36 seconds ago   Up 35 seconds   0.0.0.0:5432->5432/tcp   objective_swartz

# Docker侵入
$ docker exec -it 55f0d5aec9a0 /bin/bash
root@55f0d5aec9a0:/#

# 正しくマウントされているか確認
root@55f0d5aec9a0:/# ls -l /work
total 196612
-rw-r--r--  1 root     root 198153708 Dec 17 06:35 kansai-latest.osm.pbf
drwx------ 26 postgres root       832 Dec 20 04:55 postgis_data
PostGISのデータベース作成
osm2pgsqlでOSMデータをインポートする際にインポート先のPostgresqlデータベースの定義が事前に必要なので作成しておく(今回osmという名称で作成する)。その際に、そのデータベースに対してPostGISを扱うEXTENSIONの有効化が必要なので忘れずに実施すること
# Postgresql接続
root@55f0d5aec9a0:/# psql -U postgres
psql (12.5 (Debian 12.5-1.pgdg100+1))
Type "help" for help.

# Database作成 (osmという名称とした)
postgres=# create database osm;
CREATE DATABASE

# Database一覧表示
postgres=# \l
                                    List of databases
       Name       |  Owner   | Encoding |  Collate   |   Ctype    |   Access privileges
------------------+----------+----------+------------+------------+-----------------------
 osm              | postgres | UTF8     | en_US.utf8 | en_US.utf8 |
...

# osm Databaseへ接続
postgres=# \c osm
You are now connected to database "osm" as user "postgres".

# PostGISエクステンションをosmデータベースに適応
osm=# create extension postgis;
CREATE EXTENSION

# 以上で準備完了
osm=# \q
root@55f0d5aec9a0:/#
osm2pgsqlコマンドの実行
ようやくインポート作業となるがもう一つだけ準備が必要。OSMの各データには点や線、ポリコンといったデータが存在するが、そのそれぞれに対してさらに様々な属性値が存在する。その属性値をDBのTable列とどのような関係をもたせるかの定義ファイル(osm2pgsqlではstyleファイルと呼ぶ)を準備する必要がある。
今回は先に紹介したサイト LearnOSM - はじめてからのOpenStreetMapガイド 内から提供されているスタイルを利用する
上記をダウンロードして作業ディレクトリに保存する
# default.style を上記よりダウンロードして配置した
root@55f0d5aec9a0:/# ls -l /work
total 196620
-rw-r--r--  1 root     root      6025 Dec 20 05:16 default.style
-rw-r--r--  1 root     root 198153708 Dec 17 06:35 kansai-latest.osm.pbf
drwx------ 26 postgres root       832 Dec 20 04:55 postgis_data
ようやくインポート作業になる。下記コマンドを実行する
root@55f0d5aec9a0:/# cd /work
root@55f0d5aec9a0:/work# osm2pgsql --create --database=osm --slim --style=./default.style -U postgres -H localhost kansai-latest.osm.pbf
...
(かなりしばらく待つ)
...
Osm2pgsql took 24146s overall
あとは気長に待つ。私のような非力なPCの場合は一晩かかって翌朝完了するぐらいの所要時間になる。(24,146s = 6.7hour)
仕上がりを確認
planet_osm_* というTableが複数定義されており、それぞれにデータがInsertされていることが確認できる。
root@55f0d5aec9a0:/work# psql -U postgres osm;
psql (12.5 (Debian 12.5-1.pgdg100+1))
Type "help" for help.

osm=# \dt
               List of relations
 Schema |        Name        | Type  |  Owner
--------+--------------------+-------+----------
 public | planet_osm_line    | table | postgres
 public | planet_osm_nodes   | table | postgres
 public | planet_osm_point   | table | postgres
 public | planet_osm_polygon | table | postgres
 public | planet_osm_rels    | table | postgres
 public | planet_osm_roads   | table | postgres
 public | planet_osm_ways    | table | postgres
 public | spatial_ref_sys    | table | postgres
(8 rows)

osm=# \d planet_osm_roads;
                         Table "public.planet_osm_roads"
       Column       |           Type            | Collation | Nullable | Default
--------------------+---------------------------+-----------+----------+---------
 osm_id             | bigint                    |           |          |
 access             | text                      |           |          |
 addr:housename     | text                      |           |          |
 addr:housenumber   | text                      |           |          |
 addr:interpolation | text                      |           |          |
 admin_level        | text                      |           |          |
 aerialway          | text                      |           |          |
...

osm=# select count(*) from planet_osm_point;
 count
--------
 367808
(1 row)

osm=# select count(*) from planet_osm_line;
  count
---------
 1263136
(1 row)
OSMのデータの基本構造
※本セクションは私の理解が甘いので間違っているかもしれません。
しっかりと理解する場合はこの辺を参照
nodes (planet_osm_nodes)
OSMを構成する点や線、ポリコンもすべて頂点の1個以上の集合。その頂点を定義するのが nodes である。Table構造もIDと緯度経度の3列なシンプルなもの。
osm=# select * from planet_osm_nodes limit 5;
    id    |    lat    |    lon
----------+-----------+------------
 56577716 | 353219106 | 1396343130
 56577734 | 353219087 | 1396342033
 56577739 | 353223037 | 1396319209
 56577850 | 353221939 | 1396321446
 56577855 | 353229890 | 1396317181
point (planet_osm_point)
いわゆる点を表す。例えばosmデータで以下のような点が定義されている場合には、id = osm_id として planet_osm_point に登録され、同IDにて座標値が planet_osm_nodes に定義されている。
 <node id="274017002" visible="true" version="4" changeset="14708059" timestamp="2013-01-19T14:04:25Z" user="xxxx" uid="xxxx" lat="34.9867552" lon="135.7624890">
  <tag k="amenity" v="restaurant"/>
  <tag k="name" v="新福菜館本店"/>
 </node>
osm=# select * From planet_osm_nodes where id = '274017002';
-[ RECORD 1 ]---
id  | 274017002
lat | 349867552
lon | 1357624890

osm=# select * From planet_osm_point where osm_id = '274017002';
-[ RECORD 1 ]------+---------------------------------------------------
osm_id             | 274017002
...
amenity            | restaurant
...
name               | 新福菜館本店
...
way                | 0101000020110F0000902A9E6466D36C41AB1EE7AF10C14F41
way (planet_osm_way) と polygon (planet_osm_polygon), line (planet_osm_line)
頂点の順序付き集合。閉じているものはpolygonであり、閉じてないものはlineとなる。
下記はployconの例で元のOSMでは以下で定義されているものの場合
<way id="160731923" visible="true" version="11" changeset="63886009" timestamp="2018-10-26T02:30:00Z" user="xxxx" uid="xxxx">
  <nd ref="1727782796"/>
  <nd ref="1727782822"/>
  <nd ref="1727782826"/>
  <nd ref="1727782831"/>
  <nd ref="1727782834"/>
  <nd ref="1727782833"/>
  <nd ref="1727782788"/>
  <nd ref="1727782787"/>
  <nd ref="1727782794"/>
  <nd ref="1727782792"/>
  <nd ref="1727782789"/>
  <nd ref="1727782796"/>
  <tag k="addr:block_number" v="590"/>
  <tag k="addr:city" v="京都市"/>
  <tag k="addr:housenumber" v="2"/>
  <tag k="addr:postcode" v="600-8216"/>
  <tag k="addr:province" v="京都府"/>
  <tag k="addr:quarter" v="東塩小路町"/>
  <tag k="addr:street" v="烏丸通七条下る"/>
  <tag k="addr:suburb" v="下京区"/>
  <tag k="building" v="retail"/>
  <tag k="building:levels" v="7"/>
  <tag k="height" v="30"/>
  <tag k="name" v="Yodobashi"/>
  <tag k="name:en" v="Yodobashi Camera"/>
  <tag k="name:fr" v="achat électronique apple"/>
  <tag k="name:ja" v="ヨドバシカメラ"/>
  <tag k="name:ja_rm" v="Yodobashikamera"/>
  <tag k="name:ko" v="요도야바시"/>
  <tag k="opening_hours" v="Mo-Su 09:30-20:00"/>
  <tag k="shop" v="electronics"/>
  <tag k="source" v="Bing"/>
  <tag k="website" v="http://www.yodobashi-kyoto.com/"/>
  <tag k="wheelchair" v="yes"/>
 </way>
planet_osm_way と planet_osm_polygon の2つのテーブルで以下で表現されている
osm=# select * from planet_osm_ways where id = 160731923;
-[ RECORD 1 ]--------------------------------------------------------------------------------------------------------------------------------------------------------------------------------------------------------------------------------------------------------------------------------------------------------------------------------------------------------------------------------------------------------------------------------------------------------------------------------------------
id    | 160731923
nodes | {1727782796,1727782822,1727782826,1727782831,1727782834,1727782833,1727782788,1727782787,1727782794,1727782792,1727782789,1727782796}
tags  | {name,Yodobashi,shop,electronics,height,30,source,Bing,name:en,"Yodobashi Camera",name:fr,"achat électronique apple",name:ja,ヨドバシカメラ,name:ko,요도야바시,website,http://www.yodobashi-kyoto.com/,building,retail,addr:city,京都市,name:ja_rm,Yodobashikamera,wheelchair,yes,addr:street,烏丸通七条下る,addr:suburb,下京区,addr:quarter,東塩小路町,addr:postcode,600-8216,addr:province,京都府,opening_hours,"Mo-Su 09:30-20:00",building:levels,7,addr:housenumber,2,addr:block_number,590}

osm=# select * from planet_osm_polygon where osm_id = 160731923;
-[ RECORD 1 ]------+------------------------------------------------------------------------------------------------------------
--------------------------------------------------------------------------------------------------------------------------------
--------------------------------------------------------------------------------------------------------------------------------
-------------------------------------------------------
osm_id             | 160731923
...
addr:housenumber   | 2
...
building           | retail
...
name               | Yodobashi
...
shop               | electronics
...
z_order            | 0
way_area           | 12775
way                | 0103000020110F0000010000000C000000F895DC782CD36C41CFB8D3368AC14F410A0A518A2CD36C41C2414A5E7CC14F41DE753F892
CD36C418CB722035FC14F41D10F7B1F32D36C41FAA90BC15EC14F41A67C765633D36C41566CC89A5EC14F412BD4BC963AD36C41A1CF38F55EC14F4165EA6F9C3
AD36C414D3854005DC14F41CE975B4B3ED36C4103E3FAE75CC14F4128B2515A3ED36C411735F2808CC14F415880BD0C36D36C41CA4633078CC14F41E5CCC0073
6D36C41DBEA5AAB8AC14F41F895DC782CD36C41CFB8D3368AC14F41
lineの例も同様に載せておく (planet_osm_waysとplanet_osm_line)
 <way id="174762075" visible="true" version="10" changeset="79181018" timestamp="2020-01-04T05:34:57Z" user="hayashi" uid="621319">
  <nd ref="2783315750"/>
  <nd ref="3554802235"/>
  <nd ref="410083087"/>
  <nd ref="5196506199"/>
  <nd ref="5196506198"/>
  <nd ref="2783315752"/>
  <nd ref="3743790129"/>
  <nd ref="3743790130"/>
  <tag k="highway" v="secondary"/>
  <tag k="lanes" v="2"/>
  <tag k="maxspeed" v="40"/>
  <tag k="name" v="塩小路通"/>
  <tag k="name:en" v="Shio-koji dori"/>
  <tag k="name:ja" v="塩小路通"/>
  <tag k="name:ko" v="시오코지도리"/>
  <tag k="oneway" v="yes"/>
  <tag k="oneway:bicycle" v="yes"/>
  <tag k="ref" v="115"/>
  <tag k="source" v="Bing"/>
 </way>
↓
osm=# select * from planet_osm_ways where id = 174762075;;
-[ RECORD 1 ]-----------------------------------------------------------------------------------------------------------------------------------------------------------------
id    | 174762075
nodes | {2783315750,3554802235,410083087,5196506199,5196506198,2783315752,3743790129,3743790130}
tags  | {ref,115,name,塩小路通,lanes,2,oneway,yes,source,Bing,highway,secondary,name:en,"Shio-koji dori",name:ja,塩小路通,name:ko,시오코지도리,maxspeed,40,oneway:bicycle,yes}

osm=# select * from planet_osm_line where osm_id = 174762075;;
-[ RECORD 1 ]------+------------------------------------------------------------------------------------------------------------
--------------------------------------------------------------------------------------------------------------------------------
-----------------------------------------------
osm_id             | 174762075
...
highway            | secondary
...
name               | 塩小路通
...
oneway             | yes
...
ref                | 115
...
z_order            | 36
way_area           |
way                | 0102000020110F0000080000007397286741D36C41A7993C8930C14F41C41EAC8A43D36C41B2B274B630C14F412B5EB73249D36C417
A3ADA3F31C14F410EA803644DD36C41B59C6B8531C14F4173DF29004FD36C41258413E531C14F4151B3B01E51D36C41F6344DB232C14F41B567F1EC51D36C41A
FB7F4E932C14F418AD4EC2353D36C41366D9D9933C14F41
おそらく、planet_osm_line/polygon にある way のカラムは planet_osm_way への逆引きのようなものと思うが詳細は理解しいない。
planet_osm_rels
理解していないので保留
planet_osm_road
おそらく planet_osm_line のサブセット
QGIS で OSMデータを可視化
QGISは下記ダウンロードサイトよりダウンロード&インストールが可能。今回は安定版とされるVersion 3.10を利用する (2020.12現在)
PostGISとの接続
上記の手順通りにDockerを起動したままであれば、ローカル側の5432ポートがDocker内のPostGISの5432ポートにバインディングされている状態となる。QGISの左側ブラウザパネルよりPostGISを選択(右クリック)後、「接続の新規作成...」を選択する。
- 名前: OSM_KANSAI
- ホスト: localhost
- ポート: 5432
- データベース: osm
として接続テストを押すとユーザ名/パスワードを入力画面がでる。ここでユーザ名「postgres」としてパスワードを空にするとエラーになる.
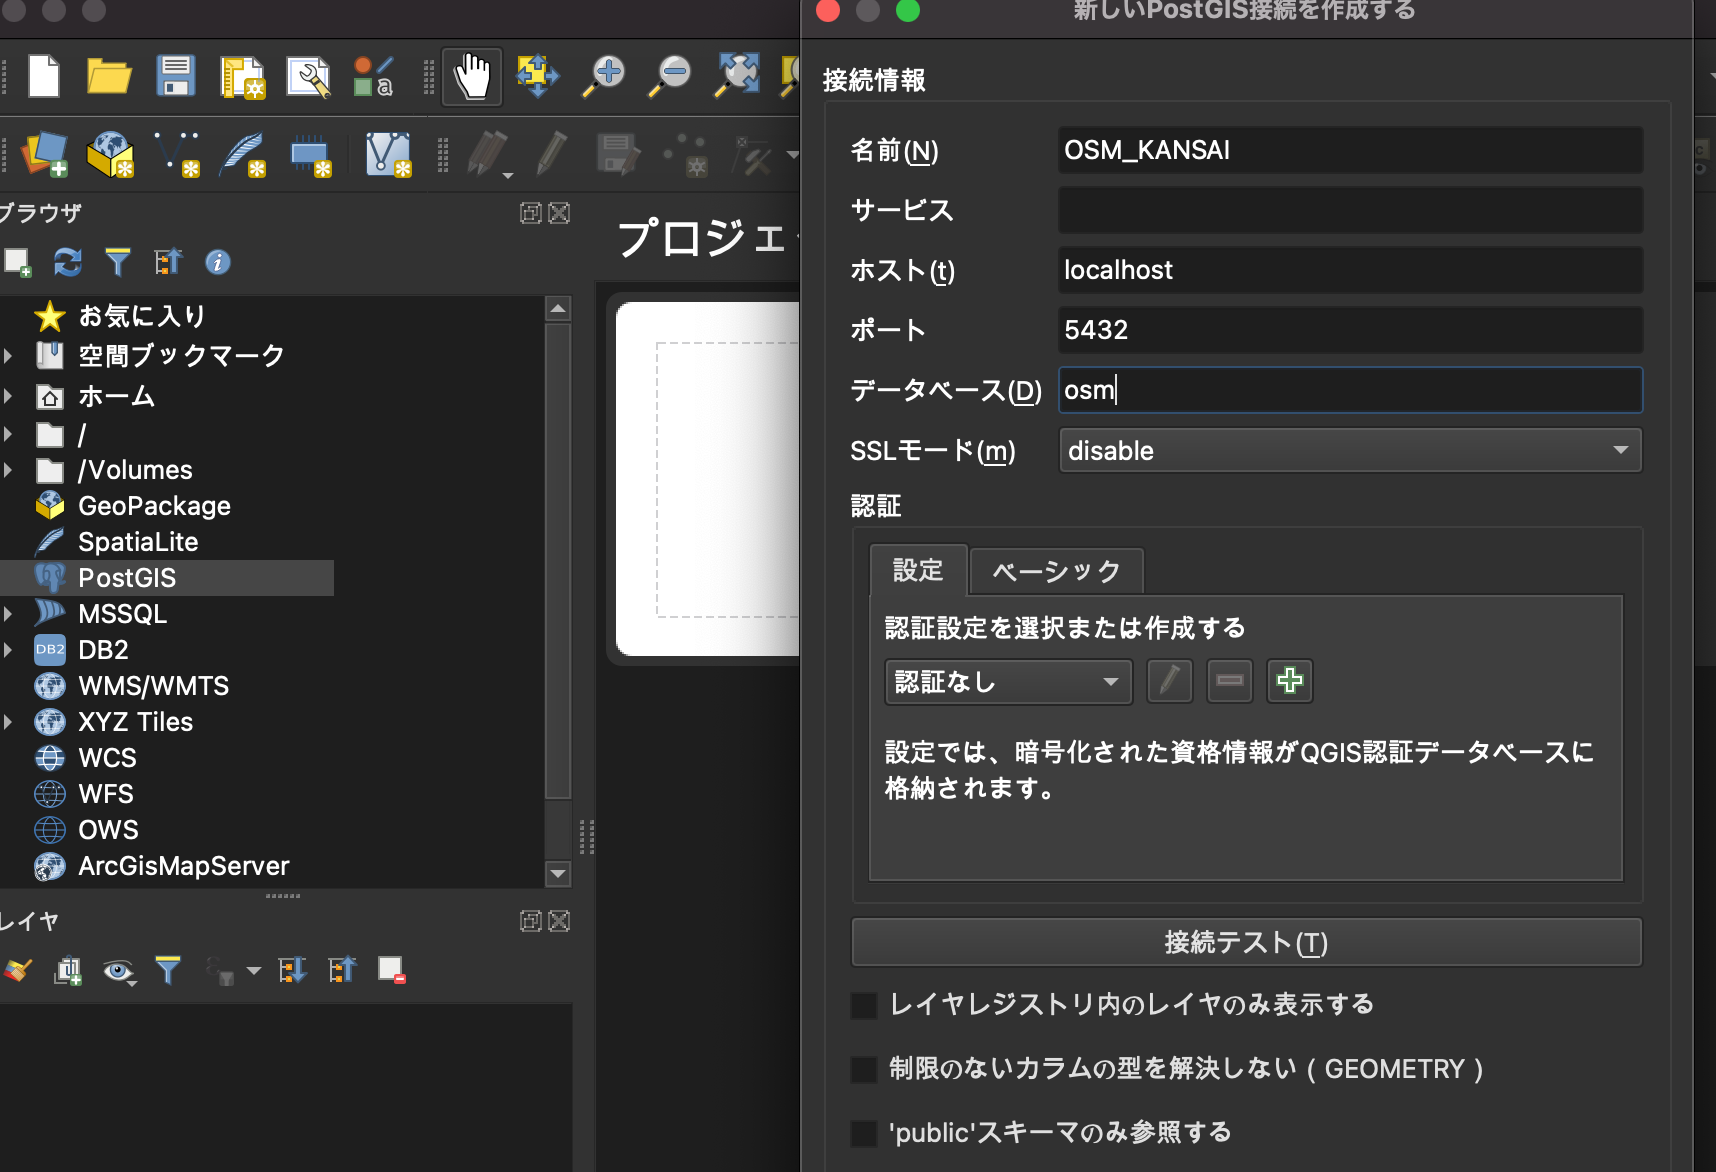
よって、Postgres側で postgresユーザにパスワードをセットする。
その後、再びテストすると接続成功するはず。
# PostGISが動作しているDocker内にて
root@55f0d5aec9a0:/work# psql -U postgres
psql (12.5 (Debian 12.5-1.pgdg100+1))
Type "help" for help.

# パスワードをセットする
postgres=# alter role postgres with password 'postgres';
ALTER ROLE
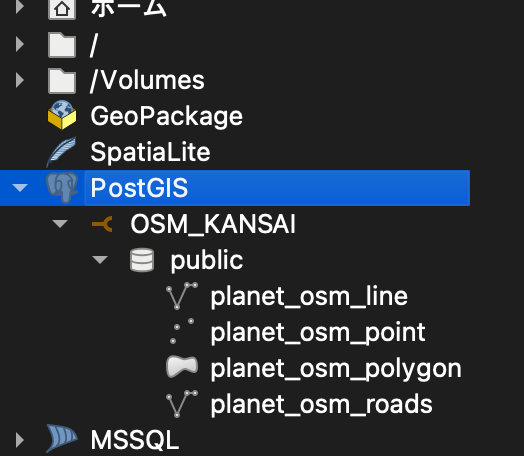
接続完了後、ブラウザパネルPostGISから追加した接続先を展開すると以下のように line, point, polygon, roads が項目として現れる。
QGIS にて表示
試しに planet_osm_line を選択(ダブルクリック). レイアに追加してみる。
lineにはフェリー航路が含まれているため近畿地方が小さくlineが密集して表示される。
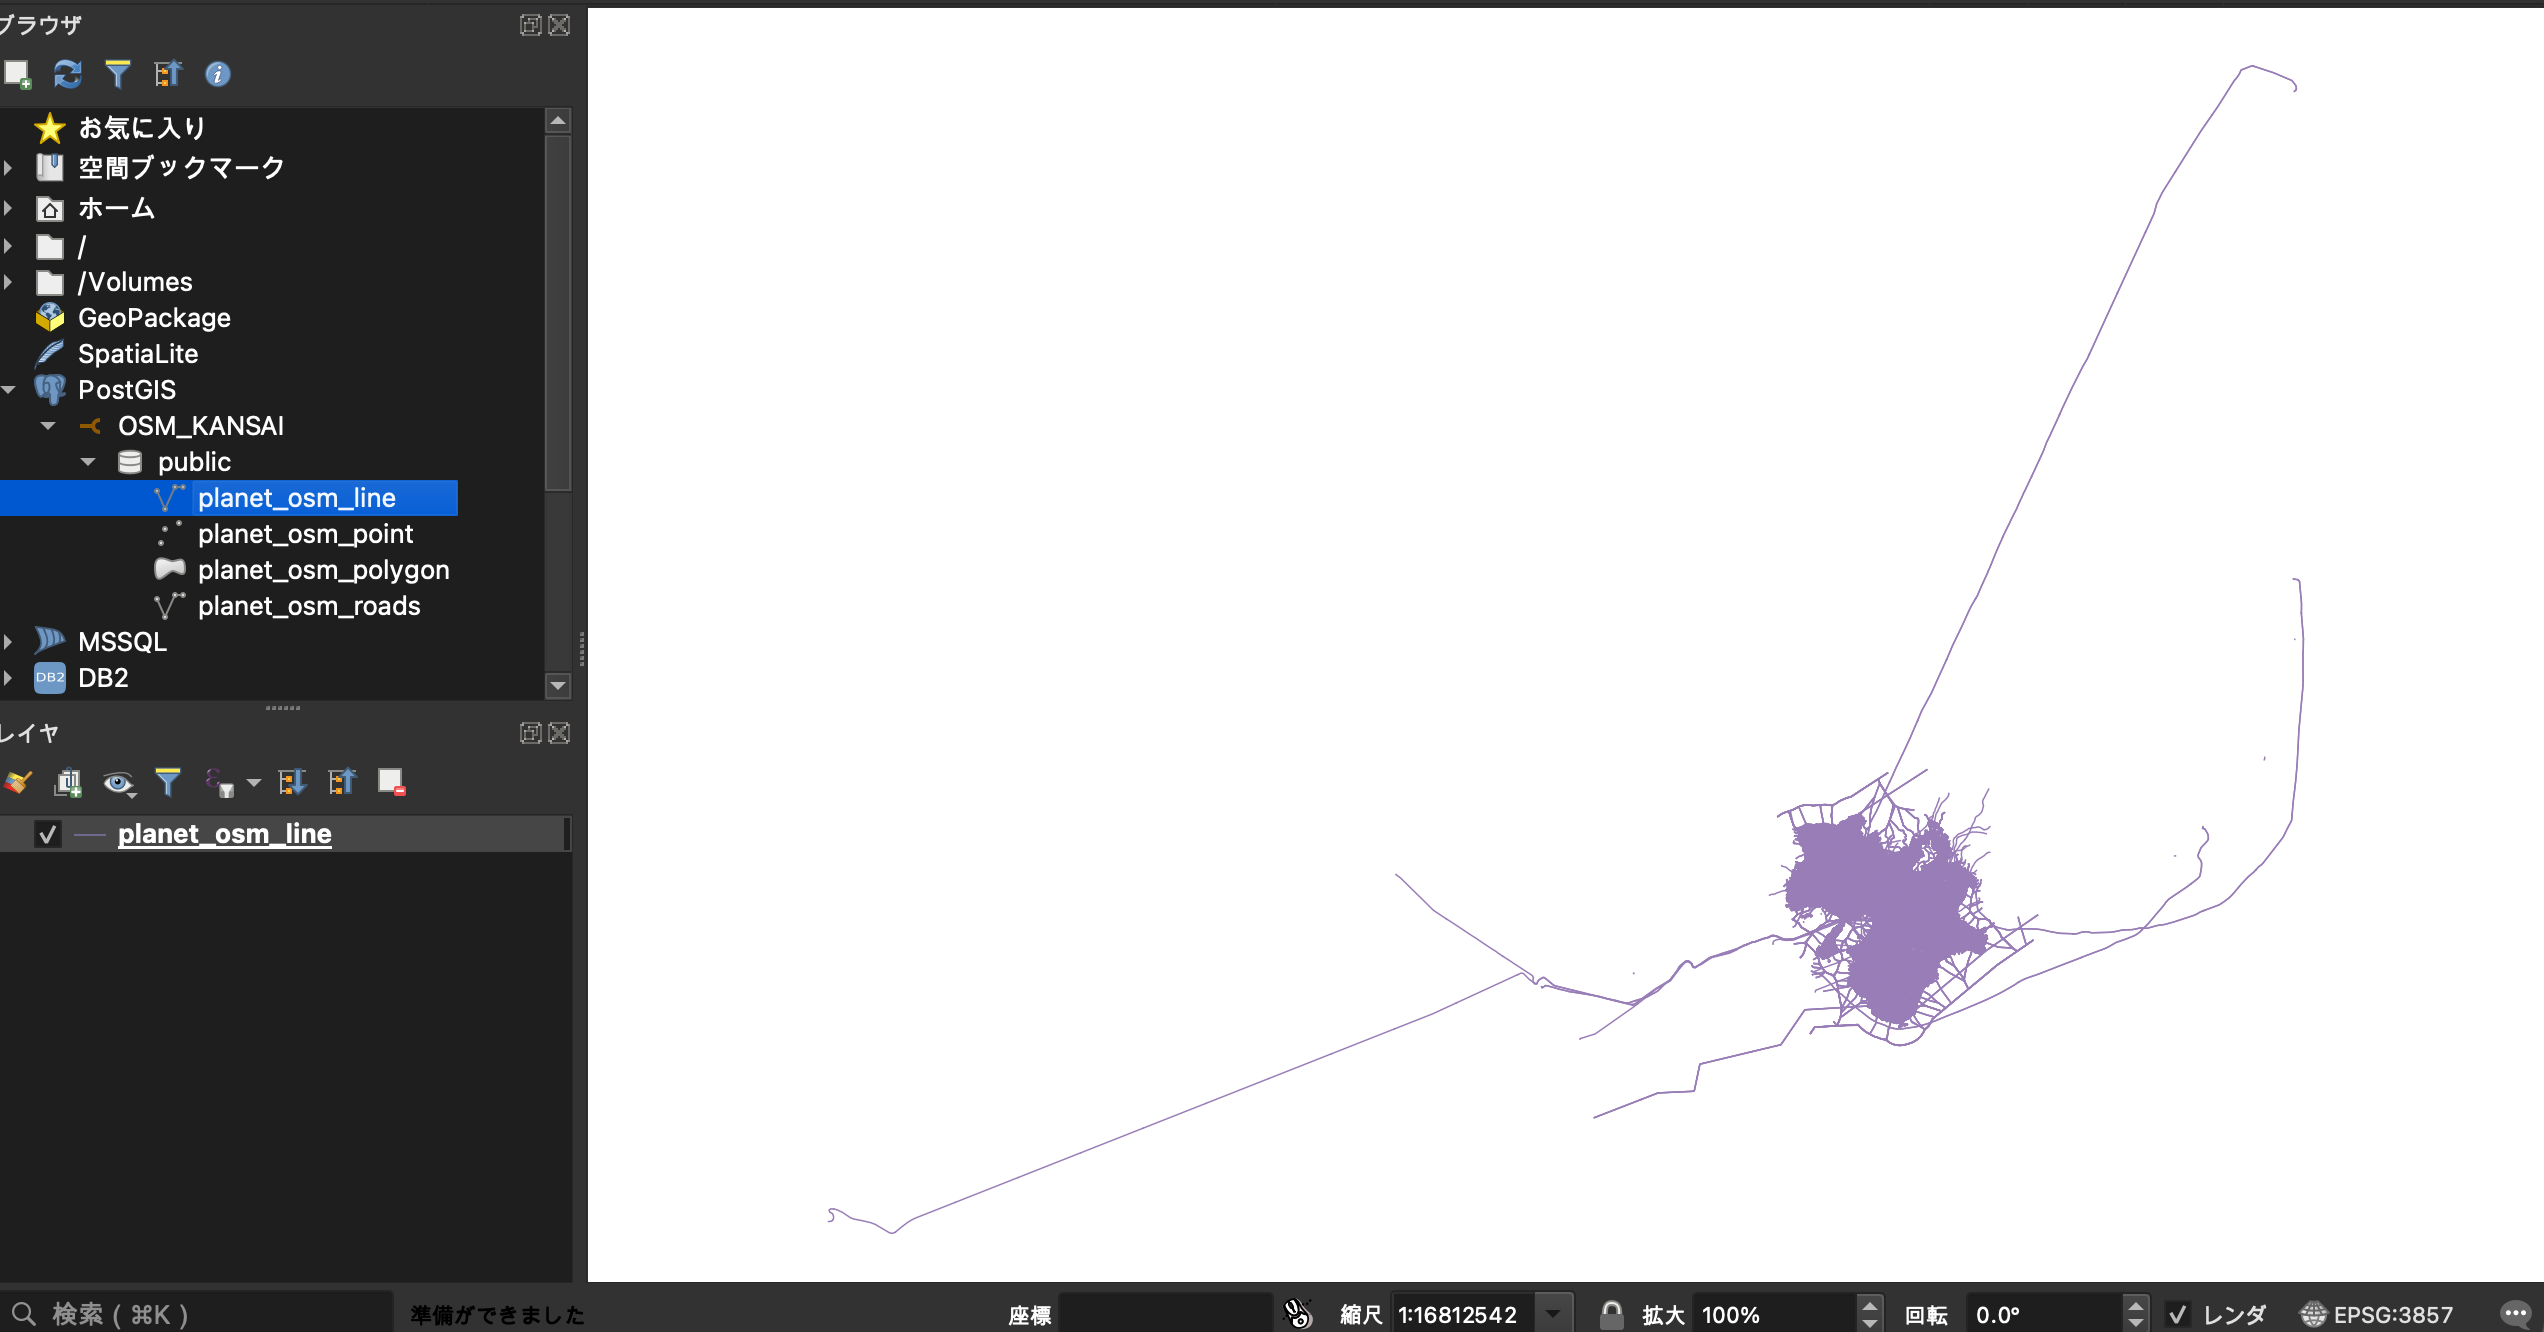
QGISのズームボタンを調整すると近畿地方が見える
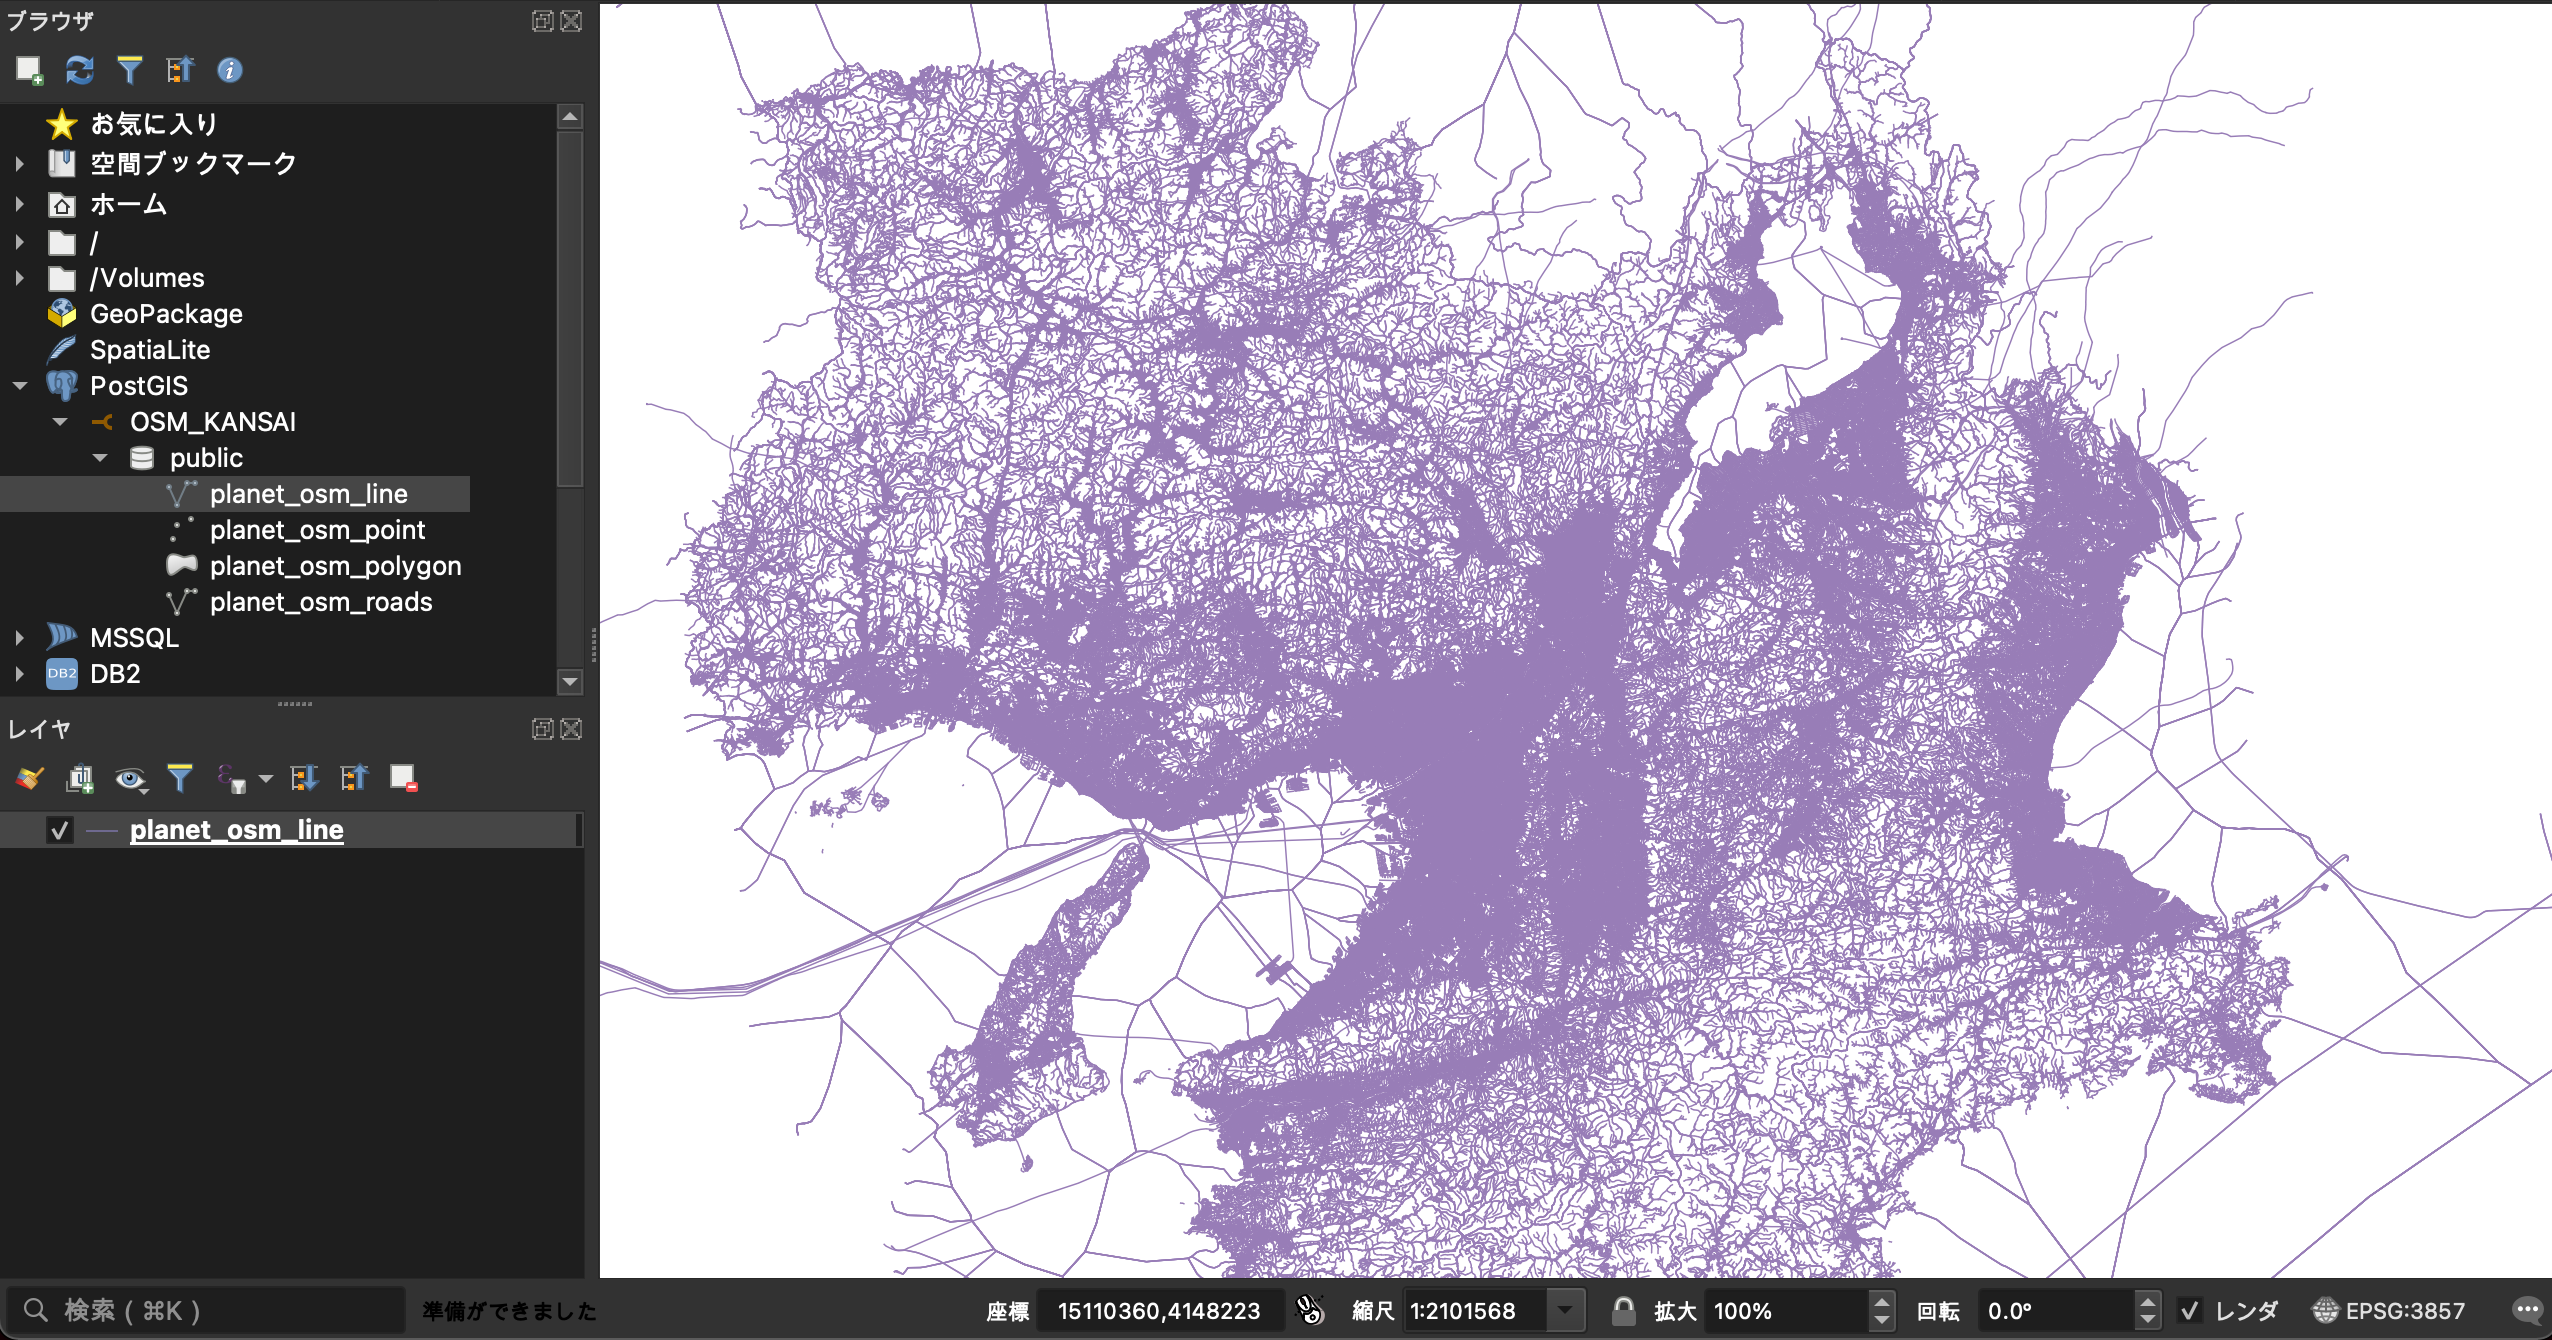
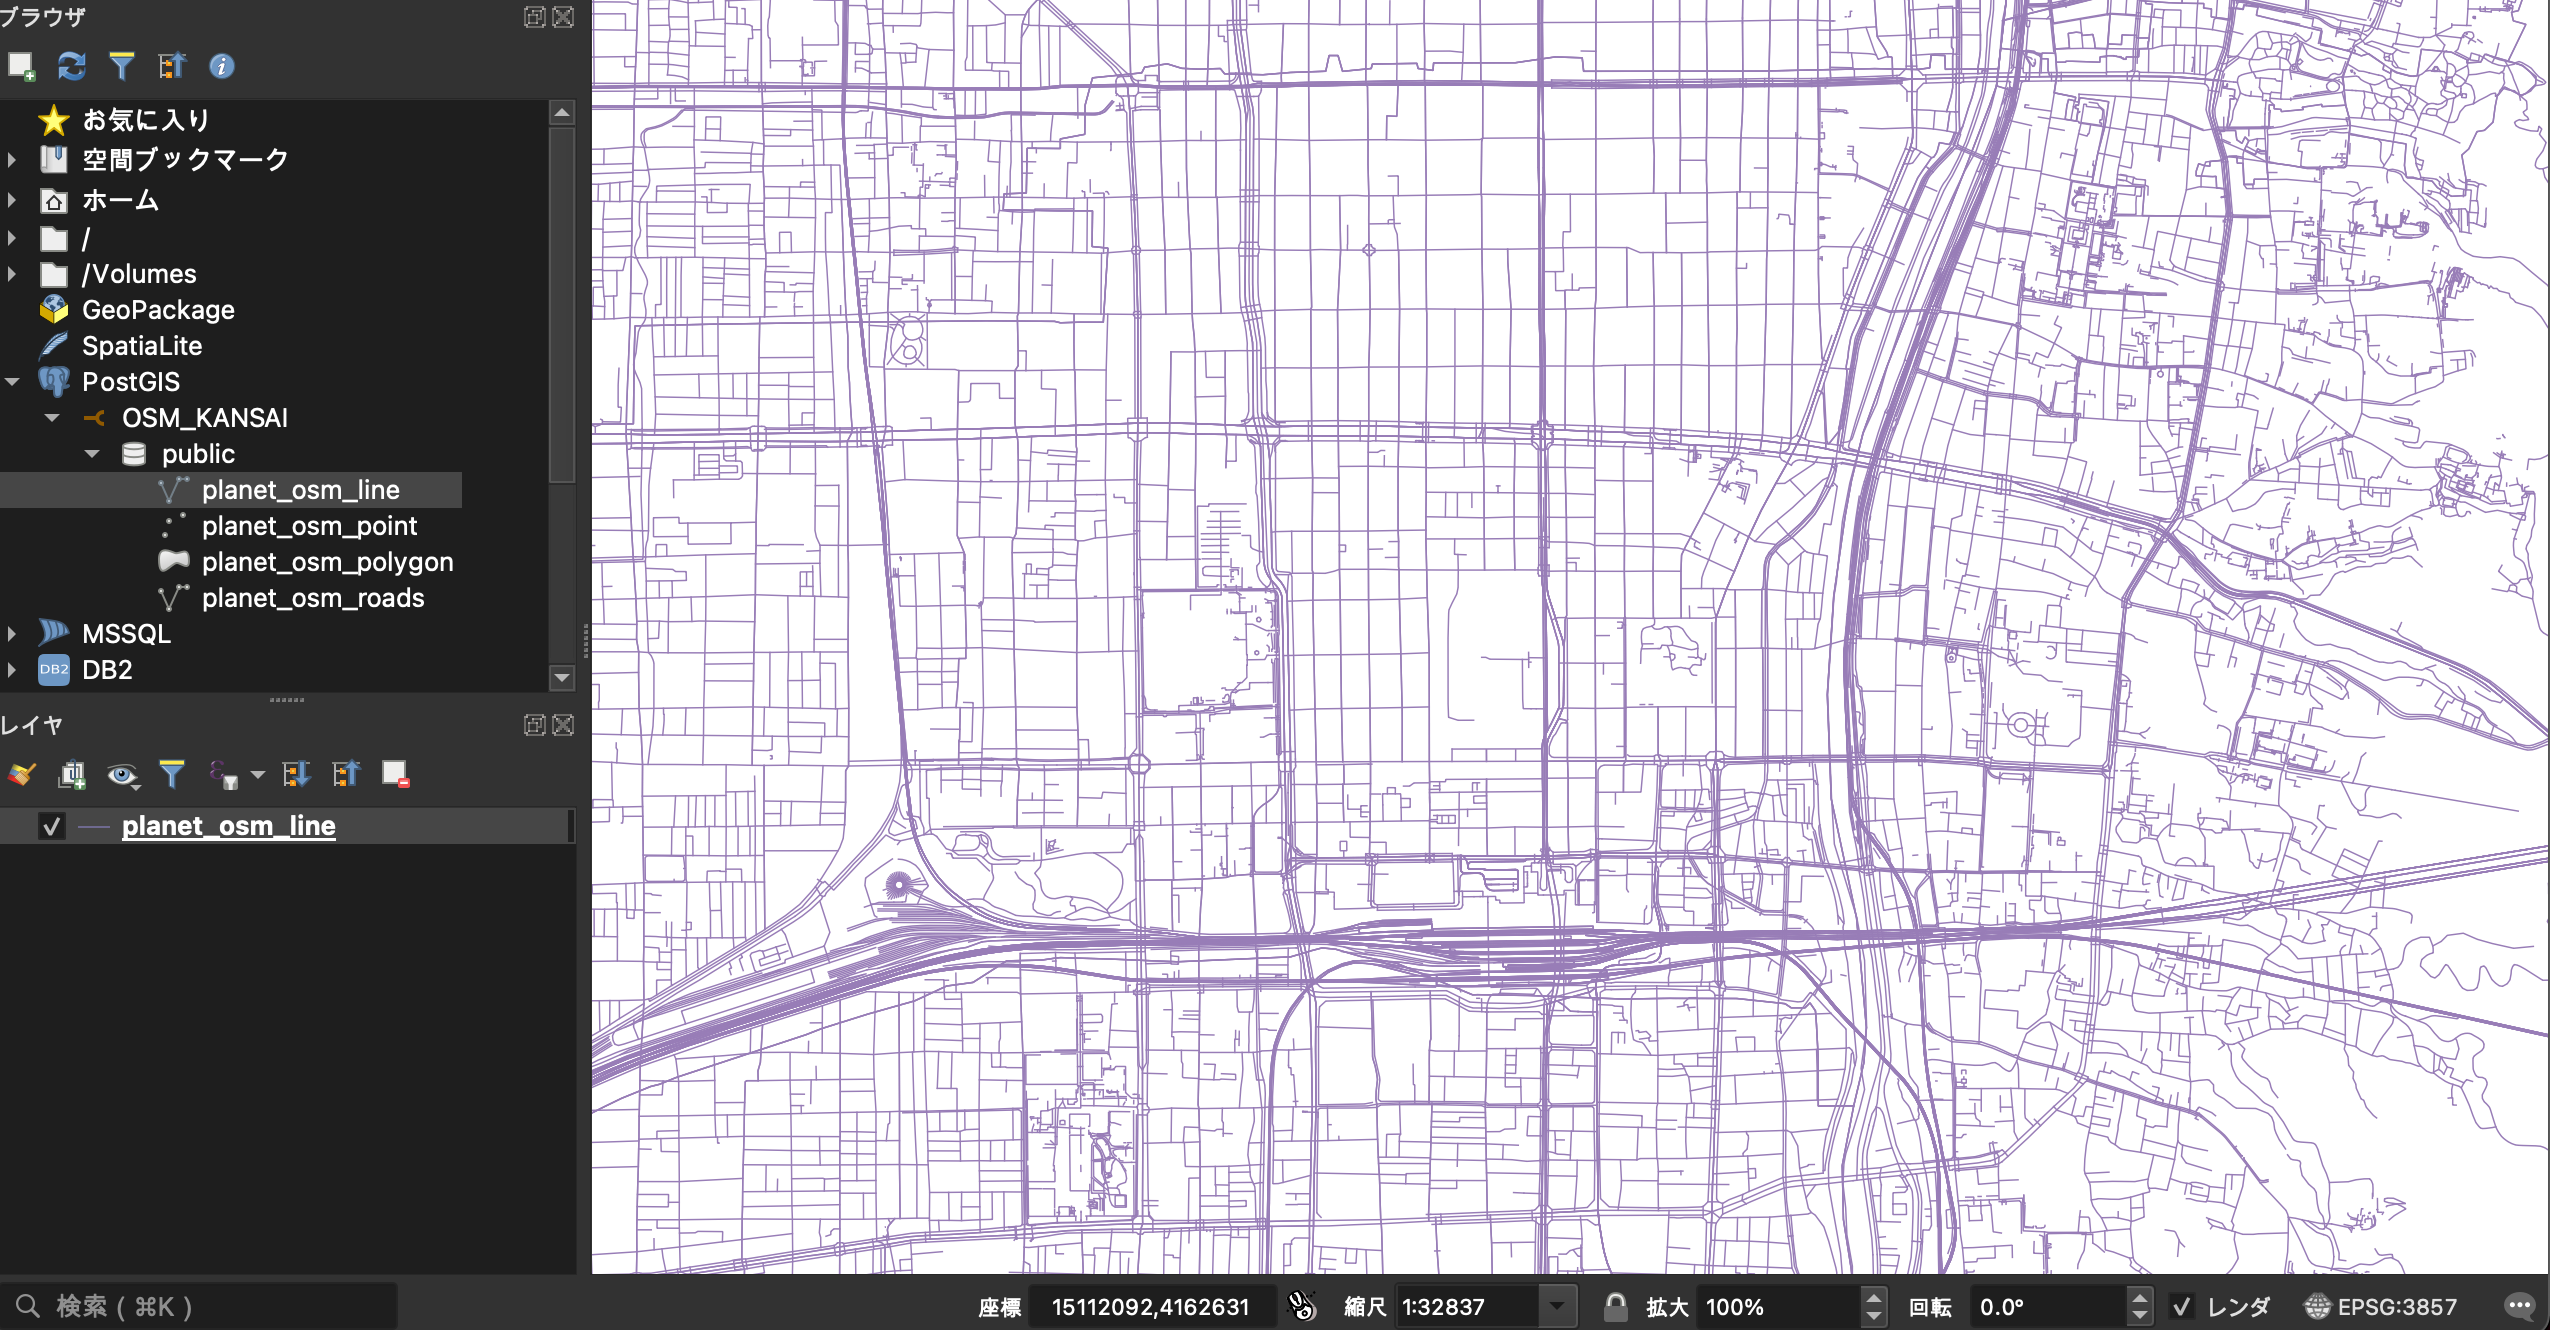
更に拡大して京都駅周辺を見るとこんな感じになる
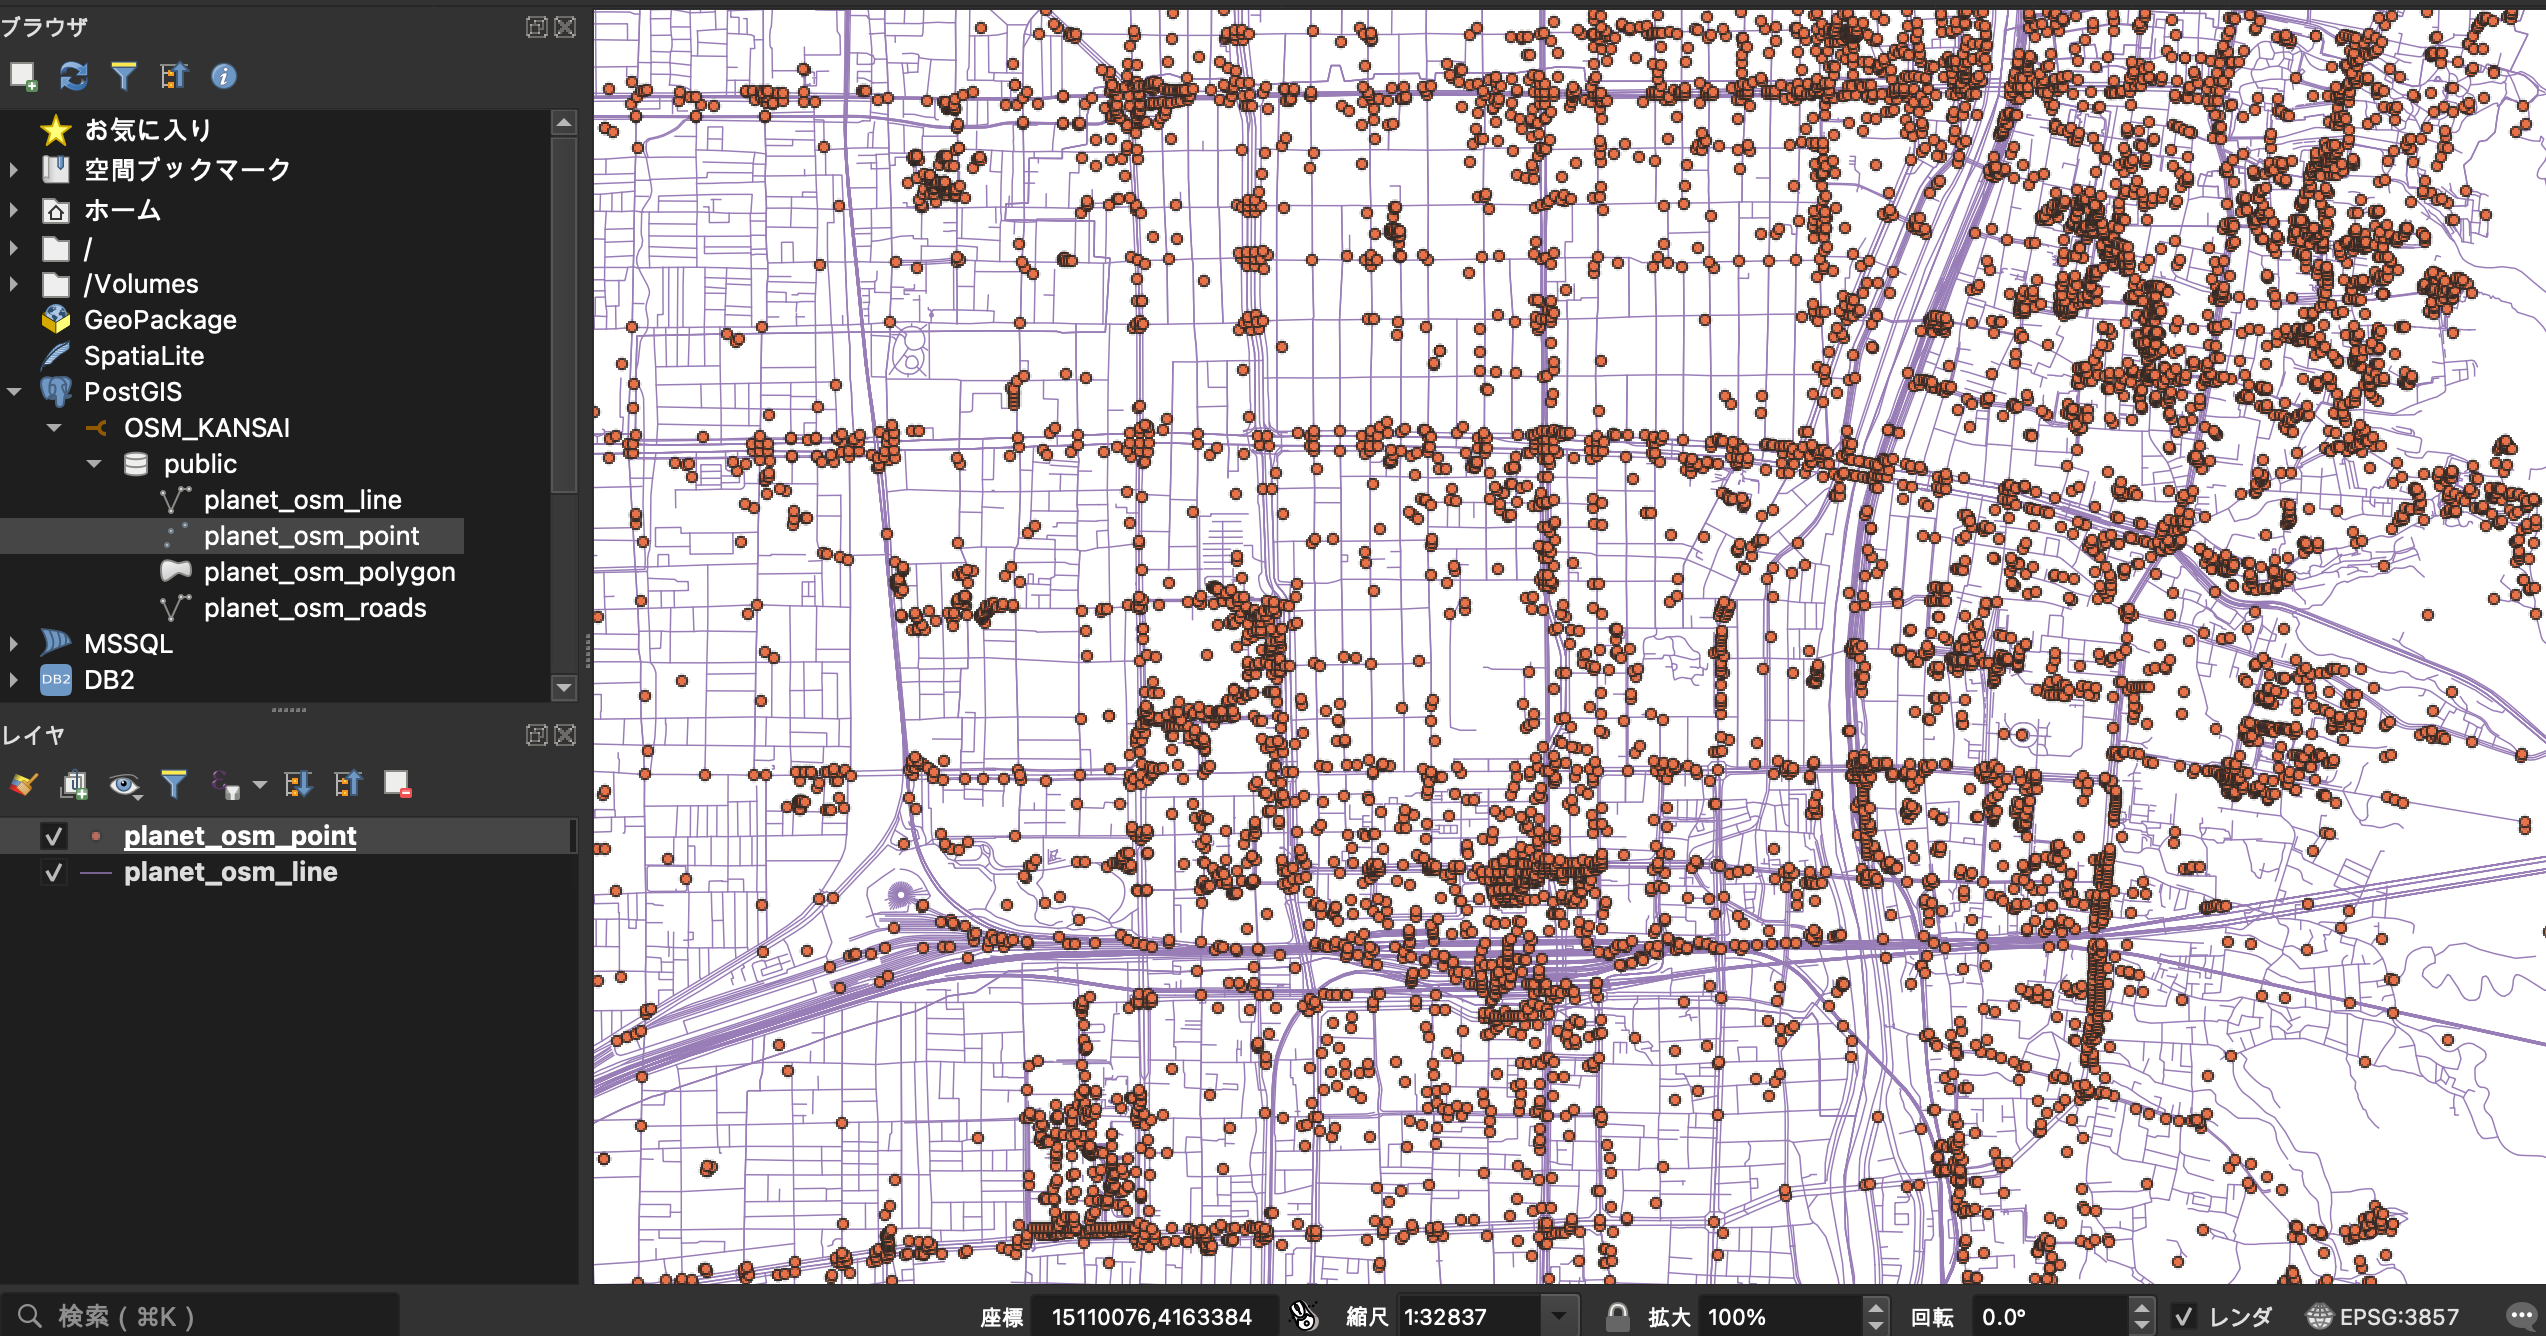
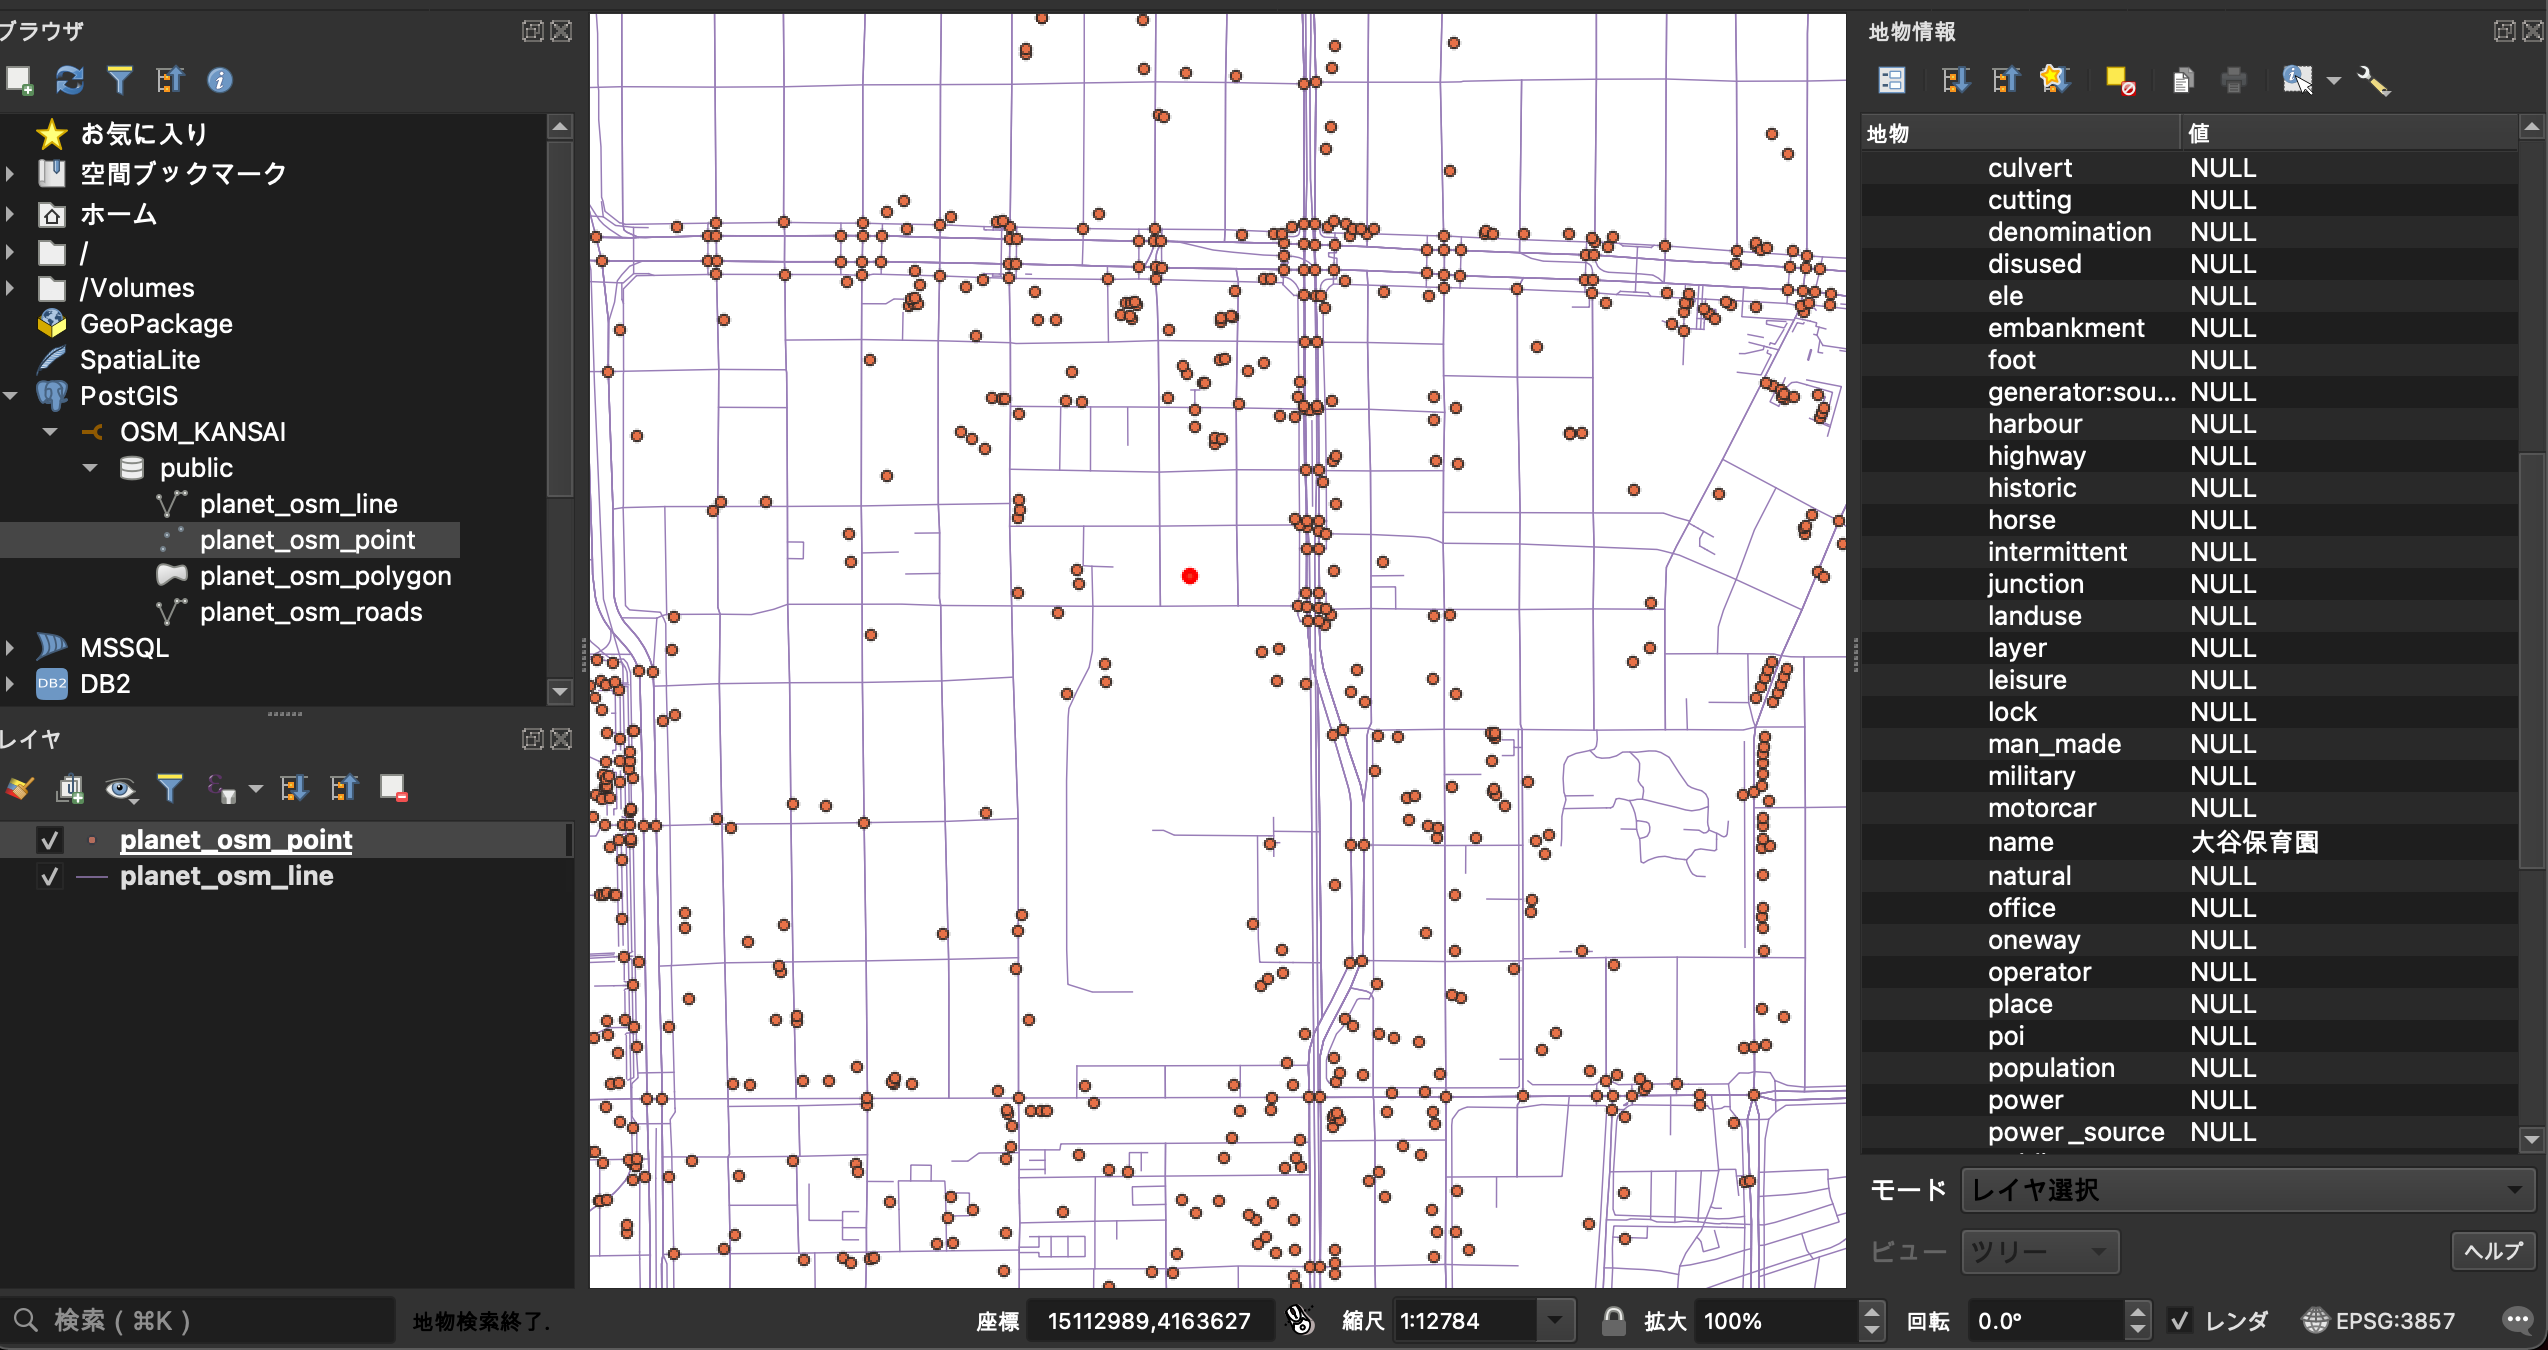
この状態で planet_osm_pointも選択するとこんな感じになる。
QGIS の地物情報表示
QGISの地物情報の表示機能を選択後、地図上のpointやlineを選択すると各種属性値が確認できる。
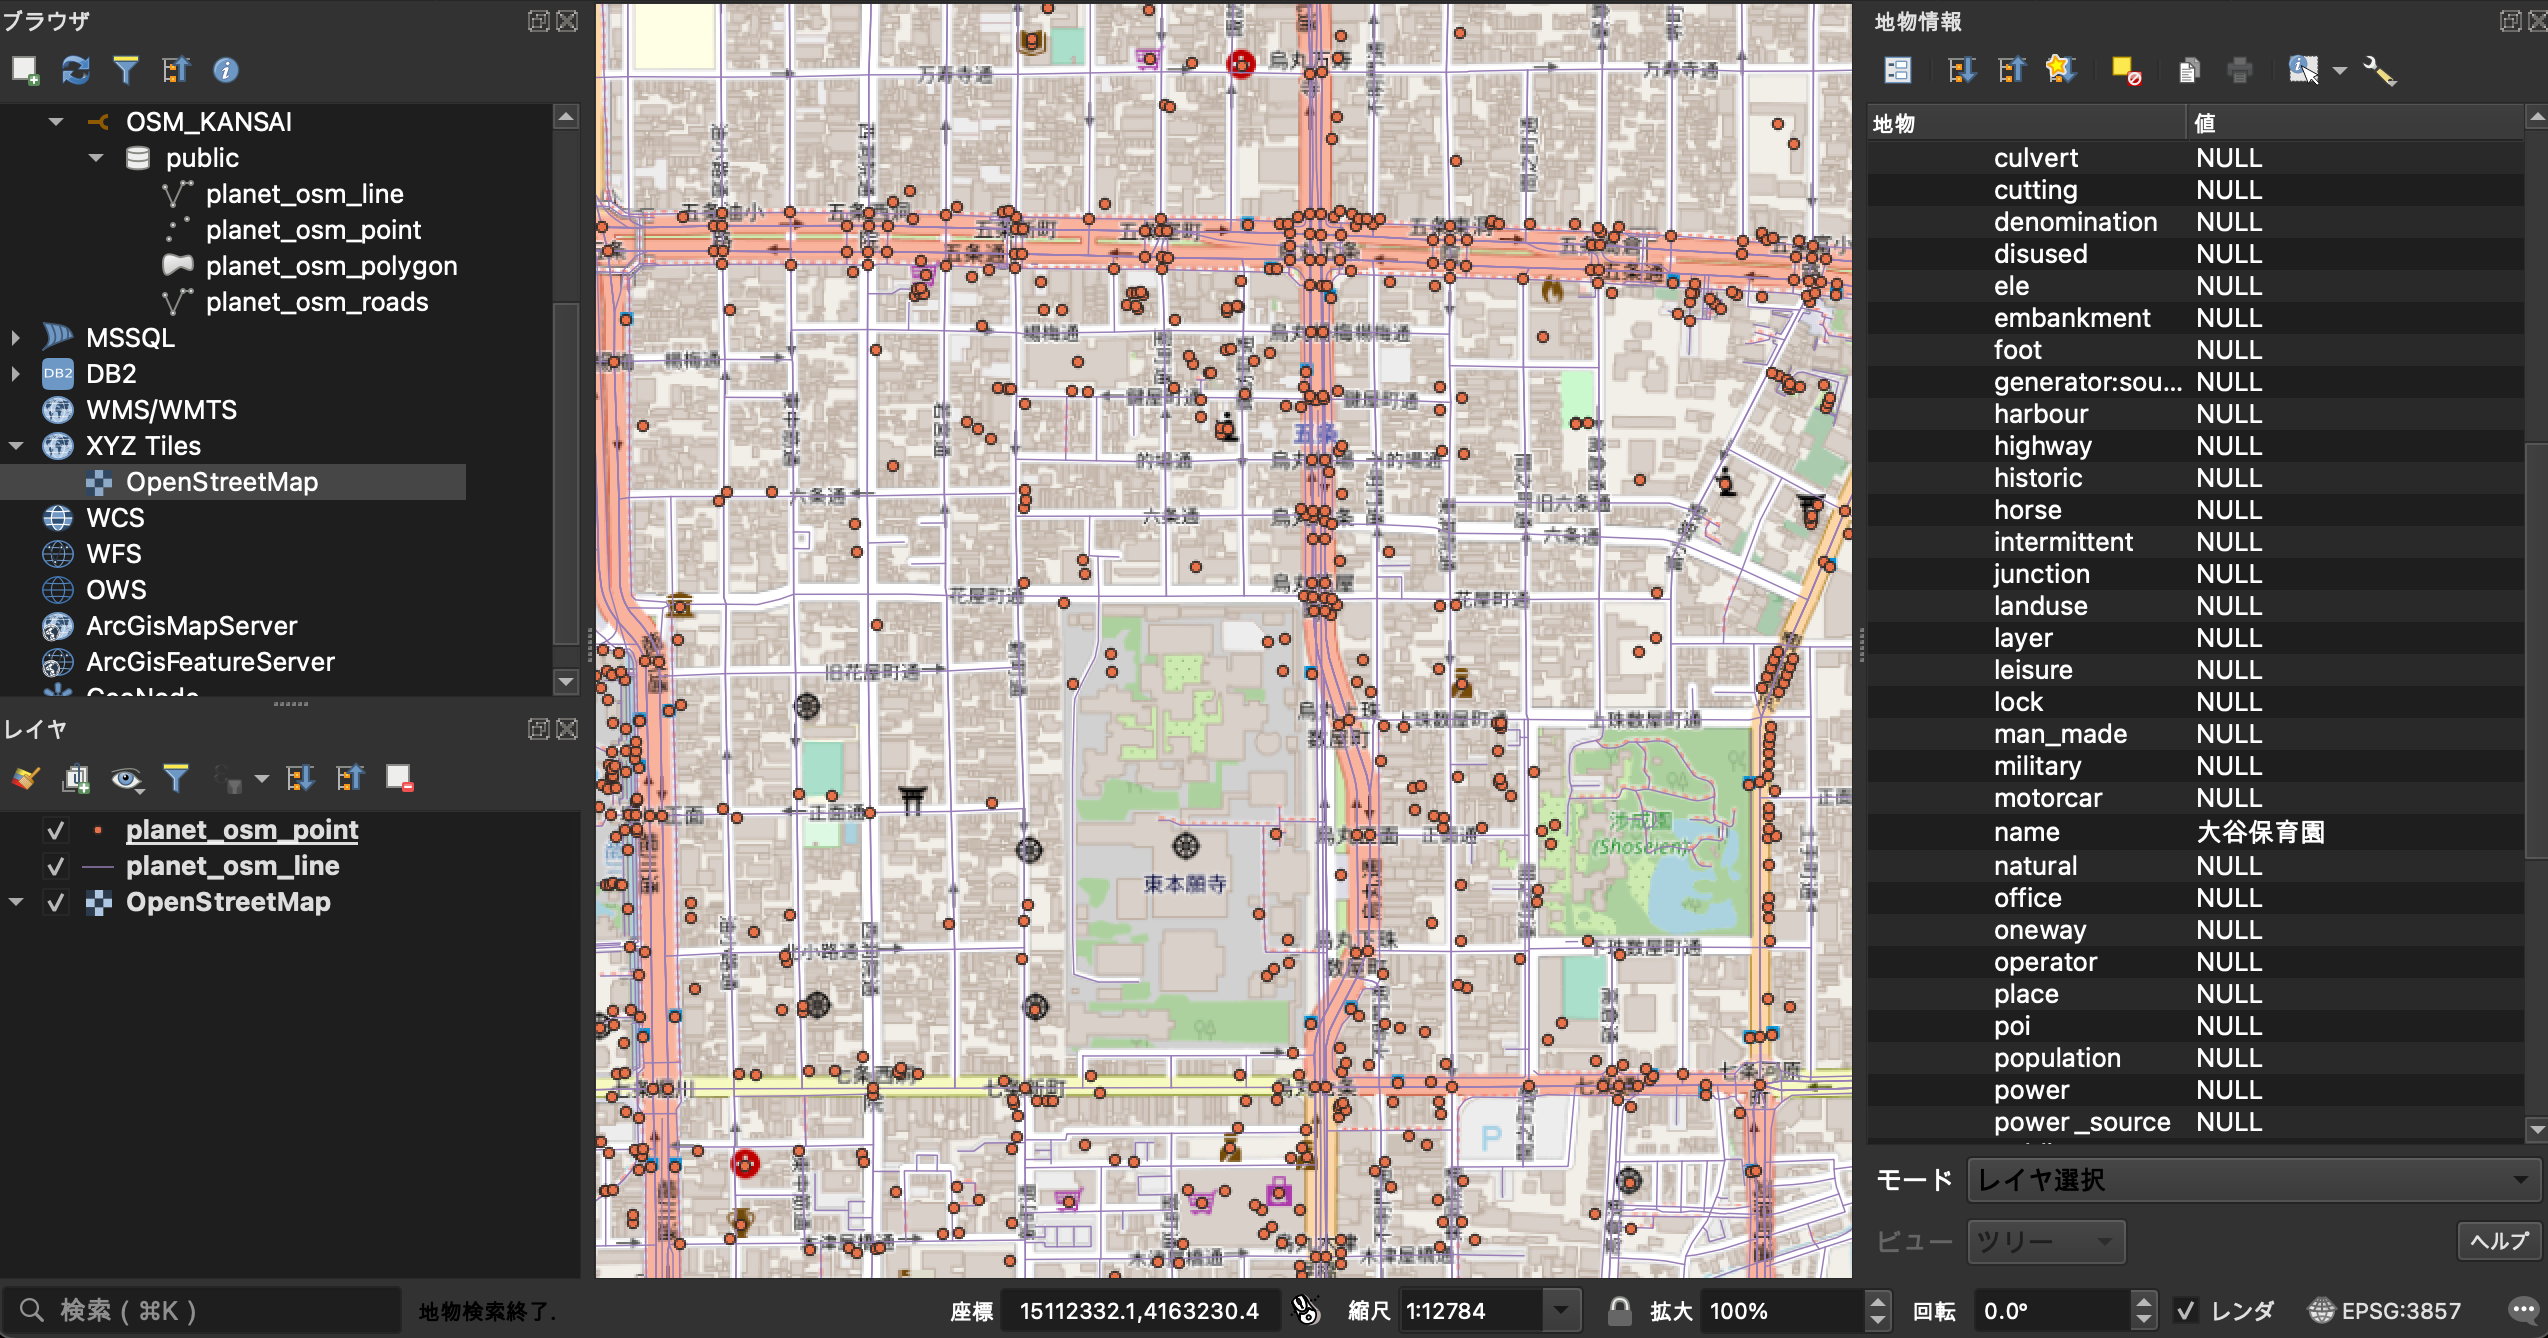
ブラウザパネルの「XYZ Tiles」からOpenStreetMapを選択後、レイヤーにて最下層に配置すると以下のようにOpenStreetMapの地図上にOSMデータを重ねて確認することができる。
QGISで簡単な地物絞り込み
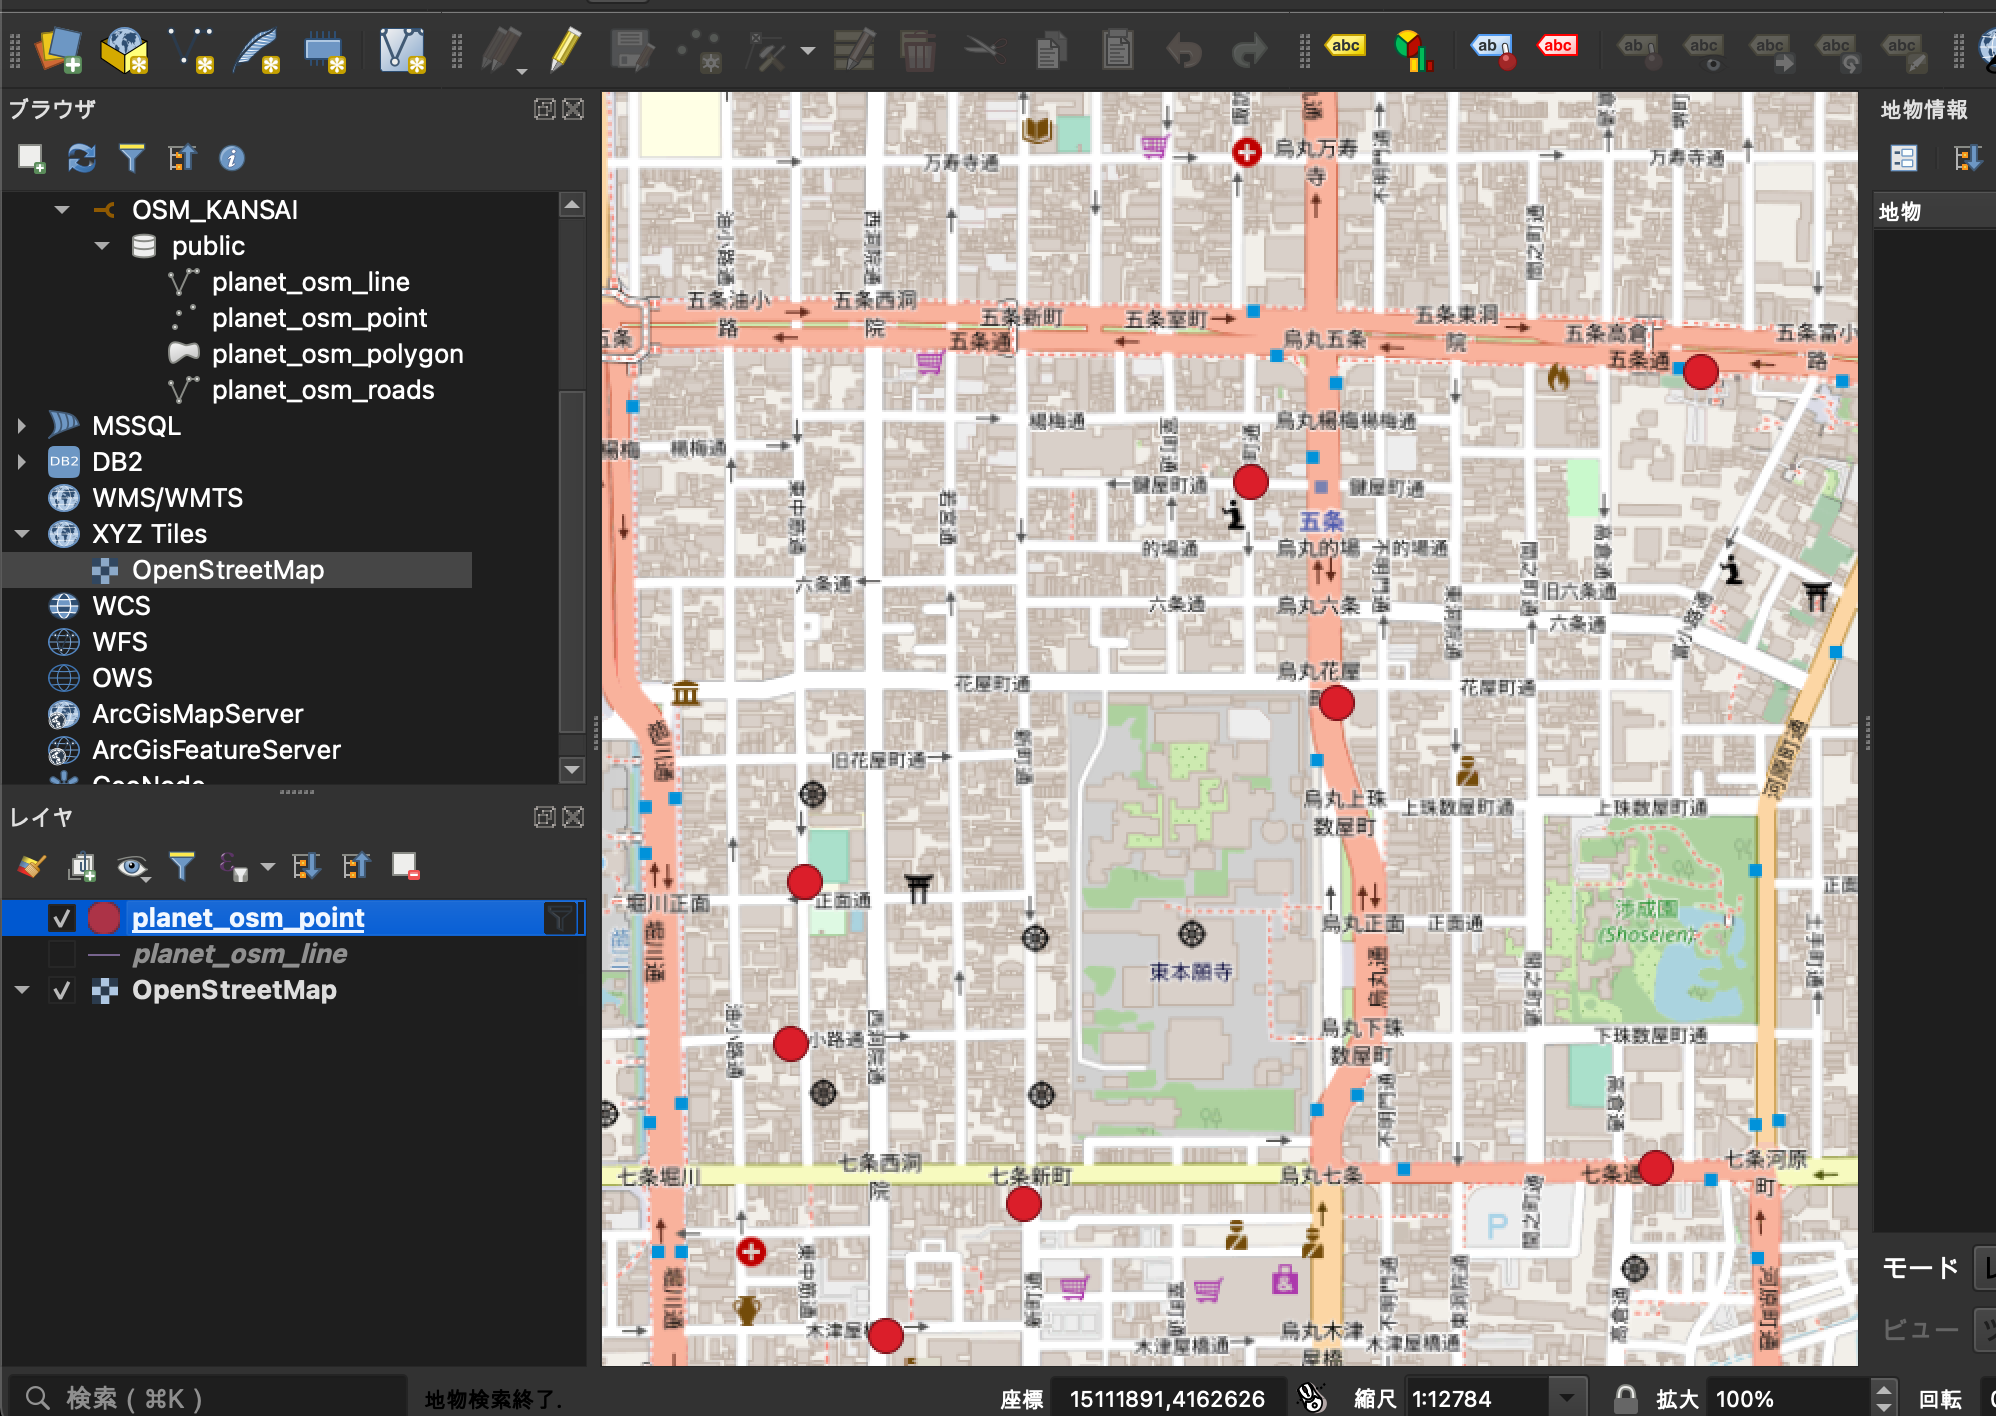
例えば、上記京都駅周辺で郵便ポストのみを表示してみる。レイヤからplanet_osm_lineのチェックを外し point のみにしたあとに、レイヤの planet_osm_pointを右クリックから「フィルター」を選択。
フィールドの「amenity」を選択後、値の「全て」を押すと、値パネルに planet_osn_pointのamenityカラムに対して SQL でいうところの distinct をした要素のの一覧が表示される。
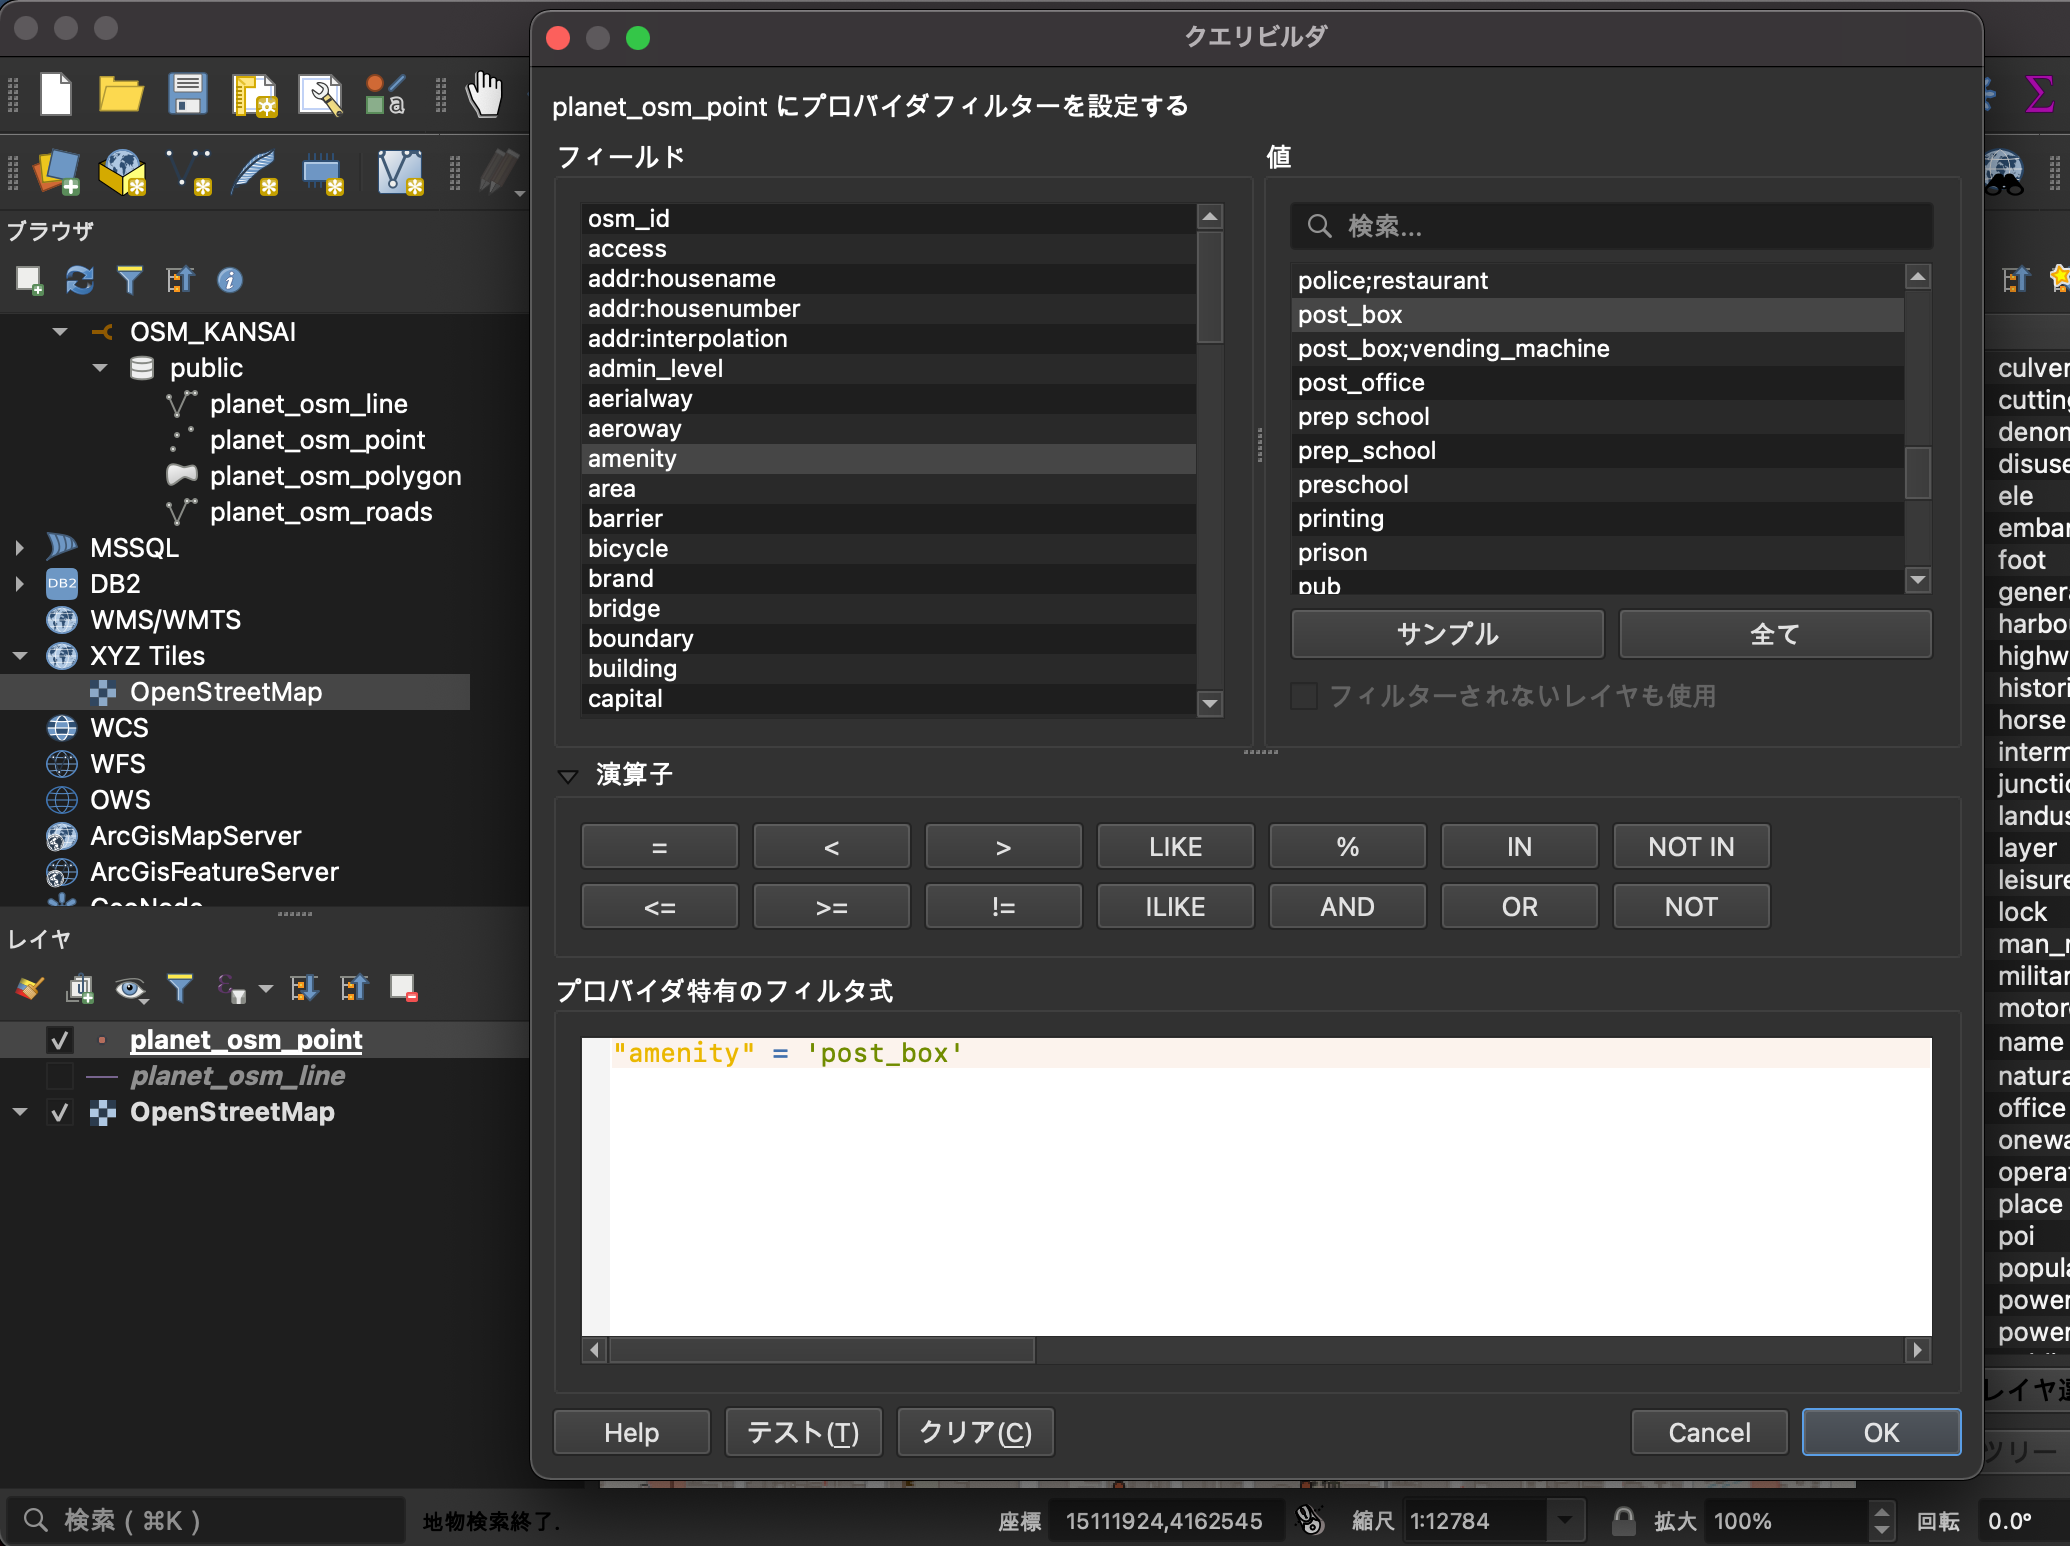
フィールドの「amenity」、演算子の「=」、値の「post_box」を順にダブルクリックすると白いフィルタ式の部分が "amenity" = 'post_box'となるはずで、これでOKを押すと地図上のPointが郵便ポストのみになる。(わかりやすくpointのスタイルを大きな赤丸に変更した)
興味がありましたらこのOSMデータを利用した経路検索エンジンValhallaを利用してみた記事も続きなので参照ください。