背景
SPIREではクラウドプラットフォームに依存しないNode Attestationの手段として、Join Tokenと呼ばれるワンタイムトークンを使ったAttestationの他に、SSHホスト証明書やX.509証明書を使ったAttestationがビルトインとして提供されています。
このエントリでは証明書を使ったNode Attestationの仕組みとその設定方法について記載します。
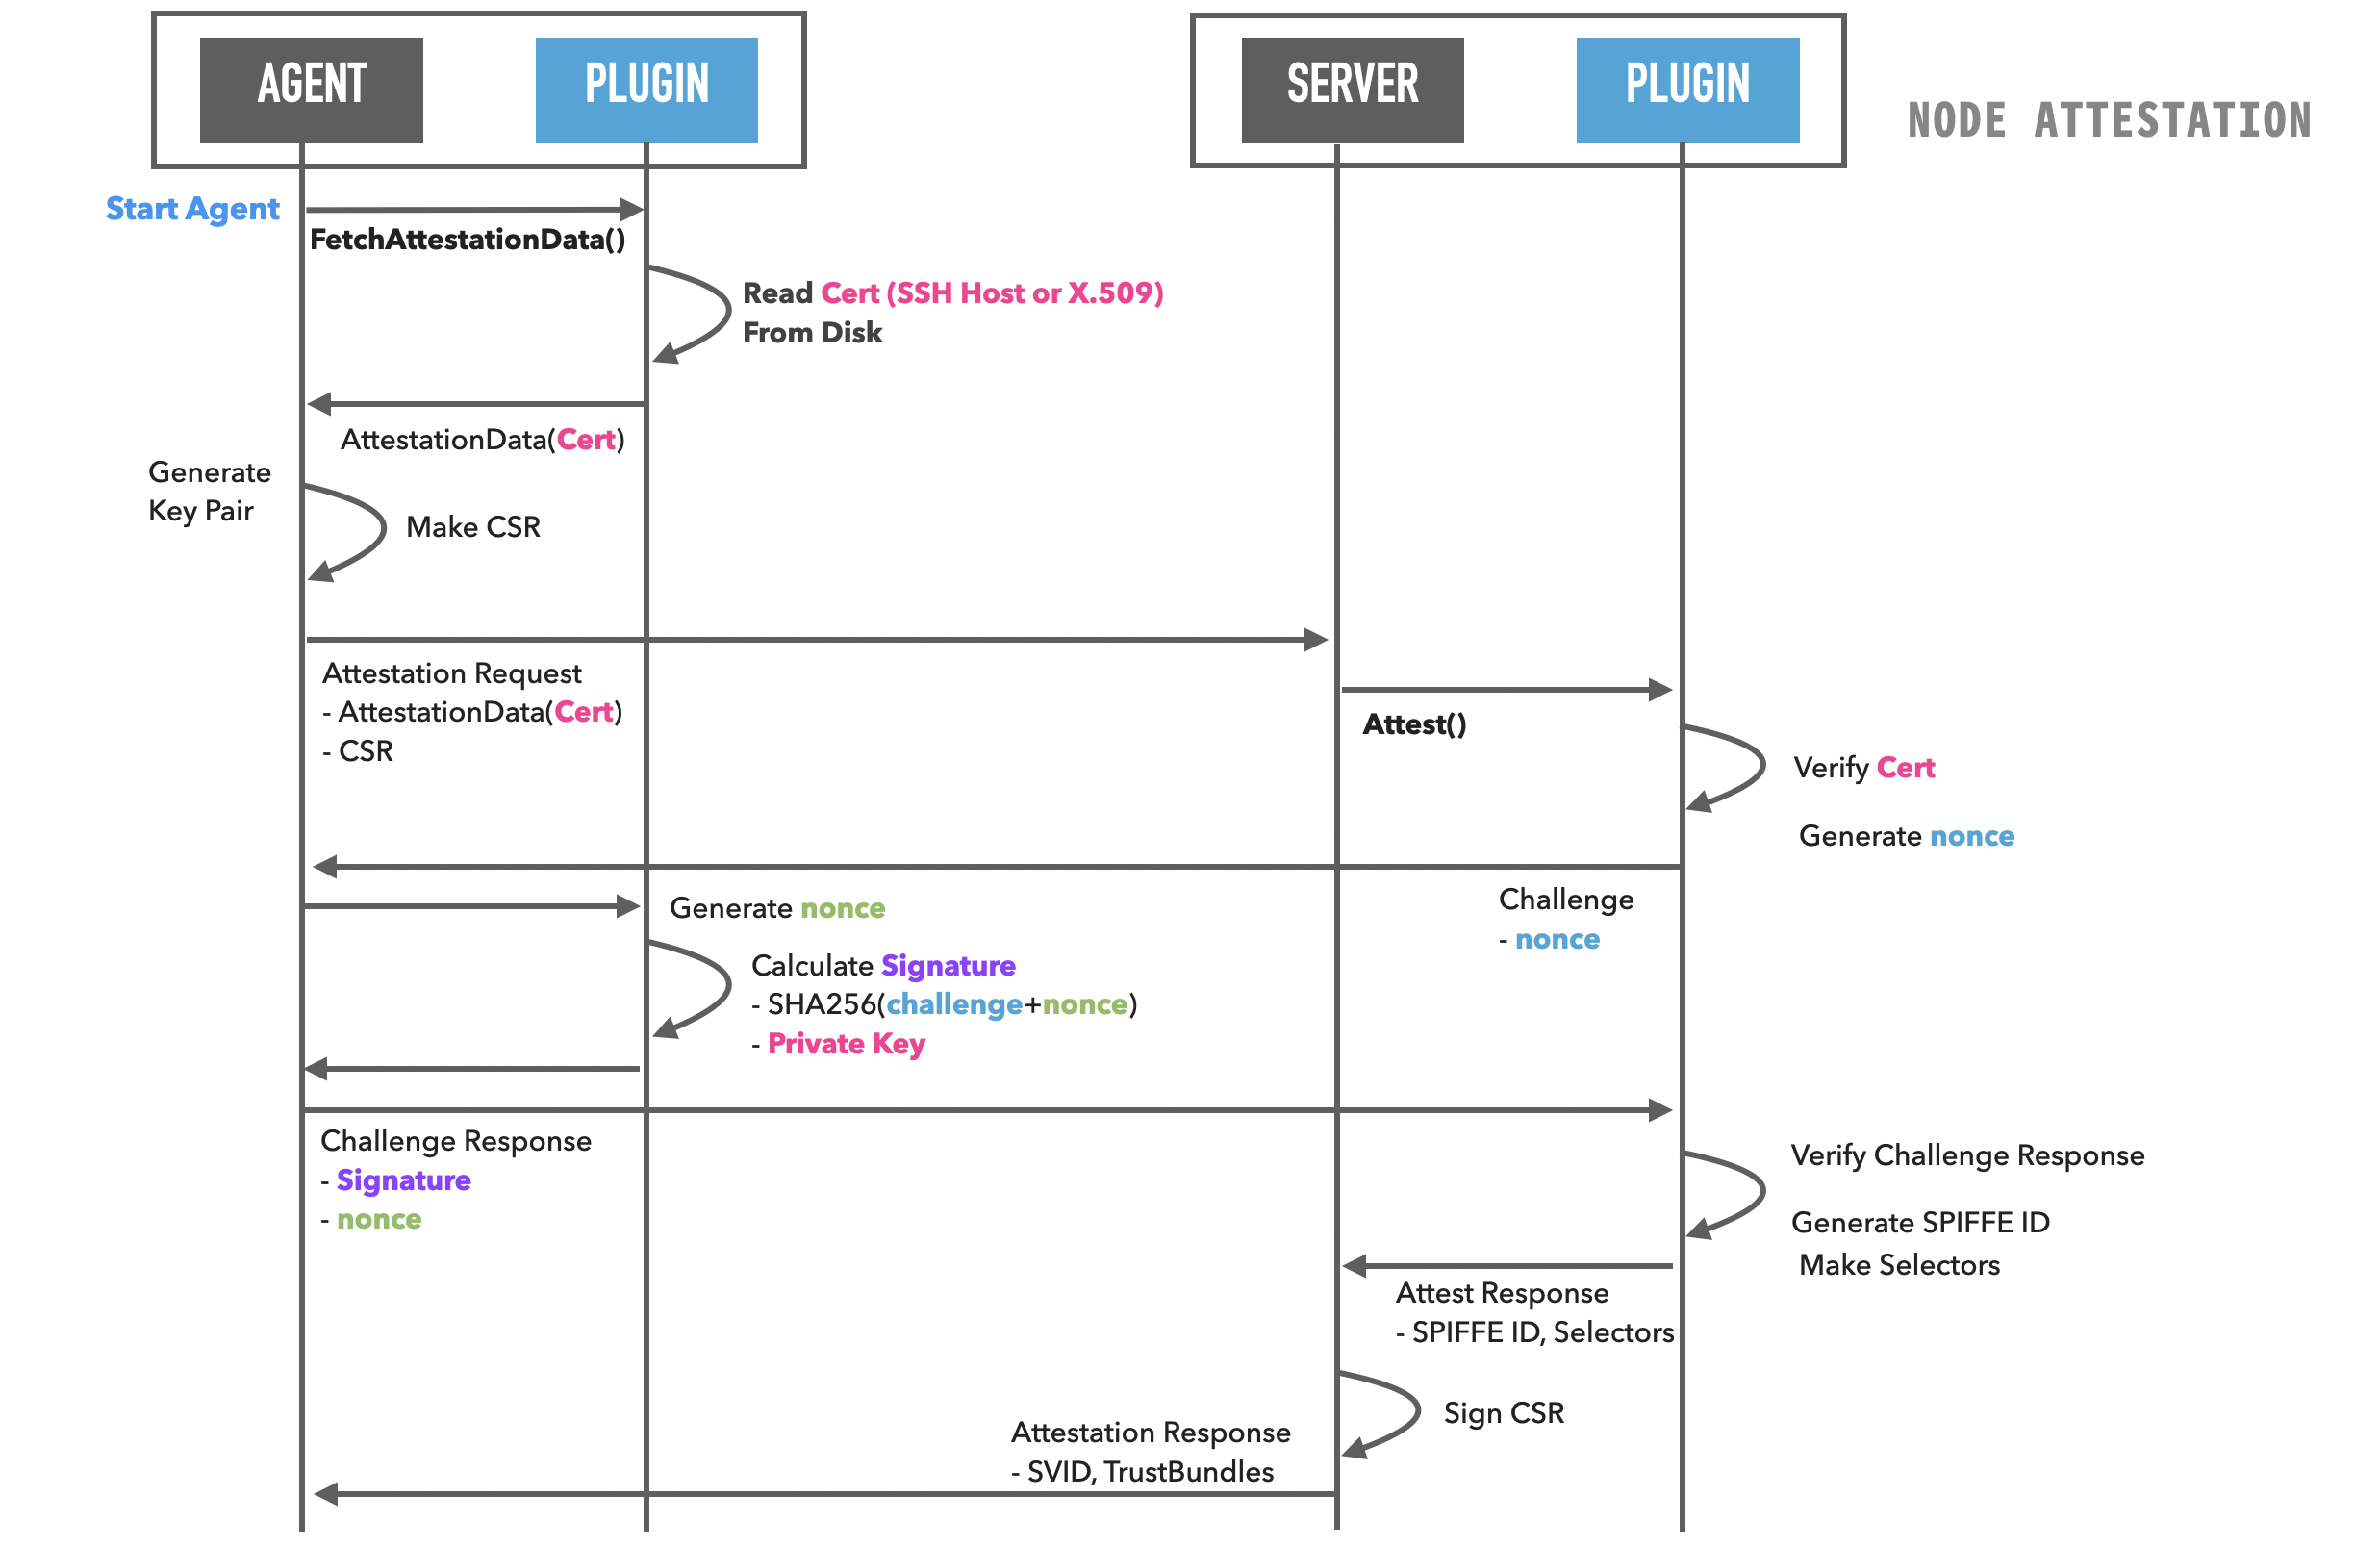
Node Attestationのフロー
sshpop・x509popは扱う証明書の種類が異なっているだけで、どちらもAttestationフローは同じようなものです。基本的にSPIRE ServerによるCA証明書(公開鍵)を使ったAgentの証明書の検証と、その後にチャレンジ・レスポンス方式により秘密鍵の所有確認を行っています。
チャレンジ・レスポンスでは、乱数を加えたディジタル署名の検証が行われており、ディジタル署名は事前に検証済みの証明書(公開鍵)を使って検証されます。
証明書の作成
ここに記載しているのはあくまで検証用の証明書を簡単に用意するための手順となります。実際に運用する際には正しい証明書の発行手順を確認してください。
sshpop
※ ここでは説明を簡単にするためCAはAgent側で用意し、公開鍵をServerに渡します。
CA鍵ペアの生成
$ ssh-keygen -f spire-sshpop-ca.key
ホストの公開鍵に署名
$ ssh-keygen -s spire-sshpop-ca.key -I spire-agent -h -n `hostname` -V +366d /etc/ssh/ssh_host_rsa_key.pub
x509pop
※ ここでは説明を簡単にするためCAはAgent側で用意し、CA証明書をServerに渡します。
CAの準備
$ openssl ecparam -out root_ca.key -name prime256v1 -genkey
$ openssl req -days 3650 -x509 -new -key root_ca.key -out root_ca.pem -config <(cat /etc/pki/tls/openssl.cnf ; printf "\n[v3]\nbasicConstraints=CA:true") -extensions v3 -CAcreateserial
Agentの秘密鍵生成とCSRの用意
$ openssl ecparam -out spire-agent.key -name prime256v1 -genkey
$ openssl req -new -key spire-agent.key -out agent.csr
準備したCAを使ってCSRに署名
※ x509popに使うX.509証明書はKeyUsageにDigital Signatureが含まれる必要があります。
$ openssl x509 -days 365 -req -CA root_ca.pem -CAkey root_ca.key -in agent.csr -out spire-agent.pem -extfile <(cat /etc/pki/tls/openssl.cnf ; printf "\n[v3]\nkeyUsage=digitalSignature\nsubjectAltName=DNS:spire-agent") -extensions v3 -CAcreateserial
SPIRE Agentの設定
sshpop
pluginの設定にsshのホスト証明書と秘密鍵をしています。
https://github.com/spiffe/spire/blob/master/doc/plugin_agent_nodeattestor_sshpop.md
agent {
  -省略-
}

plugins {
    NodeAttestor "sshpop" {
        plugin_data {
            host_cert_path = "/etc/ssh/ssh_host_ecdsa_key-cert.pub"
            host_key_path = "/etc/ssh/ssh_host_ecdsa_key"
        }
    }
    KeyManager "memorty" {
        plugin_data {
        }
    }
    WorkloadAttestor "unix" {
        plugin_data {
        }
    }
}
x509pop
x509popでは、pluginの設定にAgentのX.509証明書と秘密鍵を指定します。
https://github.com/spiffe/spire/blob/master/doc/plugin_agent_nodeattestor_x509pop.md
agent {
  -省略-
}

plugins {
    NodeAttestor "x509pop" {
        plugin_data {
            certificate_path = "/var/lib/spire/x509pop/spire-agent.pem"
            private_key_path = "/var/lib/spire/x509pop/spire-agent.key"
        }
    }
    KeyManager "memorty" {
        plugin_data {
        }
    }
    WorkloadAttestor "unix" {
        plugin_data {
        }
    }
}
SPIRE Serverの設定
sshpop
今回はAgentがCAを運用しているため、SSHホスト証明書に署名したCAが持つ公開鍵をSPIRE Serverに登録します。
server {
 -省略-
}

plugins {
    DataStore "sql" {
        plugin_data {
            database_type = "sqlite3"
            connection_string = "/var/lib/spire/data/datastore.sqlite3"
        }
    }

    NodeAttestor "sshpop" {
        plugin_data {
            # 信頼するCAの公開鍵が含まれる authorized_keys フォーマットのファイル
            cert_authorities_path = "/var/lib/spire/sshpop/ssh_cert_authority.pub"

            # 設定ファイルに直接指定することも可能
            # host_authorities = ["ssh-ed25519 ...."]
        }
    }

    NodeResolver "noop" {
        plugin_data {}
    }

    KeyManager "memory" {
        plugin_data = {}
    }

    UpstreamAuthority "disk" {
        plugin_data {
            key_file_path = "/var/lib/spire/ca/dummy_upstream_ca.key"
            cert_file_path = "/var/lib/spire/ca/dummy_upstream_ca.crt"
        }
    }
}
x509pop
x509popでは、CAの証明書を指定します。
参考: https://github.com/spiffe/spire/blob/master/doc/plugin_server_nodeattestor_x509pop.md
server {
 -省略-
}

plugins {
    DataStore "sql" {
        plugin_data {
            database_type = "sqlite3"
            connection_string = "/var/lib/spire/data/datastore.sqlite3"
        }
    }

    NodeAttestor "x509pop" {
        plugin_data {
            # 信頼するCAの証明書
            ca_bundle_path = "/var/lib/spire/x509pop/agent-ca-cert.pem"

            # 複数ファイルの指定も可能
            # ca_bundle_paths = ["..."]
        }
    }

    NodeResolver "noop" {
        plugin_data {}
    }

    KeyManager "memory" {
        plugin_data = {}
    }

    UpstreamAuthority "disk" {
        plugin_data {
            key_file_path = "/var/lib/spire/ca/dummy_upstream_ca.key"
            cert_file_path = "/var/lib/spire/ca/dummy_upstream_ca.crt"
        }
    }
}
SPIFFE IDのフォーマットについて
Node AttestationによってAgentに割り当てられるSPIFFE IDは設定ファイルで変更することができます。それぞれのpluginの設定にてSPIFFE IDのパス部をagent_path_template にGoのテンプレートフォーマットで指定することができます。
sshpop
以下の例では SSHホスト証明書を発行する際に指定したPrincipalをSPIFFE IDのパスに含めています。
principalの他にもホスト名やなども利用できます。 デフォルトはFingerprintが含まれています(spiffe://<trust-domain>/spire/agent/sshpop/<fingerprint>)。
NodeAttestor "sshpop" {
      plugin_data {
          cert_authorities_path = "./conf/server/dummy_ssh_cert_authority.pub"
          agent_path_template = "static/{{ index .ValidPrincipals 0 }}"
      }
}
x509pop
以下の例ではX.509証明書のCommon NameをSPIFFE IDのパスに含めています。
その他にもX.509証明書が持つ要素を指定することができます。こちらもデフォルトはFingerprintが含まれます(spiffe://<trust domain>/spire/agent/x509pop/<fingerprint>)。
NodeAttestor "x509pop" {z
      plugin_data {
          ca_bundle_path = "/opt/spire/conf/server/agent-cacert.pem"
          agent_path_template = "/cn/{{ .Subject.CommonName }}"
      }
}
まとめ
sshpopもx509もどちらも同じようなフローでNode Attestationが行われ、設定できる内容も似たような内容になっていますので、運用しやすい方を選べばよいかなと思います。
しかしx509popではCA証明書のFingerprintでAgentをグルーピングできるような仕組み(Node Selector)を提供しているため、RegistrationEntryで中間CAやルートCAの単位でノードをグルーピングして登録したい場合などにはx509popが有効かもしれません。