はじめに
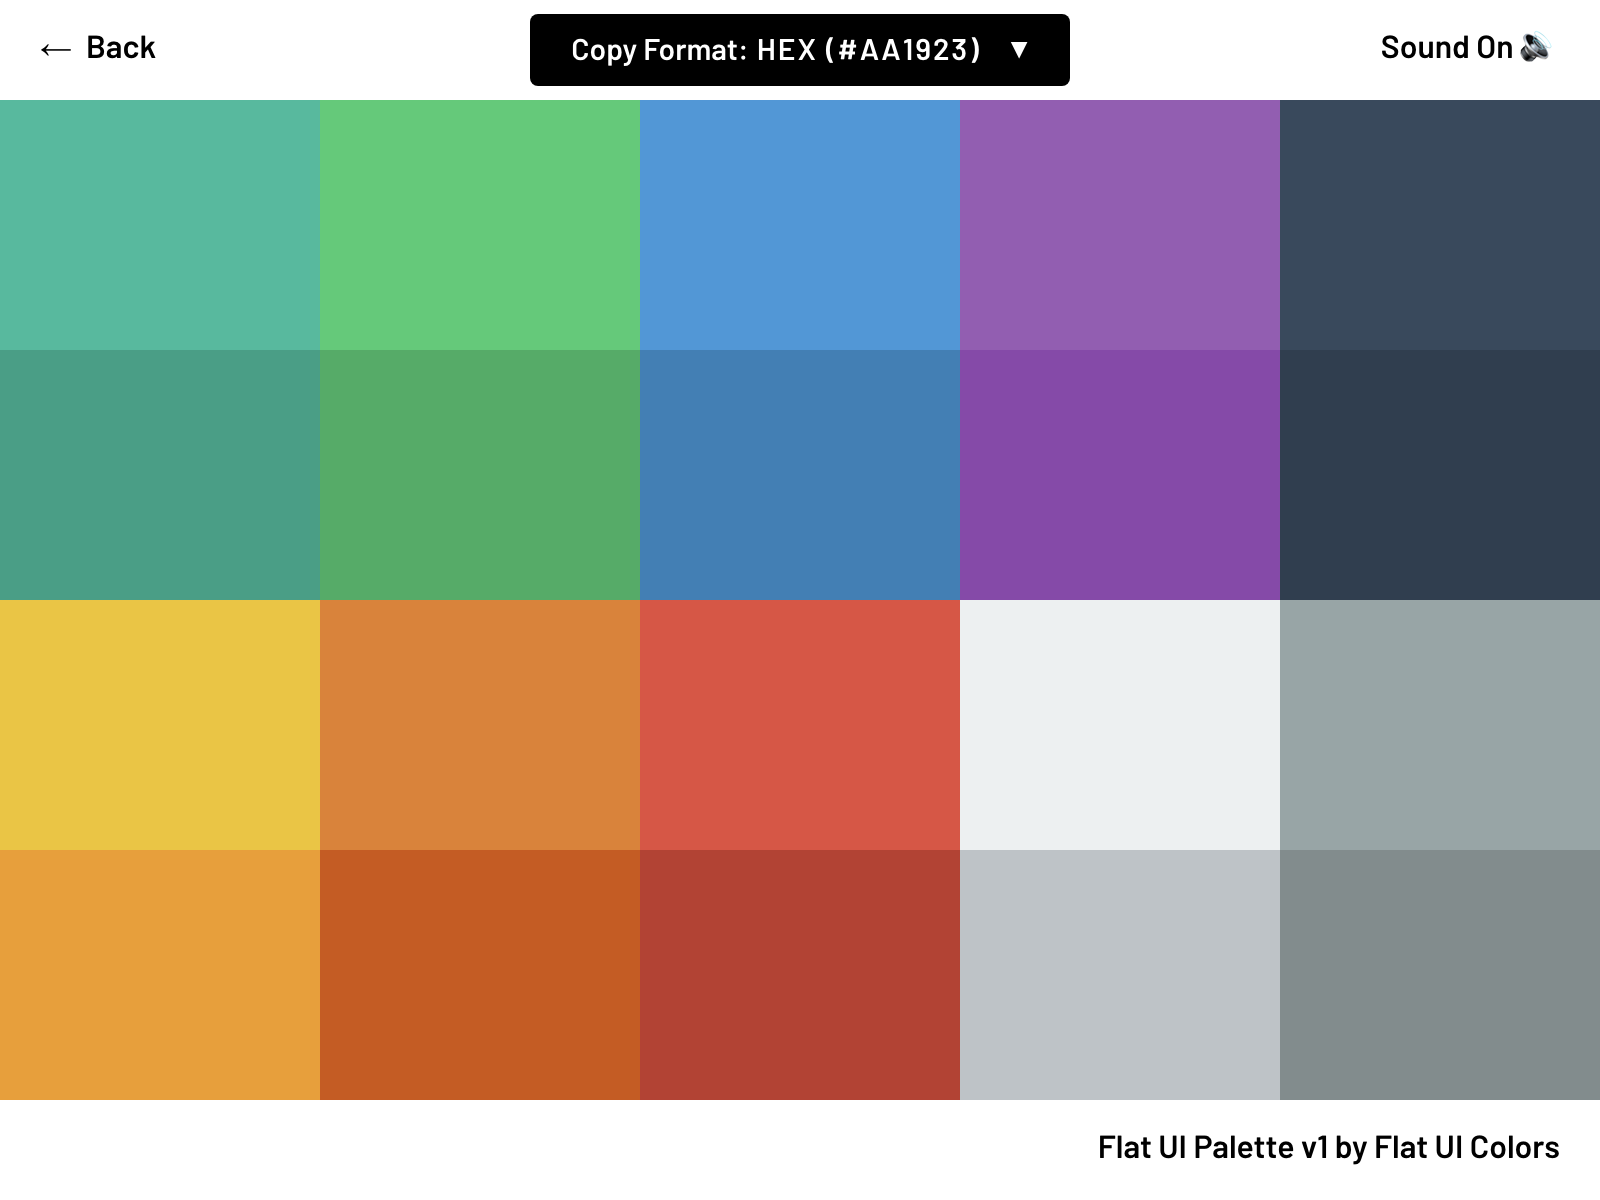
僕は普段アプリの配色を考えるときにFlat UI Colors (https://flatuicolors.com/)を参考にしています。このサイトの配色に従うことで、色の選択に悩むことが少なくなり、整った印象を持つアプリが作れるようになります。

このサイトはワンクリックでHEX値やRGB値などをコピーできるように作られていて便利なのですが、それでも毎回サイトからコピーするのはわりと面倒です。
「エンジニアならもっと楽したい…。ならば、Flat UI ColorsをスクレイピングしてRGB値を抽出し、ソースコードファイルに変換してしまおう」
という発想です。
この記事で紹介するソースコードはGitHub (https://github.com/HituziANDO/flat_ui_colors)にプッシュしていますので、あわせてご参照ください。
スクレイピングの成果物
まず最初に、スクレイピングの成果物は以下のようなRGB値を列挙したソースコードです。以下は成果物の一つのJavaScriptコードの一部です。完全版はこちらにあります。他にもTypeScript、SCSS、Swiftに対応しています。
/**
 * Flat UI Palette v1 by Flat UI Colors
 * https://flatuicolors.com/palette/defo
 */
const Defo = {
    turquoise: rgb(26, 188, 156),
    emerald: rgb(46, 204, 113),
    peterRiver: rgb(52, 152, 219),
    amethyst: rgb(155, 89, 182),
    wetAsphalt: rgb(52, 73, 94),
    greenSea: rgb(22, 160, 133),
    nephritis: rgb(39, 174, 96),
    belizeHole: rgb(41, 128, 185),
    wisteria: rgb(142, 68, 173),
    midnightBlue: rgb(44, 62, 80),
    sunFlower: rgb(241, 196, 15),
    carrot: rgb(230, 126, 34),
    alizarin: rgb(231, 76, 60),
    clouds: rgb(236, 240, 241),
    concrete: rgb(149, 165, 166),
    orange: rgb(243, 156, 18),
    pumpkin: rgb(211, 84, 0),
    pomegranate: rgb(192, 57, 43),
    silver: rgb(189, 195, 199),
    asbestos: rgb(127, 140, 141),
}

const FlatUIColors = {
    Defo,
};
ディレクトリ構成
プロジェクトのディレクトリ構成は以下の通りです。
L app/
  L __init__.py
  L main.py
  L flat_ui_colors_parser.py
  L writer/
    L __init__.py
    L js_writer.py
    L scss_writer.py
    L swift_writer.py
    L ts_writer.py
  L util/
    L __init__.py
    L string_util.py
L dist/
L tmp/screenshots/
L requirements.txt
L README.md
appディレクトリがPythonコードを格納しているところになり、main.pyがエントリポイントとなります。ターミナルでpython app/main.pyと打つことでスクレイピングを開始できます。distとtmpディレクトリはプログラムを実行することで生成され、スクレイピングの結果が出力されます。
flat_ui_colors_parser.pyがスクレイピングおよびHTMLパーサの実装になります。writerディレクトリには、スクレイピングで得たデータを各プログラミング言語のソースコードに変換するWriterが実装されています。
プロジェクトのセットアップに関しては、README.mdを読んでください。
プログラムの解説
このプログラムは主にMain、Parser、Writerの3つのパートからなります。
Main
エントリポイントとなるmain.pyはシンプルです。以下の処理をしています。
- Writerの初期化
- WebサイトのURLをfor文で順番にFlatUiColorsParserに渡し実行
- Writerの終了処理および出力
import os
from flat_ui_colors_parser import FlatUiColorsParser
from writer.js_writer import JsWriter
from writer.scss_writer import ScssWriter
from writer.swift_writer import SwiftWriter
from writer.ts_writer import TsWriter

if __name__ == '__main__':
    # Writerの初期化
    writers = [SwiftWriter(), JsWriter(), TsWriter(), ScssWriter()]

    urls = [
        "https://flatuicolors.com/palette/defo",
        "https://flatuicolors.com/palette/us",
        "https://flatuicolors.com/palette/au",
        "https://flatuicolors.com/palette/gb",
        "https://flatuicolors.com/palette/ca",
        "https://flatuicolors.com/palette/cn",
        "https://flatuicolors.com/palette/nl",
        "https://flatuicolors.com/palette/fr",
        "https://flatuicolors.com/palette/de",
        "https://flatuicolors.com/palette/in",
        "https://flatuicolors.com/palette/ru",
        "https://flatuicolors.com/palette/es",
        "https://flatuicolors.com/palette/se",
        "https://flatuicolors.com/palette/tr"
    ]
    for url in urls:
        FlatUiColorsParser.exec(url, writers)

    # Writerの終了処理
    for writer in writers:
        writer.finish()

    # distディレクトリがない場合は作成
    DIST_DIR = "dist"
    os.makedirs(DIST_DIR, exist_ok=True)

    # 結果の出力
    for writer in writers:
        f = open(f"{DIST_DIR}/{writer.filename()}", "w", encoding="UTF-8")
        f.write(writer.source_code())
        f.close()
Parser
次にFlatUiColorsParserクラスを見ていきます。このクラスはスクレイピングとHTML解析を担当しています。
import os
import re
import time
from bs4 import BeautifulSoup
from selenium import webdriver
from selenium.webdriver import Chrome
from util.string_util import to_camel


class FlatUiColorsParser:
    @classmethod
    def exec(cls, url, writers):
        # URLからリスト名を抽出
        # 例) https://flatuicolors.com/palette/defo -> Defo
        list_name = to_camel(url.rsplit('/', 1)[-1], True)

        # ヘッドレスモードでChromeを動かす
        opts = webdriver.ChromeOptions()
        opts.add_argument("--headless")
        opts.add_argument("--no-sandbox")
        driver = Chrome(executable_path="/usr/local/bin/chromedriver", options=opts)

        # サイトを取得
        driver.get(url)
        # Flat UI ColorsのサイトはVue.jsで画面が作られるため、
        # ページ取得およびJS実行が終わるまで少し待機
        time.sleep(4)

        # HTMLを取得
        html = driver.page_source

        # 色見本用にサイトのスクリーンショットを撮っておく
        os.makedirs("tmp/screenshots", exist_ok=True)
        driver.save_screenshot(f"tmp/screenshots/{list_name}.png")

        # webdriverの終了
        driver.quit()

        # HTML解析にBeautifulSoup4を使用
        soup = BeautifulSoup(html, 'html.parser')

        # このカラーパレットを作ったデザイナー名を抽出
        authors = []
        elements = soup.select(".author")
        for element in elements:
            author = element.text.replace("\n", "").strip()
            authors.append(author)

        # RGB情報を抽出
        colors = []
        # class="color"の要素をすべて取得
        elements = soup.select(".color")
        for element in elements:
            # 色名を取得。余計な文字は除去し、キャメルケースに変換
            color_name = element.text \
                .replace('\'', '') \
                .replace('-', ' ') \
                .replace('!', '') \
                .replace('?', '') \
                .replace('=', '') \
                .strip()
            color_name = to_camel(color_name, False)

            # 色名は後で変数名に使うため、
            # 数字から始まる色名は先頭に'_'を付ける
            if re.match(r'^\d.*$', color_name):
                color_name = '_' + color_name

            # アルファベット以外の文字を置換
            color_name = color_name \
                .replace('á', 'a') \
                .replace('ó', 'o') \
                .replace('è', 'e') \
                .replace('ā', 'a') \
                .replace('â', 'a')

            # 要素のstyle属性に"background: rgb(r, g, b);"の形式でRGB値が入っているので、
            # rgb(r, g, b)だけを抽出
            color = element.get("style").replace('background: ', '').replace(';', '').strip()

            colors.append((color_name, color))

        # Writerに抽出した情報を渡す
        for writer in writers:
            writer.add_color_list(url, authors, list_name, colors)
Writer
最後にWriterを見ていきます。ここではJsWriterクラスを使って説明します。このクラスはFlatUIColorsParserクラスの解析結果を受け取って、JavaScriptのソースコードに変換する役目を担っています。
class JsWriter:
    """
    JavaScript code writer.
    """

    def __init__(self, indent="    "):
        self.__list_names = []
        self.__indent = indent
        # JavaScriptコード
        # RGB値を扱う基本クラスやユーティリティ関数を定義
        self.__source_code = """export class FlatUIColor {
    /**
     * @param {number} red Red. The range of its value is 0 to 255.
     * @param {number} green Green. The range of its value is 0 to 255.
     * @param {number} blue Blue. The range of its value is 0 to 255.
     */
    constructor(red, green, blue) {
        this.red = red;
        this.green = green;
        this.blue = blue;
    }

    /**
     * Returns rgb(r, g, b).
     */
    rgbAsCSS() {
        return `rgb(${this.red}, ${this.green}, ${this.blue})`;
    }

    /**
     * Returns rgba(r, g, b, a).
     * @param {number} alpha Alpha. The range of its value is 0 to 1.0.
     */
    rgbaAsCSS(alpha) {
        return `rgba(${this.red}, ${this.green}, ${this.blue}, ${alpha})`;
    }
}

const rgb = (r, g, b) => new FlatUIColor(r, g, b);\n\n"""

    def filename(self):
        # 出力されるファイル名
        return "flat_ui_colors.js"

    def source_code(self):
        # JsWriterで書き込まれたJSコード
        return self.__source_code

    def add_color_list(self, url, authors, list_name, colors):
        """
        :param url: URL of the color list page.
        :param authors: Authors.
        :param list_name: The color list name.
        :param colors: (color_name, color)[]. color_name: A color name. color: 'rgb(r, g, b)'
        """

        # コメントの追加
        # このカラーパレットを作ってくれたデザイナーに敬意を払ってauthorは書きましょう
        self.__source_code += "/**\n"
        for author in authors:
            self.__source_code += f" * {author}\n"
        self.__source_code += f" * {url}\n"
        self.__source_code += " */\n"

        # begin object {list_name}
        self.__source_code += f"const {list_name} = {{\n"

        # Add colors
        for color in colors:
            self.__add_color(color[0], color[1])

        self.__source_code += "\n"

        # begin array
        self.__source_code += f"{self.__indent}palette: [\n"
        for color in colors:
            self.__source_code += f"{self.__indent}{self.__indent}{list_name}.{color[0]},\n"
        # end array
        self.__source_code += f"{self.__indent}]\n"

        # end object {list_name}
        self.__source_code += "};\n\n"

        self.__list_names.append(list_name)

    def finish(self):
        # begin export default object
        self.__source_code += "const FlatUIColors = {\n"

        for name in self.__list_names:
            self.__source_code += f"{self.__indent}{name},\n"

        # end export default object
        self.__source_code += "};\n"
        self.__source_code += "export default FlatUIColors;\n"

    def __add_color(self, color_name, color):
        """
        :param color_name: A color name.
        :param color: rgb(r, g, b)
        """

        self.__source_code += f"{self.__indent}{color_name}: {color},\n"
見ての通りFlatUIColorsParserから受け取った情報をもとに完成形をイメージしてJavaScriptコードを作っていきます。このJsWriterで出力されるソースコードは、スクレイピングの成果物で紹介したものになります。
Writerは、filename、source_code、add_color_list、finishメソッドを実装しておけば、ダックタイピングにより様々なWriterを動かすことができます。つまり、このプロジェクトに用意されていないプログラミング言語でも、他のWriterを参考に書き、main.pyに追加すれば、同様に出力を得ることができます。
おわりに
上記のJsWriterで出力されたflat_ui_colors.jsは、以下のように使うことができます。僕は、CSS in JSで使うことが多いため、rgbAsCSSというメソッドを生やしています。
const color = FlatUIColors.Gb.protossPylon.rgbAsCSS()
console.log(color)  // -> "rgb(0, 168, 255)"
最後に、スクレイピング・プログラムを回しまくるのは控えましょう。成果物もGitHubにプッシュしてあるので、皆さんはここからコピーして使ってください。もし、使っているプログラミング言語のソースコードファイルが無いときは、Writerを書いてプルリクくだされば有り難いです。