はじめに
やりたいこと
次の方針で、Androiのゲームアプリを作りたい!
- ゲームの作成はUnityで行いたい
- メニュー画面など、3D表示しない部分はAndroid Studioで作りたい

やったこと
注意事項
- この投稿は、Unity、Android Studioでの開発経験のある方を対象としております
- Unityをライブラリとして組込む場合、全画面表示以外はサポートされていません
開発環境
- Android Studio
- Android Studio Dolphin | 2021.3.1
- Unity
- 2022.1.23f1
実施内容
公式ガイドの内容を元に、試行錯誤した結果をまとめました。
https://docs.unity3d.com/ja/2022.1/Manual/UnityasaLibrary-Android.html
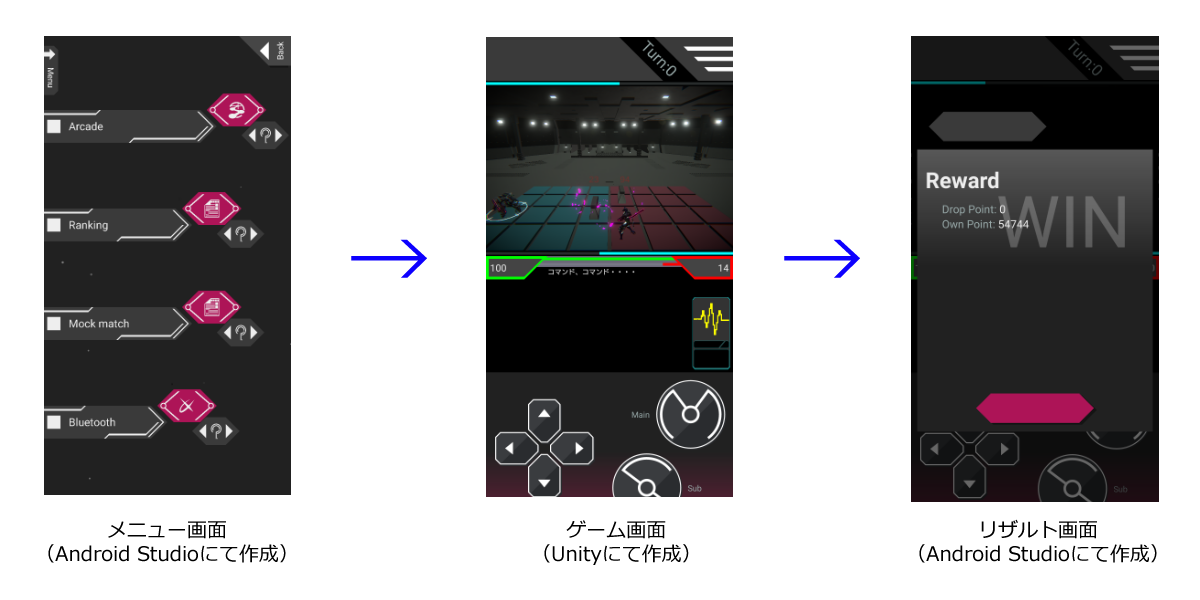
Android Studioでメニュー画面を作成
ゲーム画面を起動するまでの画面、ゲーム画面終了後の画面、を作成しておきます。
内容はご随意に。
Unityでゲーム部分を作成
内容はご随意に。
ゲーム部分が完成したら、Exportを行います
- File > Build Settings を開きます
- PlatformにAndroidを選択し、Export Projectにチェックをつけます
- Exportを押すと、Export先のディレクトリが聞かれるので、適当に指定します
- 指定したディレクトリに、Androidアプリケーションのプロジェクトが出力されます

UnityのExport結果をAndroidのライブラリとしてビルド
UnityがExportしたAndroidアプリケーションのプロジェクトを、ライブラリとしてビルドします。
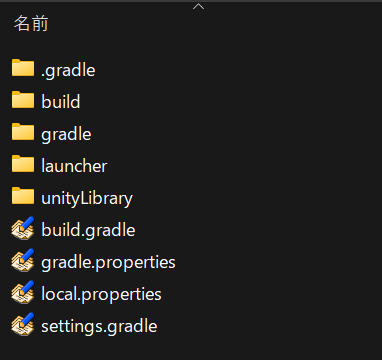
次のファイルを変更します。
- {出力先ディレクトリ}/build.gradle
- {出力先ディレクトリ}/launcher/build.gradle
- {出力先ディレクトリ}/gradle.properties
- {出力先ディレクトリ}/launcher/src/main/AndroidManifest.xml
- {出力先ディレクトリ}/unityLibrary/src/main/AndroidManifest.xml
変更箇所をピックアップします。
launcher/build.gradle
// gradleのバージョンを4.2.0に変更する
// 変更前:classpath 'com.android.tools.build:gradle:4.0.1'
classpath 'com.android.tools.build:gradle:4.2.0'
launcher/build.gradle
// ライブラリとしてビルドする
// 変更前→ apply plugin: 'com.android.application'
apply plugin: 'com.android.library'

// アプリケーションIDの削除
// 変更前→ applicationId '{Unityが出力したアプリケーションID}'

// bundleのブロックを削除
// 変更前↓
// bundle {
//     language {
//         enableSplit = false
//     }
//     density {
//         enableSplit = false
//    }
//    abi {
//        enableSplit = true
//    }
// }
gradle.properties
# 非推奨のオプションを削除
# 変更前→ android.enableR8=false
launcher/src/main/AndroidManifest.xml
<!-- アプリケーションのフルスクリーン設定を削除 -->
<!--  変更前→ <supports-screens android:smallScreens="true" android:normalScreens="true" android:largeScreens="true" android:xlargeScreens="true" android:anyDensity="true" /> -->

<!-- アプリケーションの設定を削除 -->
<!-- 変更前→ <application android:label="@string/app_name" android:icon="@mipmap/app_icon" /> -->
unityLibrary/src/main/AndroidManifest.xml
<!-- アプリケーションの設定を削除 -->
<!-- 変更前↓ -->
<!-- <application android:extractNativeLibs="true">
<!--   <activity android:name="com.unity3d.player.UnityPlayerActivity" android:theme="@style/UnityThemeSelector" android:screenOrientation="fullUser" android:launchMode="singleTask" android:configChanges="mcc|mnc|locale|touchscreen|keyboard|keyboardHidden|navigation|orientation|screenLayout|uiMode|screenSize|smallestScreenSize|fontScale|layoutDirection|density" android:resizeableActivity="false" android:hardwareAccelerated="false" android:exported="true">
<!--     <intent-filter>
<!--       <action android:name="android.intent.action.MAIN" />
<!--       <category android:name="android.intent.category.LAUNCHER" />
<!--     </intent-filter>
<!--     <meta-data android:name="unityplayer.UnityActivity" android:value="true" />
<!--     <meta-data android:name="android.notch_support" android:value="true" />
<!--     </activity>
<!--   <meta-data android:name="unity.splash-mode" android:value="0" />
<!--   <meta-data android:name="unity.splash-enable" android:value="True" />
<!--   <meta-data android:name="unity.launch-fullscreen" android:value="True" />
<!--   <meta-data android:name="unity.allow-resizable-window" android:value="False" />
<!--   <meta-data android:name="notch.config" android:value="portrait|landscape" />
<!-- </application>
{出力先ディレクトリ}にて、次のコマンドでビルドします。
gradle build
ビルドに成功すると、{出力先ディレクトリ}/launcher/build/outputs/aar/launcher-release.aar が出力されます。
aarをAndroidアプリへ組み込む
出力された aarファイルを、{Androidプロジェクトのディレクトリ}/app/libs へ配置し、build.gradleに以下のように追記します
app/build.gradle
dependencies {
    implementation fileTree(dir: 'libs', include: ['*.jar','*.aar'])
}
次のようにUnityで作成したゲーム画面を表示します。
sample.kt
override fun onCreate(savedInstanceState: Bundle?) {
    // 省略

    // container はゲーム画面のViewを配置する個所にあらかじめFrameLayoutを置いておく
    val player = createUnityPlayer()
    val lp = ViewGroup.LayoutParams(ViewGroup.LayoutParams.MATCH_PARENT, ViewGroup.LayoutParams.MATCH_PARENT)
    container.addView(player.view, 0, lp)
}

private fun createUnityPlayer(): UnityPlayer {
    return UnityPlayer(activity).also {
        it.init(it.settings.getInt("gles_mode", 1), false)
        it.windowFocusChanged(true)
    }
}
おわりに
以上の内容で、Unityで作成したゲーム画面を、メニュー画面を含む Androidアプリケーションに取り込むことができました。
次に、メニュー画面での選択内容をゲーム画面へ渡す、ゲームの結果をリザルト画面へ渡す処理が必要になるかと思います。次のページの内容で実現することが出来たので、必要に応じてご参照ください。
- Android(kotlin/Java) → Unity
- Unity → Android(kotlin/Java)