Table of content
- Environment
- 1.1. Command line
- 1.2. pip
- 1.3. pyenv
- 1.4. virtualenv
- 1.5. iPython Notebook
- Module
- File access
- Database access
- Plotting with matplotlib
1. Environment
1.1. Command line
- To execute a python script:
$ python myscript.py
- To open python command line:
$ python
1.2. pip
-
pipis a Python package manager. -
pipis already installed for Python 2 >=2.7.9 or Python 3 >=3.4. - If your environment has no
pip, you can installpipby the following steps:
$ wget https://bootstrap.pypa.io/get-pip.py
$ python get-pip.py
- Reference: https://pip.pypa.io/en/stable/user_guide
1.3. pyenv
- Manage multiple versions of Python like
rbenvin Ruby - https://github.com/yyuu/pyenv
1.4. virtualenv
- A tool to create multiple Python environments
- Can use
virtualenvdirectly, or usepyenv-virtualenv, a plugin of pyenv - virtualenv: https://pypi.python.org/pypi/virtualenv
- pyenv-virtualenv: https://github.com/yyuu/pyenv-virtualenv
1.5. iPython Notebook
- An interactive Python environment
- Write & execute Python code, markdown, mathmatical notations in LaTex, plots & media.
- Can be used for experiment, demo, presentation & communication
-
iPython Notebookis currently renamed toJupyter Notebook - http://jupyter.org/
Install iPython Notebook with pip
$ pip install jupyter
- Note: iPython works on Python2.7 or Python3.3 or above.
Start iPython Notebook
$ jupyter notebook
Using iPython Notebook
- Browse file from directory tree
- Open existing notebook
- Create new notebook
- Write python code in cell
- Write markdown text in cell (normal text, Latex)
- New cell above/below a current cell
- Delete a cell
2. Module
Basic on module
- In
mymod.py:
def mysum(a, b):
    return a + b
- In
myscript.py:
import mymod
print(mymod.mysum(3, 4))
- Execute
myscript.py
> python myscript.py
7
- Use alias to module:
import mymod as mm
print(mm.mysum(3, 4))
# mm works as alias to mymod
- Functions or variables from modules can be accessed directly by:
from mymod import mysum
print(mysum(3, 4))
Import patterns
# Import a module and access the module's elements through it name
import modulename
modulename.func1(params)
# Use alias to a module
import modulename as alias
alias.func1(params)
# Import specific names from a module
from modulename import func1, func2
func1(params)
func2(params)
# Import specific names and use alias
from modulename import func1 as f
f(params)
# Import all names from a module except those beginning with an underscore (_)
from modulename import *
func1(params)
func2(params)
Global variable __name__
-
Within a module, global variable
__name__returns the module's name. -
The script which is being execute has
__main__as its module name. -
For example:
- In
mymod.py:
print(__name__)- In
myscript.py:
import mymod- Execute
myscripts.py
> python myscripts.py mymod- Execute
mymod.py
> python mymod.py __main__ - In
Module can be executed directly
- We can use
__name__to distinguish a module is called directly or not. - In
mymod.py
def mysum(a, b):
    return a + b
if __name__ == "__main__":
    print("Mymod is executed directly")
Module search path
- Python search module from directories listed in
sys.path
import sys
print(sys.path)
3. File access
Reading from file
Read all data from file
f = open('stock1.csv', 'r')
data = f.read()
f.close()
print(data)
sec_code,opn,high,low,now,time
6702,602,610,599,608,2016-01-04 00:00:00
6702,608,611,608,610,2016-01-04 00:10:00
6758,2958,3000,2940,2998,2016-01-04 00:00:00
6758,2998,3011,2992,3009,2016-01-04 00:10:00
Read one line
f = open('stock1.csv', 'r')
data = f.readline()
f.close()
print(data)
sec_code,opn,high,low,now,time
Read all lines
f = open('stock1.csv', 'r')
for line in f:
    print(line)
f.close()
sec_code,opn,high,low,now,time
6702,602,610,599,608,2016-01-04 00:00:00
6702,608,611,608,610,2016-01-04 00:10:00
6758,2958,3000,2940,2998,2016-01-04 00:00:00
6758,2998,3011,2992,3009,2016-01-04 00:10:00
Write to file
f = open('sample_out.csv', 'wb')
f.write('Programming with Python \n')
f.write('Write 2 numbers: %d %f' % (5, 7.95))
f.close()
Reading from CSV
import csv
linecount = 0
with open('stock1.csv', 'rb') as csvfile:
    stockreader = csv.reader(csvfile, delimiter=',')
    for row in stockreader:
        print(row)
        linecount += 1

print("%d lines" % linecount)
['sec_code', 'opn', 'high', 'low', 'now', 'time ']
['6702', '602', '610', '599', '608', '2016-01-04 00:00:00']
['6702', '608', '611', '608', '610', '2016-01-04 00:10:00']
['6758', '2958', '3000', '2940', '2998', '2016-01-04 00:00:00']
['6758', '2998', '3011', '2992', '3009', '2016-01-04 00:10:00']
5 lines
Writing to CSV
import csv
with open('sample_out.csv', 'wb') as csvfile:
    csvwriter = csv.writer(csvfile, delimiter=',', lineterminator="\n")
    csvwriter.writerow(['Product', 'Price', 'Amount'])
    csvwriter.writerow(['Table', 12000, 5])
    csvwriter.writerow(['Chair', 4700, 25])
Serialization with pickle
Writing data with pickle
import pickle
f = open('sample_out.pkl', 'wb')
mixed = ['abc', 1, 5, 7.39]
str = "String data in pickle"
pickle.dump(mixed, f)
pickle.dump(str, f)
f.close()
Reading data with pickle
f = open('sample_out.pkl', 'rb')
new_mixed = pickle.load(f)
new_str = pickle.load(f)
f.close()
print(new_mixed)
print(new_str)
['abc', 1, 5, 7.39]
String data in pickle
4. Database access with mysql-connector-python
Install mysql-connector-python package
Install manually
- Download mysql-connector-python-2.1.3.zip from
- Unzip the file
- Change dir to mysql-connector-python-2.1.3
- ./setup.py install
Install through pip
$ echo https://cdn.mysql.com/Downloads/Connector-Python/mysql-connector-python-2.1.3.tar.gz >> requirements.txt
$ pip install -r requirements.txt
$ pip list | grep mysql
Connector/Python API Reference
Connect to DB
import mysql.connector
from mysql.connector import errorcode

config = {
    'user': 'us',
    'password': 'pwd',
    'host': 'localhost',
    'database': 'stocks'
}

try:
    mysql_cnn = mysql.connector.connect(**config)
except mysql.connector.Error as err:
    if err.errno == errorcode.ER_ACCESS_DENIED_ERROR:
        print("Something is wrong with your user name or password")
    elif err.errno == errorcode.ER_BAD_DB_ERROR:
        print("Database does not exist")
    else:
        print(err)
SELECT data
cursor = mysql_cnn.cursor(buffered=True)
sql = 'SELECT * FROM stocks_10minute WHERE sec_code = 9984'
cursor.execute(sql)
- Get number of records
print('Row count: %d' % cursor.rowcount)
Row count: 608
- Extract 1 record
rec = cursor.fetchone()
print(rec)
(26911001, 9984, 6050, 6081, 6030, 6046, datetime.datetime(2016, 1, 4, 0, 0))
- Extract price & time columns and save into 2 lists
records = [rec for rec in cursor]
price = [rec[5] for rec in records] # now column
time = [rec[6] for rec in records] # time column
cursor.close()
True
UPDATE data
- Get a cursor for updating
upd_cursor = mysql_cnn.cursor()
- Execute UPDATE statement
id = 29269249
value = 5266
upd_sql = "UPDATE stocks_10minute SET now = %d WHERE id = %d" % (value, id)
upd_cursor.execute(upd_sql)
- Commit the data to DB & close cursor
mysql_cnn.commit()
upd_cursor.close()
True
INSERT data
import datetime
- Get a cursor for insertion
ins_cursor = mysql_cnn.cursor()
- Execute INSERT statement
ins_sql = (
  "INSERT INTO stocks_10minute (sec_code, open, high, low, now, time) "
  "VALUES (%s, %s, %s, %s, %s, %s)"
)
data = (9984, 5245, 5288, 5243, 5265, datetime.datetime(2016, 2, 1, 0, 10))
ins_cursor.execute(ins_sql, data)
- Get the new ID in case the id column is auto_increment
new_id = ins_cursor.lastrowid
new_id
29278575
- Commit the data to DB & close cursor
mysql_cnn.commit()
ins_cursor.close()
True
DELETE data
- Get a cursor for deletion
del_cursor = mysql_cnn.cursor()
- Execute DELETE statement
del_sql = (
  "DELETE FROM stocks_10minute WHERE id = %d " % new_id
)
del_cursor.execute(del_sql)
- Commit the data to DB & close cursor
mysql_cnn.commit()
del_cursor.close()
True
Disconnect
mysql_cnn.close()
5. Plotting with matplotlib
Introduction
- matplotlib is a powerful library for 2D plotting in Python.
Install
$ pip install matplotlib
Basic
- Import required libraries
import numpy as np
import matplotlib.pyplot as plt
- Command to show plot directly on notebook
%matplotlib inline
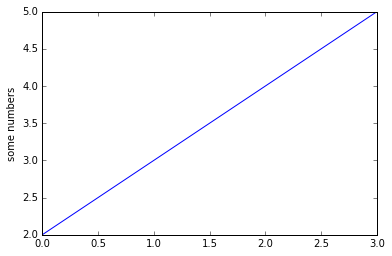
- We can draw a plot by simply passing arrays for X & Y into
plotfunction - If only 1 array is passed to plot function, it will be considered as data for the Y-axis.
- And the values for X-axis will be automatically generated from 0, spaced by 1.
plt.plot([2, 3, 4, 5])
plt.ylabel('some numbers')
plt.show()
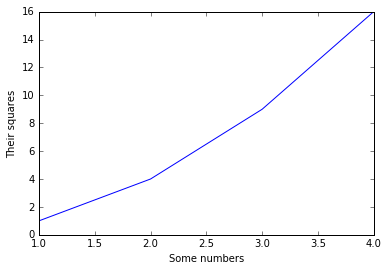
- If 2 arrays are passed to
plot, they will be considered as data for X & Y-axis respectively
plt.plot([1, 2, 3, 4], [1, 4, 9, 16])
plt.xlabel('Some numbers')
plt.ylabel('Their squares')
plt.show()
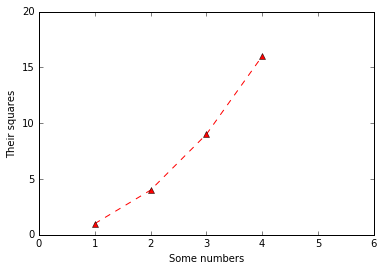
- The 3rd param in plot function is used to format the color & line type of the plot.
- A format string may have 3 component: color, marker style & line style.
- EX:
'ro--'indicates: RED color, circle marker & dashed line. - For more info on the format string: http://matplotlib.org/api/pyplot_api.html#matplotlib.pyplot.plot
-
'axis'command takes [xmin, xmax, ymin, ymax] to specify the viewport of the axes.
plt.plot([1, 2, 3, 4], [1, 4, 9, 16], 'r^--')
plt.xlabel('Some numbers')
plt.ylabel('Their squares')
plt.axis([0, 6, 0, 20])
plt.show()
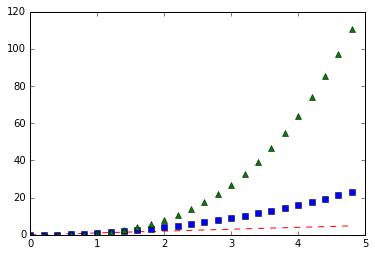
- 'plot' function may receive data for multiple line. In this example, it draws 3 lines, with 3 params per each.
# Numpy's arange function receive the start, end & interval value to generate an array of evenly spaced values.
# Here, the values range from 0 -> 5, evenly spaced by 0.2
t = np.arange(0., 5., 0.2)

plt.plot(t, t, 'r--', t, t ** 2, 'bs', t, t ** 3, 'g^')
plt.show()
Controlling line properties
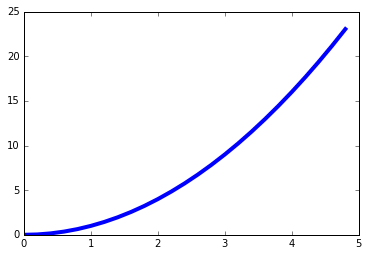
- We can set properties for line through keyword arguments.
x = np.arange(0., 5., 0.2)
y = x ** 2
plt.plot(x, y, linewidth=4.0)
plt.show()
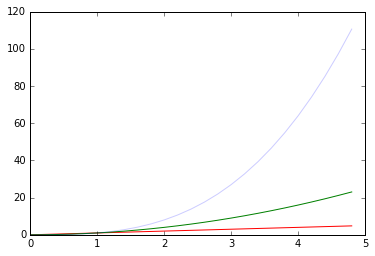
- plot can return multiple Line2D objects, corresponding to the input params.
- For complex property setting, we can receive Line2D object, and call methods to set properties for the lines.
- List of properties & methods of Line2D object: http://matplotlib.org/api/lines_api.html#matplotlib.lines.Line2D
- Basically, a property can be accessed through keyword args with the same name, or through methods with the following patterns:
- get_[property]
- set_[property]
line1, line2, line3 = plt.plot(x, x, x, x ** 2, x, x ** 3)
line1.set_color('red')
line2.set_color('green')
line3.set_color('blue')
line3.set_alpha(0.2)
plt.show()
- To get a list of settable properties & gettable properties of Line2D object, call
'setp'&'getp'
plt.setp(line1)
plt.getp(line1)
Working with multiple figures and axes
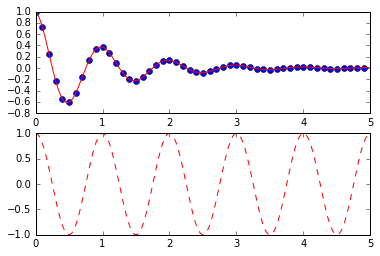
- Use
'figure'function to set current figure. By default,figure(1)is automatically called behind the scene. - Use
'subplot'function to set the current plot & also define the grid of the current figure. - A figure is divided into grids of rows & columns.
- Subplot receives 3 parameters:
nrows,ncols,plot_number - plot_number ranges from 1 to nrows * ncols
- EX: Calling
subplot(2, 1, 2)specifies that the figure has 2 rows, 1 cols, and select the lower plot as active.
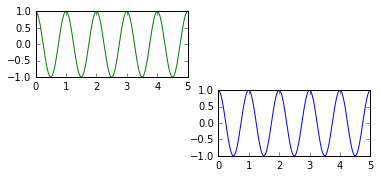
- EX: Calling
- If all of nrows, ncols, plot_number are less that 10, we can use only one 3-digit number to identify the grid system & the plot number.
- EX: Calling
subplot(324)specifies that the figure has 3 rows, 2 cols & select the plot at (2, 1) as active.
- EX: Calling
def f(t):
    return np.exp(-t) * np.cos(2 * np.pi * t)

t1 = np.arange(0.0, 5.0, 0.1)
t2 = np.arange(0.0, 5.0, 0.02)

# Select the 1st figure
plt.figure(1)
plt.subplot(2, 1, 1)
plt.plot(t1, f(t1), 'bo', t2, f(t2), 'r')

plt.subplot(2, 1, 2)
plt.plot(t2, np.cos(2 * np.pi * t2), 'r--')

# Select the 2nd figure
plt.figure(2)
# 3 rows, 2 cols & set the (2, 2) as active
plt.subplot(324)
plt.plot(t2, np.cos(2 * np.pi * t2), 'b-')

# 3 rows, 2 cols & set the (1, 1) as active
plt.subplot(321)
plt.plot(t2, np.cos(2 * np.pi * t2), 'g-')

plt.show()
Working with text
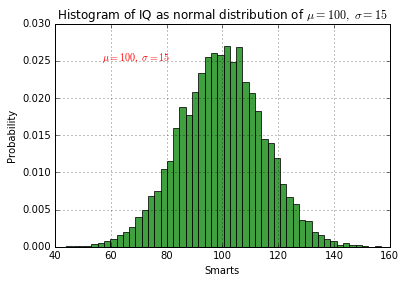
-
xlabel,ylabel,titleare functions used to put text in specific positions. -
textfunction is used to put text at any position. - The
textfunction receives:- x, y: as position of the text. These specify the values in X-axis & Y-axis
- s: the text content
- And other properties of text in form of keyword params. For more detail: http://matplotlib.org/api/pyplot_api.html#matplotlib.pyplot.text
- For text content, we can write LaTex notation inside $..$
mu, sigma = 100, 15
x = mu + sigma * np.random.randn(10000)

n, bins, patches = plt.hist(x, 50, normed=1, facecolor='g', alpha=0.75)
plt.xlabel('Smarts')
plt.ylabel('Probability')
plt.title('Histogram of IQ as normal distribution of $\mu=100,\ \sigma=15$')
plt.text(57, .025, r'$\mu=100,\ \sigma=15$', color='r')
plt.axis([40, 160, 0, 0.03])
plt.grid(True)
plt.show()
Annotating text
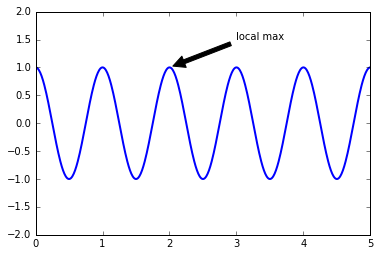
- Use 'annotate' function to put a text for explanation. 'annotate' receives the following params:
- s: the explanation text.
- xy: position to annotate. The position will be pointed by an arrow.
- xytext: position of the text.
- arrowprops: format of the arrow.
- For more info: http://matplotlib.org/api/pyplot_api.html#matplotlib.pyplot.annotate
ax = plt.subplot(111)
t = np.arange(0.0, 5.0, 0.01)
s = np.cos(2 * np.pi * t)
line, = plt.plot(t, s, lw=2)
plt.annotate('local max', xy=(2, 1), xytext=(3, 1.5), arrowprops=dict(facecolor='k', shrink=0.05))
plt.ylim(-2, 2)
plt.show()
Working with legend
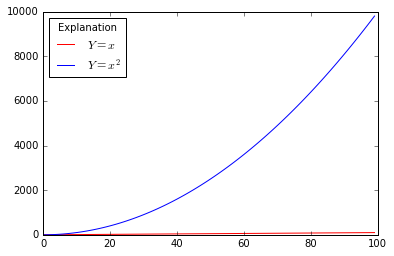
- Use
legendfunction to draw a legend for the axes. - Each line should be assigned a label, then call legend to draw a legend box.
- Some important params of
legendfunction:-
loc: location of the legend box in plot. 1: upper right, 2: upper left, 3: lower left, 4: lower right... -
title: title of the legend box
-
- For more details: http://matplotlib.org/api/pyplot_api.html#matplotlib.pyplot.legend
x = np.array(range(100))
line1, line2 = plt.plot(x, x, 'r', x, x ** 2, 'b')
line1.set_label('$Y=x$')
line2.set_label('$Y=x^2$')
plt.legend(loc=2, title='Explanation')
# plt.legend((line1, line2), ('For $Y=x$', 'For $Y=x^2$'))  # Or use legend function to set labels for lines
plt.show()
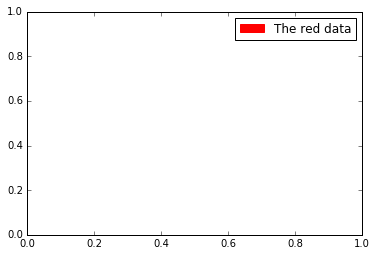
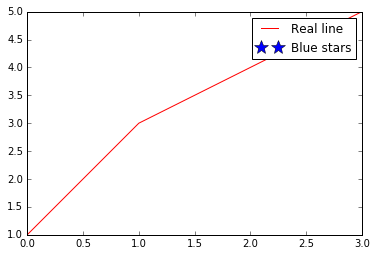
Creating artists specifically for adding to the legend (aka. Proxy artists)
import matplotlib.patches as mpatches

red_patch = mpatches.Patch(color='r', label='The red data')
plt.legend(handles=[red_patch])

plt.show()
import matplotlib.lines as mlines

line1, = plt.plot([1,3,4,5], label='Real line', color='r')
blue_line = mlines.Line2D([], [], color='blue', marker='*', linestyle='',
                          markersize=15, label='Blue stars')
plt.legend(handles=[line1, blue_line])
plt.show()
Legend location
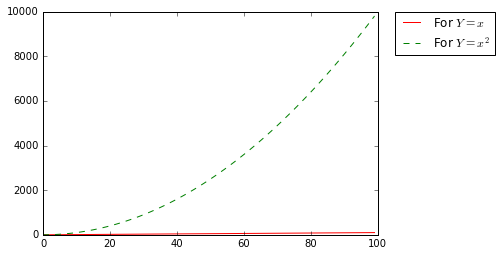
- Use
bbox_to_anchorproperty to adjust position of the legend box, for example, to put it outside the plot.
x = np.array(range(100))
line1, = plt.plot(x, x, 'r', label='$Y=x$')
line2, = plt.plot(x, x ** 2, 'g--', label='$Y=x^2$')
plt.legend([line1, line2], ['For $Y=x$', 'For $Y=x^2$'], loc=2, bbox_to_anchor=(1.05, 1), borderaxespad=0.0)
plt.show()
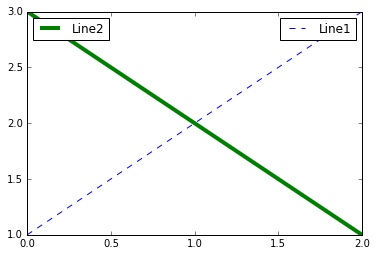
Multiple legends on the same Axes
line1, = plt.plot([1, 2, 3], label='Line1', linestyle='--')
line2, = plt.plot([3, 2, 1], label='Line2', linewidth=4)

# Create the legend for 1st line
first_legend = plt.legend(handles=[line1], loc=1)

# Add a new legend
ax = plt.gca().add_artist(first_legend)

# Create another legend for the 2nd line
plt.legend(handles=[line2], loc=2)

plt.show()
Financial charts
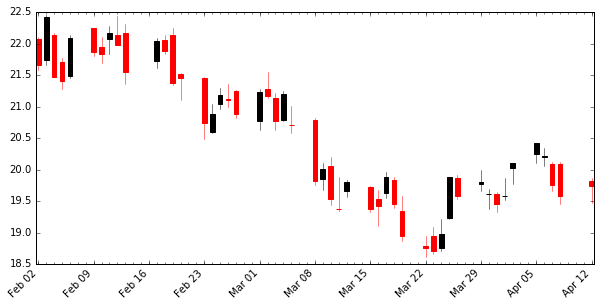
Candle stick chart
from matplotlib.dates import DateFormatter, WeekdayLocator,\
    DayLocator, MONDAY
from matplotlib.finance import quotes_historical_yahoo_ohlc, candlestick_ohlc


# (Year, month, day) tuples suffice as args for quotes_historical_yahoo
date1 = (2004, 2, 1)
date2 = (2004, 4, 12)


mondays = WeekdayLocator(MONDAY)        # major ticks on the mondays
alldays = DayLocator()              # minor ticks on the days
weekFormatter = DateFormatter('%b %d')  # e.g., Jan 12
dayFormatter = DateFormatter('%d')      # e.g., 12

quotes = quotes_historical_yahoo_ohlc('INTC', date1, date2)
if len(quotes) == 0:
    raise SystemExit

fig, ax = plt.subplots()
fig.set_size_inches(10, 5)
fig.subplots_adjust(bottom=0.2)
ax.xaxis.set_major_locator(mondays)
ax.xaxis.set_minor_locator(alldays)
ax.xaxis.set_major_formatter(weekFormatter)
# ax.xaxis.set_minor_formatter(dayFormatter)

# plot_day_summary(ax, quotes, ticksize=3)
candlestick_ohlc(ax, quotes, width=0.6)

ax.xaxis_date()
ax.autoscale_view()
plt.setp(plt.gca().get_xticklabels(), rotation=45, horizontalalignment='right')

plt.show()
(From http://matplotlib.org/examples/pylab_examples/finance_demo.html)
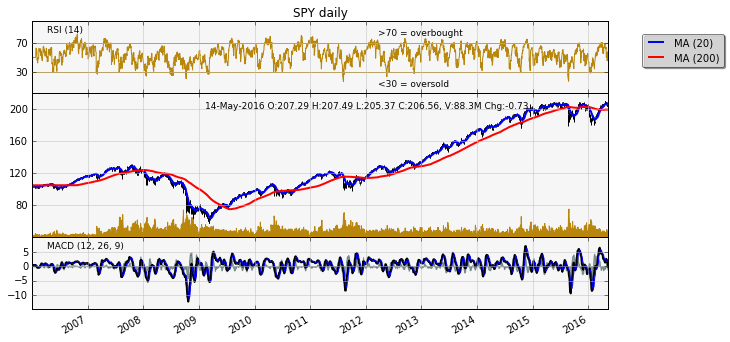
Stock prices with indicators
import datetime
import numpy as np
import matplotlib.colors as colors
import matplotlib.finance as finance
import matplotlib.dates as mdates
import matplotlib.ticker as mticker
import matplotlib.mlab as mlab
import matplotlib.pyplot as plt
import matplotlib.font_manager as font_manager


startdate = datetime.date(2006, 1, 1)
today = enddate = datetime.date.today()
ticker = 'SPY'


fh = finance.fetch_historical_yahoo(ticker, startdate, enddate)
# a numpy record array with fields: date, open, high, low, close, volume, adj_close)

r = mlab.csv2rec(fh)
fh.close()
r.sort()


def moving_average(x, n, type='simple'):
    """
    compute an n period moving average.

    type is 'simple' | 'exponential'

    """
    x = np.asarray(x)
    if type == 'simple':
        weights = np.ones(n)
    else:
        weights = np.exp(np.linspace(-1., 0., n))

    weights /= weights.sum()

    a = np.convolve(x, weights, mode='full')[:len(x)]
    a[:n] = a[n]
    return a


def relative_strength(prices, n=14):
    """
    compute the n period relative strength indicator
    http://stockcharts.com/school/doku.php?id=chart_school:glossary_r#relativestrengthindex
    http://www.investopedia.com/terms/r/rsi.asp
    """

    deltas = np.diff(prices)
    seed = deltas[:n+1]
    up = seed[seed >= 0].sum()/n
    down = -seed[seed < 0].sum()/n
    rs = up/down
    rsi = np.zeros_like(prices)
    rsi[:n] = 100. - 100./(1. + rs)

    for i in range(n, len(prices)):
        delta = deltas[i - 1]  # cause the diff is 1 shorter

        if delta > 0:
            upval = delta
            downval = 0.
        else:
            upval = 0.
            downval = -delta

        up = (up*(n - 1) + upval)/n
        down = (down*(n - 1) + downval)/n

        rs = up/down
        rsi[i] = 100. - 100./(1. + rs)

    return rsi


def moving_average_convergence(x, nslow=26, nfast=12):
    """
    compute the MACD (Moving Average Convergence/Divergence) using a fast and slow exponential moving avg'
    return value is emaslow, emafast, macd which are len(x) arrays
    """
    emaslow = moving_average(x, nslow, type='exponential')
    emafast = moving_average(x, nfast, type='exponential')
    return emaslow, emafast, emafast - emaslow


plt.rc('axes', grid=True)
plt.rc('grid', color='0.75', linestyle='-', linewidth=0.5)

textsize = 9
left, width = 0.1, 0.8
rect1 = [left, 0.7, width, 0.2]
rect2 = [left, 0.3, width, 0.4]
rect3 = [left, 0.1, width, 0.2]


fig = plt.figure(figsize=(10, 5), facecolor='white')
axescolor = '#f6f6f6'  # the axes background color

ax1 = fig.add_axes(rect1, axisbg=axescolor)  # left, bottom, width, height
ax2 = fig.add_axes(rect2, axisbg=axescolor, sharex=ax1)
ax2t = ax2.twinx()
ax3 = fig.add_axes(rect3, axisbg=axescolor, sharex=ax1)


# plot the relative strength indicator
prices = r.adj_close
rsi = relative_strength(prices)
fillcolor = 'darkgoldenrod'

ax1.plot(r.date, rsi, color=fillcolor)
ax1.axhline(70, color=fillcolor)
ax1.axhline(30, color=fillcolor)
ax1.fill_between(r.date, rsi, 70, where=(rsi >= 70), facecolor=fillcolor, edgecolor=fillcolor)
ax1.fill_between(r.date, rsi, 30, where=(rsi <= 30), facecolor=fillcolor, edgecolor=fillcolor)
ax1.text(0.6, 0.9, '>70 = overbought', va='top', transform=ax1.transAxes, fontsize=textsize)
ax1.text(0.6, 0.1, '<30 = oversold', transform=ax1.transAxes, fontsize=textsize)
ax1.set_ylim(0, 100)
ax1.set_yticks([30, 70])
ax1.text(0.025, 0.95, 'RSI (14)', va='top', transform=ax1.transAxes, fontsize=textsize)
ax1.set_title('%s daily' % ticker)

# plot the price and volume data
dx = r.adj_close - r.close
low = r.low + dx
high = r.high + dx

deltas = np.zeros_like(prices)
deltas[1:] = np.diff(prices)
up = deltas > 0
ax2.vlines(r.date[up], low[up], high[up], color='black', label='_nolegend_')
ax2.vlines(r.date[~up], low[~up], high[~up], color='black', label='_nolegend_')
ma20 = moving_average(prices, 20, type='simple')
ma200 = moving_average(prices, 200, type='simple')

linema20, = ax2.plot(r.date, ma20, color='blue', lw=2, label='MA (20)')
linema200, = ax2.plot(r.date, ma200, color='red', lw=2, label='MA (200)')


last = r[-1]
s = '%s O:%1.2f H:%1.2f L:%1.2f C:%1.2f, V:%1.1fM Chg:%+1.2f' % (
    today.strftime('%d-%b-%Y'),
    last.open, last.high,
    last.low, last.close,
    last.volume*1e-6,
    last.close - last.open)
t4 = ax2.text(0.3, 0.9, s, transform=ax2.transAxes, fontsize=textsize)

props = font_manager.FontProperties(size=10)
leg = ax2.legend(loc='center left', bbox_to_anchor=(1.05, 1.3), shadow=True, fancybox=True, prop=props)
leg.get_frame().set_alpha(0.5)


volume = (r.close*r.volume)/1e6  # dollar volume in millions
vmax = volume.max()
poly = ax2t.fill_between(r.date, volume, 0, label='Volume', facecolor=fillcolor, edgecolor=fillcolor)
ax2t.set_ylim(0, 5*vmax)
ax2t.set_yticks([])


# compute the MACD indicator
fillcolor = 'darkslategrey'
nslow = 26
nfast = 12
nema = 9
emaslow, emafast, macd = moving_average_convergence(prices, nslow=nslow, nfast=nfast)
ema9 = moving_average(macd, nema, type='exponential')
ax3.plot(r.date, macd, color='black', lw=2)
ax3.plot(r.date, ema9, color='blue', lw=1)
ax3.fill_between(r.date, macd - ema9, 0, alpha=0.5, facecolor=fillcolor, edgecolor=fillcolor)


ax3.text(0.025, 0.95, 'MACD (%d, %d, %d)' % (nfast, nslow, nema), va='top',
         transform=ax3.transAxes, fontsize=textsize)

# ax3.set_yticks([])
# turn off upper axis tick labels, rotate the lower ones, etc
for ax in ax1, ax2, ax2t, ax3:
    if ax != ax3:
        for label in ax.get_xticklabels():
            label.set_visible(False)
    else:
        for label in ax.get_xticklabels():
            label.set_rotation(30)
            label.set_horizontalalignment('right')

    ax.fmt_xdata = mdates.DateFormatter('%Y-%m-%d')


class MyLocator(mticker.MaxNLocator):
    def __init__(self, *args, **kwargs):
        mticker.MaxNLocator.__init__(self, *args, **kwargs)

    def __call__(self, *args, **kwargs):
        return mticker.MaxNLocator.__call__(self, *args, **kwargs)

# at most 5 ticks, pruning the upper and lower so they don't overlap
# with other ticks
# ax2.yaxis.set_major_locator(mticker.MaxNLocator(5, prune='both'))
# ax3.yaxis.set_major_locator(mticker.MaxNLocator(5, prune='both'))

ax2.yaxis.set_major_locator(MyLocator(5, prune='both'))
ax3.yaxis.set_major_locator(MyLocator(5, prune='both'))

plt.show()
(From http://matplotlib.org/examples/pylab_examples/finance_work2.html)
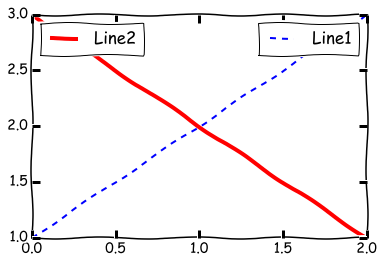
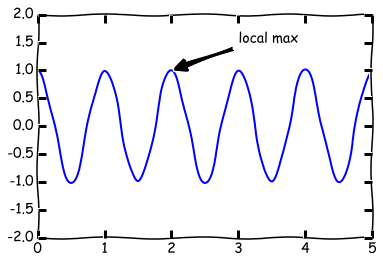
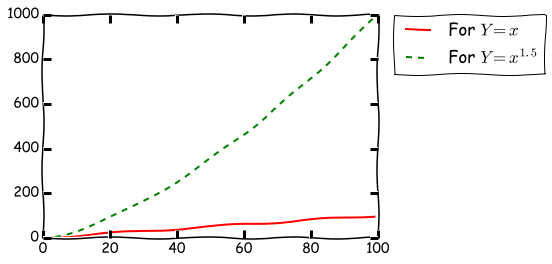
XKCD-style sketch plots
- Simply blocking our plotting code by
with plt.xkcd(), we can draw plots in XKCD-style (comic-style). - XKCD-style sketch is based on XKCD by Randall Monroe: http://xkcd.com/
- For more information on
xkcdfunction, see: http://matplotlib.org/api/pyplot_api.html#matplotlib.pyplot.xkcd
with plt.xkcd():
    line1, = plt.plot([1, 2, 3], label='Line1', linestyle='--')
    line2, = plt.plot([3, 2, 1], label='Line2', linewidth=4)

    # Create the legend for 1st line
    first_legend = plt.legend(handles=[line1], loc=1)

    # Add a new legend
    ax = plt.gca().add_artist(first_legend)

    # Create another legend for the 2nd line
    plt.legend(handles=[line2], loc=2)

    plt.show()
with plt.xkcd():
    ax = plt.subplot(111)
    t = np.arange(0.0, 5.0, 0.01)
    s = np.cos(2 * np.pi * t)
    line, = plt.plot(t, s, lw=2)
    plt.annotate('local max', xy=(2, 1), xytext=(3, 1.5), arrowprops=dict(facecolor='k', shrink=0.05))
    plt.ylim(-2, 2)
    plt.show()
with plt.xkcd():
    x = np.array(range(100))
    line1, = plt.plot(x, x, 'r', label='$Y=x$')
    line2, = plt.plot(x, x ** 1.5, 'g--', label='$Y=x^2$')
    plt.legend([line1, line2], ['For $Y=x$', 'For $Y=x^{1.5}$'], loc=2, bbox_to_anchor=(1.05, 1), borderaxespad=0.0)
    plt.show()
