1. はじめに
Microsoft Security の運用を始めると、Microsoft Defender XDR で運用管理されている方は多いと思います。Defender XDR のコンソールは様々な情報を収集してアラート/インシデント情報や端末情報を確認することが出来ますが、定型化した操作について自動化したいお客様が多いのではないかと思います。
この記事では、Defender XDR の情報を Microsoft Defender for Endpoint API に対して Python を用いてアクセスする方法をご紹介します。
2. こんな方にお勧め
- Powershell じゃなくって Python でやりたい
- M365D の運用をスクリプト化したい
- これから AzureFunction / ロジックアプリに実装する上で、API の叩き方を知りたい
3. 環境
- Python 3.x スクリプトを実行できる環境
- Entra ID サービスプリンシパルを発行できる権限
4. やってみる
4.1 事前準備 - サービスプリンシパルの発行
本設定では Python スクリプトを実施して M365D にアクセスする際に、Entra ID で権限を付与されたサービスプリンシパルで認証・認可する設定としています。
-
Entra ID でアプリケーションを作成します。
-
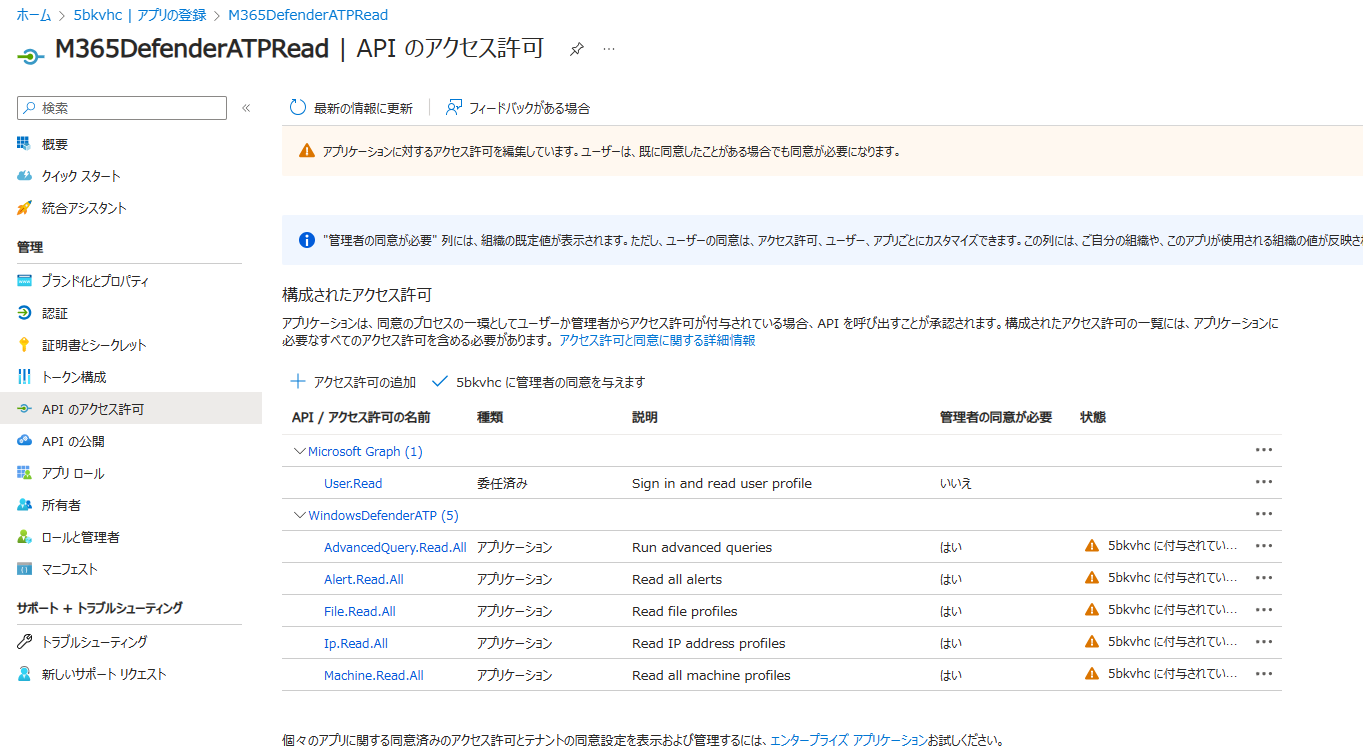
「API のアクセス許可」から、「所属する組織で使用している API」を選択し、
WindowsDefenderATPを選択します。 -
アプリケーションに与える WindowsDefenderATP の権限を与えます。
- 必要となる権限(
Alert.Read.AllやMachine.Read.Allなど)は、用いるAPI のクエリー内容によって変わります。 - 例えば、List Machine API を実施したい場合は、
Machine.Read.Allの権限が必要です。API のドキュメントに記載があるので確認するようにしましょう。

- 必要となる権限(
-
API のアクセス許可に対して、「管理者の同意の確認」を与えます。
4.2 Python スクリプト
4.1 で作成したサービスプリンシパルを用いて M365 Defender の情報を取得する Python スクリプト例です。Python3 の標準ライブラリである urllib.request を用いています (MS Learn のサンプルが urllib ベースで紹介されていたため)
- M365D / Advanced Hunting でクエリーを実施する
- M365D / デバイスインベントリに登録された情報をフィルターして出力する
4.2.1 M365D / Advanced Hunting でクエリーを実施する
Entra ID にサービスプリンシパルを用いてトークンを取得し、そのトークンを利用して MDATP API に Query を送ります。RESTAPI の結果を JSON / CSV でローカルフォルダに書き込む(file1.json / file1.csv) 設定を入れていますが、結果を画面出力したい場合は、print(json.dumps(results, indent=3)) の行をコメントアウトして下さい。
Python サンプル
#!/usr/bin/python3
import json
from unittest import result
import urllib.request
import urllib.parse
import sys
import csv
from datetime import datetime, timedelta

#-----------------------------------------------------------------------
# Authentication from Entra ID using Service Principal
#-----------------------------------------------------------------------
tenantId = "<your tenant id>"
appId = "<your service principal id>"
appSecret = "<your service principal secret>"

url = "https://login.windows.net/%s/oauth2/token" % (tenantId)
resourceAppIdUri = 'https://api.securitycenter.windows.com'
body = {
    'resource' : resourceAppIdUri,
    'client_id' : appId,
    'client_secret' : appSecret,
    'grant_type' : 'client_credentials'
}

data = urllib.parse.urlencode(body).encode("utf-8")
req = urllib.request.Request(url, data)
response = urllib.request.urlopen(req)
jsonResponse = json.loads(response.read())
aadToken = jsonResponse["access_token"]

#-----------------------------------------------------------------------
# Advanced Hunting Query API
#-----------------------------------------------------------------------
query = 'DeviceRegistryEvents | limit 10' # Paste your own query here

url = "https://api.securitycenter.microsoft.com/api/advancedqueries/run"
headers = {
    'Content-Type' : 'application/json',
    'Accept' : 'application/json',
    'Authorization' : "Bearer " + aadToken
}

data = json.dumps({ 'Query' : query }).encode("utf-8")

req = urllib.request.Request(url, data, headers)
response = urllib.request.urlopen(req)
jsonResponse = json.loads(response.read())
results = jsonResponse["Results"]

#print(json.dumps(results, indent=3))    # 結果を成型して画面表示

# Export CSV
outputFile = open("file1.csv", 'w')
output = csv.writer(outputFile)
output.writerow(results[0].keys())
for result in results:
    output.writerow(result.values())
outputFile.close()

# Export JSON
outputFile = open("file1.json", 'w')
json.dump(results, outputFile)
outputFile.close()
スクリプト出力例
生成した file1.json を jq を用いて成型表示させています。
4.2.2 M365D / デバイスインベントリに登録された情報をフィルターして出力する
Entra ID にサービスプリンシパルを用いてトークンを取得し、そのトークンを利用して MDATP API の List machines API を叩いています。
List Machines API では OData V4 Queries によるクエリーフィルタが使えるようになっています。フィルターのサンプル例は公式ドキュメントに紹介されています。
- フィールド
riskScoreがHighの場合の抽出例です。
https://api.securitycenter.microsoft.com/api/machines?$filter=riskScore+eq+'High'
本ユースケースでは、M365D に登録されている生存デバイスを抽出するため、以下の条件としました。
- センサーの正常性状態が「アクティブ」
- オンボードの状態が「オンボードされました」
この場合のクエリーフィルタは以下を用いています。
https://api.securitycenter.microsoft.com/api/machines?$filter=healthStatus+eq+'Active'+and+onboardingStatus+eq+'Onboarded'
Python サンプル
#!/usr/bin/python3
import json
from unittest import result
import urllib.request
import urllib.parse
import sys
import csv
from datetime import datetime, timedelta

#-----------------------------------------------------------------------
# Authentication from Entra ID using Service Principal
#-----------------------------------------------------------------------
tenantId = "<your tenant id>"
appId = "<your service principal id>"
appSecret = "<your service principal secret>"

url = "https://login.windows.net/%s/oauth2/token" % (tenantId)
resourceAppIdUri = 'https://api.securitycenter.windows.com'
body = {
    'resource' : resourceAppIdUri,
    'client_id' : appId,
    'client_secret' : appSecret,
    'grant_type' : 'client_credentials'
}

data = urllib.parse.urlencode(body).encode("utf-8")
req = urllib.request.Request(url=url, data=data)
response = urllib.request.urlopen(req)
jsonResponse = json.loads(response.read())
aadToken = jsonResponse["access_token"]

#-----------------------------------------------------------------------
# GET List Machines API
#-----------------------------------------------------------------------
url = "https://api.securitycenter.microsoft.com/api/machines?$filter=healthStatus+eq+'Active'+and+onboardingStatus+eq+'Onboarded'"
headers = {
    'Content-Type' : 'application/json',
    'Accept' : 'application/json',
    'Authorization' : "Bearer " + aadToken
}
req = urllib.request.Request(url=url,headers=headers)
response = urllib.request.urlopen(req)
jsonResponse = json.loads(response.read())
print(json.dumps(jsonResponse, indent=3))    # 結果を成型して画面表示
スクリプト実施例
M365D のデバイス画面から、フィルタされた情報が抽出されて JSON 形式で出力されます。

5. まとめ
いざ Microsoft 365 Defender の情報を API で拾うにも、Docs の情報が分かり難く、Powershell ではなく Python のサンプルがヒットしなかったので、整理がてらまとめてみました。手元にサンプルがあることで、皆様の Microsoft E5 Security の運用のヒントになればと思います。本記事がどなたかの参考になれば幸いです。
*本稿は、個人の見解に基づいた内容であり、所属する会社の公式見解ではありません。また、いかなる保証を与えるものでもありません。正式な情報は、各製品の販売元にご確認ください。
参考情報


