1. はじめに
Microsoft Security の運用を始めると、Microsoft Defender XDR で運用管理されている方が多いと思います。Defender XDR のコンソールは様々な情報を収集してアラート/インシデント情報や端末情報を確認することが出来ますが、定型化した操作について自動化したいお客様が多いのではないかと思います。
この記事では、Defender XDR の情報を Microsoft Defender for Endpoint API に対して Powershell を用いてアクセスする方法をご紹介します。
2. こんな方にお勧め
- Windows OS から Powershell で情報を収集したい
- M365D の運用をスクリプト化したい
- これから AzureFunction / ロジックアプリに実装する上で、API の叩き方を知りたい
3. 環境
- Powershell
- Entra ID サービスプリンシパルを発行できる権限
4. やってみる
4.1 事前準備 - サービスプリンシパルの発行
本設定では Python スクリプトを実施して M365D にアクセスする際に、Entra ID で権限を付与されたサービスプリンシパルで認証・認可する設定としています。
-
Entra ID でアプリケーションを作成します。
-
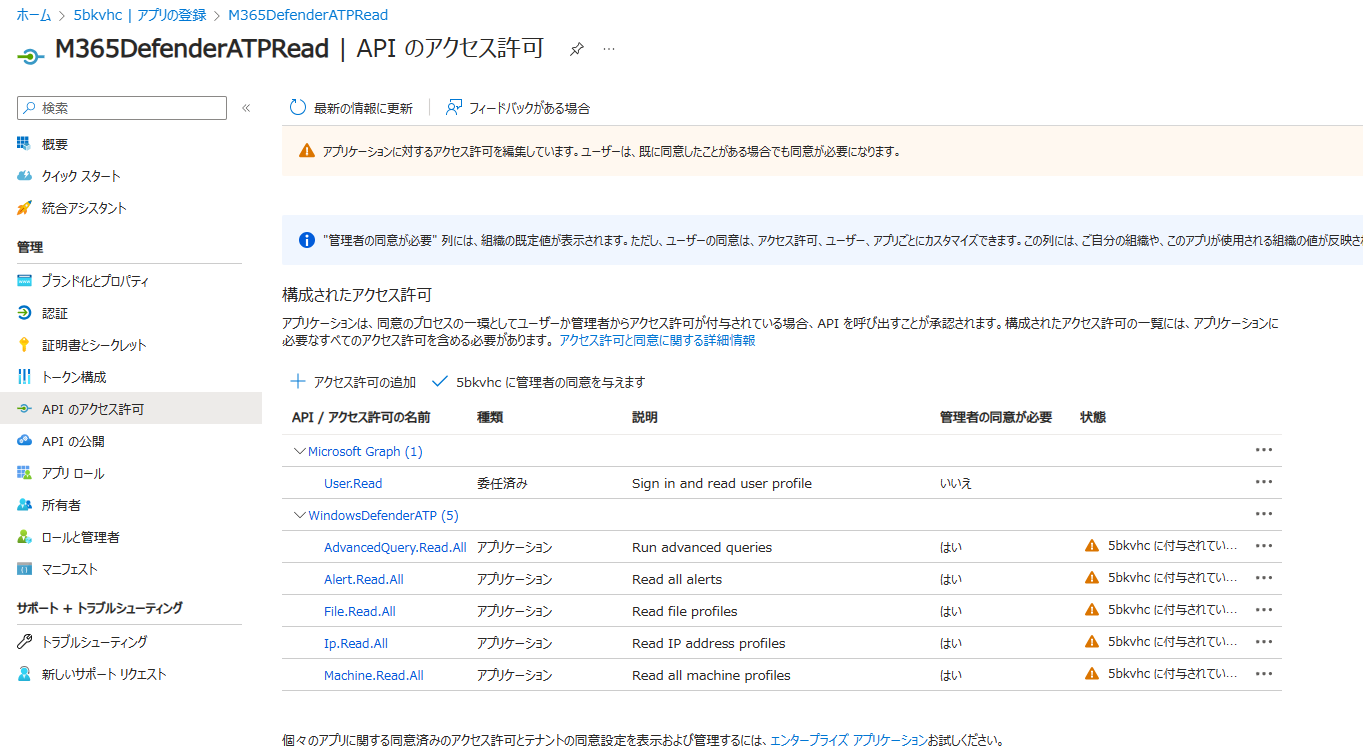
「API のアクセス許可」から、「所属する組織で使用している API」を選択し、
WindowsDefenderATPを選択します。 -
アプリケーションに与える WindowsDefenderATP の権限を与えます。
- 必要となる権限(
Alert.Read.AllやMachine.Read.Allなど)は、用いるAPI のクエリー内容によって変わります。 - 例えば、List Machine API を実施したい場合は、
Machine.Read.Allの権限が必要です。API のドキュメントに記載があるので確認するようにしましょう。

- 必要となる権限(
-
API のアクセス許可に対して、「管理者の同意の確認」を与えています。
4.2 Powershell スクリプト
4.1 で作成したサービスプリンシパルを用いて Defender XDR の情報を取得する Powershell スクリプト例です。トークンを生成して、API にアクセスするサンプルは以下を参考としています。
スクリプト例
今回は、ターゲットの PC に対して、ウイルススキャンを実施する runAntiVirusScan API を作成してみました。
Powershell サンプル
Get-Token.ps1
# That code gets the App Context Token and save it to a file named "Latest-token.txt" under the current directory
# Paste below your Tenant ID, App ID and App Secret (App key).

$tenantId = '<Your Tenant ID>' ### Paste your tenant ID here
$appId = '<Your Application ID>' ### Paste your Application ID here
$appSecret = '<Your Application Secret>' ### Paste your Application secret here

$resourceAppIdUri = 'https://api.securitycenter.microsoft.com'
$oAuthUri = "https://login.microsoftonline.com/$TenantId/oauth2/token"
$authBody = [Ordered] @{
     resource = "$resourceAppIdUri"
     client_id = "$appId"
     client_secret = "$appSecret"
     grant_type = 'client_credentials'
}
$authResponse = Invoke-RestMethod -Method Post -Uri $oAuthUri -Body $authBody -ErrorAction Stop
$token = $authResponse.access_token
Out-File -FilePath "./Latest-token.txt" -InputObject $token
return $token
MdatpQuickScan.ps1
# Returns Alerts created in the past 48 hours.

$token = ./Get-Token.ps1       #run the script Get-Token.ps1  - make sure you are running this script from the same folder of Get-Token.ps1

# Target Machine ID from Defender portal
$machineid = "<Your machine id>"

# The URL contains the type of query and the time filter we create above
$url = "https://api.security.microsoft.com/api/machines/$machineid/runAntiVirusScan"

# Set the WebRequest headers
$headers = @{
    'Content-Type' = 'application/json'
    Accept = 'application/json'
    Authorization = "Bearer $token"
}

$body = @{
    'Comment' = 'This quick scan trigger is generated by Powershell'
    'ScanType' = 'Quick'
}

$jsonbody = ConvertTo-Json $body

# Send the webrequest and get the results.
$response = Invoke-WebRequest -Method post -Uri $url -Headers $headers -Body $jsonbody

# Extract the alerts from the results.
$response | ConvertFrom-Json | ConvertTo-Json -Depth 100
スクリプト出力例
MdatpQuickScan.ps1 を実行した例です。
{
  "@odata.context": "https://api.security.microsoft.com/api/$metadata#MachineActions/$entity",
  "id": "xxxxx",
  "type": "RunAntiVirusScan",
  "title": null,
  "requestor": "WindowsDefenderATP",
  "requestorComment": "This is generated by Powershell",
  "status": "Pending",
  "machineId": "08cba7359fa08c840cb94c189ecfbe64a9b79cb2",
  "computerDnsName": "vmwinaddc01.ad.azurecsa.net",
  "creationDateTimeUtc": "2024-11-20T04:49:23.700478Z",
  "lastUpdateDateTimeUtc": "2024-11-20T04:49:23.7004786Z",
  "cancellationRequestor": null,
  "cancellationComment": null,
  "cancellationDateTimeUtc": null,
  "errorHResult": 0,
  "scope": null,
  "externalId": null,
  "requestSource": "PublicApi",
  "relatedFileInfo": null,
  "commands": [],
  "troubleshootInfo": null
}
5. まとめ
Defender XDR の情報を API で拾うにも、Docs の情報が分かり難いため、整理がてらまとめてみました。手元にサンプルがあることで、皆様の Defender XDR の運用のヒントになればと思います。本記事がどなたかの参考になれば幸いです。
*本稿は、個人の見解に基づいた内容であり、所属する会社の公式見解ではありません。また、いかなる保証を与えるものでもありません。正式な情報は、各製品の販売元にご確認ください。


