はじめに
組込みデバイスがIoT化した際に多くの需要が出てきそうな、OTA(Over the Air)によるアプリの遠隔アップデート。
どのような仕組みなのかを知るために、手元のESP32でやってみました。
まず、OTAと言っても、その目的によって様々なやり方があります。
-
Arduino IDE等の開発ツールからアプリを書き込む際に、通常のシリアル接続経由ではなくWIFI経由で書き込むことで更新する。
例えばこちらに詳しいやり方が載っています。
ESP32/ESP8266でネットワーク経由でスケッチを更新する -
デバイス上でHTTPサーバを動かしておき、そこへアプリをアップロードすることで更新する。
例えばこちらに詳しいやり方が載っています。
ESP32 で Arduino を使わずに OTA する方法 -
外部のHTTPSサーバにアプリの更新版を設置しておき、デバイスがそこからダウンロードすることで更新する。
IoTの利用シーンでは3が求められると思われるため、今回は3の方式を試してみました。
【今回の環境】
- ボード:ESP32-DevKitC-32D
- 開発環境:Windows 10 + ESP-IDF v4.0.1
- 更新アプリの置き場所:Amazon S3
ESP32におけるOTAの仕組み
Partition Table
OTAを行わない場合のデフォルトのPartition Table (Single factory app, no OTA)は、以下の通り。アプリはfactoryというPartitionに書き込まれます。
# Name,   Type, SubType, Offset,  Size, Flags
nvs,      data, nvs,     0x9000,  0x6000,
phy_init, data, phy,     0xf000,  0x1000,
factory,  app,  factory, 0x10000, 1M,
一方、menuconfigでOTA用のPartition Table (Factory app, two OTA definitions)を選択すると、以下のようになります。
# Name,   Type, SubType, Offset,  Size, Flags
nvs,      data, nvs,     0x9000,  0x4000,
otadata,  data, ota,     0xd000,  0x2000,
phy_init, data, phy,     0xf000,  0x1000,
factory,  0,    0,       0x10000, 1M,
ota_0,    0,    ota_0,  0x110000, 1M,
ota_1,    0,    ota_1,  0x210000, 1M,
APIを使ってOTAするとota_0とota_1のどちらかに更新アプリが書き込まれ、以降はそこから起動されるようになります。次にどこから起動するかの情報はotadataに記録されています。
OTAの仕組みはこちらに。
[ESP-IDF Programming Guide - Over The Air Updates (OTA)]
(https://docs.espressif.com/projects/esp-idf/en/latest/esp32/api-reference/system/ota.html)
Partition Tableのことはこちらで解説されています。
[ESP-IDF Programming Guide - Partition Tables]
(https://docs.espressif.com/projects/esp-idf/en/latest/esp32/api-guides/partition-tables.html)
Rollback
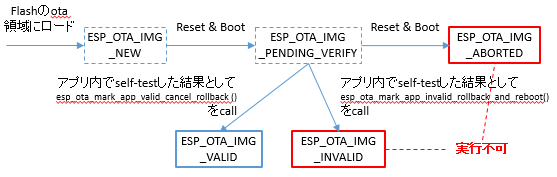
OTAで更新したアプリが正しく動作しなかった場合に備えて、Rollbackの仕組みも用意されています。プロジェクト設定でRollbackを有効にすると、ota_0やota_1に格納された更新アプリは以下の状態遷移を経て実行可否が決定されます。実行不可となった更新アプリは以降は使われず、もう一つの実行可能な更新アプリか、Factory appが使われます。
サンプルプロジェクトを使ったテスト
ESP-IDFのexamplesフォルダに、system\ota\simple_ota_exampleというサンプルプロジェクトがありました。HTTPSサーバから更新アプリをダウンロードしてアップデートまでしてくれる関数esp_https_ota()を使ったサンプルです。
今回はこのサンプルを使ってみます。
プロジェクト設定
まず、idf.py menuconfigにて以下を追加設定。
| 項目 | 設定値 | 備考 |
|---|---|---|
| Example Connection Configuration -> WiFi SSID | WiFiの設定を入力 | |
| Example Connection Configuration -> WiFi Password | WiFiの設定を入力 | |
| Example Connection Configuration -> Obtain IPv6 link-local address | OFF | 我が家のNWはIPv6対応してないので |
| Bootloader config -> Enable app rollback support | ON | Rollbackのテストもしてみたいので |
また、server_certs\ca_cert.pemに、接続先httpsサーバーのCA証明書を置いておく必要があります。今回使うAmazon S3で使われているルート証明書をPEM形式で置いておきます。
コードの修正
このsimple_ota_exampleは、指定のURLから更新アプリをダウンロードして書き換えるだけのコードです。それだけだとつまらないので、以下のように書き換えてみました。
- コード内でアプリのバージョン番号を定義して、それをコンソールに表示する。
- 更新アプリのURLにもこのバージョン番号を含めて、そのバージョン用の更新アプリが掲載されたら更新する仕掛けに。
- Rollbackテスト用にself-testのコードも入れる。
まず、プログラム冒頭でバージョン番号や更新URLを以下の通り定義した上で、
# define APP_VERSION  "01"
# define APP_UPGRADE_URL  "https://s3-us-west-2.amazonaws.com/<bucket>/temp/simple_ota.bin." APP_VERSION
static const char *app_upgrade_url = APP_UPGRADE_URL;
app_main()の末尾でsimple_ota_example_task()を呼びだしている部分を以下のように変更。Hello world!を表示して、30秒後にOTAを試すことを繰り返します。
    self_test();
    while (1) {
        printf("Hello world! (Ver.%s)\n", APP_VERSION);
        for (int i = 30; i > 0; i--) {
            if ((i % 10) == 0) {
                printf("Wait for %d seconds...\n", i);
            }
            vTaskDelay(1000 / portTICK_PERIOD_MS);
        }
        printf("Starting to try OTA from the following URL\n%s\n", app_upgrade_url);
        simple_ota_example_task();
    }
続いて、simple_ota_example_task()内で接続先URLを定義している部分を冒頭で定義した変数に置き換えます。
    esp_http_client_config_t config = {
        .url = app_upgrade_url,
        .cert_pem = (char *)server_cert_pem_start,
        .event_handler = _http_event_handler,
    };
Rollbackのテストをするためのself test関数は以下のようにしてみました。
void self_test()
{
    const esp_partition_t *running = esp_ota_get_running_partition();
    esp_ota_img_states_t ota_state;
    if (esp_ota_get_state_partition(running, &ota_state) == ESP_OK) {
        if (ota_state == ESP_OTA_IMG_PENDING_VERIFY) {
            if (1) {
                /* When self-test was passed */
                printf("Self test was passed\n");
                esp_ota_mark_app_valid_cancel_rollback();
            }
            else {
                /* When self-test was failed */
                printf("Self test was failed !!!!!\n");
                printf("Will be rollback & reboot !!!!!\n\n");
                vTaskDelay(5000 / portTICK_PERIOD_MS);
                esp_ota_mark_app_invalid_rollback_and_reboot();
            }
        }
    }
}
ビルドして書込み
ビルドして書き込みます。
idf.py build
idf.py flash
シリアルポートをモニタすると、Ver.01がFactory appとして書き込まれて動いているのがわかります。まだ更新アプリを設置してないのでOTAは失敗して、Ver.01のHello world!が繰り返し出力されます。
Hello world! (Ver.01)
Wait for 30 seconds...
Wait for 20 seconds...
Wait for 10 seconds...
Starting to try OTA from the following URL
https://s3-us-west-2.amazonaws.com/<bucket>/temp/simple_ota.bin.01
I (34660) simple_ota_example: Starting OTA example
I (36110) esp_https_ota: Starting OTA...
I (36110) esp_https_ota: Writing to partition subtype 16 at offset 0x110000
E (38380) esp_ota_ops: OTA image has invalid magic byte (expected 0xE9, saw 0x3c)
E (38380) esp_https_ota: Error: esp_ota_write failed! err=0x5379
E (38390) simple_ota_example: Firmware upgrade failed
Hello world! (Ver.01)
Wait for 30 seconds...
...
更新アプリをS3に設置してOTAさせてみる
いよいよOTAのテストです。プログラム冒頭のバージョン番号を02に変更。
# define APP_VERSION "02"
ビルドした後、今度はFlashせずにS3に設置します。
idf.py build
aws s3 cp build\simple_ota.bin s3://<bucket>/temp/simple_ota.bin.01 --acl public-read
シリアルポートをモニタしていると、Ver.02に切り替わりました。良い感じです。
Hello world! (Ver.01)
Wait for 30 seconds...
Wait for 20 seconds...
Wait for 10 seconds...
Starting to try OTA from the following URL
https://s3-us-west-2.amazonaws.com/<bucket>/temp/simple_ota.bin.01
I (34669) simple_ota_example: Starting OTA example
I (36119) esp_https_ota: Starting OTA...
I (36119) esp_https_ota: Writing to partition subtype 16 at offset 0x110000
(... snip ...)
Self test was passed
Hello world! (Ver.02)
Wait for 30 seconds...
...
Rollbackさせてみる
次はバージョン03を作りますが、self-testを失敗させてみます。
# define APP_VERSION "03"
そして、self_test()関数の中のif文を変更して失敗パターンの分岐を実行させます。
            if (0) {
                /* When self-test was passed */
                /* ... snip ... */
            }
            else {
                /* When self-test was failed */
                /* ... snip ... */
            }
ビルドしてS3に設置します。
idf.py build
aws s3 cp build\simple_ota.bin s3://<bucket>/temp/simple_ota.bin.02 --acl public-read
シリアルポートをモニタしていると、一度OTAが走りますが、Self testに失敗し、再びVer.02に戻りました。良い感じです。
Hello world! (Ver.02)
Wait for 30 seconds...
Wait for 20 seconds...
Wait for 10 seconds...
Starting to try OTA from the following URL
https://s3-us-west-2.amazonaws.com/<bucket>/temp/simple_ota.bin.02
I (34665) simple_ota_example: Starting OTA example
I (36175) esp_https_ota: Starting OTA...
I (36175) esp_https_ota: Writing to partition subtype 17 at offset 0x210000
(... snip ...)

Self test was failed !!!!!
Will be rollback & reboot !!!!!

(... snip ...)
Hello world! (Ver.02)
Wait for 30 seconds...
Wait for 20 seconds...
Wait for 10 seconds...
Starting to try OTA from the following URL
https://s3-us-west-2.amazonaws.com/<bucket>/temp/simple_ota.bin.02
I (35156) simple_ota_example: Starting OTA example
I (37126) esp_https_ota: Starting OTA...
I (37126) esp_https_ota: Writing to partition subtype 17 at offset 0x210000
...
ただ、このテストで残念だったのは、self-testに失敗するバージョン03が引き続きS3上に残っているので、再度OTAを繰り返してバージョン02と03を行ったり来たりしてしまうこと。実運用では、Rollbackした際の良い手続きを考える必要がありそうです。
アプリに署名して安全性を高める
上記の単純なOTAだと、例えば更新アプリの設置場所が乗っ取られて不正アプリを置かれてしまった場合に、デバイスがその不正アプリで書き換えられてしまいます。最初にアプリ署名をしておくことで、この脅威を防ぐことができます。
本当は、Hardware Secure Bootの仕組みまで入れるとよりセキュアになるのですが、そこまでやるとデバイスを元に戻せなくなってしまうので、今回はアプリ署名だけを試しました。
ESP32のSecure BootやSigned App Verificationについては以下もご参考までに。
ESP32のSecure Bootの仕組み
プロジェクト設定
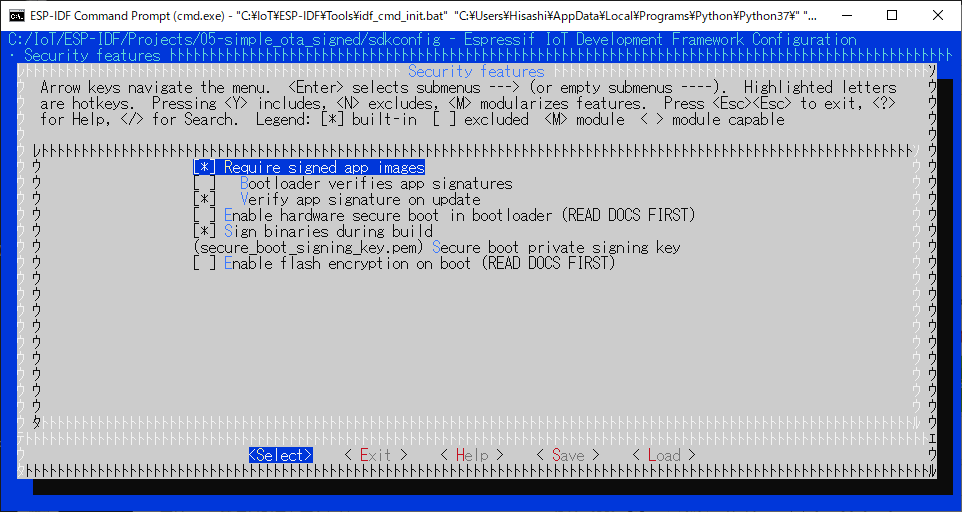
まず、idf.py menuconfigにて以下を追加設定。
| 項目 | 設定値 | 備考 |
|---|---|---|
| Security features -> Require signed app images | ON | これをONにするとVerify app signature on updateも自動的にONになる |
また、secure_boot_signing_key.pemという名前で署名鍵を作っておく必要があります。
python espsecure.py generate_signing_key secure_boot_signing_key.pem
ビルドして書込み
プログラム冒頭のバージョン番号を01に戻します。
# define APP_VERSION "01"
そして、ビルドして書込み。
idf.py build
idf.py flash
シリアルポートをモニタすると、Ver.01が動き始めました。そして、S3には以前のVer.02の署名無しアプリが残っていたのでOTAを試みましたが、署名が正しくないということで失敗。再びVer.01に戻りました。
Hello world! (Ver.01)
Wait for 30 seconds...
Wait for 20 seconds...
Wait for 10 seconds...
Starting to try OTA from the following URL
https://s3-us-west-2.amazonaws.com/<bucket>/temp/simple_ota.bin.01
I (34670) simple_ota_example: Starting OTA example
I (36140) esp_https_ota: Starting OTA...
I (36140) esp_https_ota: Writing to partition subtype 16 at offset 0x110000
(... snip ...)
I (74690) esp_image: Verifying image signature...
E (74690) secure_boot: image has invalid signature version field 0xffffffff
E (74690) esp_image: Secure boot signature verification failed
I (74700) esp_image: Calculating simple hash to check for corruption...
W (74940) esp_image: image valid, signature bad
E (74950) simple_ota_example: Firmware upgrade failed
Hello world! (Ver.01)
Wait for 30 seconds...
...
正しく署名した更新アプリをS3に設置してOTAさせてみる
次に、署名済の正しい更新アプリをS3に設置しなおします。
プログラム冒頭のバージョン番号を02に変更。
# define APP_VERSION "02"
ビルドして、S3に設置。
idf.py build
aws s3 cp build\simple_ota.bin s3://<bucket>/temp/simple_ota.bin.01 --acl public-read
シリアルポートをモニタしていると、Verifying image signature...と出力された後に再起動が始まり、Ver.02に切り替わりました。正しい署名鍵を使ってビルドしたアプリだけが更新処理されることが確認できました。
Hello world! (Ver.01)
Wait for 30 seconds...
Wait for 20 seconds...
Wait for 10 seconds...
Starting to try OTA from the following URL
https://s3-us-west-2.amazonaws.com/<bucket>/temp/simple_ota.bin.01
I (106610) simple_ota_example: Starting OTA example
I (108090) esp_https_ota: Starting OTA...
I (108090) esp_https_ota: Writing to partition subtype 16 at offset 0x110000
(... snip ...)
I (148470) esp_image: Verifying image signature...
I (149150) wifi:state: run -> init (0)
(... snip ...)
Self test was passed
Hello world! (Ver.02)
Wait for 30 seconds...
...