はじめに
以前に、ESP-IDF Programming Guideの案内に沿って、Espressif社のESP-AWS-IoT SDKを使ってAWS IoTにつなぎました。
ESP32からAWS-IoTにつなぐ(Espressif社のSDKを利用)
しかし上記のSDKはやや古く(2018年5月)、Amazon FreeRTOSのフル機能が入っているわけではなさそうだったので、今回はAmazon FreeRTOSそのものを入手して動かしてみました。ビルドしてフラッシュすると、あらかじめ用意されているデモが動きます。今回はそこまで。
【今回の環境】
- ESP32-DevKitC-32D
- Amazon FreeRTOS Version 202012.00
- Toolchain v5.2.0
- Windows 10
開発環境準備
ESP32の開発環境であるESP-IDFの最新バージョンはv4.xですが、Amazon FreeRTOSのページ(下記)を見ると、
Espressif ESP32-DevKitC と ESP-WROVER-KIT の開始方法
こんな記述があります。
ESP-IDF のバージョン 3.3 (FreeRTOS で使用されるバージョン) では、ESP32 コンパイラの最新バージョンがサポートされていません。ESP-IDF のバージョン 3.3 と互換性のあるコンパイラを使用する必要があります。
最初はESP-IDF v4.xで使われているESP-IDF Tools 2.3 (Toolchain v8.2.0)で強引に進めようとしましたが、ビルドエラーが多発。諦めてESP-IDF v3.3で使われているESP-IDF Tools 1.2 (Toolchain v5.2.0)を用意するところからやり直しました(IDFそのものは、それ相当のものがAmazon FreeRTOSの中に含まれているので不要)。
以下のページに沿って進めます。
Standard Setup of Toolchain for Windows (CMake)
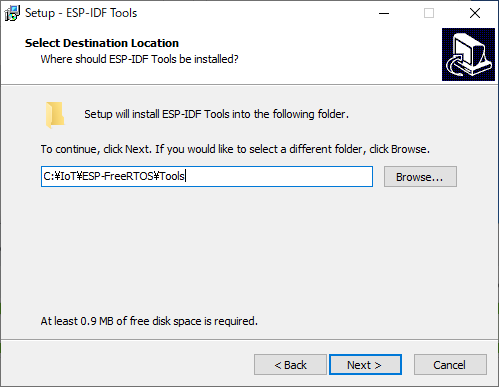
フォルダ構成はこのようにしました。
C:\IoT\
 └ ESP-FreeRTOS\
    ├ Tools\
    └ FreeRTOS\
ESP-IDF Toolsのインストール
ページ中のリンク(以下)からインストーラをダウンロードして実行します。
https://dl.espressif.com/dl/esp-idf-tools-setup-1.2.exe
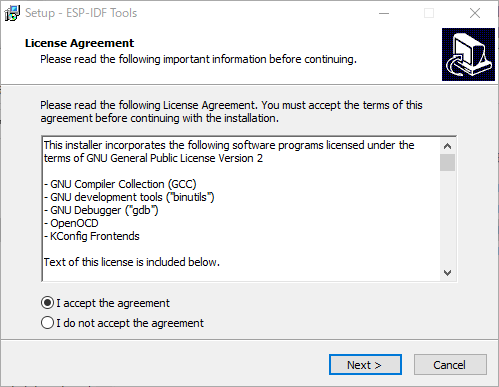
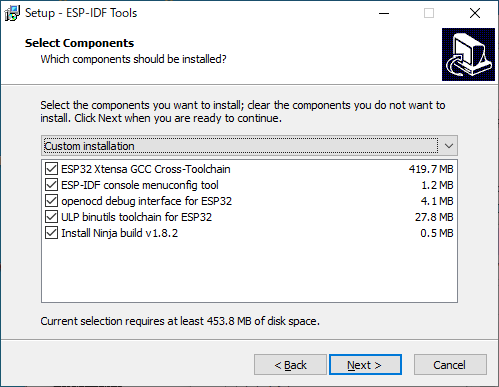
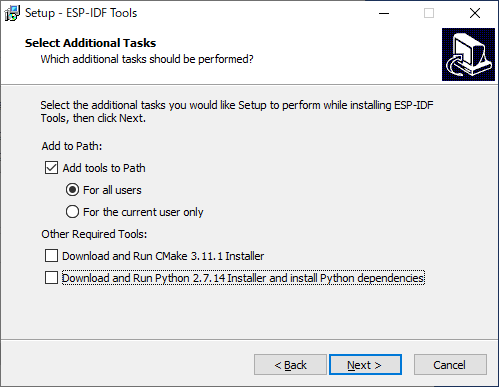
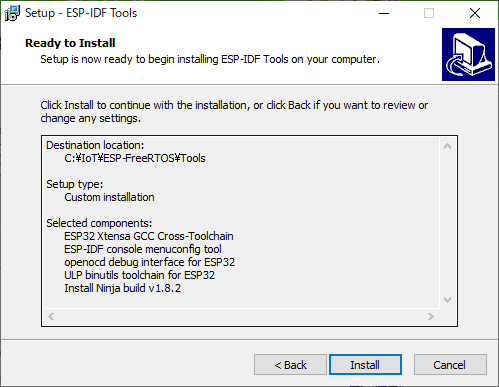
以下の理由からDefault installationではなくCustom installationを選択しました。
- このインストーラはPython 2.7.14をインストールしようとするが、自環境には既にPython 3.7.3が入っていたので。
- このインストーラはCMake 3.11.1をインストールしようとするが、Amazon FreeRTOSのビルドには3.13以上が必要。
というわけで、次の画面ではCmakeとPythonのチェックを外して先へ進みます。
「Install」ボタンを押してインストールします。
CMakeのインストール
CMakeはこちらから最新のものを入手してインストールします。
https://cmake.org/
Amazon FreeRTOSの入手
GitからFreeRTOSをダウンロードします。
cd C:\IoT\ESP-FreeRTOS
git clone -b release --recursive https://github.com/aws/amazon-freertos FreeRTOS
Pythonパッケージのインストール
ダウンロードしたFreeRTOS内にESP-IDF相当のフォルダがあるので、その中のrequirements.txtを使って必要なパッケージをインストールしておきます。
set IDF_PATH=C:/IoT/ESP-FreeRTOS/FreeRTOS/vendors/espressif/esp-idf
python -m pip install --user -r %IDF_PATH%\requirements.txt
最初のデモ(CORE_MQTT_MUTUAL_AUTH_DEMO)のビルドと実行
Wi-Fi接続情報の設定
以下のファイルを編集して設定します。
FreeRTOS\tools\aws_config_quick_start\configure.json
{
    "afr_source_dir":"../..",
    "thing_name":"ESP32-DevKitC-02",
    "wifi_ssid":"?????",
    "wifi_password":"?????",
    "wifi_security":"eWiFiSecurityWPA2"
}
AWSの設定
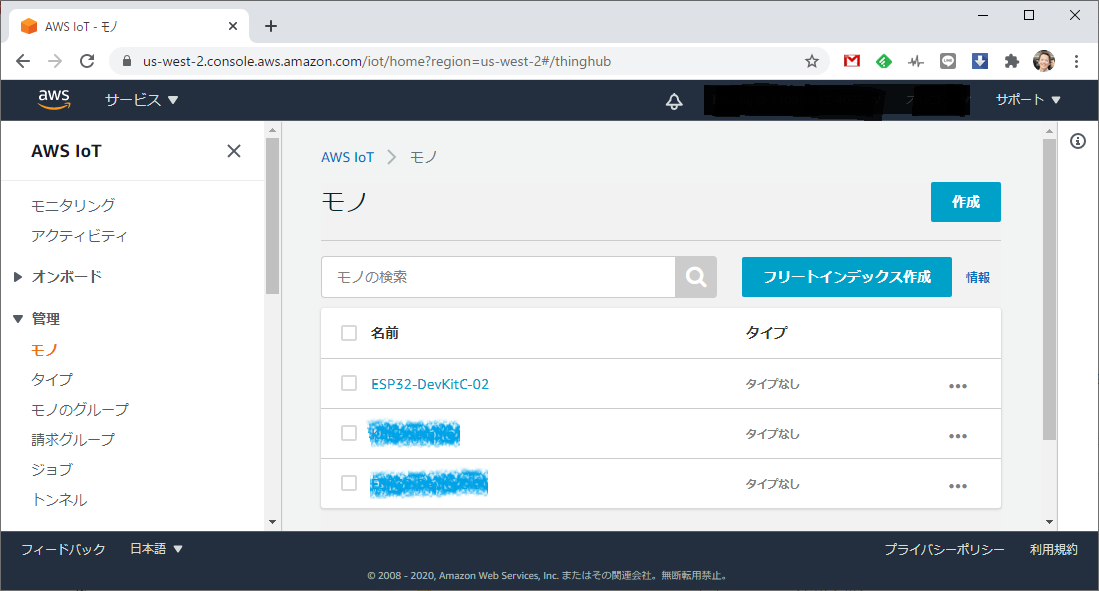
同じフォルダFreeRTOS\tools\aws_config_quick_startにあるSetupAWS.pyを動かすと、AWS IoTに以下の設定を行った上で、鍵・証明書のダウンロードやソースコードへの反映を行ってくれます。
- 「モノ」の登録
- 鍵と証明書の生成
- ポリシーの作成
なお、自分の環境は、AWSCLIの設定は行っていたものの、Python環境にboto3が入っていなかったので、あらかじめpipコマンドでこれを入れておく必要がありました。
C:\IoT\ESP-FreeRTOS> pip install boto3
(...snip...)
Successfully installed boto3-1.16.40 botocore-1.19.40

C:\IoT\ESP-FreeRTOS> cd FreeRTOS\tools\aws_config_quick_start

C:\IoT\ESP-FreeRTOS\FreeRTOS\tools\aws_config_quick_start> python SetupAWS.py setup
Creating a Thing in AWS IoT Core.
Acquiring a certificate and private key from AWS IoT Core.
Writing certificate ID to: ESP32-DevKitC-02_cert_id_file
Writing certificate PEM to: ESP32-DevKitC-02_cert_pem_file
Writing private key PEM to: ESP32-DevKitC-02_private_key_pem_file
Creating a policy on AWS IoT Core.
Completed prereq operation!
Updated aws_clientcredential.h
Updated aws_clientcredential_keys.h
Completed update operation!

C:\IoT\ESP-FreeRTOS\FreeRTOS\tools\aws_config_quick_start>
ビルドと実行
まず、cmakeでNinjaのビルドファイル生成します。-DBOARDにボード名称を指定する必要がありますが、以下フォルダにいくつかあるcmakeファイルから適切なものをえらえば良さそうです。
FreeRTOS\vendors\espressif\boards\esp32\esp32_devkitc.cmake
c:\IoT\ESP-FreeRTOS\FreeRTOS> cmake -DVENDOR=espressif -DBOARD=esp32_devkitc -DCOMPILER=xtensa-esp32 -GNinja -S . -B build
-- The C compiler identification is GNU 5.2.0
-- The CXX compiler identification is GNU 5.2.0
-- The ASM compiler identification is GNU
(...snip...)
-- Component libraries:
=========================Resolving dependencies==========================
module disabled: posix
reason:          posix::mcu_port is not defined by vendor.
dependency path: posix->posix::mcu_port


====================Configuration for FreeRTOS====================
  Version:                 202011.00
  Git version:             202011.00

Target microcontroller:
  vendor:                  Espressif
  board:                   ESP32-DevKitC
  description:             Development board produced by Espressif that comes in two
                           variants either with ESP-WROOM-32 or ESP32-WROVER module
  family:                  ESP32
  data ram size:           520KB
  program memory size:     4MB

Host platform:
  OS:                      Windows-10.0.19042
  Toolchain:               xtensa-esp32
  Toolchain path:          C:/IoT/ESP-FreeRTOS/Tools/tools
  CMake generator:         Ninja

FreeRTOS modules:
  Modules to build:        ble, ble_hal, ble_wifi_provisioning, common, common_io,
                           core_json, core_mqtt, core_mqtt_demo_dependencies, crypto,
                           defender, dev_mode_key_provisioning, device_shadow,
                           device_shadow_demo_dependencies, freertos_cli_plus_uart,
                           freertos_plus_cli, greengrass, https, kernel, logging, mqtt,
                           ota, pkcs11, pkcs11_implementation, pkcs11_utils, platform,
                           retry_utils, secure_sockets, serializer, shadow, tls,
                           transport_interface_secure_sockets, wifi
  Enabled by user:         ble, ble_hal, ble_wifi_provisioning, common_io, core_json,
                           core_mqtt_demo_dependencies, defender, device_shadow,
                           device_shadow_demo_dependencies, freertos_cli_plus_uart,
                           freertos_plus_cli, greengrass, https, logging, ota, pkcs11,
                           pkcs11_implementation, pkcs11_utils, platform, secure_sockets,
                           shadow, wifi
  Enabled by dependency:   common, core_mqtt, crypto, demo_base, dev_mode_key_
                           provisioning, freertos, kernel, mqtt, ota_http, ota_mqtt,
                           pkcs11_mbedtls, retry_utils, serializer, tls, transport_
                           interface_secure_sockets, utils
  3rdparty dependencies:   http_parser, jsmn, mbedtls, pkcs11, tinycbor
  Available demos:         demo_cli_uart, demo_core_mqtt, demo_defender, demo_device_
                           shadow, demo_gatt_server, demo_greengrass_connectivity,
                           demo_https, demo_mqtt_ble, demo_numeric_comparison, demo_ota,
                           demo_shadow_ble, demo_tcp, demo_wifi_provisioning
  Available tests:
=========================================================================

-- Configuring done
-- Generating done
-- Build files have been written to: C:/IoT/ESP-FreeRTOS/FreeRTOS/build

C:\IoT\ESP-FreeRTOS\FreeRTOS>
続いてビルドします。
C:\IoT\ESP-FreeRTOS\FreeRTOS> cmake --build build
(...snip...)

[999/999] Generating aws_demos.bin
esptool.py v2.8

C:\IoT\ESP-FreeRTOS\FreeRTOS>
ビルドが終了したら、フラッシュしてモニタします。
C:\IoT\ESP-FreeRTOS\FreeRTOS> cmake --build build --target flash
(...snip...)
Hard resetting via RTS pin...

C:\IoT\ESP-FreeRTOS\FreeRTOS> python vendors\espressif\esp-idf\tools\idf.py monitor
(...snip...)
72 1114 [iot_thread] [INFO] [MQTT_MutualAuth_Demo] [mqtt_demo_mutual_auth.c:1104] 73 1114 [iot_thread] Incoming Publish Topic Name: ESP32-DevKitC-02/example/topic matches subscribed topic.Incoming Publish Message : Hello World!74 1114 [iot_thread]
75 1164 [iot_thread] [INFO] [MQTT_MutualAuth_Demo] [mqtt_demo_mutual_auth.c:553] 76 1164 [iot_thread] Keeping Connection Idle...77 1164 [iot_thread]
78 1364 [iot_thread] [INFO] [MQTT_MutualAuth_Demo] [mqtt_demo_mutual_auth.c:533] 79 1364 [iot_thread] Publish to the MQTT topic ESP32-DevKitC-02/example/topic.80 1364 [iot_thread]
81 1364 [iot_thread] [INFO] [MQTT_MutualAuth_Demo] [mqtt_demo_mutual_auth.c:543] 82 1364 [iot_thread] Attempt to receive publish message from broker.83 1364 [iot_thread]
84 1400 [iot_thread] [INFO] [MQTT] [core_mqtt.c:855] 85 1400 [iot_thread] Packet received. ReceivedBytes=2.86 1400 [iot_thread]
87 1400 [iot_thread] [INFO] [MQTT] [core_mqtt.c:1132] 88 1400 [iot_thread] Ack packet deserialized with result: MQTTSuccess.89 1400 [iot_thread]
90 1400 [iot_thread] [INFO] [MQTT] [core_mqtt.c:1145] 91 1400 [iot_thread] State record updated. New state=MQTTPublishDone.92 1400 [iot_thread]
93 1400 [iot_thread] [INFO] [MQTT_MutualAuth_Demo] [mqtt_demo_mutual_auth.c:1031] 94 1400 [iot_thread] PUBACK received for packet Id 3.95 1400 [iot_thread]
96 1401 [iot_thread] [INFO] [MQTT] [core_mqtt.c:855] 97 1401 [iot_thread] Packet received. ReceivedBytes=46.98 1401 [iot_thread]
99 1401 [iot_thread] [INFO] [MQTT] [core_mqtt.c:1015] 100 1401 [iot_thread] De-serialized incoming PUBLISH packet: DeserializerResult=MQTTSuccess.101 1401 [iot_thread]
102 1401 [iot_thread] [INFO] [MQTT] [core_mqtt.c:1028] 103 1401 [iot_thread] State record updated. New state=MQTTPubAckSend.104 1401 [iot_thread]
105 1401 [iot_thread] [INFO] [MQTT_MutualAuth_Demo] [mqtt_demo_mutual_auth.c:1093] 106 1401 [iot_thread] Incoming QoS : 1
107 1401 [iot_thread]
108 1401 [iot_thread] [INFO] [MQTT_MutualAuth_Demo] [mqtt_demo_mutual_auth.c:1104] 109 1401 [iot_thread] Incoming Publish Topic Name: ESP32-DevKitC-02/example/topic matches subscribed topic.Incoming Publish Message : Hello World!110 1401 [iot_thread]
111 1451 [iot_thread] [INFO] [MQTT_MutualAuth_Demo] [mqtt_demo_mutual_auth.c:553] 112 1451 [iot_thread] Keeping Connection Idle...113 1451 [iot_thread]
(...以下繰り返し...)
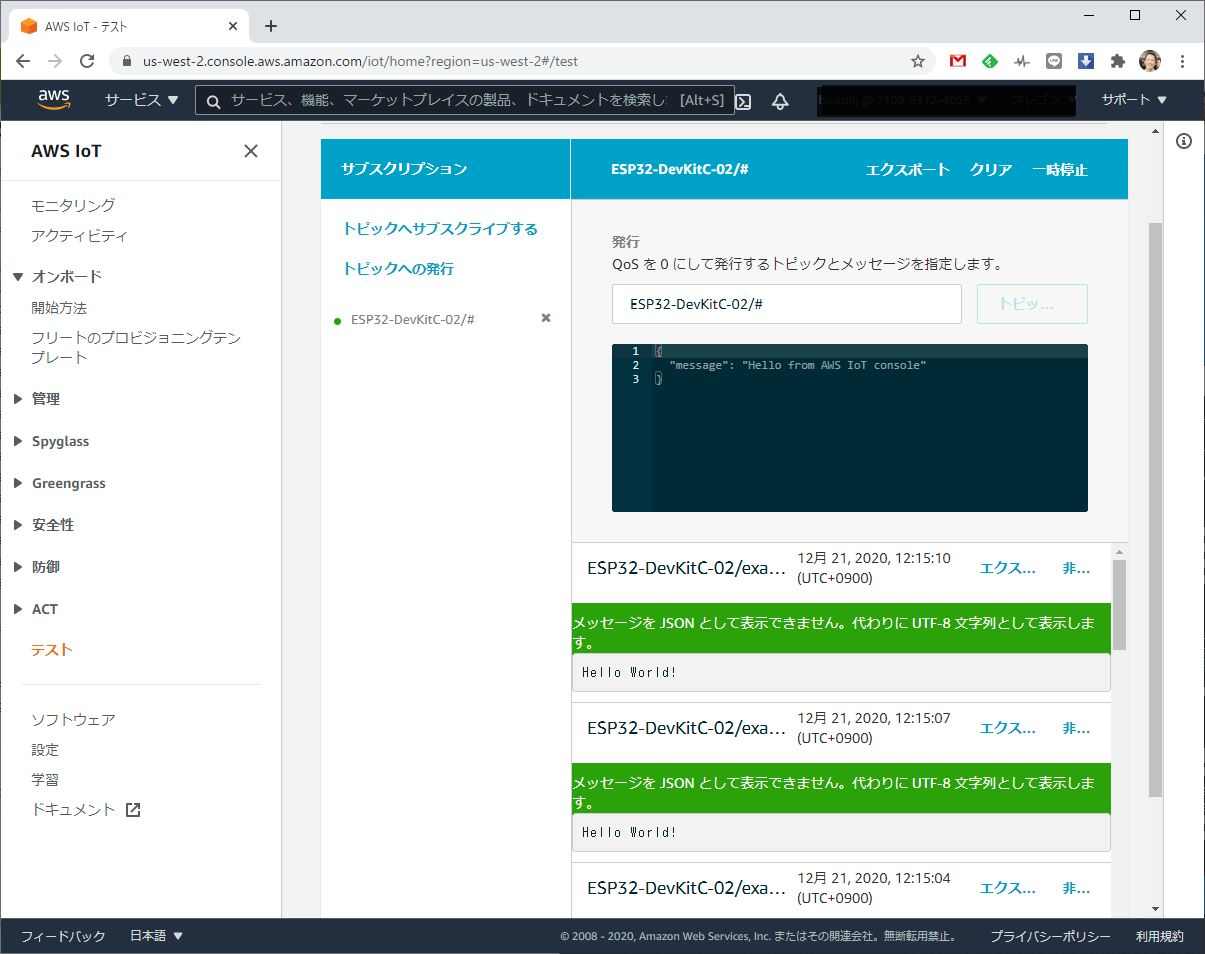
ESP32-DevKitC-02/example/topicというトピックでHello World!を繰り返し送っている様子が見えます。AWS IoT側でもHello World!が送られていることを確認できました。
別のデモ(DEVICE_SHADOW_DEMO)のビルドと実行
上記の他にもいくつかデモが用意されているので、もう一つ実行してみます。
デモの切替
デモの使い方はFreeRTOS\demos\README.mdに簡単な説明があります。
そこに書いてある内容に従って、FreeRTOS\vendors\espressif\boards\esp32\aws_demos\config_files\aws_demo_config.hを開いて、次はDEVICE_SHADOW_DEMOというのを選んでみます。
// #define CONFIG_CORE_MQTT_MUTUAL_AUTH_DEMO_ENABLED
# define CONFIG_DEVICE_SHADOW_DEMO_ENABLED
ビルドと実行
先ほどと同じようにビルドしてフラッシュします。
C:\IoT\ESP-FreeRTOS\FreeRTOS> cmake --build build
(...snip...)
[78/79] Generating aws_demos.bin
esptool.py v2.8

C:\IoT\ESP-FreeRTOS\FreeRTOS> cmake --build build --target flash
(...snip...)
Hard resetting via RTS pin...

C:\IoT\ESP-FreeRTOS\FreeRTOS> python vendors\espressif\esp-idf\tools\idf.py monitor
(...snip...)
2 8 [iot_thread] [INFO ][DEMO][80] ---------STARTING DEMO---------
(...snip...)
78 1247 [iot_thread] [INFO] [ShadowDemo] [shadow_demo_main.c:622] 79 1247 [iot_thread] Send desired power state with 1.80 1247 [iot_thread]
81 1247 [iot_thread] [INFO] [ShadowDemo] [shadow_demo_helpers.c:802] 82 1247 [iot_thread] the published payload:{"state":{"desired":{"powerOn":1}},"clientToken":"001247"}
 83 1247 [iot_thread]
84 1248 [iot_thread] [INFO] [ShadowDemo] [shadow_demo_helpers.c:830] 85 1248 [iot_thread] PUBLISH sent for topic $aws/things/ESP32-DevKitC-02/shadow/update to broker with packet ID 5.

86 1248 [iot_thread]
87 1299 [iot_thread] [INFO] [ShadowDemo] [shadow_demo_main.c:673] 88 1299 [iot_thread] No change from /update/delta, unsubscribe all shadow topics and disconnect from MQTT.
(...snip...)
193 1650 [iot_thread] [INFO ][DEMO][16500] -------DEMO FINISHED-------
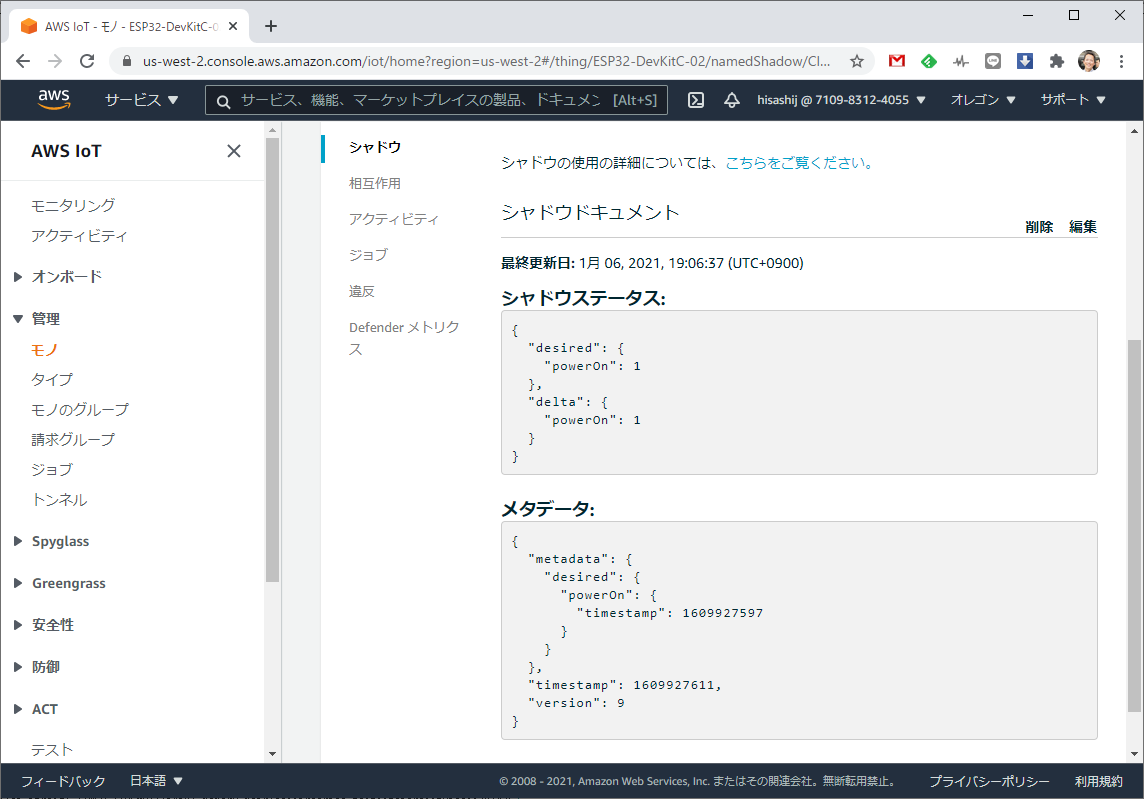
ログは長いのでそれっぽいところだけ取り出しましたが、{"desired":{"powerOn":1}}という内容を送っている様子が見えます。AWS IoT側でもシャドウを確認できました。
