現職でReactとJS(今はTS)だけであらゆる機能を実装してきましたが、最近アサインされる機能がライブラリやAPI抜きでは太刀打ちできないケースが増えてきていて、実際去年の秋に担当したある機能は外部APIを使って実装しました。
ライブラリを選定して目指す機能が実現できるかの可否を判断する「技術検証」を頼まれる事が増えてきていますが、如何せんライブラリを導入した経験がまだ浅いので、選定→インストール→実装までを一度自分で経験してライブラリを扱う勘所を掴んでおきたいと思いました。
そこで目をつけたのが「ドラッグ&ドロップ」
どんなアプリでも幅広く使われるこのUIは3年前プログラミングの勉強してる時にプレーンなJSで実装した事もありましたが(記事)開発現場ではライブラリを使う事がほとんどだと思います。
前置きが長くなりましたが、本題に入ります。
まずドラッグ&ドロップを実装する上でどのライブラリがいいかの選定、そのライブラリでやろうとしてる事が実現できるかの検証をこの記事で紹介します。
ライブラリの選定:
まずライブラリはドキュメントが豊富か、と関連する記事が多いかで判断し、このReact DnDを選定しました。
https://react-dnd.github.io/react-dnd/about
react-beautiful-dndも候補にありましたが、情報量ではReact DnDには敵わなかったです。
今回実現したい操作:
今回自分がやろうとしたのはソリティアでカードをドラッグして移動したいカードにドロップした時に何がどこにドロップされたのか?のデータを受け取り、それを元に移動の許可判定をするという処理です。ただ単にリストをソートして順番を入れ替えるとか、カラムに移動させるだけだったら公式ドキュメントのDemoに載ってるコードをそのまま使えば事足りますが、こういう実装のサンプルはなかなか無いので、公式ドキュメント、参考になりそうな記事を漁って見つけた点の情報を徐々につないでいき、なんとかこのライブラリの使い方を掴みました。GitHubにサンプルが上がっていてもバージョンが古かったりして苦戦しました。。
まずこのライブラリの登場人物は3つ。
1. DnD Provider
Drag SourceとDrop Targetをラップする大元の親Component
2. Drag Source
ドラッグして動かすもの
3. Drop Target
ドロップを受け付ける場所。
実際のコードはこんな感じです。細かいところは省いてます。
大元の親となるDnD ProviderがApp.js
import React from 'react';
import { HTML5Backend } from 'react-dnd-html5-backend'
import { DndProvider } from 'react-dnd'

const App = () => {
  return (
    <DndProvider backend={HTML5Backend}>
      <>
        //この中にDragSourceとDropTragetを置く
      </>
    </DndProvider>
  )
};
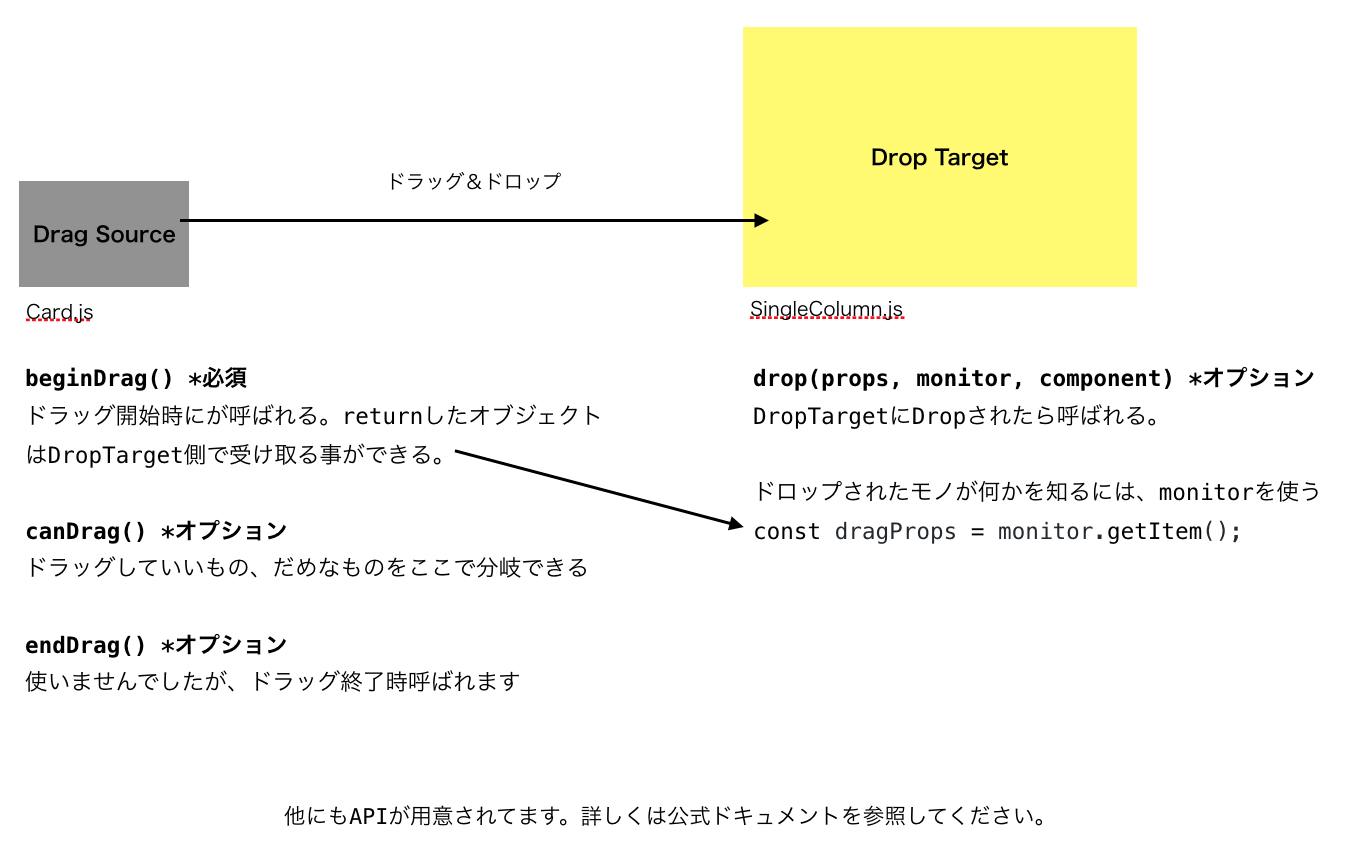
動かすDrag SourceのCard.js (これでDraggableになる)
import React, { Component } from 'react';
import { DragSource } from 'react-dnd';

const itemSource = {
  beginDrag(props) {
    return {
      card: props.card,
      parentIndex: props.parentIndex,
      isFromFoundation: props.isFromFoundation
    };
  },
  canDrag(props) {
    retrun props.card.face;
  }
}

function collect(connect, monitor) {
  return {
    connectDragSource: connect.dragSource(),
    connectDragPreview: connect.dragPreview(),
    isDragging: monitor.isDragging(),
  }
}

class Card extends Component {
  render() {
    const { isDragging, connectDragSource, card, index } = this.props;
    const opacity = isDragging ? 0 : 1;

    //returnする大元の親は必ずプレーンなdivでくくる必要がある、StyledComponentなどは不可
    return connectDragSource(
      card.face ? (
        <div style={{ opacity }}><CardImage index={index} src={`${process.env.PUBLIC_URL}/${card.pattern}/${card.number}.png`} /></div>
      ) : (
        <div><CardImage index={index} src={`${process.env.PUBLIC_URL}/cardFace.png`} /></div>
      )
    );
  }
}

export default DragSource('item', itemSource, collect)(Card);
Drop TargetのSingleColumn.js
import React, { Component } from 'react';
import { DropTarget } from 'react-dnd';

const itemSource = {
  drop(props, monitor) {
    const dragProps = monitor.getItem();
    //↑でCard.jsでbeginDragでreturnしたオブジェクトが取れる
    return props.onDrop(dragProps, props.index);
  }
}

function collect(connect, monitor) {
  return {
    connectDropTarget: connect.dropTarget(),
    hovered: monitor.isOver(),
    item: monitor.getItem(),
  }
}

class SingleColumn extends Component {
  renderCards = (column, parentIndex) => {
    return column.map((card, index) => {
      return <Card index={index} parentIndex={parentIndex} key={card.id} card={card} />
    })
  }
  render() {
    const { connectDropTarget, column, index } = this.props;

    //returnする大元の親は必ずプレーンなdivでくくる必要がある、StyledComponentなどは不可
    return connectDropTarget(
      <div>
        <Column index={index}>
          {this.renderCards(column, index)}
          <ColumnFrame />
        </Column>
      </div>
    );
  }
}

export default DropTarget('item', itemSource, collect)(SingleColumn);
SingleColumn.jsをまとめるColumn.js
const Columns = () => {
  const { state, dispatch } = useContext(store);

  const onDrop = (dragProps, targetIndex) => {
    //dragPropsにはCard.jsのbeginDragでreturnしたオブジェクトが入ってます
    {
      card,
      parentIndex,
      isFromFoundation
    };
   //これらの情報を元に判定処理をここで行います
  }

  const renderColumns = () => {
    return state.columns.map((column, index) => {
      return <SingleColumn index={index} key={index} column={column} onDrop={onDrop} />
    })
  }

  return (
    <>
      {renderColumns()}
    </>
  )
};

export default Columns;
DragSourceとDropTargetの関係を図にまとめるとこんな感じです。
この仕組みを応用すれば画像、動画などを管理するページとかで、フォルダAをフォルダBに移動とかという実装にも応用できそうです。
ちなみにこちらが今回このドラッグ&ドロップを組み込んだソリティアです。
https://upbeat-panini-974f90.netlify.app/
まだバグありますが、ドラッグドロップでカードの移動はできます。
ソースコードはこちら
https://github.com/eiciemm/react-solitarire/tree/main/src
まとめ:
ライブラリはフレームワーク程じゃ無いにしても使いこなすのにルールを覚える点が少し似てると思いました。そしてルールを完璧に掴めば応用が効いて変わった使い方やカスタマイズも容易にできる。もちろん限度があるでしょうが。
もともとライブラリに頼るというのは悪いイメージがありました。公式ドキュメントで公開されてるDemoと全く同じように使うのであればそれは凄いラッキーで、それによって浮いた工数を他の部分の作り込みに時間を割けばいいと思いますし、Demoと違う使い方をする場合はライブラリのルールを理解しないといけなく、これが容易い作業では無いので、ライブラリ=手抜きとは一概には言えないかなと思いました。
今後はこれ以外にも話題のライブラリを触ってみようと思います。