はじめに
TeachableMachineでは、ノーコードで音声認識を簡単に実装することができます。今回はそれをアプリに取り込む方法をお伝えします。
今回作るもの
ボタンを押すと録音が開始し、完了すると音を分類してその割合を表示するアプリを作りました。
開発環境
- Flutter: 3.14.0
- Dart: 3.2.0
- tflite_audio: 0.3.0
TeachableMachineで音声を学習させる
TeachableMachineを用いて音声を学習します。学習の仕方は以下の記事で説明しています。ご参照ください。
学習した音声のデータをエクスポートする
以下の手順でTensorflow Liteをエクスポートしてください。

riveライブラリの追加
以下のコマンドを実行するか、手動でpubspec.yamlに指定のバージョンを追記してください。
flutter pub add tflite_audio
ダウンロードしたファイルを追加
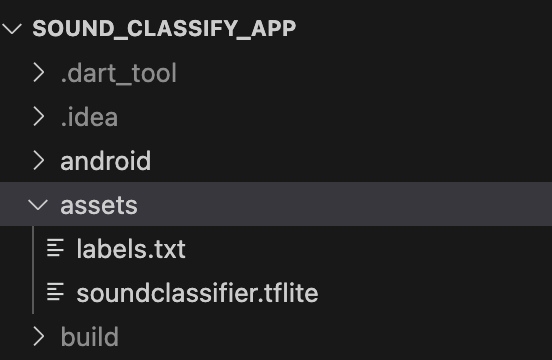
/assetsディレクトリを作成し、TeachableMachineからダウンロードしたフォルダの中にある.txt, .tfliteファイルを挿入します。名前はlabels.txt, soundclassifierにしました。

また、pubspec.yamlに以下の記述を追加してください。
flutter:
  uses-material-design: true
  # 以下を追記
  assets:
    - assets/labels.txt
    - assets/soundclassifier.tflite
iOSの設定
① ios/Runner/Info.plistに以下を追記してください。
	<key>NSMicrophoneUsageDescription</key>
	<string>録音するためにマイクへの許可をお願いします。</string>
② ios/Podfileで以下を編集してください
-
platform :iosを12.0以上にする
platform :ios, '12.0'
-
pod'TensorFlowLiteSelectTfOps','~> 2.6.0'を以下に追記
target 'Runner' do
  use_frameworks!
  use_modular_headers!
   # 追記箇所
  pod'TensorFlowLiteSelectTfOps','~> 2.6.0'

  flutter_install_all_ios_pods File.dirname(File.realpath(__FILE__))
  target 'RunnerTests' do
    inherit! :search_paths
  end
end
③ Targets > Runner > BuildSettings > All and add the following line to Linking > Other Linkerに以下を追加

-force_load $(SRCROOT)/Pods/TensorFlowLiteSelectTfOps/Frameworks/TensorFlowLiteSelectTfOps.framework/TensorFlowLiteSelectTfOps
④ ios/Flutter/Release.xcconfigに以下を追記
#include "Pods/Target Support Files/Pods-Runner/Pods-Runner.profile.xcconfig"
⑤ /iOSディレクトリで以下を実行
$ flutter pub get
$ pod install
$ flutter clean
main.dartで音声認識の実装
音声認識のコードは以下のようになっています。
import 'package:flutter/material.dart';
import 'package:flutter/services.dart';
import 'package:tflite_audio/tflite_audio.dart';
import 'dart:convert'; // JSON文字列を扱うために必要

void main() {
  runApp(MyApp());
}

class MyApp extends StatelessWidget {
  @override
  Widget build(BuildContext context) {
    return MaterialApp(
      title: 'Flutter Demo',
      theme: ThemeData.dark(),
      home: MyHomePage(),
    );
  }
}

class MyHomePage extends StatefulWidget {
  @override
  _MyHomePageState createState() => _MyHomePageState();
}

class _MyHomePageState extends State<MyHomePage> {
  String _sound = "Press the button to start";
  bool _recording = false;
  late Stream<Map<dynamic, dynamic>> result;

  @override
  void initState() {
    super.initState();
    TfliteAudio.loadModel(
      model: 'assets/soundclassifier.tflite',
      label: 'assets/labels.txt',
      outputRawScores: true, // Rawスコア(それぞれの割合を出力)を出力する
      numThreads: 1,
      isAsset: true,
      inputType: 'rawAudio', // Rawスコア(それぞれの割合を出力)を出力する
    );
  }

  void _recorder() {
    if (!_recording) {
      setState(() => _recording = true);
      result = TfliteAudio.startAudioRecognition(
        numOfInferences: 1,
        sampleRate: 44100,
        bufferSize: 22016,
      );
      result.listen((event) async {
        // ラベルリストを非同期で取得
        final labels = await fetchLabelList();
        // recognitionResultからスコアのリストを取得
        final rawScores = json.decode(event["recognitionResult"]);
        List<double> scores = List<double>.from(rawScores);

        // スコアをパーセント表示に変換し、それぞれのラベルと結合する
        String recognitionResults = "";
        for (int i = 0; i < scores.length; i++) {
          recognitionResults +=
              "${labels[i]}: ${(scores[i] * 100).toStringAsFixed(2)}%\n";
        }

        setState(() {
          _recording = false;
          _sound = recognitionResults;
        });
      });
    }
  }

  Future<List<String>> fetchLabelList() async {
    final labelData = await rootBundle.loadString('assets/labels.txt');
    return LineSplitter().convert(labelData);
  }

  void _stop() {
    TfliteAudio.stopAudioRecognition();
    setState(() {
      _recording = false;
      _sound = "Press the button to start";
    });
  }

  @override
  Widget build(BuildContext context) {
    return Scaffold(
      body: Container(
        child: Center(
          child: Column(
            mainAxisAlignment: MainAxisAlignment.spaceEvenly,
            children: <Widget>[
              Container(
                padding: EdgeInsets.all(20),
              ),
              MaterialButton(
                onPressed: _recorder,
                color: _recording ? Colors.grey : Colors.pink,
                textColor: Colors.white,
                child: Icon(Icons.mic, size: 60),
                shape: CircleBorder(),
                padding: EdgeInsets.all(25),
              ),
              Text(
                _sound,
                textAlign: TextAlign.center,
                style: Theme.of(context).textTheme.headline5,
              ),
            ],
          ),
        ),
      ),
    );
  }
}
エラー対処
実行時に
error (xcode): sandbox: dart(52307) deny(1) file-write-create
というエラーが出た場合、
xcodeのBuild SettingsのUser Script Sandboxing (ENABLE_USER_SCRIPT_SANDBOXING) を Noにすると解決しました。
最後に
TeachableMachineを使用するとこんなにも簡単にアプリで音声認識を実装することができました。色々なツールを組み合わせてアプリを作るのは楽しいですね。これからも面白いものにたくさん触れていこうと思います。

