はじめに
顔検出ツールの開発にはとてもお金がかかるらしい。これだけライブラリとか整っているのに本当なのか。作るのがどれくらい大変なのか、自分でやってみようと思う
環境
macOS majave
Python 3.7
openCV 4.0
YOLO v3
YOLO
今回はYOLOを使ってみようと思います。
YOLOってYou only look once(一度見るだけで)の略らしいです。
NNで一からモデルを構築しなくても、YOLOなら大丈夫。
画像だけでなく、Webカメラなどとも連動できるので、リアルタイムの検出も可能です。
準備
インストールしたものの早速エラーが。。。
$ git clone https://github.com/pjreddie/darknet
xcrun: error: invalid active developer path (/Library/Developer/CommandLineTools), missing xcrun at: /Library/Developer/CommandLineTools/usr/bin/xcrun
Xcode-selectを入れろとのことなのでインストール
$ xcode-select --install
インストールできたら再度
$ git clone https://github.com/pjreddie/darknet
インストールできたらディレクトリを変更して、コンパイルします。
$ cd darknet
$ make
その後weigthファイルをダウンロードします。
macならcurl(-Oをつけます。)、winならwgetでダウンロードします。
$ curl https://pjreddie.com/media/files/yolov3.weights -O
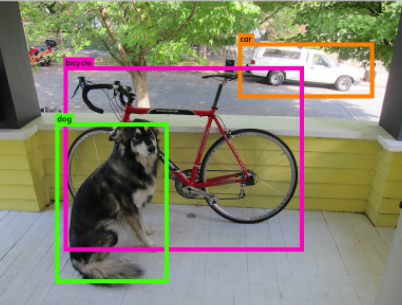
準備完了なので、サンプルでデータで確認。
dataフォルダ内に、違うjpgを準備しておき、コードを書き換えれば、汎用できます。
$ ./darknet detect cfg/yolov3.cfg yolov3.weights data/dog.jpg
一応
srcフォルダのimage.cを編集をすることで、機能の編集は可能です。
pythonユーザーなのでなれませんが、編集したらコンパイル(make)が必要です。
さらに動画で
$ ./darknet detector demo cfg/coco.data cfg/yolov3.cfg yolov3.weights
Demo needs OpenCV for webcam images.
と出てくるのでMakefileを修正。
CUDAを有効化
GPU=1
cuDNNを有効化
CUDNN=1
OpenCVを有効化
OPENCV=1
で、できない。なぜだ。。
[ここ](Create frozen graph from DarkNet weights)とか見ました。
こことか見ました。
途中OSerror出たのでErrno 24: Too many open files.
久しぶりに調べすぎて疲れた。。。。結局原因特定できず。。。
ということで諦めて
OpenCVでチャレンジしました。
import cv2

cap = cv2.VideoCapture(0)

before = None
while True:
    ret, frame = cap.read()
    cv2.imshow('Raw Frame', frame)
    gray = cv2.cvtColor(frame, cv2.COLOR_BGR2GRAY)
    if before is None:
        before = gray.copy().astype('float')
        continue
    cv2.accumulateWeighted(gray, before, 0.5)
    mdframe = cv2.absdiff(gray, cv2.convertScaleAbs(before))
    cv2.imshow('MotionDetected Frame', mdframe)

    thresh = cv2.threshold(mdframe, 3, 255, cv2.THRESH_BINARY)[1]
    contours, hierarchy = cv2.findContours(thresh,cv2.RETR_TREE,cv2.CHAIN_APPROX_SIMPLE)
    max_area = 0
    target = contours[0]
    for cnt in contours:
        area = cv2.contourArea(cnt)
        if max_area < area and area < 10000 and area > 1000:
            max_area = area;
            target = cnt

    if max_area <= 1000:
        areaframe = frame
        cv2.putText(areaframe, 'nothing', (10,255), cv2.FONT_HERSHEY_SIMPLEX, 3, (255, 255,255), 3, cv2.LINE_AA)
    else:
        x,y,w,h = cv2.boundingRect(target)
        areaframe = cv2.rectangle(frame,(x,y),(x+w,y+h),(0,255,0),2)

    cv2.imshow('Motion Detect', areaframe)
    k = cv2.waitKey(1)
    if k == 27:
        break

cap.release()
cv2.destroyAllWindows()
という(本当はよくない)ファイルを作って
$ python opencv.py
追記
Pytorchを使ってYOLOからリアルタイムやっていました。
$ git clone https://github.com/ayooshkathuria/pytorch-yolo-v3.git
$ cd pytorch-yolo-v3
$ wget https://pjreddie.com/media/files/yolov3.weights
$ python detect.py --images imgs --det det
エラーが出ました。Pytorchのインストールが必要とのこと。
$ conda install pytorch torchvision -c pytorch
準備ができたのでチャレンジ!
$ python cam_demo.py

・
・
・
RuntimeError: Python is not installed as a framework. The Mac OS X backend will not be able to function correctly if Python is not installed as a framework. See the Python documentation for more information on installing Python as a framework on Mac OS X. Please either reinstall Python as a framework, or try one of the other backends. If you are using (Ana)Conda please install python.app and replace the use of 'python' with 'pythonw'. See 'Working with Matplotlib on OSX' in the Matplotlib FAQ for more information.
どうやらmatplotlibのbackendの問題らしい→https://qiita.com/Kodaira_/items/1a3b801c7a5a41c9ce49
$ python -c "import matplotlib;print(matplotlib.matplotlib_fname())"
/Users/hoge/.matplotlib/matplotlibrc
$ vi /Users/hoge/.matplotlib/matplotlibrc
vimでbackendをTkAggに変更し再度チャレンジしたら無事できました。
既にある動画とかであれば
$ python video_demo.py --video hogehoge.mp4
とかにすれば行けると思います。多分。
参照
Python+OpenCVとWebカメラを使って動体検知する話
チュートリアル
チュートリアル-テキスト
ValueError: need more than 2 values to unpack このエラーについて→これはopenCV4.0ゆえ
Macで物体検知アルゴリズムYOLO V3を動かす
