Shadowsocks(シャドーソックス)というSocks5プロキシに基づく暗号化通信を可能とするオープンソースソフトウェアを利用した[v2ray](https://www.v2ray.com/ "v2ray")を使ってプロキシサーバを構築します。通信はwebsocketで行ないます。
#1.環境
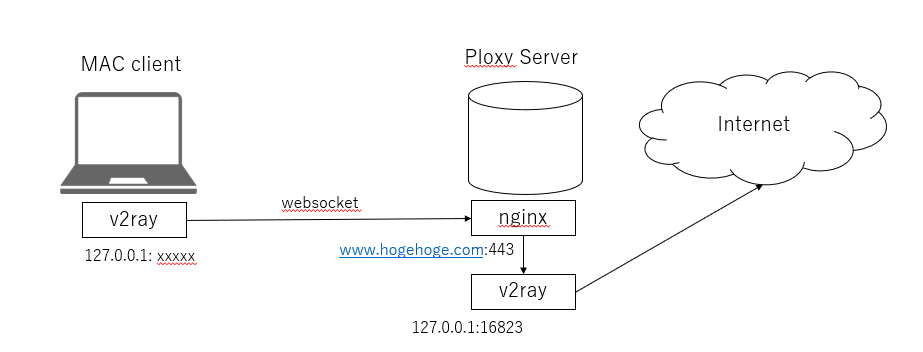
環境は以下の通りです。
##1.1 利用サーバ
サーバ:さくらインターネットVPS(CentOS Linux release 7.9.2009 (Core))
##1.2 構成
#2.サーバ構築
サーバ環境を構築していきます。
##2.1 v2rayインストール
以下のコマンドを入れるだけでインストールされます。
# bash <(curl -L https://raw.githubusercontent.com/v2fly/fhs-install-v2ray/master/install-release.sh)

[root@ik1-443-53662 ~]# bash <(curl -L https://raw.githubusercontent.com/v2fly/fhs-install-v2ray/master/install-release.sh)
  % Total    % Received % Xferd  Average Speed   Time    Time     Time  Current
                                 Dload  Upload   Total   Spent    Left  Speed
100 21113  100 21113    0     0  50814      0 --:--:-- --:--:-- --:--:-- 50874
info: Installing V2Ray v4.34.0 for x86_64
Downloading V2Ray archive: https://github.com/v2fly/v2ray-core/releases/download/v4.34.0/v2ray-linux-64.zip
  % Total    % Received % Xferd  Average Speed   Time    Time     Time  Current
                                 Dload  Upload   Total   Spent    Left  Speed
100   644  100   644    0     0   2855      0 --:--:-- --:--:-- --:--:--  2849
100 11.8M  100 11.8M    0     0  2588k      0  0:00:04  0:00:04 --:--:-- 3521k
Downloading verification file for V2Ray archive: https://github.com/v2fly/v2ray-core/releases/download/v4.34.0/v2ray-linux-64.zip.dgst
info: Extract the V2Ray package to /tmp/tmp.aV2lSnxixY and prepare it for installation.
rm: cannot remove '/etc/systemd/system/v2ray.service.d/10-donot_touch_multi_conf.conf': No such file or directory
rm: cannot remove '/etc/systemd/system/v2ray@.service.d/10-donot_touch_multi_conf.conf': No such file or directory
info: Systemd service files have been installed successfully!
warning: The following are the actual parameters for the v2ray service startup.
warning: Please make sure the configuration file path is correctly set.

[Unit]
Description=V2Ray Service
Documentation=https://www.v2fly.org/
After=network.target nss-lookup.target

[Service]
User=nobody
CapabilityBoundingSet=CAP_NET_ADMIN CAP_NET_BIND_SERVICE
AmbientCapabilities=CAP_NET_ADMIN CAP_NET_BIND_SERVICE
NoNewPrivileges=true
ExecStart=/usr/local/bin/v2ray -config /usr/local/etc/v2ray/config.json
Restart=on-failure
RestartPreventExitStatus=23

[Install]
WantedBy=multi-user.target
# In case you have a good reason to do so, duplicate this file in the same directory and make your customizes there.
# Or all changes you made will be lost!  # Refer: https://www.freedesktop.org/software/systemd/man/systemd.unit.html
[Service]
ExecStart=
ExecStart=/usr/local/bin/v2ray -config /usr/local/etc/v2ray/config.json

warning: The systemd version on the current operating system is too low.
warning: Please consider to upgrade the systemd or the operating system.

installed: /usr/local/bin/v2ray
installed: /usr/local/bin/v2ctl
installed: /usr/local/share/v2ray/geoip.dat
installed: /usr/local/share/v2ray/geosite.dat
installed: /usr/local/etc/v2ray/config.json
installed: /var/log/v2ray/
installed: /var/log/v2ray/access.log
installed: /var/log/v2ray/error.log
installed: /etc/systemd/system/v2ray.service
installed: /etc/systemd/system/v2ray@.service
removed: /tmp/tmp.aV2lSnxixY
info: V2Ray v4.34.0 is installed.
You may need to execute a command to remove dependent software: yum remove curl unzip
Please execute the command: systemctl enable v2ray; systemctl start v2ray
[root@ik1-443-53662 ~]#
##2.2 UUIDを入手
設定にUUIDが必要になりますので、以下より入手します。
UUID Generater
https://www.uuidgenerator.net/
##2.3 v2rayのconfig設定
以下のプロファイルを編集します。
vi /usr/local/etc/v2ray/config.json
以下を参考にパラメータを設定します。
[root@ v2ray]# more config.json
{
  "log": {
    "access": "/var/log/v2ray/access.log",
    "error": "/var/log/v2ray/error.log",
    "loglevel": "error"
  },
  "inbounds": [
    {
      "port": 16823,                                      //ポート番号を入力
      "protocol": "vmess",
      "settings": {
        "clients": [
          {
            "id": "xxxxxxxxx-xxxx-xxxx-xxxx-xxxxxxxxxxx", //UUIDを入力
            "level": 0,
            "alterId": 0
          }
        ]
      },
      "streamSettings": {
        "network": "ws",
        "wsSettings": {
          "path":"/vmess/"
        }
      },
      "sniffing": {
        "enabled": true,
        "destOverride": [
          "http",
          "tls"
        ]
      }
    }
  ],
  "outbounds": [
    {
      "protocol": "freedom",
      "settings": {}
    },
    {
      "protocol": "blackhole",
      "settings": {},
      "tag": "blocked"
    },
    {
      "protocol": "freedom",
      "settings": {},
      "tag": "direct"
    },
    {
      "protocol": "mtproto",
      "settings": {},
      "tag": "tg-out"
    }
  //include_out_config
  //
  ],
  "dns": {
    "server": [
      "1.1.1.1",
      "1.0.0.1",
      "8.8.8.8",
      "8.8.4.4",
      "localhost"
    ]
  },
  "routing": {
    "domainStrategy": "IPOnDemand",
    "rules": [
      {
        "type": "field",
        "ip": [
          "0.0.0.0/8",
          "10.0.0.0/8",
          "100.64.0.0/10",
          "127.0.0.0/8",
          "169.254.0.0/16",
          "172.16.0.0/12",
          "192.0.0.0/24",
          "192.0.2.0/24",
          "192.168.0.0/16",
          "198.18.0.0/15",
          "198.51.100.0/24",
          "203.0.113.0/24",
          "::1/128",
          "fc00::/7",
          "fe80::/10"
        ],
        "outboundTag": "blocked"
      },
      {
        "type": "field",
        "inboundTag": ["tg-in"],
        "outboundTag": "tg-out"
      },
      {
        "type": "field",
        "protocol": [
          "bittorrent"
        ],
        "outboundTag": "blocked"
      }
    ]
  },
  "transport": {
    "kcpSettings": {
      "uplinkCapacity": 100,
      "downlinkCapacity": 100,
      "congestion": true
    },
    "sockopt": {
      "tcpFastOpen": true
    }
  }
}
v2rayを有効化します。 無効化はdisable
systemctl enable v2ray
systemctl disable v2ray
起動 / 再起動
systemctl start v2ray
systemctl restart v2ray
v2rayが起動していることを確認します。
[root@nginx]# systemctl status v2ray.service
● v2ray.service - V2Ray Service
   Loaded: loaded (/etc/systemd/system/v2ray.service; enabled; vendor preset: disabled)
  Drop-In: /etc/systemd/system/v2ray.service.d
           mq10-donot_touch_single_conf.conf
   Active: active (running) since Tue 2021-02-16 13:11:42 CST; 10 months 12 days ago
     Docs: https://www.v2fly.org/
 Main PID: 5126 (v2ray)
   CGroup: /system.slice/v2ray.service
           mq5126 /usr/local/bin/v2ray -config /usr/local/etc/v2ray/config.json

Warning: Journal has been rotated since unit was started. Log output is incomplete or unavailable.
##2.4 nginxのdefaultconfig設定
webサーバはnginxを利用します。
nginxがインストールされているかを確認します。
[root@nginx]# rpm -qa | grep nginx
nginx-mod-http-xslt-filter-1.16.1-3.el7.x86_64
nginx-mod-mail-1.16.1-3.el7.x86_64
nginx-mod-http-perl-1.16.1-3.el7.x86_64
nginx-1.16.1-3.el7.x86_64
nginx-all-modules-1.16.1-3.el7.noarch
nginx-mod-stream-1.16.1-3.el7.x86_64
nginx-mod-http-image-filter-1.16.1-3.el7.x86_64
nginx-filesystem-1.16.1-3.el7.noarch
見つからない場合は以下のコマンドでインストールします。
yum install nginx
以下のdefaultconfigを編集します。
[root@conf.d]# pwd
/etc/nginx/conf.d
[root@conf.d]# ls
default.conf  default.conf.back
以下を参考にパラメータを設定します。
[root@conf.d]# more default.conf
server {
listen 80;
server_name hogehoge.com www.hogehoge.com;        //ドメインを入力
access_log /var/log/nginx/hogehoge.com-access.log main; //ログファイルのPathを入力
error_log /var/log/nginx/hogehoge.com-error.log;     //ログファイルのPathを入力
root /home/www/hogehoge.com;                //ドメインを入力
location / {
index index.html index.htm;
}
}
##2.5 nginxのploxy設定
プロキシサーバ用の設定をします。
以下のnginx.confを編集します。
[root@nginx]# pwd
/etc/nginx
[root@nginx]# ls
conf.d        fastcgi.conf.default    koi-utf     mime.types.default  nginx.conf.org       sites-available  uwsgi_params.default
default.d     fastcgi_params          koi-win     nginx.conf          scgi_params          sites-enabled    win-utf
fastcgi.conf  fastcgi_params.default  mime.types  nginx.conf.default  scgi_params.default  uwsgi_params
以下を参考にパラメータを設定します。
[root@nginx]# more nginx.conf
# For more information on configuration, see:
#   * Official English Documentation: http://nginx.org/en/docs/
#   * Official Russian Documentation: http://nginx.org/ru/docs/

user www;
worker_processes auto;
error_log /var/log/nginx/error.log;
pid /run/nginx.pid;

# Load dynamic modules. See /usr/share/doc/nginx/README.dynamic.
include /usr/share/nginx/modules/*.conf;

events {
    worker_connections 1024;
}

http {
    log_format  main  '$remote_addr - $remote_user [$time_local] "$request" '
                      '$status $body_bytes_sent "$http_referer" '
                      '"$http_user_agent" "$http_x_forwarded_for"';

    access_log  /var/log/nginx/access.log  main;

    sendfile            on;
    tcp_nopush          on;
    tcp_nodelay         on;
    keepalive_timeout   3 ;
    types_hash_max_size 2048;
    gzip on;
    server_names_hash_bucket_size 128;

    server_tokens off;
    include             /etc/nginx/mime.types;
    default_type        application/octet-stream;

    # Load modular configuration files from the /etc/nginx/conf.d directory.
    # See http://nginx.org/en/docs/ngx_core_module.html#include
    # for more information.
    include /etc/nginx/conf.d/*.conf;
    include /etc/nginx/sites-enabled/*.conf;

    server {
        listen       80 default_server;
        listen       [::]:80 default_server;
        server_name  _;
        root         /usr/share/nginx/html;

        # Load configuration files for the default server block.
        include /etc/nginx/default.d/*.conf;

        location / {
        }

        error_page 404 /404.html;
        location = /404.html {
        }

        error_page 500 502 503 504 /50x.html;
        location = /50x.html {
        }
    }

# Settings for a TLS enabled server.
#
    server {
        listen       443 ssl;                   //443番を利用
#        listen       [::]:443 ssl http2 default_server;
        server_name  aquabranch.design www.hogehoge.com;   //プロキシサーバで利用するドメインを追記
#        root         /usr/share/nginx/html;
#
        ssl_certificate "/etc/pki/nginx/server.crt";       //SSLで利用するkeyの設定
        ssl_certificate_key "/etc/pki/nginx/server.key";     //SSLで利用するkeyの設定
#        ssl_session_cache shared:SSL:1m;
#        ssl_session_timeout  10m;
#        ssl_ciphers HIGH:!aNULL:!MD5;
#        ssl_prefer_server_ciphers on;
#
#        # Load configuration files for the default server block.
#        include /etc/nginx/default.d/*.conf;
#
location = /vmess/  {                       //Pathの設定
            proxy_redirect off;                 //リダイレクトはしない
            proxy_pass http://127.0.0.1:16823;         //ローカルIP、ポート番号の設定
            proxy_http_version 1.1;
            proxy_set_header Upgrade $http_upgrade;
            proxy_set_header Connection "upgrade";
            proxy_set_header X-Real-IP $remote_addr;
            proxy_set_header Host $http_host;
        }
#        location / {
#        }
#
#        error_page 404 /404.html;
#        location = /404.html {
#        }
#
#        error_page 500 502 503 504 /50x.html;
#        location = /50x.html {
#        }
    }

}
##2.6 Port開放
firewalldやufwなどで指定したポートを開けておきます。
firewall-cmd --permanent --add-port=16823/tcp
Firewallを再起動
firewall-cmd --reload
ポートが空いていることを確認
[root@ik1-443-53662 ~]# firewall-cmd --list-all
public (active)
  target: default
  icmp-block-inversion: no
  interfaces: eth0
  sources:
  services: dhcpv6-client ssh
  ports: 16823/tcp
  protocols:
  masquerade: no
  forward-ports:
  source-ports:
  icmp-blocks:
  rich rules:
#3 mac設定
以下よりMACクライアントをダウンロードします。
homebrewでインストールします。
macにインストールしたv2rayのconfigファイル
[MacBook-ea:~/Library/LaunchAgents $ more yanue.v2rayu.v2ray-core.plist
<?xml version="1.0" encoding="UTF-8"?>
<!DOCTYPE plist PUBLIC "-//Apple//DTD PLIST 1.0//EN" "http://www.apple.com/DTDs/PropertyList-1.0.dtd">
<plist version="1.0">
<dict>
        <key>KeepAlive</key>
        <true/>
        <key>Label</key>
        <string>yanue.v2rayu.v2ray-core</string>
        <key>ProgramArguments</key>
        <array>
                <string>./v2ray-core/v2ray</string>
                <string>-config</string>
                <string>/Applications/V2rayU.app/Contents/Resources/config.json</string>
        </array>
        <key>StandardErrorPath</key>
        <string>/Users/hoge/Library/Logs/v2ray-core.log</string>
        <key>StandardOutPath</key>
        <string>/Users/hoge/Library/Logs/v2ray-core.log</string>
        <key>WorkingDirectory</key>
        <string>/Applications/V2rayU.app/Contents/Resources</string>
</dict>
</plist>
[MacBook-ea:~/Library/LaunchAgents $
#参考
MACクライアントのインストールPath
/Applications/V2rayU.app/Contents/Resources/
config.json

~/Library/LaunchAgents/yanue.v2rayu.v2ray-core.plist
~/Library/Preferences/net.yanue.V2rayU.plist
~/Library/Logs/V2rayU.log