[2022年6月20日追記]
Contact Form 7 のバージョンアップ(5.6)により、本記事の方法でメールの送信ができなくなりましたので、ご注意ください。
新バージョンに対応した実装方法について、こちらでも調べてみますが、コメントでご教示いただけると幸いです!
今回やること
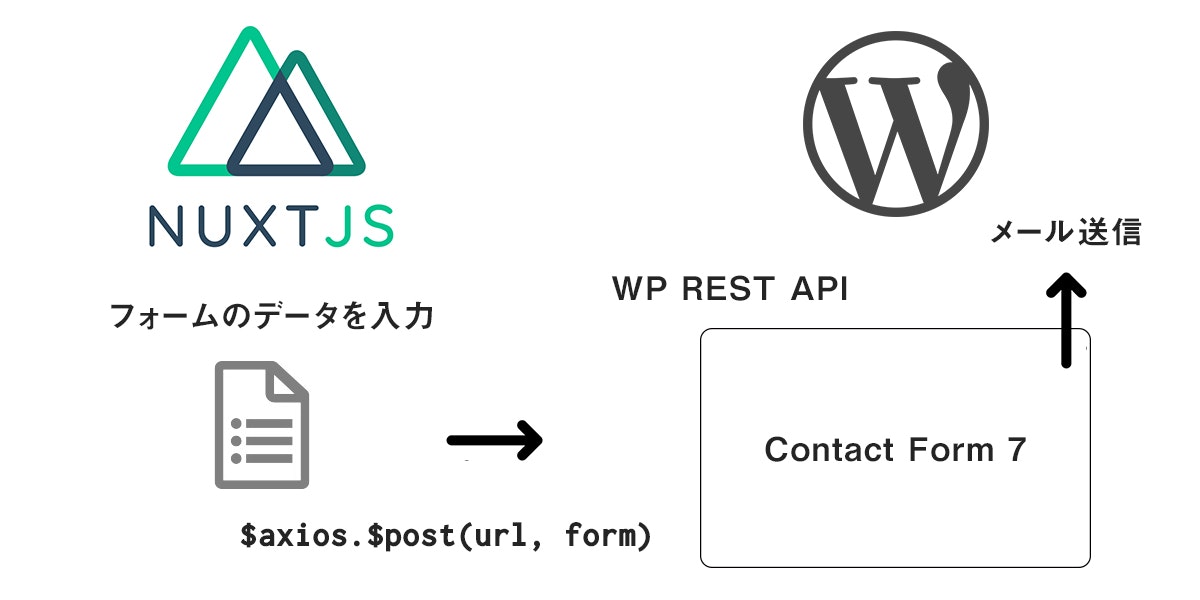
Nuxt.jsで作成した静的サイトにお問い合わせフォームを実装します。
フォームに入力されたデータをaxiosでWP REST API経由でWordPressのContact Form 7に送り、Contact Form 7からメールを送信します。
なお、今回フロントはNuxtで実装していきますが、Vue-cliでも、Reactでも、ES2018などをBabelで使う場合などでも、だいたい同じ方法で実装できるかと思います。
WordPress側の設定
WordPressのインストールはここでは省略させていただきます。
基本設定 & 必要プラグインのインストール
 まずは必要なプラグインをインストールしていきます。
### 1. Contact Form 7
今回主役のお問い合わせフォームのプラグイン。WordPressお問い合わせフォームプラグインの定番中の定番!
2. Application Passwords
WP REST APIでアクセスする際の認証に必要なアプリケーションパスワードを生成します。
アプリケーションパスワードの設定
[2020年3月10日追記]
Nuxtアプリから、ContactForm7へ送信するだけであれば、
以下のApplication Passwordsの設定と認証の設定は不要とのことです!
@ixkaito さまよりコメントいただきました。
ありがとうございます!
Application Passwordsのプラグインを入れると、ユーザーの設定ページにApplication Passwordsの設定項目が追加されます。

任意の認証用ユーザー名を入力して [Add New]をクリック
一度だけパスワードが表示されるので、忘れずにコピーして一旦どこかに保存しておきましょう。
Contact Form 7 の設定
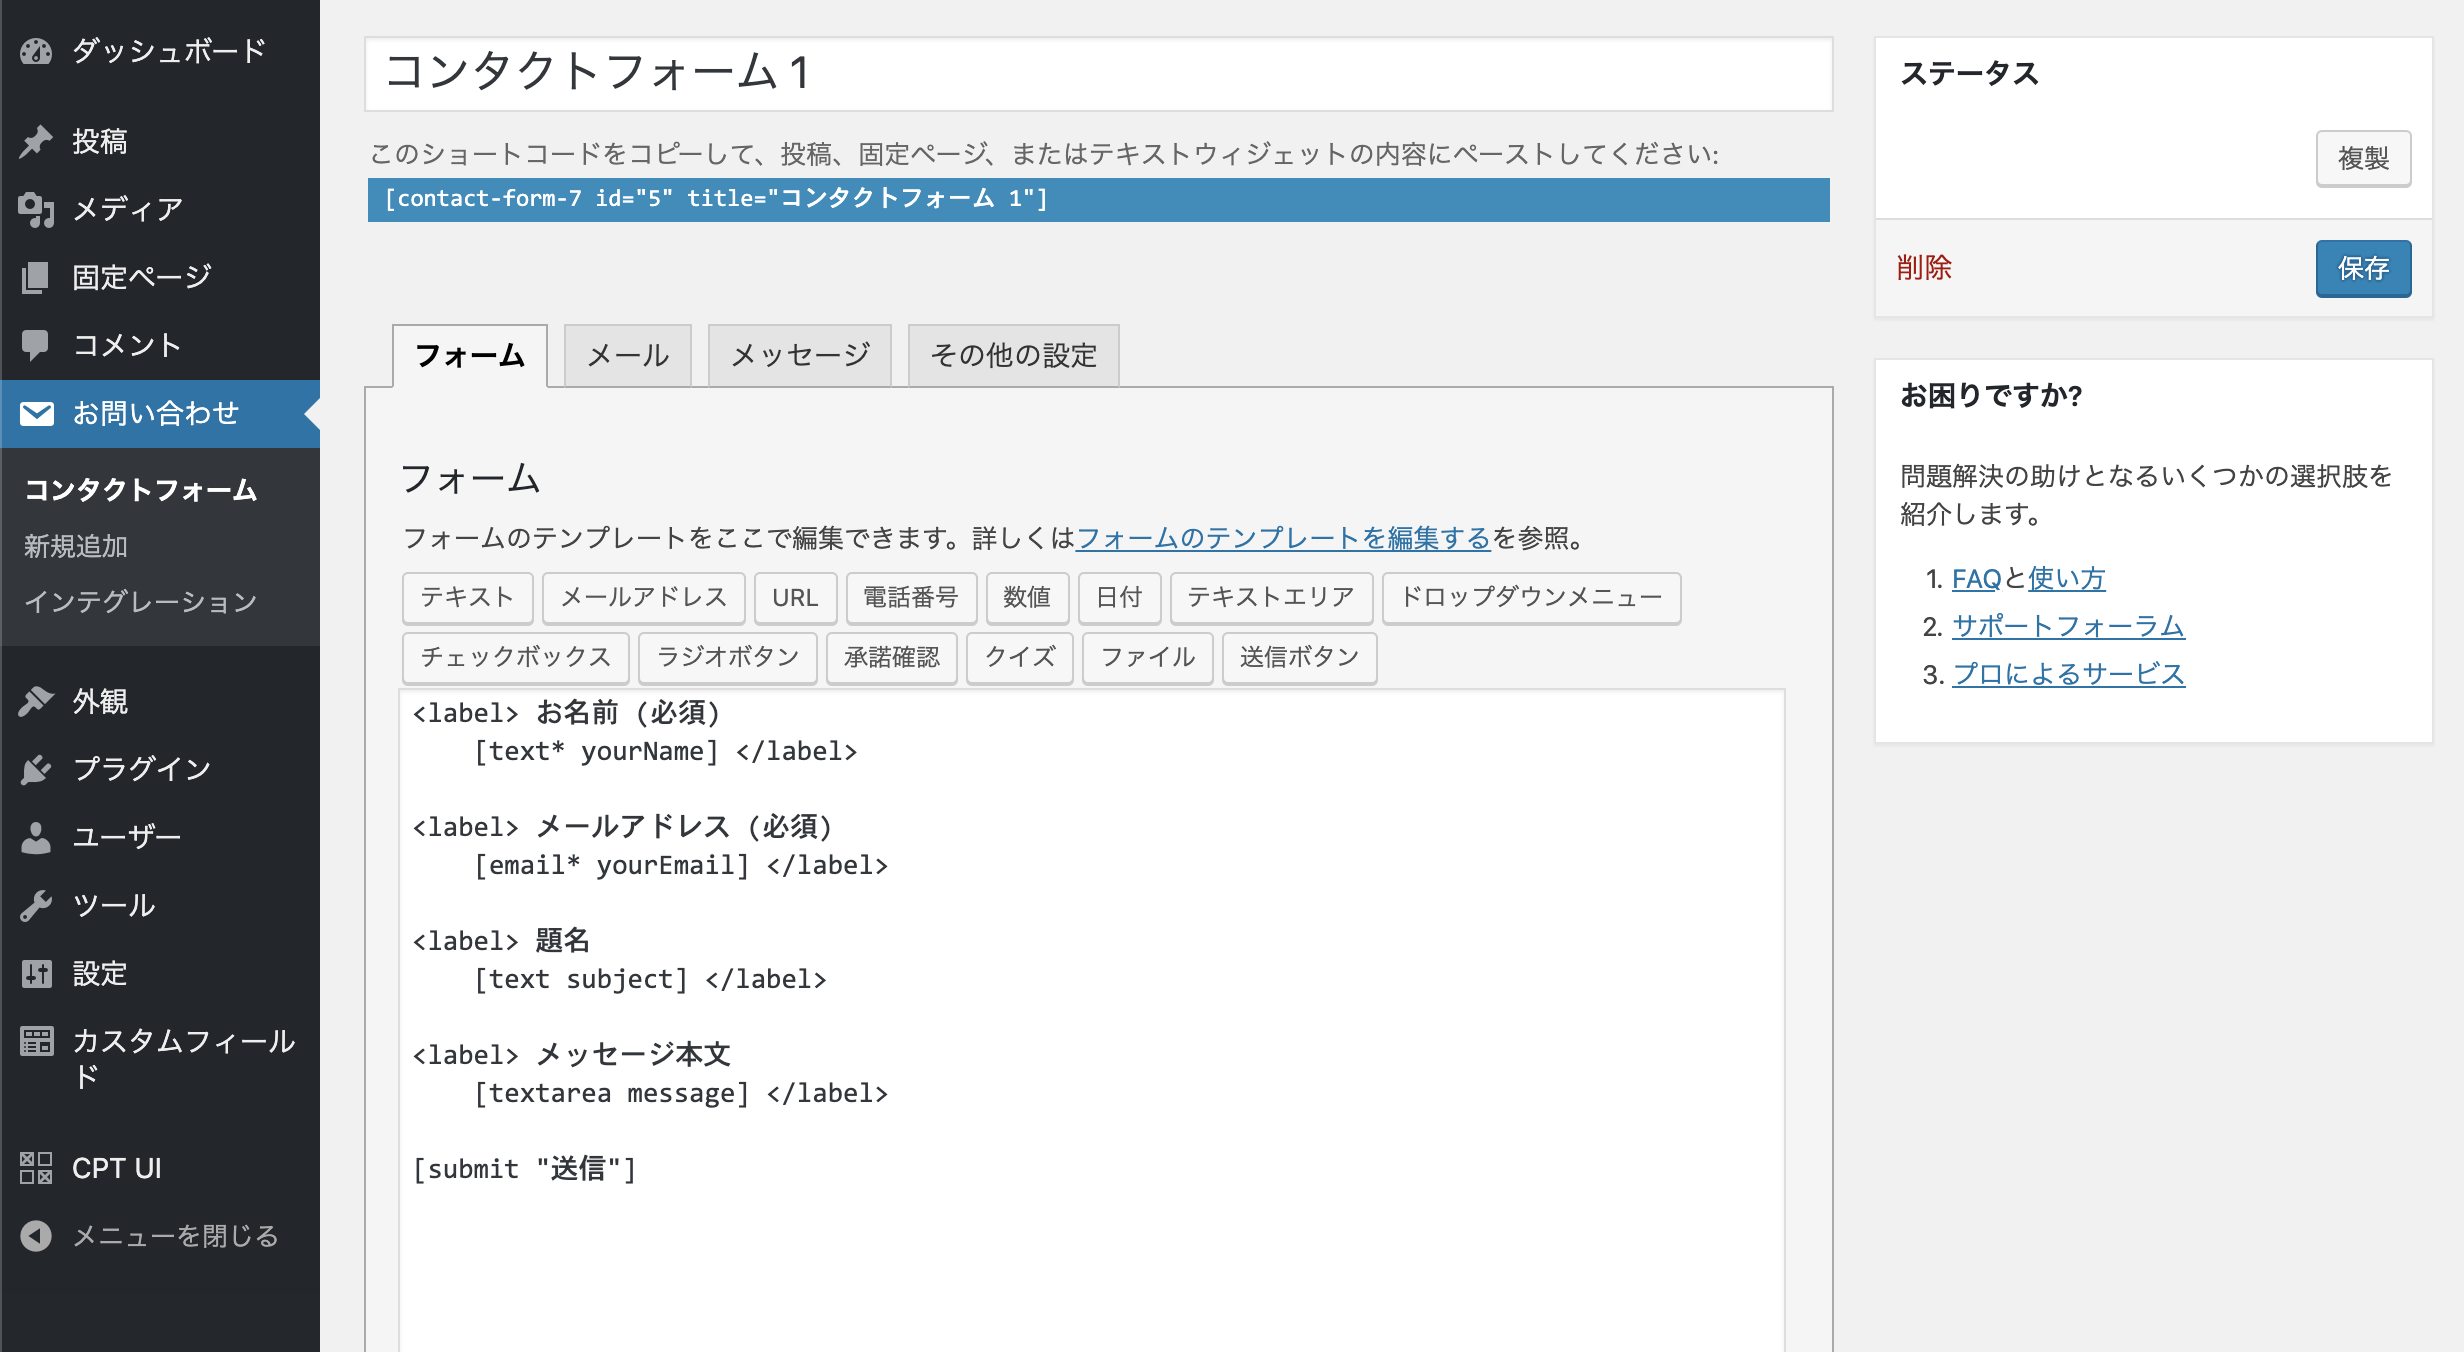
 ここで、フォームの項目、自動返信メールの設定、送信後のメッセージなどを設定します。
基本的には、普通にWordPressでContact Form 7を設定するのと同じです。
ただし、メールタグの名前は、後々JavaScriptで使うことを考えると、ケバブケースでなくキャメルケースにしておくと良いです。
WP REST API にアクセスして確認
さて、ここまできたらREST APIでメールが送信できることを確認してみましょう。
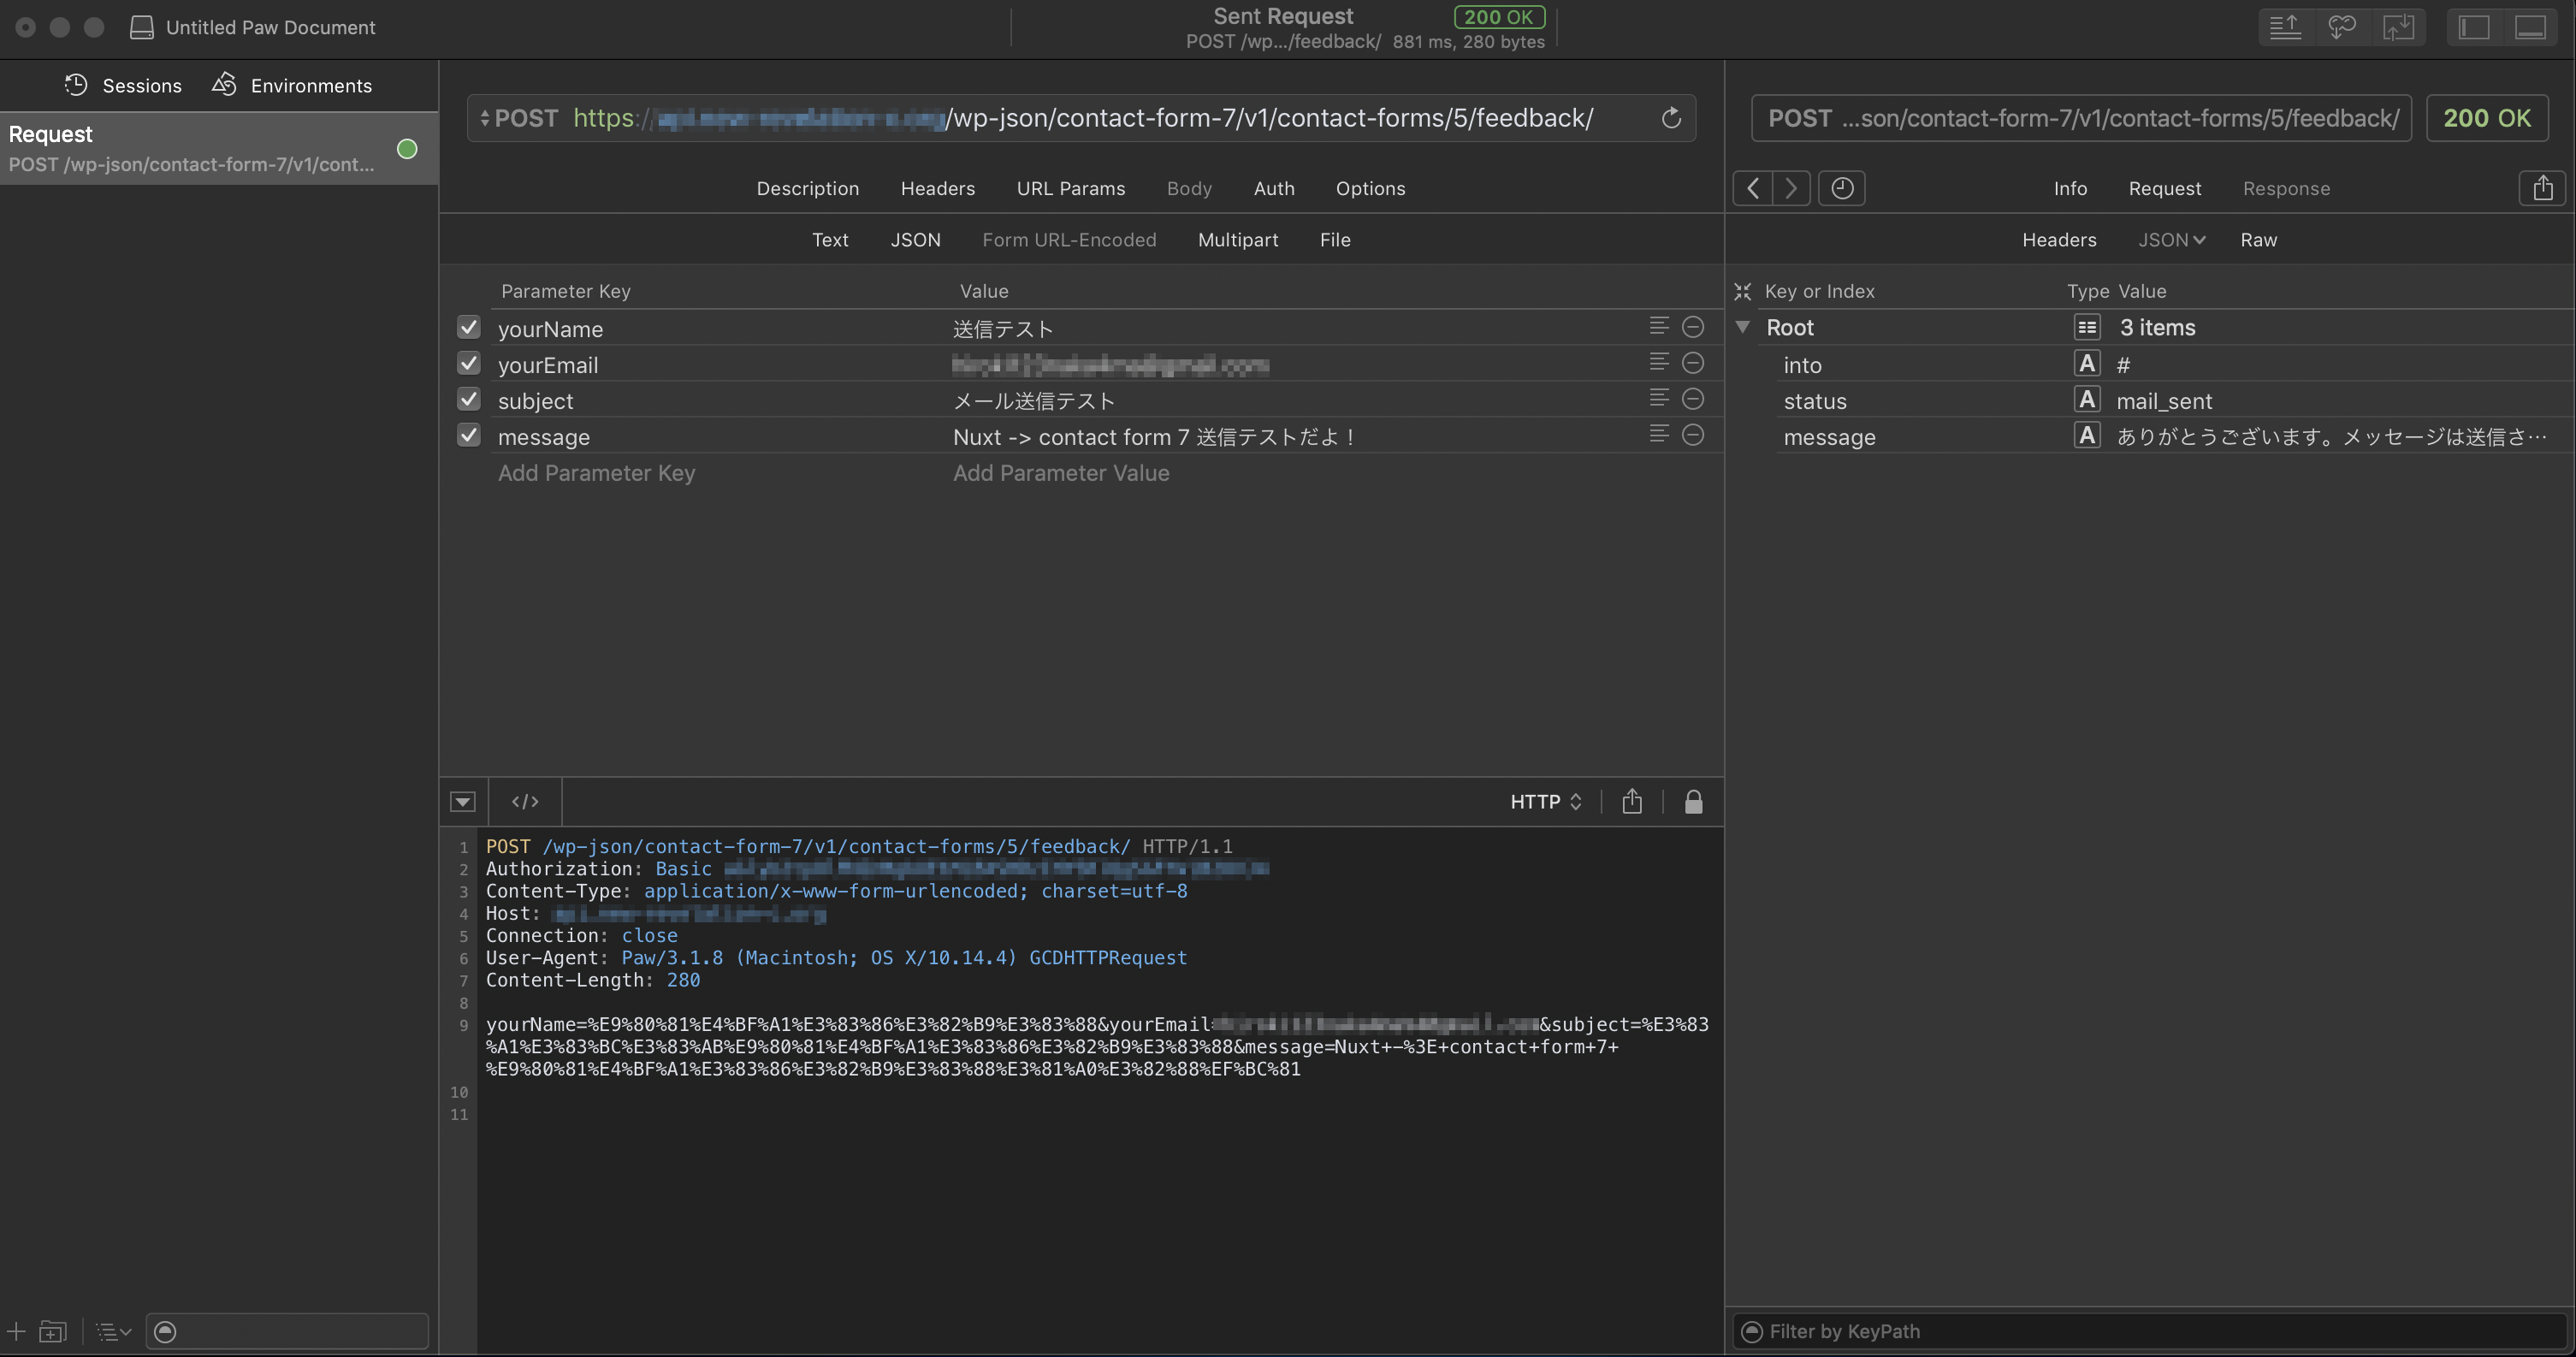
HTTPクライアントにはPaw( https://paw.cloud/ )を使います。

https://{ドメイン名}/wp-json/contact-form-7/v1/contact-forms/{フォームID}/feedback/
BodyにはForm URL-Encodedに設定して、フォームの内容を入力していきます。
 AuthタブからBasic Authを選択し、先程設定したApplication Passwordsのユーザー名とパスワードをここに入力します。
リクエストを送信して、無事にメールが届けばOKです。
フロントエンドの設定
今回のプロジェクトファイルはGitHubで公開しています。
https://github.com/hiropy0123/nuxt-contact-form
Nuxtのセットアップ
create-nuxt-appでプロジェクトを作成します。
https://github.com/nuxt/create-nuxt-app
$ yarn create nuxt-app nuxt-contact-form
このように設定してみました。

? Project name nuxt-contact-form
? Project description My extraordinary Nuxt.js project
? Use a custom server framework -> none
? Choose features to install -> Linter / Formatter, Prettier, Axios
? Use a custom UI framework -> bulma
? Use a custom test framework -> none
? Choose rendering mode -> Universal
? Author name -> '名前を入れる'
? Choose a package manager -> yarn
追加でいくつかパッケージを追加していきます
便利な機能なので追加!
# Sass loader
$ yarn add -D node-sass sass-loader

# Pug loader
$ yarn add -D pug pug-plain-loader

# @nuxtjs/dotenv
$ yarn add @nuxtjs/dotenv

# lodash
$ yarn add lodash
お問い合わせページの作成
pagesディレクトリにお問い合わせページを作成します。
フォーム部分はコンポーネントとして、別ファイルにします。
また、今回は簡単なバリデーション機能と、確認画面(モーダル表示)と送信完了画面(モーダル)を作成します。
モーダル部分も別コンポーネントで作成します。
<template lang="pug">
  section.l-section
    .l-container
      contact-form(ref="form", @open-modal="openModal()")
      transition(name="modal", v-cloak)
        form-modal(
          v-if="isModal",
          @close-modal="closeModal()",
          @clear-data="clear()",
          @submit="submit()",
          :data-response="responseData"
        )
</template>

<script>
import ContactForm from '@/components/ContactForm'
import FormModal from '@/components/FormModal'

export default {
  components: {
    ContactForm,
    FormModal
  },
  data() {
    return {
      isModal: false,
      responseData: null
    }
  },
  methods: {
    openModal() {
      this.isModal = true
    },
    closeModal() {
      this.isModal = false
    },
    clear() {
      this.$refs.form.reset()
    },
    submit() {
      const formData = this.convertJsontoUrlencoded(this.$store.state.formData)
      const USER = process.env.USER
      const PASSWORD = process.env.APPLICATION_PASSWORD
      // Base64に変換
      const TOKEN = window.btoa(`${USER}:${PASSWORD}`)
      const axiosConfig = {
        headers: {
          'Authorization': `Basic ${TOKEN}`,
          'Content-Type': 'application/x-www-form-urlencoded; charset=utf-8'
        }
      }

      this.$axios
        .post('/contact-form-7/v1/contact-forms/5/feedback/', formData)
        .then(response => {
          console.log(response)
        })
        .catch(error => {
          console.log(error)
        })
    },
    // Conver to JSON Object to application/x-www-form-urlencoded
    convertJsontoUrlencoded(obj) {
      let str = [];
      for (let key in obj) {
        if (obj.hasOwnProperty(key)) {
            str.push(encodeURIComponent(key) + "=" + encodeURIComponent(obj[key]))
        }
      }
      return str.join("&");
    }
  }
}
</script>
<template lang="pug">
  div.contact-form
    .form-content
      label.required 名前
      input(
        v-model="formData.yourName"
        type="text"
        class="form-control"
        name="yourName"
        required
        autocomplete="name"
        @blur="touched.yourName = true"
      )
      .input-hint
        span.error(v-show="touched.yourName && !formData.yourName") 必須項目です

    .form-content
      label.required メールアドレス
      input(
        v-model="formData.yourEmail"
        type="text"
        class="form-control"
        name="yourEmail"
        required
        autocomplete="email"
        @blur="touched.yourEmail = true"
      )
      .input-hint
        span.error(v-show="touched.yourEmail && !formData.yourEmail") 必須項目です。
        span.error(v-show="touched.yourEmail && !validEmail(formData.yourEmail)") メールアドレスを正しく入力してください。

    .form-content
      label 題名
      input(
        v-model="formData.subject"
        type="text"
        class="form-control"
        name="subject"
      )

    .form-content
      label お問い合わせ内容
      textarea(
        v-model="formData.message"
        class="form-control"
        name="message"
        rows="8"
      )

    button(:disabled="hasError", @click="confirm") 確認画面へ

</template>

<script>
import _ from 'lodash'

const initialState = () => {
  return {
    formData: {
      yourName: '',
      yourEmail: '',
      subject: '',
      message: ''
    },
    touched: {
      yourName: false,
      yourEmail: false
    },
    valid: {
      yourName: false,
      yourEmail: false
    },
    isModal: false
  }
}

export default {
  data() {
    return initialState()
  },
  computed: {
    hasError() {
      return !this.validateForm()
    }
  },
  methods: {
    // バリデーション
    validEmail(email) {
      const RegExp = /^[a-zA-Z0-9.!#$%&'*+\/=?^_`{|}~-]+@[a-zA-Z0-9-]+(?:\.[a-zA-Z0-9-]+)*$/
      return RegExp.test(email)
    },
    validateForm() {
      // 入力をトライしたかどうか
      const array = _.map(this.touched, item => {
        return item
      })
      const allTouched = array.every(value => {
        return value === true
      })

      if (this.formData.yourName) {
        this.valid.yourName = true
      } else {
        this.valid.yourName = false
      }
      if (this.formData.yourEmail) {
        this.valid.yourEmail = true
      } else {
        this.valid.yourEmail = false
      }

      // 入力されているかどうか
      const array2 = _.map(this.valid, item => {
        return item
      })
      const allValid = array2.every(value => {
        return value === true
      })

      return allTouched && allValid
    },
    // Vuexに保存
    storeForm() {
      const form = this.formData
      this.$store.commit('setFormData', form)
    },
    // 確認ページ
    confirm() {
      this.storeForm()
      this.open()
    },
    // モーダルを開く
    open() {
      this.$emit('open-modal')
    },
    // モーダルを閉じる
    close() {
      this.$emit('close-modal')
    },

    // dataを初期値に戻す
    reset() {
      Object.assign(this.$data, initialState())
    }
  }
}
</script>
確認画面と送信完了後のメッセージをモーダルで作成
<template lang="pug">
  .contact-confirm
    .overlay
    slot
      .modal
        h2(:class="myStatus") {{ dataResponse ? dataResponse.message : '入力内容をご確認ください。' }}
        .confirm(v-if="!dataResponse")
          dl
            dt 名前
            dd {{ getFormData.yourName }}
          dl
            dt メールアドレス
            dd {{ getFormData.yourEmail }}
          dl
            dt 題名
            dd {{ getFormData.subject }}
          dl
            dt お問い合わせ内容
            dd(v-html="getFormData.message")

          .btn-submit(@click="send") 送信
          .btn-return(@click="close") 修正する

        .response(v-if="dataResponse")
          .response-body(v-html="dataResponse.body")
          .btn-return(@click="close") 閉じる
</template>


<script>
import { mapGetters } from 'vuex'

export default {
  props: {
    dataResponse: {
      type: Object,
      required: false,
      default: null
    }
  },
  computed: {
    myStatus() {
      if (this.dataResponse !== null) {
        return this.dataResponse.status
      } else {
        return ''
      }
    },
    ...mapGetters(['getFormData'])
  },
  methods: {
    close() {
      this.$store.dispatch('resetForm')
      this.$emit('close-modal')
    },
    clear() {
      this.$emit('clear-data')
    },
    send() {
      this.clear()
      this.$emit('submit')
    }
  }
}
</script>
重要なポイント!
REST APIからフォームを送信するときの重要なポイントは2つあります。
1. フォームで送信するデータをJSON形式から、X-WWW-FROM-URLENCODEDの形式に変換する
2. headerにAuthorizationの情報を含める
axiosの設定
先ほど、取得したApplication PasswordsとWordPressのAPIのURLをenvファイルに登録します。
WP_REST_API_BASE_URL=https://ドメイン名/wp-json
WPUSER=ユーザー名
APPLICATION_PASSWORD="パスワード"
この.envファイルはプロジェクトの一番上のディレクトリに置いて、.gitignoreに登録して公開されないようにします。
require('dotenv').config() // 一番上にenvファイルを読み込む設定を追加

export default {
  // 諸々省略
  // ~
  modules: [
    '@nuxtjs/axios',
    '@nuxtjs/dotenv'
  ],
  // 環境変数の読み込み
  env: {
    WP_REST_API_BASE_URL: process.env.WP_REST_API_BASE_URL,
    WPUSER: process.env.WPUSER,
    APPLICATION_PASSWORD: process.env.APPLICATION_PASSWORD
  },
  /*
   ** Axios module configuration
   */
  axios: {
    baseURL: process.env.WP_REST_API_BASE_URL // baseURLの設定
  },
  // ~
}
フォームのデータを application/json から application/x-www-form-urlencoded に変換する
convertJsontoUrlencoded(obj) {
  let str = [];
  for (let key in obj) {
    if (obj.hasOwnProperty(key)) {
      str.push(encodeURIComponent(key) + "=" + encodeURIComponent(obj[key]))
    }
  }
  return str.join("&");
}
Authorizationの設定
submit() {
  const formData = this.convertJsontoUrlencoded(this.$store.state.formData)
  const USER = process.env.WPUSER
  const PASSWORD = process.env.APPLICATION_PASSWORD
  // Base64に変換
  const TOKEN = window.btoa(`${USER}:${PASSWORD}`)
  const axiosConfig = {
    headers: {
      'Authorization': `Basic ${TOKEN}`,
      'Content-Type': 'application/x-www-form-urlencoded; charset=utf-8'
    }
  }

  this.$axios
    .post('/contact-form-7/v1/contact-forms/5/feedback/', formData, axiosConfig)
    .then(response => {
      console.log(response)
      this.responseData = response.data
    })
    .catch(error => {
      console.log(error)
    })
}
submitメソッドの中で、WPUSERとAPPLICATION_PASSWORDを呼び出して、TOKENを作成しています。
window.btoa() は文字列をBase64にエンコードしてくれます。
送信確認
実際に送受信の確認をしてみます。
正常に送信されると、Contact Form 7で設定した送信完了のメッセージが、表示されます。
送信されるメール本文の内容やメールの送信先は、Contact Form 7で設定できます。
まとめ
WordPress Contact Form 7 は利用している方も多いと思うのですが、フロントエンドをNuxtにすることで、フォーム入力の表現や確認画面の表現が自由にできるのがいいですね!
