JenkinsのBuild情報を収集・解析するのにfluentd,Elasitcserach,kibanaでログ収集するPlatformのお試し環境を立ち上げたときのメモ。
前提条件
- git for winsowsがインストールされていること。
- cURLがインストールされていること。(2016/05/22はアクセスタイムアウトしていた。)
- VirtualBoxがインストールされていること。(installしただけではだめでBIOSでVT-x/AMD-Vを有効化しておくこと。)
- Vagrantがインストールされていること。
環境
| 環境等 | バージョン |
|---|---|
| HostOS | Windows7 Home Premium Service Pack1 |
| VirtualBox | 4.3.26 |
| GuestOS | Ubuntu 14.04 |
| Vagrant | 1.8.1 |
| ubuntu | 14.04 |
| docker | 1.10.3 |
| fluentd | 0.12.19 |
| Elasticsearch | 2.2.2 |
| kibana | 4.4.2 |
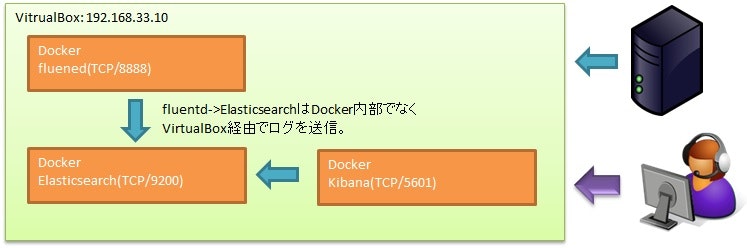
実際に構築した環境
fluentdのTCP/8888にログを投げて、kibanaのTCP/5601でブラウジングできる。
成果物
GitHubからDownloadできる。
https://github.com/hiroomit/vagrant
使い方
1.Git Bashでconsole立ち上げて作業フォルダを作成する。
$ mkdir -p vagrant/work
$ cd vagrant/work
2.GitHubからDownloadする。
$ git clone https://github.com/hiroomit/vagrant
3.仮想環境を立ち上げる。
Virtualboxをproviderにしてvagrantの立ち上げる。
$ cd vagrant/work
$ ./taniguchi_trusty64.sh start
4.fluentdログを飛ばす。
$ curl -v -H "Content-Type: application/json" -XPOST http://localhost:8888/test -d @sample.txt
5.kibanaにアクセスする。
http://localhost:5601にアクセスする。
logstash-*でDashboardを作成する。
作り方
Vagrantの準備
VagrantのPluginのInstall
Git Bash立ち上げて作業フォルダを作成
$ mkdir -p vagrant/work
$ cd vagrant/work
とりあえず下記いれてみた。まずはsaharaだけでもいれておく。
$ vagrant plugin install sahara
あとは今後のお遊びのためのおまけ。
$ vagrant plugin list
docker-provider (0.1.0)
sahara (0.0.17)
vagrant-aws (0.7.0)
vagrant-berkshelf (4.1.0)
vagrant-lxc (1.2.1)
vagrant-omnibus (1.4.1)
vagrant-share (1.1.5, system)
Vagrantfileの編集
$ vagrant init ubuntu/trusty64
Vagrantファイルが生成されてるので設定を変更。
- config.vm.network: ipaddressをprivate networkの192.168.33.10の固定に設定。
- vb.gui: 最初はdebug用にvb.guiをtrueにして、動き始めたら#でコメントアウト。
- vb.memory: fluentd+Elasticsearch+kibanaの環境だとdefaultの1024MBでは足りず2048MBに増やした。
  # Create a private network, which allows host-only access to the machine
  # using a specific IP.
  config.vm.network "private_network", ip: "192.168.33.10"

  # Provider-specific configuration so you can fine-tune various
  # backing providers for Vagrant. These expose provider-specific options.
  # Example for VirtualBox:
  #
   config.vm.provider "virtualbox" do |vb|
     # Display the VirtualBox GUI when booting the machine
     vb.gui = true

     # Customize the amount of memory on the VM:
     vb.memory = "2048"
   end
  #
  # View the documentation for the provider you are using for more
  # information on available options.
Vagrantの起動
$ vagrant up --provider virtualbox
ここで起動せずにはまった。
デバイスマネージャーからVirtualBox Host-Only Ethernet Adapterを作成することで回避した記憶。
関連リンク
http://www.makisima.org/v3/2010/11/12/virtualbox-err-host-only-network/
Windows10系は別の話もあるっぽい。
http://d.hatena.ne.jp/kobarn/20150805
https://www.virtualbox.org/ticket/14040
Vagrantでboxのカスタマイズ
docker packageのinstall
ここは本当はchefとか使いたいところだが勉強が必要なのでここではinstall shell scriptで対応。ついでテスト用にcurlのinstall, sshキーの設定、fluentdのログをdockerのホストとコンテナで共有できるようDirectoryを作成。
$ cat provision.sh
# !/bin/sh
sudo apt-get update

# install docker
sudo apt-get install -y apt-transport-https ca-certificates
while :
do
    sudo apt-key adv --keyserver hkp://p80.pool.sks-keyservers.net:80 --recv-keys 58118E89F3A912897C070ADBF76221572C52609D
    if [ $? = 0 ]; then
        break;
    fi
done

sudo echo "deb https://apt.dockerproject.org/repo ubuntu-trusty main" > /etc/apt/sources.list.d/docker.list
sudo apt-get update
sudo apt-get purge lxc-docker
sudo apt-cache policy docker-engine
sudo apt-get install -y linux-image-extra-$(uname -r)
sudo apt-get install -y apparmor
sudo apt-get install -y docker-engine
sudo service docker start
sudo usermod -aG docker vagrant

# install curl
sudo apt-get install -y curl

# install ssh-key
sudo -u vagrant ssh-keygen -t rsa -N '' -f /home/vagrant/.ssh/id_rsa
ssh-keygen -t rsa -N '' -f ~/.ssh/id_rsa

# prepare log for fluentd
mkdir -p /data
chmod 777 /data
Vagrantfileにprovision設定を追加
やっていることは下記のこと。
- chefのinstall
- provision.shの実行でdocker等のinstall
- dockerのコンテナ起動
  # Enable provisioning with a shell script. Additional provisioners such as
  # Puppet, Chef, Ansible, Salt, and Docker are also available. Please see the
  # documentation for more information about their specific syntax and use.
  # config.vm.provision "shell", inline: <<-SHELL
  #   sudo apt-get update
  #   sudo apt-get install -y apache2
  # SHELL
  config.omnibus.chef_version=:latest
  config.vm.provision :shell, :path =>"provision.sh"
  config.vm.provision "docker" do |d|
    d.run "elasticsearch",
      args: "-p 9200:9200"
    d.run "kibana",
      args: "-p 5601:5601 --link elasticsearch:elasticsearch"
    d.run "hiroomi/fluentd",
      args: "-p 24224:24224 -p 8888:8888 -v /data:/fluentd/log -v /vagrant/data/fluentd/etc:/fluentd/etc"
  end
Vagrantfile等は下記の日本語サイトでお勉強した。
Vagrant日本語ドキュメント
Dockerイメージの準備
Docker Hubを利用する。
fluentdはElasticsearchのplugin入れるのでdockerイメージをcustomizeして作成。
Elasticsearch、kibanaは本家のイメージを流用した。
hiroomi/fluentd
official版fluent/fluentdにelasticsearchのpluginをinstallしようとしたがgem installできず大はまりしてしまった。
GitHubとの連携でAutomated BuildのRepositoryをDocker Hub上に作成した。
ソースからDockerfileを借用し
pluginをinstallしたうえでコンテナをBuildした。
https://github.com/hiroomit/fluentd
のDockerfileに下記コマンドを追加。
# RUN gem install fluent-plugin-webhdfs
RUN gem install fluent-plugin-secure-forward --no-ri --no-rdoc
RUN gem install fluent-plugin-elasticsearch --no-ri --no-rdoc
fluent.confの設定
httpからの入力をelasticsearchがいる192.168.33.10/9200に飛ばす設定。
http Input Plugin
fluent-plugin-secure-forward
fluent-plugin-elasticsearch
$ cat data/fluentd/etc/fluentd.conf
<source>
  @type http
  @id   input1
  @label @mainstream
  port  8888
  bind 0.0.0.0
  body_size_limit 32m
  keepalive_timeout 10s
</source>

<filter **>
  @type stdout
</filter>

<label @mainstream>
  <match docker.**>
    @type file
    @id   output_docker1
    path         /fluentd/log/docker.*.log
    symlink_path /fluentd/log/docker.log
    append       true
    time_slice_format %Y%m%d
    time_slice_wait   1m
    time_format       %Y%m%dT%H%M%S%z
  </match>
  <match **>
    @type elasticsearch
    host 192.168.33.10
    port 9200
    index_name fluentd
    type_name fluentd
    logstash_format true
    flush_interval 10s
  </match>
</label>
elasticsearch
そのまま利用。
kibana
そのまま利用。elasticsearchとlinkして起動させる。
Vagrantでprovisioningを行う。
失敗してもいいようにsaharaでsnapshotを作成しておく。
$ vagrant sandbox status
$ vagrant sandobox on # offで無効化、commitでsnapshot更新、rollbackで巻き戻し
$ vagrant provision
これで一通り立ち上げできた。
このあとやりたいこと
- 実際にJenkinsからjsonのデータ飛ばしてログの収集、分析する。
- 今回のテスト環境をAzureまたはAWSで本番稼働させる。
- provisionにshellでなくてchefやAnsibleを使ってみる。
参考
- サーバ/インフラエンジニア養成読本 ログ収集〜可視化編
- ELK(ElasticSearch, Logstash, Kibana)+fluentdの環境をDocker Composeで構築しつつ、試しにCloudWatchの統計データを収集してみた
- Vagrantのオススメ便利プラグイン