FMEでWhiteboxToolsを使いたいので、Pythonのパッケージを使えるようにしてみる。
はじめに
FMEを使えばいろんなことができるけど、PythonCallerをうまく使えば、FMEでできることが無限大に広がると思います。特にWhiteboxToolsを絡められたら素敵すぎる!そんなことで、基本的なところから、解析するところまで、勉強しながら使い方を共有したいと思います。基本的にはWindows環境で試します。適宜Macの方もカバーします。
まず最初に、役に立つサイトをいくつか紹介
前提条件
- FMEがインストール済み
流れ
- FME Formと一緒にインストールされているのPythonのバージョンの確認
- pipを使ってパッケージをインストール
- 確認
1. FME Formと一緒にインストールされているのPythonのバージョンの確認
Windowsなら、コマンドラインツールを開いて、以下のコマンドを叩く。
fme.exe python --version
例えばこんな風に返ってくる
INFORM: Using Python interpreter from `C:\Program Files\FME\fmepython312\python312.dll' with PYTHONHOME `C:\Program Files\FME\fmepython312'
INFORM: Python version 3.12 loaded successfully
Python 3.12.6
これで、Pythonがインストールされていることとそのバージョンが確認できる。
2. pipを使ってパッケージをインストール
今回は、Whitebox Toolsをインストールする。
fme.exe python -m pip install whitebox
うまく行けば、以下のように反応がある。
INFORM: Using Python interpreter from `C:\Program Files\FME\fmepython312\python312.dll' with PYTHONHOME `C:\Program Files\FME\fmepython312'
INFORM: Python version 3.12 loaded successfully
Collecting whitebox
  Downloading whitebox-2.3.6-py2.py3-none-any.whl.metadata (11 kB)
Collecting Click>=6.0 (from whitebox)
  Downloading click-8.2.0-py3-none-any.whl.metadata (2.5 kB)
Collecting colorama (from Click>=6.0->whitebox)
  Using cached colorama-0.4.6-py2.py3-none-any.whl.metadata (17 kB)
Downloading whitebox-2.3.6-py2.py3-none-any.whl (74 kB)
Downloading click-8.2.0-py3-none-any.whl (102 kB)
Using cached colorama-0.4.6-py2.py3-none-any.whl (25 kB)
Installing collected packages: colorama, Click, whitebox
Successfully installed Click-8.2.0 colorama-0.4.6 whitebox-2.3.6
ということで、あっという間にインストールができてしまいました。めでたし。
ちなみに、WindowsとMacでのインストールのコマンドは、
- Windows:
fme.exe python -m pip install <package_name>
- macOS:
./fme python -m pip install <package_name>
ということになります。
3. 確認
それでは、FMEでうまくWhitebox Toolsを呼び出せるか確認します。

まずはPythonCallerだけを含む簡単なワークスペースを作成します。
そのうえで、PythonCallerの設定を開き、迷わず、AIアシスタントボタンを押します(FME Form 2025.0.1を使っています。古いバージョンだとAI Assistantがないかもしれません)

アシスタントさんに、コードを書いてくれるよう頼みました。

ちなみに以下のようなプロンプトを書きました。
With the whitebox tools, I want to analyze a simple dem and create a slope raster.
そのあと何度かやり取りをして、最終的に以下のようなコードになり、それを貼り付けて、Workspaceを実行しました。
import whitebox
import os

class FeatureProcessor:
    def __init__(self):
        self.wbt = whitebox.WhiteboxTools()
        self.working_dir = r"c:/tmp"
        self.wbt.set_working_dir(self.working_dir)

        self.input_dem = os.path.join(self.working_dir, "iriomote.tif")
        self.output_slope = os.path.join(self.working_dir, "iriomote_slope.tif")

        self.processed = False

    def input(self, feature):  # ← このメソッド名が必要
        if not self.processed:
            self.wbt.slope(
                dem=self.input_dem,
                output=self.output_slope
            )
            self.processed = True
            feature.setAttribute("status", "Slope raster created successfully.")
        else:
            feature.setAttribute("status", "Slope raster already created.")

        feature.setAttribute("slope_raster", self.output_slope)
        return feature
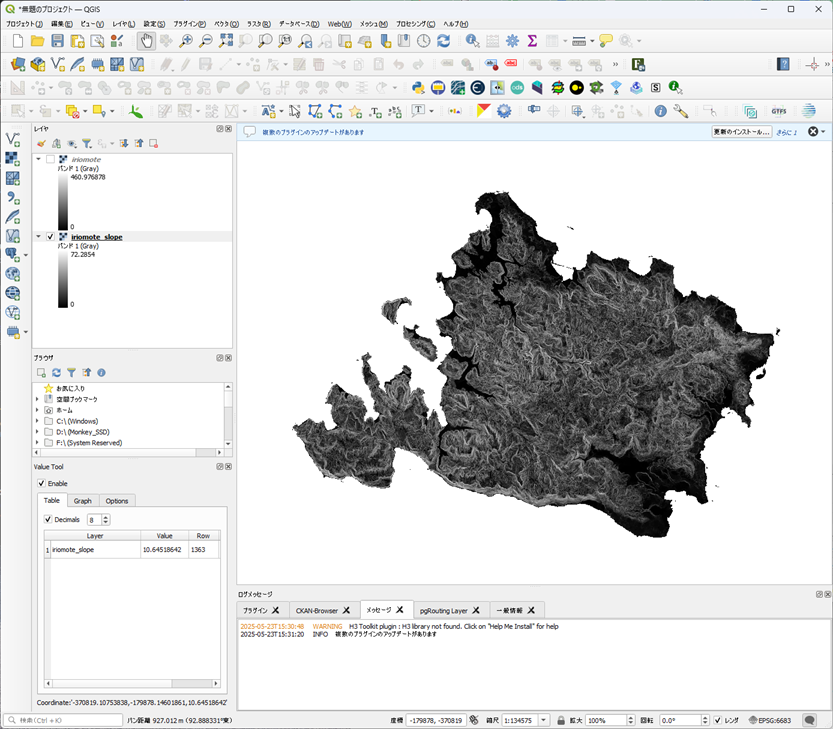
結果をQGISで表示してみました。うまく行っていますね!
FMEでWhitebox Toolsが使えるなら、地形解析、水文解析、LiDAR解析などやり放題ですよね!これはたまらない。