Raspberry Pi 4BにUbuntuをインストールする方法
Raspberry Pi 4BにUbuntu 18.04をインストールする。
Ubuntu 20.04が出ているがROSが動くか不明なため、Ubuntu 18.04をインストールする。
参考URL:https://jamesachambers.com/raspberry-pi-4-ubuntu-server-desktop-18-04-3-image-unofficial/
参考URL:https://qiita.com/gushiFX/items/7df1545b4a22061e9473
Ubuntu 20.04でROSが問題なく動くようなら20.4でもいいと思う。
Ubuntu 20.04のほうがRaspbian Pi 4Bで安定して動作するらしい。
以下のサイトでUbuntu Mateをインストール方法が書かれている。
参考URL:https://raspida.com/ubuntu20-04-rpi4b
Raspbianをインストール
公式からRaspberry Pi ImagerをダウンロードしてImageの書き込みを行った。
https://www.raspberrypi.org/downloads/
インストールしたいOSを選択して簡単にインストールができる。
Raspbianを選択してインストール!
bootloader firmwareを更新
Raspbianは初期設定でSSHが無効になっているが、bootディレクトリにsshディレクトリを作成するとSSHを有効にすることができる。
sshディレクトリの中身は空でOK。
SDカードをラズパイに挿し起動する。
しばらくしてからSSHでログインする。
WindowsならteratermやMacならsshコマンドでアクセスできる。
IPアドレスは検索ツールを使って調べた。
ユーザ名:pi
パスワード:raspberry
$ sudo apt-get update && sudo apt-get dist-upgrade -y
$ sudo rpi-update
ブートローダの更新を行う。
sudo rpi-eeprom-update -a
Ubuntu Image書き込み
以下のサイトからImageファイルをダウンロードする。
https://github.com/TheRemote/Ubuntu-Server-raspi4-unofficial/releases
今回は以下のImageをダウンロードしました。
https://github.com/TheRemote/Ubuntu-Server-raspi4-unofficial/releases/download/v28/ubuntu-18.04.4-preinstalled-desktop-arm64+raspi4.img.xz
ダウンロードしたファイルの解凍をしSDカードに書き込む。
macの場合はxzをインストールして解凍する。
$ blew install xz
$ unxz buntu-18.04.4-preinstalled-desktop-arm64+raspi4.img.xz
SDカードに書き込むはddコマンドでできるがEtcherを使って書き込むと楽。
SDカードはRaspbianをインストールしたSDカードと同じでよい。
Update
ラズパイにSDカードを挿し、SSHでログインする。
ユーザ名:ubuntu
パスワード:ubuntu
初回ログイン時はパスワードの変更を求められるので変更する。
$ wget https://raw.githubusercontent.com/TheRemote/Ubuntu-Server-raspi4-unofficial/master/Updater.sh
$ chmod +x Updater.sh
$ sudo ./Updater.sh
途中何やら聞かれるがDefaultのままとした。
Configuration file '/etc/pulse/default.pa'
 ==> Modified (by you or by a script) since installation.
 ==> Package distributor has shipped an updated version.
   What would you like to do about it ?  Your options are:
    Y or I  : install the package maintainer's version
    N or O  : keep your currently-installed version
      D     : show the differences between the versions
      Z     : start a shell to examine the situation
 The default action is to keep your current version.
*** default.pa (Y/I/N/O/D/Z) [default=N] ?
・・・
Updater is up to date.  Checking system ...
Release v28 is available!  Make sure you have made a full backup.
Note: your /boot cmdline.txt and config.txt files will be reset to the newest version.  Make a backup of those first!
Update now? (y/n)y
Ubuntu Mateをインストール
$ sudo apt-get update && sudo apt dist-upgrade
$ sudo apt-get install mate-desktop-environment ubuntu-mate-desktop
gdm3かlightdmか聞かれたのでlightdmを選択した。
インストールが完了したら一応再起動しちゃんとログインできることを確認できた。
自動ログインの設定
X11VNCはGUIでログインしている必要があるため、自動ログインできるようにする。
こちらの方法ではできませんでした
参考URL:https://www.blue-weblog.com/entry/2017/09/04/214641
$ sudo nano /usr/share/lightdm/lightdm.conf.d/60-lightdm-gtk-greeter.conf
[SeatDefaults]
greeter-session=lightdm-gtk-greeter
autologin-user=<username>
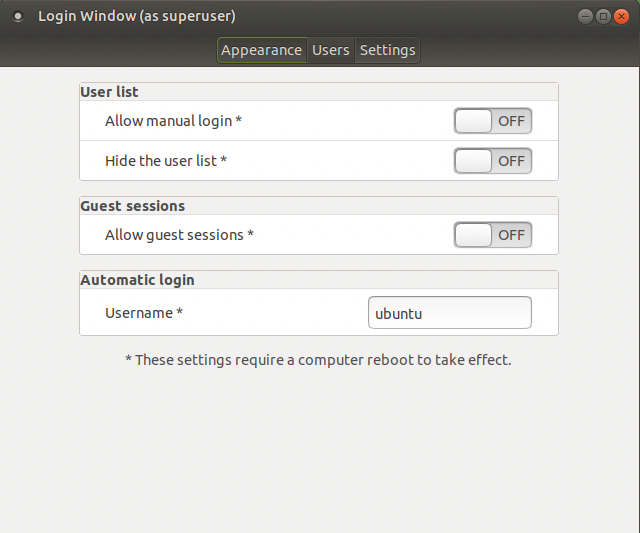
GUIで設定(こちらの方法でできました)
menu->Administration->Login Windowを選択する。

Usersタブを選択肢、Automatic loginに自動ログインさせるユーザを入力する。

VNC環境設定
リモート環境で開発するためにVNCを設定する。
X11VNCの設定
参考URL:https://www.ninton.co.jp/archives/3064
X11VNCをインストールする。
$ sudo apt-get install x11vnc
VNCに接続するためのパスワードを設定する。
$ sudo x11vnc -storepasswd /etc/x11vnc.passwd
Enter VNC password:
Verify password:
Write password to /etc/x11vnc.passwd?  [y]/n y
Password written to: /etc/x11vnc.passwd
VNCでログイン前にVNC接続できるようにする。
-geometory 1980x1080で解像度を指定できる(Windowのサイズを指定するだけで実際の解像度は設定できない模様)。
sudo x11vnc -auth guess -display :0 -rfbauth /etc/x11vnc.passwd -rfbport 5900 -forever -loop -noxdamage -repeat -shared
サービスに登録し自動的に起動するようにする。
$ sudo nano /etc/systemd/system/x11vnc.service
[Unit]
Description=x11vnc (Remote access)
After=network-online.target

[Service]
Type=simple
ExecStart=/usr/bin/x11vnc -auth guess -display :0 -rfbauth /etc/x11vnc.passwd -rfbport 5900 -forever -loop -noxdamage -repeat -shared
ExecStop=/bin/kill -TERM $MAINPID
ExecReload=/bin/kill -HUP $MAINPID
KillMode=control-group
Restart=on-failure

[Install]
WantedBy=graphical.target
systemdに登録してx11vncを起動する。
$ sudo systemctl daemon-reload
$ sudo systemctl enable x11vnc
$ sudo systemctl start x11vnc
リモートでつないだときの動作が重い!
topコマンドでCPU負荷を調べるとXorgのCPU使用率が高い。
xorg.confファイルにオプションにAccelMethodを設定することで動作が軽くなった。
参考URL:
https://ameblo.jp/ishiguso328/entry-10845849513.html
https://sosuk.hatenadiary.org/entry/20090711/1247282012
$ sudo nano /etc/X11/xorg.conf
Section "Device"
Identifier "Card0"
Driver "modesetting"
Option "AccelMethod" "XAA"
Option "RenderAccel" "on"
Option "AGPMode" "4"
EndSection
RenderAccelとAGPModeは設定しても意味ない可能性あり。たぶんなくてもよい。
ROSのインストール
参考URL:https://raspimouse-sim-tutorial.gitbook.io/project/setup/how_to_install_ros_melodic
ROSはUbuntuのバージョンに依存している。
今回はUbuntu 18.04なのでMelodicをインストールする。
| Distro | ROS ver |
|---|---|
| ubuntu 16.04(Xenial) | Kinetic Kame |
| Ubuntu 18.04(Bionic) | Melodic Morenla |
コンソールで以下を実行。
$ sudo apt-get update
$ sudo apt-get install -y curl
$ bash -c "$(curl -SsfL https://git.io/ros-melodic-desktop)"
$ source ~/.bashrc
$ mkdir -p ~/catkin_ws/src
$ cd ~/catkin_ws/
$ catkin_init_workspace src
$ echo "source ~/catkin_ws/devel/setup.bash" >> ~/.bashrc
$ catkin_make && source ~/catkin_ws/devel/setup.bash
ROSのテスト
以下のコマンドはすべて別ターミナルで実施する。
$ roscore
$ rosrun turtlesim turtlesim_node
$ rosrun turtlesim turtle_teleop_key
terminal3でキー操作すると亀が動く。
別々の端末でROSを実行する
上記のテストをPC側で描画を行い、ラズパイ側でキー操作を行う。
PCをMaster、ラズパイをSlaveとする。
それぞれのIPを調べる。ここでは以下の通りとする。
| 端末 | IPアドレス |
|---|---|
| PC | 192.168.1.10 |
| ラズパイ | 192.168.1.20 |
$ export ROS_MASTER_URI=http://192.168.1.10:11311
$ export ROS_HOSTNAME=192.168.1.10
$ export ROS_MASTER_URI=http://192.168.1.10:11311
$ export ROS_HOSTNAME=192.168.1.20
あとは各端末で以下を実行する。
$ roscore
$ rosrun turtlesim turtlesim_node
$ rosrun turtlesim turtle_teleop_key
ROS_IP/ROS_HOSTNAMEの設定について
調べたサイトではROS_IPを設定する方法があったが自分の環境ではうまくいかなかった。
roscore実行時のROS_MASTER_URIがhttp://localhost:11311となっていた。
理由は.bashrcにexport ROS_HOSTNAME=localhostの設定がされており、
ROS_IPとROS_HOSTNAMEが記述されている場合ROS_HOSTNAMEが優先されるため。
参照URL:http://wiki.ros.org/ja/ROS/EnvironmentVariables
ROS_IP/ROS_HOSTNAME
ROS_IP と ROS_HOSTNAMEは、ROSNodeかツールのネットワークアドレを設定したオプションの環境変数である。オプションは互いに排他的で、もし両方とも設定されているならROS_HOSTNAMEが優先される。IPアドレスがわかっているならROS_IPを、 ホスト名がわかっているならROS_HOSTNAMEを使ってください。マスターかほかのコンポーネントに対して、ROSコンポーネントがURIを報告するとき、この値を使うでしょう。この設定は、複数のアドレスをコンピュータに対して持っていてかつROSを特定のものにしむけたいときのみに必要です。
'localhost'を除いて、ROSのコンポーネントは、利用できるすべてのネットワークインターフェースにバインドしますが、実際の境界アドレス?(bound address)には影響しません。
もし値が、'localhost'に設定されているときは、ROSのコンポーネントはloopbackインターフェースにのみバインドされます。これは、離れたコンポーネントがあなたのローカルのコンポーネントに働きかけるのを防ぎます。

