LineBotを使って仕事の課題解決を行えるアプリケーションを作っている過程で、LINEBotにはない機能をWebアプリケーションを使って補完することを考えました。
その機能は時差を計算する機能なのですが、これをJavaScriptを使って実現したいと思い、以前の記事で、時差計算について自分なりに考え、コードを記載してみたところ、ありがたいことに、もっとDRYなコードがあることを教えていただきました。
自分が作りたかった時差計算をしてくれるサイトについて、時差計算機能が完成したのですが、教えて頂いた内容を踏まえて、JavaScriptで改めて時差を計算する方法について記事にしてみました。
開発環境等
macOS BigSur
ruby-2.6.5
Rails 6.0.3.6
Bootstrap
時差計算搭載サイト
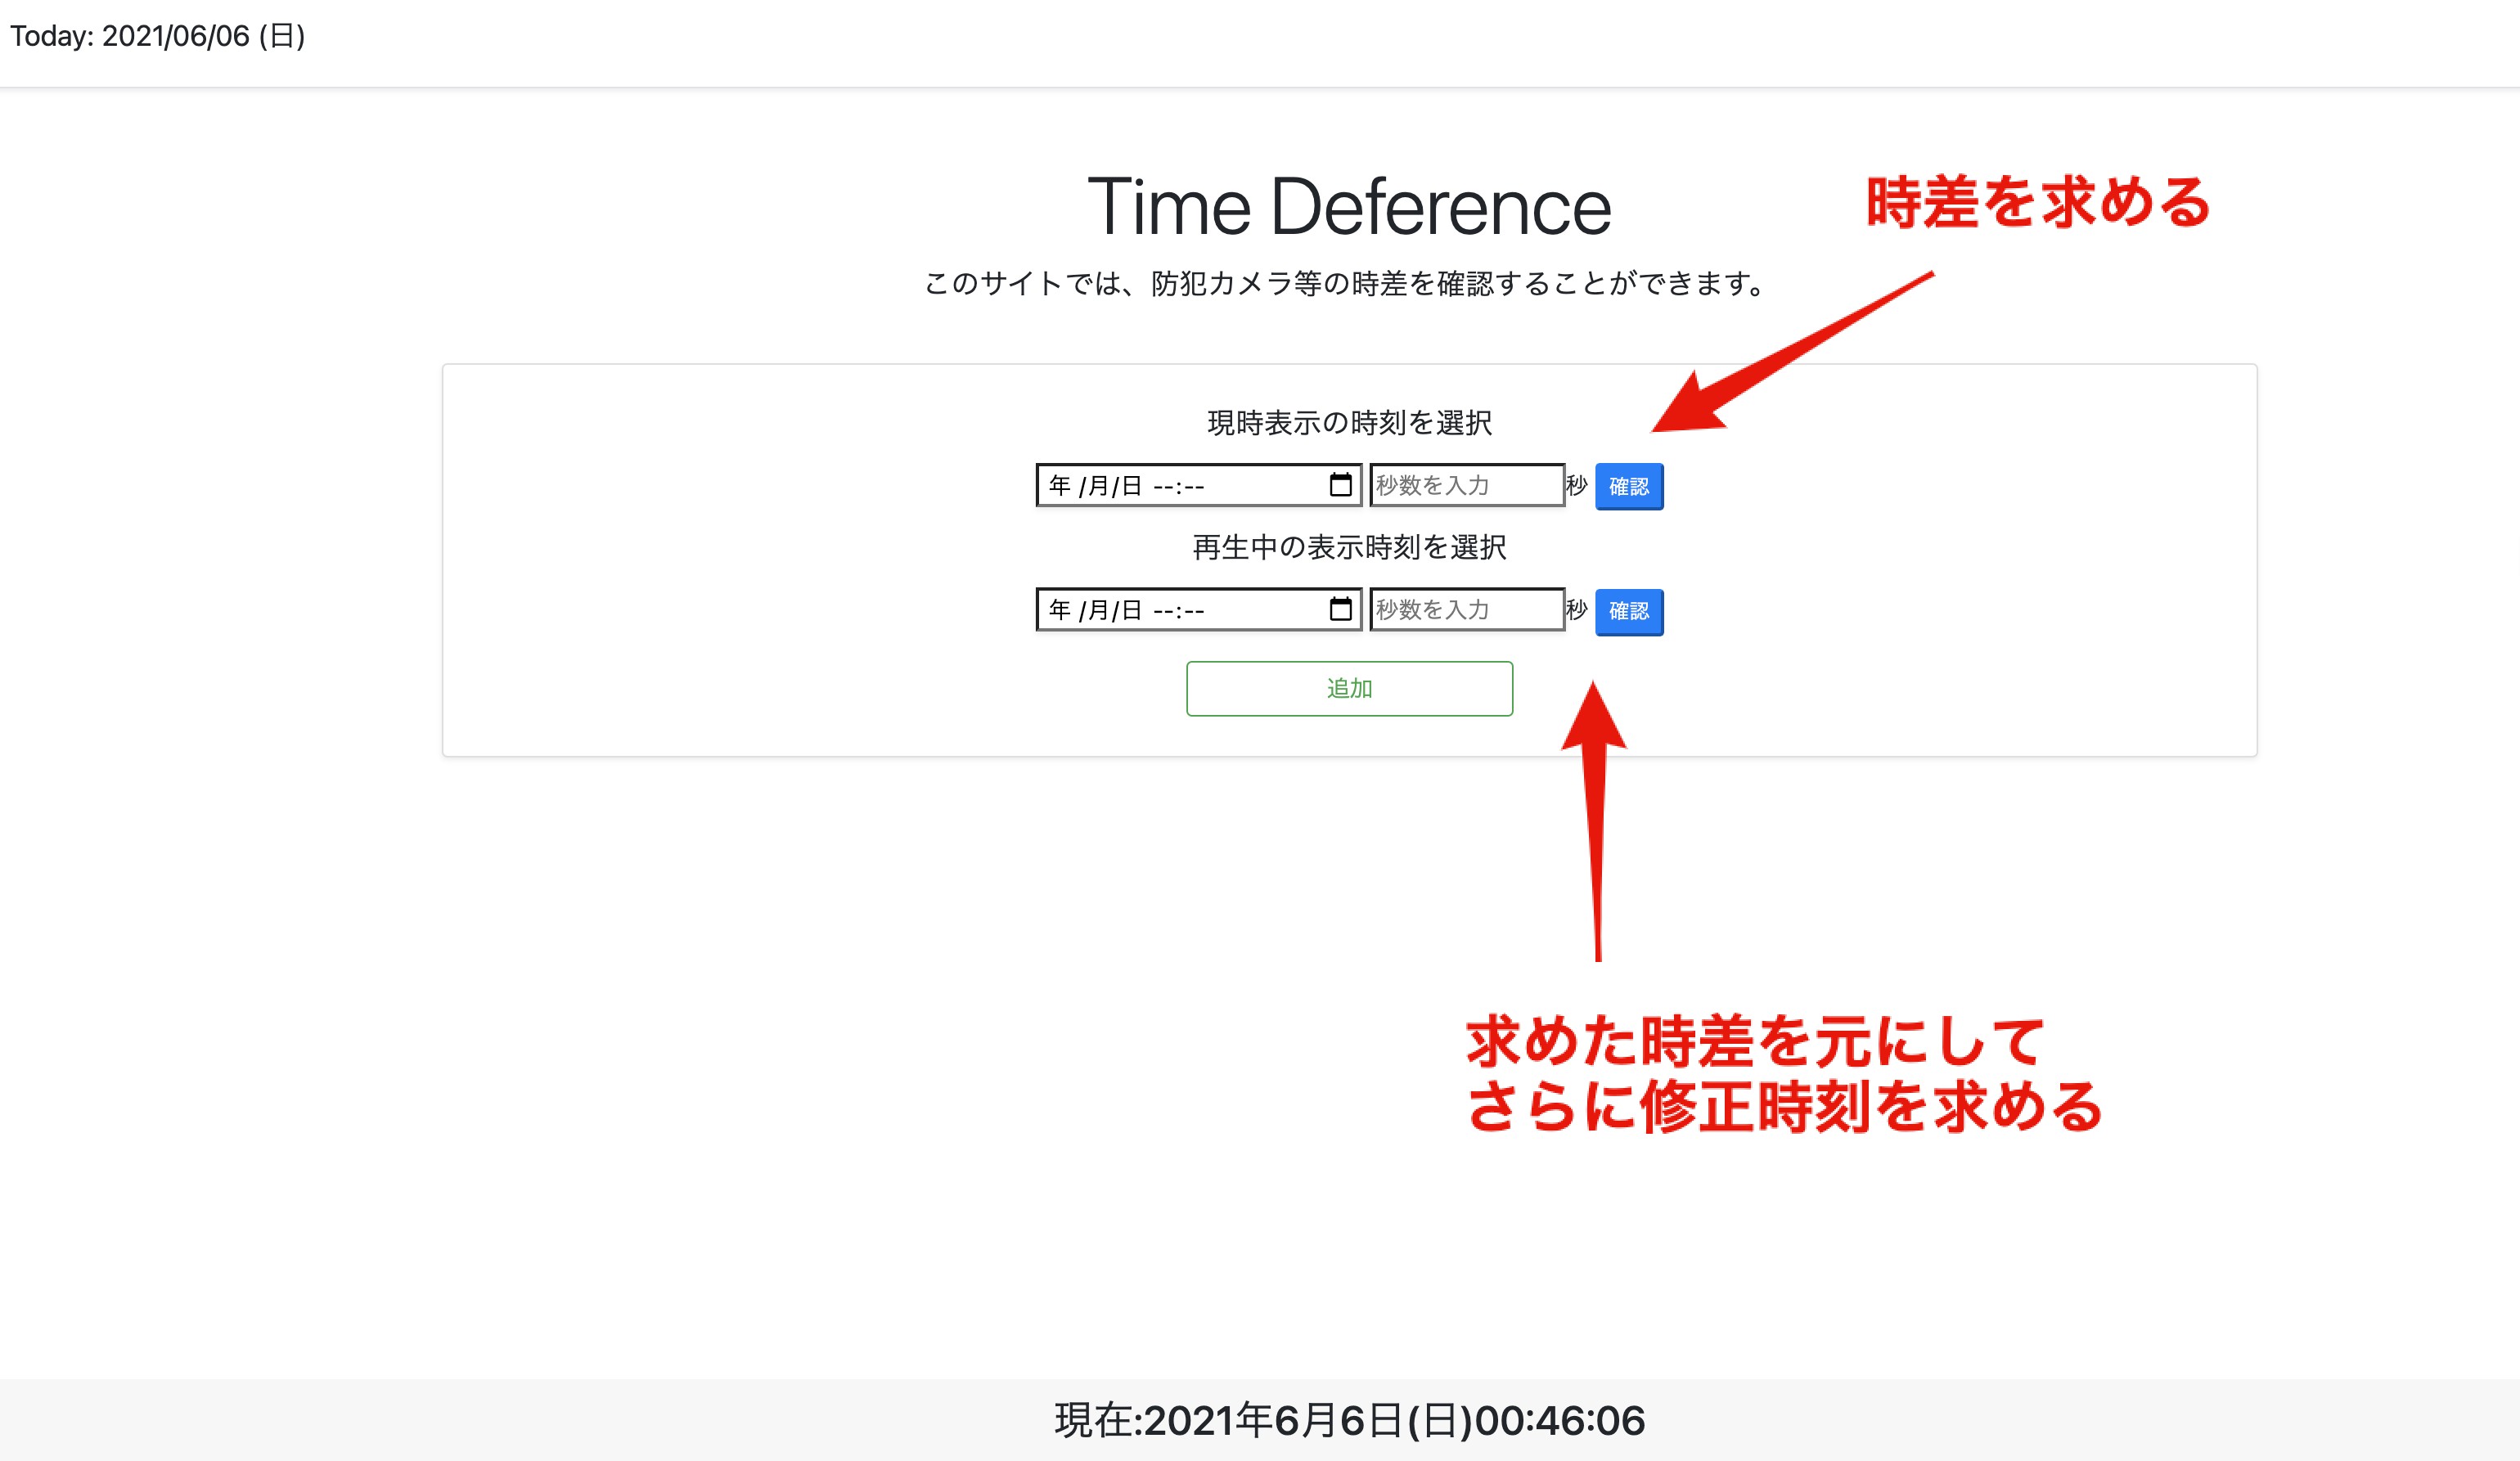
実際に使用するとこんな感じです。↓
時刻の入力はHTMLのdatatime-localを使用して、ユーザーに選択させようとしたのですが、PC版では、秒数までの入力があるのに対して、スマートフォン版では、分までしかなく、秒数まで入力させる時差計算がしたかったので、秒数を入力する欄を別に設けて、その値をDataオブジェクトに変えて計算させる仕様にしています。
計算元になる時刻表示は常に、bottomに固定されており、setIntervalでリアルタイム表示になっています。
実際のコード
見た目はBootStrapを使用して作成しました。(body部分だけ)
<body>
    <div class="pricing-header px-3 py-3 pt-md-5 pb-md-4 mx-auto">
      <h1 class="display-4 text-center">Time Deference</h1>
      <p class="lead text-center">このサイトでは、防犯カメラ等の時差を確認することができます。</p>
    </div>

  <div>
    <div class="card-header fixed-bottom text-center">
          <h3 id="RealTimeArea1"class="card-title"></h3>
    </div>

    <div class="container" id="card-area-1">
      <div class="card mb-3  shadow-sm text-center">
          <div class="card-body">
            <div class="container-fluid">
              <div class="container-count text-right">
                <h4 id = "innerCount-1" ></h4>
              </div>
              <h5><label for="InputDateTime">現時表示の時刻を選択</label></h5>
                <input type="datetime-local" id="InputDateTime-1" class="shadow-sm" style= "width: 200px;">
                <input type="number" id="InputSecondTime-1" class="shadow-sm" placeholder="秒数を入力" style= "width: 120px;" min="0" max="59"><label>秒</label>
                <button type="button" class="btn-time-deference btn-primary btn-sm" id="check-current-time-1">確認</button>
              <h3 id="RealTimeArea1"class="card-title"></h3>
              <h2 id="TimeDeference-1"></h2>
              <h5><label for="InputDateTimePass-1">再生中の表示時刻を選択</label></h5>
                <input  id="InputDateTimePass-1" type="datetime-local" class="shadow-sm" style= "width: 200px;">
                <input id="InputSecondTimePass-1" type="number" class="shadow-sm" placeholder="秒数を入力" style= "width: 120px;" min="0" max="59"><label>秒</label>
              <button type="button" class="btn-correction-time btn-primary btn-sm" id="check-correction-time-1">確認</button>
              <h2 id ="CorrectionTime-1"></h2>
              <div class="text-center">
                  <button class="m-2 btn btn-outline-success add-button" style="width: 200px;" id="add-btn-1">追加</button>
              </div>
            </div>
          </div>
        </div>
      </div>
  </div>
    </div>

  </body>
window.addEventListener('load', () => {

    let set2digits = function digits (num) {
    let digit;
      if(num < 10) {digit = "0" + num;}
      else {digit = num;}
      return digit;
    }

  let timeNow = function realtime () {
    const nowTime = new Date();
    const nowYear = nowTime.getFullYear();
    const nowMonth = nowTime.getMonth() + 1;
    const nowDay = nowTime.getDate();
    const nowHour = set2digits(nowTime.getHours());
    const nowMin = set2digits(nowTime.getMinutes());
    const nowSec = set2digits(nowTime.getSeconds());
    const dayOfWeek = nowTime.getDay();
    const dayOfWeekStr = [ "日", "月", "火", "水", "木", "金", "土" ][dayOfWeek] ;
    const realTime = "現在:" + nowYear + "年" + nowMonth + "月" + nowDay + "日"+ "(" + dayOfWeekStr + ")"
                  + nowHour + ":" + nowMin + ":" + nowSec;
    document.getElementById("RealTimeArea1").innerHTML = realTime;
    };

  setInterval(timeNow, 1000);

});
これで、現在時刻をリアルタイムで表示することができます。
こちらのサイトを参考にさせていただきました。
表示させる形は、0000年00月00日(曜日)00:00:00といった形です。
set2digitsでは、表示させる時刻が1桁の場合は、0を結合させる処理をしています。
window.addEventListener('load', () => {
  function timeInputElement(){
    const timeAreaCount = document.querySelectorAll(".container").length;
    const timeInput = document.getElementById(`InputDateTime-${timeAreaCount}`);
    const timeInputSecond = document.getElementById(`InputSecondTime-${timeAreaCount}`);
    return{
      timeAreaCount: timeAreaCount,
      timeInput: timeInput,
      timeInputSecond: timeInputSecond
    };
  };

  function getInputSecond (secondElement) {if (Number(secondElement.value) < 10){
    return secondElement.value.padStart(2, 0);
  }else{
    return secondElement.value
  }};

  function timeDeference(timeDeferenceElement){
      const nowDate = new Date();
      const inputSecond = getInputSecond(timeDeferenceElement.timeInputSecond);
      const InputDate = new Date(timeDeferenceElement.timeInput.value + ":" + inputSecond);
      const sign = nowDate > InputDate ? 1 : 0;
      const diff = Math.abs(nowDate - InputDate);
      const times = new Date(diff).toUTCString().match(/(\d+):(\d+):(\d+)/);
      const days = Math.floor(diff / 86400000);
      return {
        timeDeference: `${String(days).padStart(2, '0')}日${times[1]}時間${times[2]}分${times[3]}秒${['早い', '遅れ'][sign]}`,
        setTime: diff
      };
    };

    let setTime;
    document.addEventListener('click', event =>{
      let setCount = document.querySelectorAll(".container").length
      if (event.target.closest(`#check-current-time-${setCount}`)){
        let timeDeferenceElement = timeInputElement();
        let innerTime = timeDeference(timeDeferenceElement)
        setTime = innerTime;
        document.getElementById(`TimeDeference-${timeDeferenceElement.timeAreaCount}`).innerHTML = innerTime.timeDeference;
      }
    });

  function timeInputPassElement(){
    const timeAreaCount = document.querySelectorAll(".container").length;
    const correctionTimeInput = document.getElementById(`InputDateTimePass-${timeAreaCount}`);
    const correctionTimeInputSecond = document.getElementById(`InputSecondTimePass-${timeAreaCount}`);
    return{
      timeAreaCount: timeAreaCount,
      correctionTimeInput: correctionTimeInput,
      correctionTimeInputSecond: correctionTimeInputSecond
    };
  };

  function correctionTime(setTime, correctionTimeElement){
      const setDate = setTime.setTime
      const inputSecondCorrection = getInputSecond(correctionTimeElement.correctionTimeInputSecond);
      const InputCorrectionDate = new Date(correctionTimeElement.correctionTimeInput.value + ":" + inputSecondCorrection).getTime();
      const checkStr = setTime.timeDeference

      function parseTime(resultTime){
        let set2digits = function digits (num) {
          let digit;
          if(num < 10) {digit = "0" + num;}
          else {digit = num;}
          return digit;
        }
        const correctionYear = resultTime.getFullYear();
        const correctionMonth = resultTime.getMonth() + 1;
        const correctionDay = resultTime.getDate();
        const correctionHour = set2digits(resultTime.getHours());
        const correctionMin = set2digits(resultTime.getMinutes());
        const correctionSec = set2digits(resultTime.getSeconds());
        return "修正:" + correctionYear + "年" + correctionMonth + "月" + correctionDay + "日"
                + correctionHour + ":" + correctionMin + ":" + correctionSec;
      };

      if (checkStr.indexOf("早い") !== -1){
        resultTime = new Date(InputCorrectionDate - setDate);
        return parseTime(resultTime);
      }else{
        resultTime = new Date(InputCorrectionDate + setDate);
        return parseTime(resultTime);
      };
    };

    document.addEventListener('click', event =>{
      let setCount = document.querySelectorAll(".container").length
      if (event.target.closest(`#check-correction-time-${setCount}`)){
        if (setTime.timeDeference !== null){
          let correctionTimeElement = timeInputPassElement();
          document.getElementById(`CorrectionTime-${setCount}`).innerHTML = correctionTime(setTime, correctionTimeElement);
      }}
    });
});
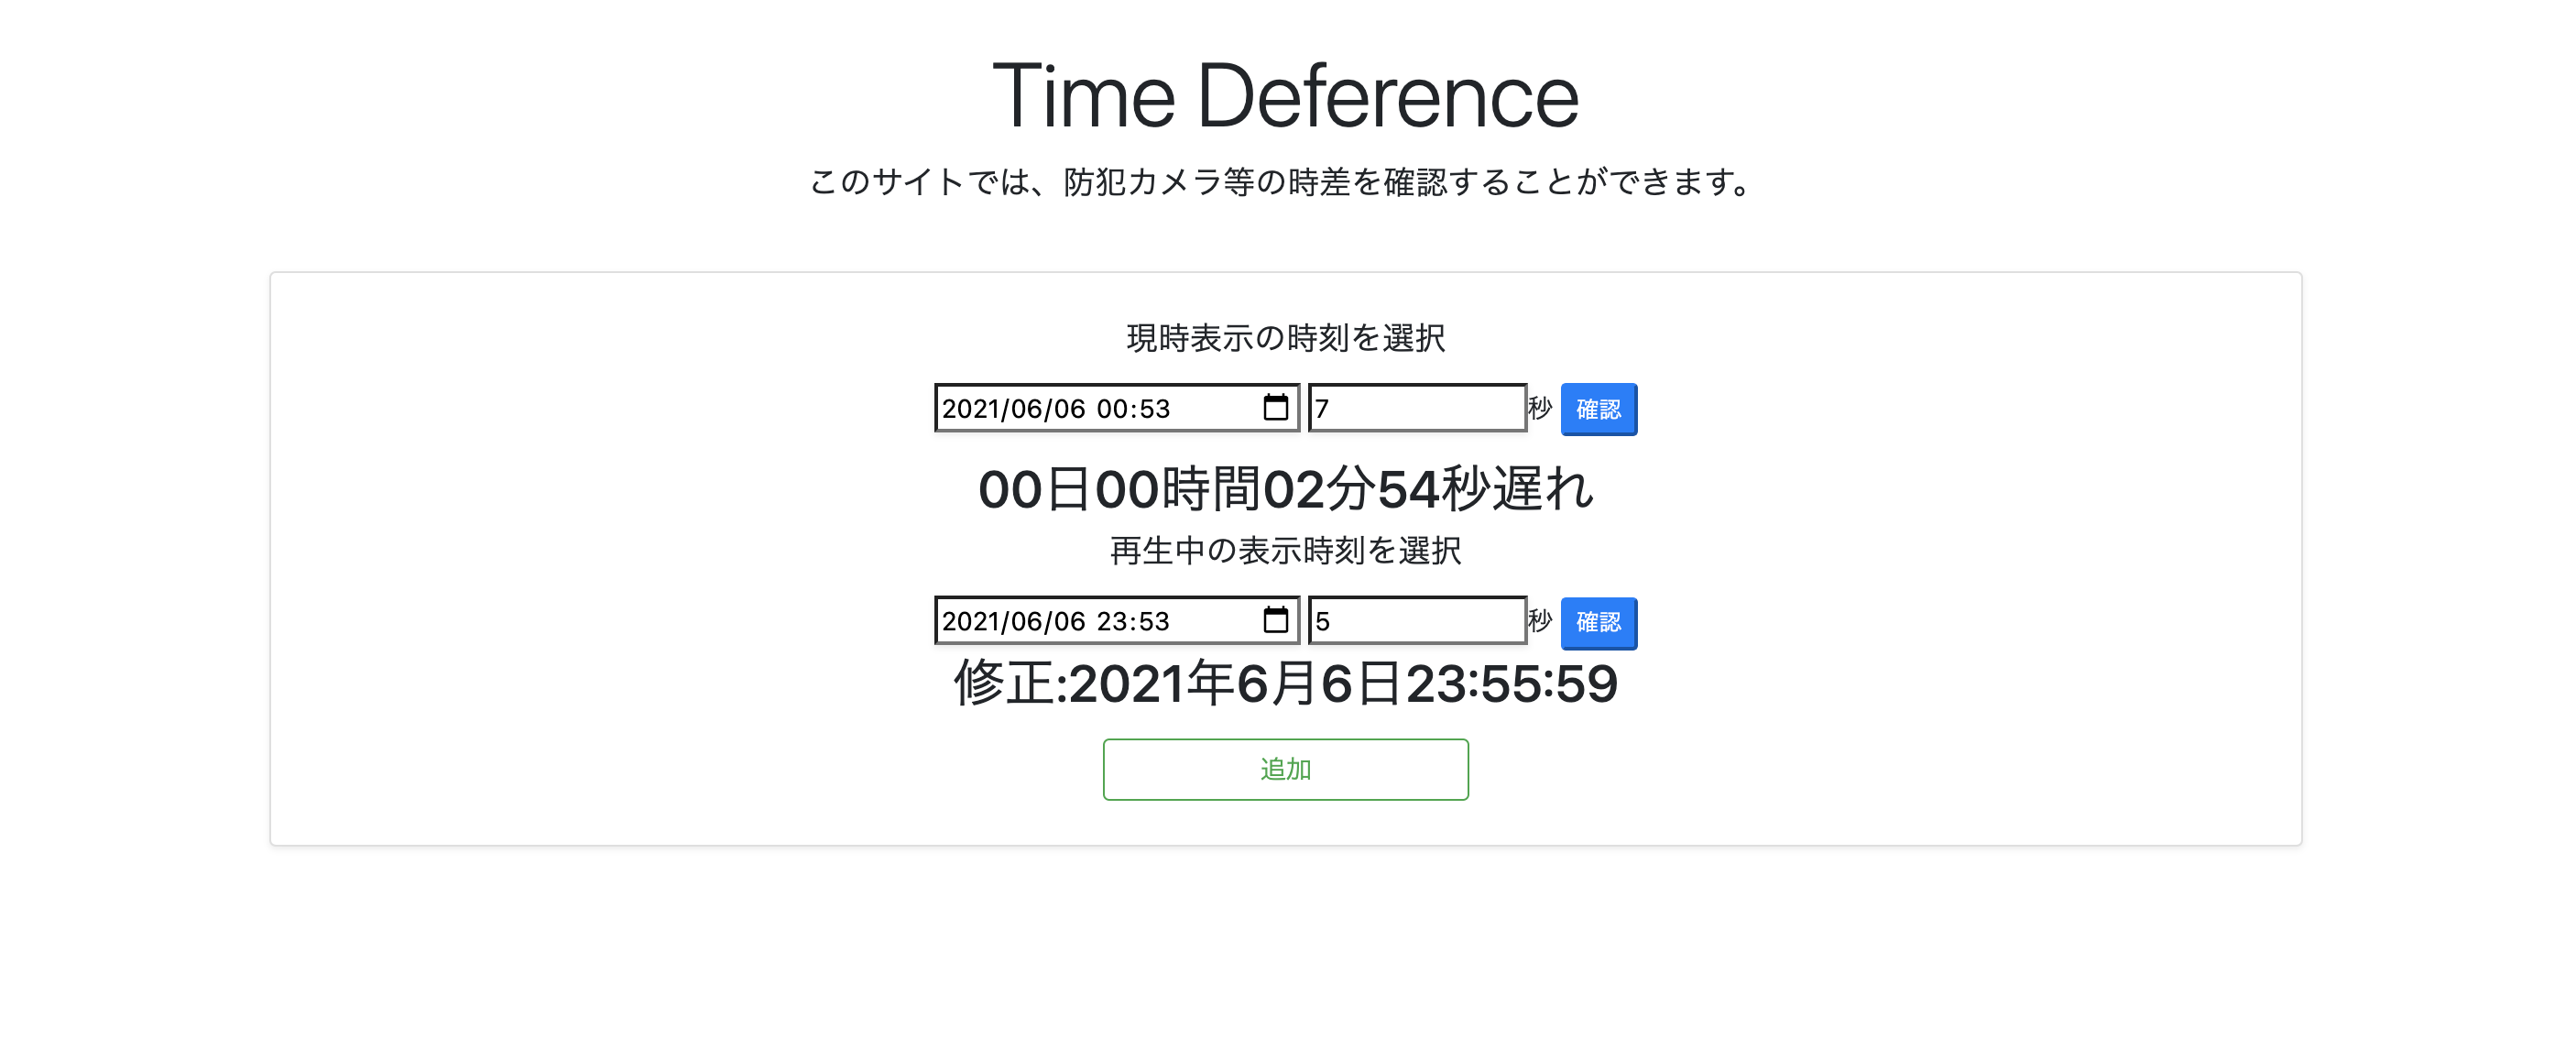
これで、現在時刻を基準にして、ユーザーが任意に指定した時刻に対する時差計算を行うことができます。
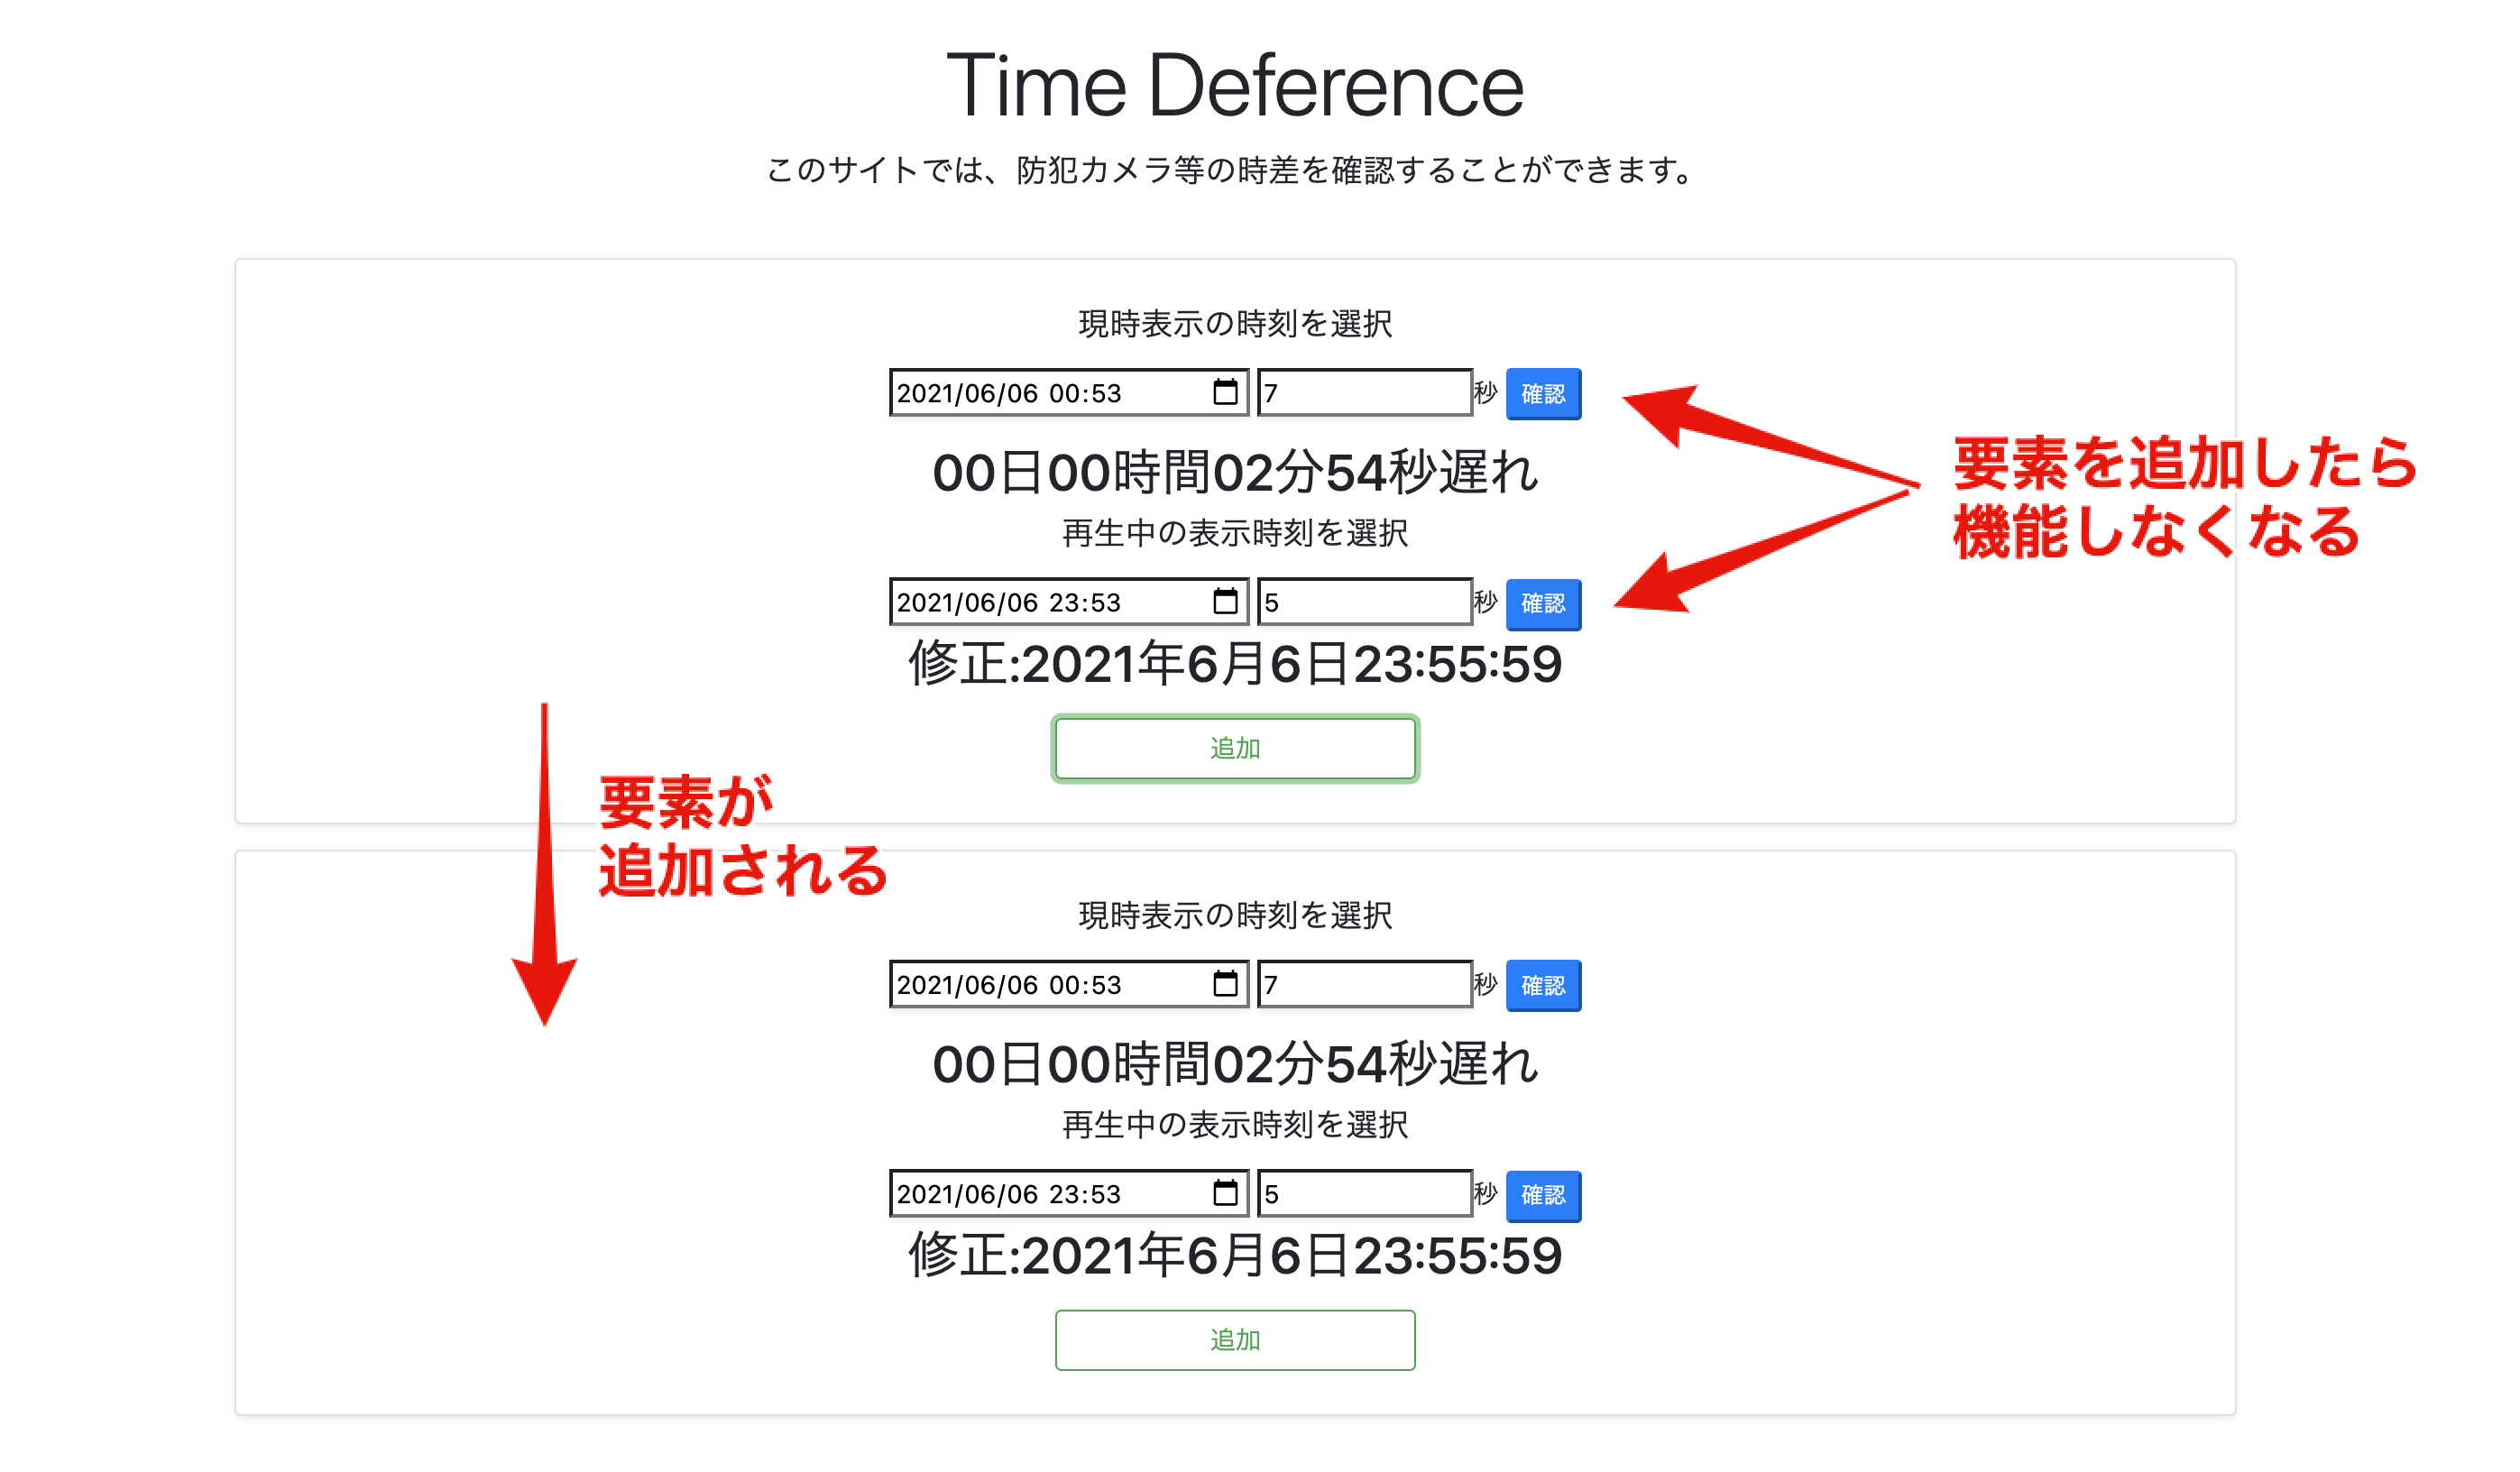
私は、時差計算ができる要素を「追加ボタン」を押すことで、追加させ、元の要素に入力した値をそのまま残しておけるような機能を実装させたかったので、要素が増えるたびに、HTMLで記載したidの枝番が増えるようにしています。
追加ボタンを押すとこんな感じです↓
時差計算機能のコード解説
実際に時差計算をしてくれるコードはこちらです。
function timeDeference(timeDeferenceElement){
      const nowDate = new Date();
      const inputSecond = getInputSecond(timeDeferenceElement.timeInputSecond);
      const InputDate = new Date(timeDeferenceElement.timeInput.value + ":" + inputSecond);
      const sign = nowDate > InputDate ? 1 : 0;
      const diff = Math.abs(nowDate - InputDate);
      const times = new Date(diff).toUTCString().match(/(\d+):(\d+):(\d+)/);
      const days = Math.floor(diff / 86400000);
      return {
        timeDeference: `${String(days).padStart(2, '0')}日${times[1]}時間${times[2]}分${times[3]}秒${['早い', '遅れ'][sign]}`,
        setTime: diff
      };
    };
datatime-localで取得した時刻は分までしかないため、別で設けた秒数を入力できるinputタグのnumberで最小値と最大値を設けて、datatime-localで取得した値と結合させ、Dateオブジェクトを取得することで、PC版でもスマートフォン版でもこのサイトから秒数までの時差計算ができるようにさせています。
時差の計算結果を現在時刻より00日00時間00分00秒遅い/早いで表示させたかったので、計算する時刻が現在時刻の値より大きいか否かで0「遅い」1「早い」の値を定数signに格納させています。
Math.abs()関数を使用することで、計算結果の絶対値を取得することができるため、現在時刻よりも早くても、遅くても、時差式の計算結果をそのまま利用できるようにしています。
const times = new Date(diff).toUTCString().match(/(\d+):(\d+):(\d+)/);
定数timesに時差計算で出した時差diffの時、分、秒の部分を配列として格納させて、後から自由に取り出せるようにしています。
ちなみに、times[0]は、"00:00:00"というmatchメソッドで指定した正規表現/(\d+):(\d+):(\d+)/にマッチした値の全体部分が格納さます。
この正規表現の意味は//で囲った部分が正規表現であることを意味し、\dは0-9の整数を意味しており、直後に+を付すことで1回以上の繰り返しを意味しています。
つまり、new Date(diff).toUTCString()によって、"Thu, 01 Jan 1970 00:00:00 GMT"こんな感じの文字列が返ってきますが、.match(/(\d+):(\d+):(\d+)/)によって、00:00:00の部分だけを配列として返すことができるというわけです。
matchメソッドはキャプチャグループを含むすべての一致するものを含む配列を返します。
一致するものがない場合は null を返します。
Math.floor()関数は、計算結果の小数点を切り捨てた値を返してくれます。
const days = Math.floor(diff / 86400000)によって、時差の日数を出すことができます。
86400000ですが、Dateオブジェクトによる算術演算子はミリ秒で計算結果を返します。
よって、このミリ秒を日単位まで繰り上げるために日数 = 1000 * 60 * 60 * 24 (86400000)となっているわけです。
時差計算によって導き出した値の結果をreturnで呼び出し元に返しています。
この時に、計算結果を2つの値timeDeferenceとsetTimeで返していますが、setTimeは2つ目のcorrectionTime関数で使うためです。
時差計算を元に、更に、その時差計算結果を次の任意の時間の修正値に使えるようにしています。
${String(days).padStart(2, '0')}日${times[1]}時間${times[2]}分${times[3]}秒${['早い', '遅れ'][sign]}
についてですが、daysは、この時点で、number型として定義されているため、後のtimesや「早い」「遅い」は全てstring型になっており、daysも文字列型にするためにString()で文字列に変換しています。
また、padStart()は任意の固定長文字列を返すメソッドなので、daysを文字列にしなければなりません。
padStart(2, '0')によって、2桁の固定長文字列を返すことになり、daysの値が1桁の場合は、0が追加されて表示されることになります。
自分が記事にした内容について、コメントを頂き、自分の学習をさらに深めていくことができました。
長文記事になり、わかりにくい点が多々あったと思いますが、自分の理解をアウトプットしてみたので、何かご指導いただけることがありましたらコメントいただけるとありがたいです。