はじめに
SpringBootにて作成したアプリケーションがローカル環境において想定通りに動作し、あとは本番環境にアップして公開だけだなぁと一息ついていたのですが、想像の倍ハマりました・・・・
最終的に公開できたので、Herokuに公開にあたって何を行ったのかを紹介します。
私以外でHerokuでのデプロイにおいて悩んでいらっしゃる方にとって参考になる記事になれば幸いです。
環境
OS: macOS Catalina 10.15.6
JDK:14.0.1
Spring Boot 2.3.3
jquery 3.3.1-1
bootstrap 4.2.1
maven
eclipse
作成したアプリケーションについて
筆者は「【後悔しないための入門書】Spring解体新書」を参考に、Spring MVCでCRUDアプリケーションを作成しました。
アプリケーションに実装している主な機能は下記の通りです。
・ログイン/ログアウト
・新規会員登録/退会
・登録情報更新
・コンテンツ検索
.テンプレートエンジンにはthymeleaf、CSSフレームワークにはBootstrapを使用し画面を作成
作成したコントローラーやhtmlファイルについては本記事では触れません。
Herokuへのデプロイにつまずき、「1から作り直さないといけないかなぁ・・・」と思ってらっしゃる方もいるかもしれませんが、その必要はありません。
①Herokuへの会員登録/Heroku CLIのインストール
下の記事を参考にHerokuへの会員登録をしてください。
https://blog.cloud-acct.com/posts/u-heroku-deploy-intro/
↓下記で会員登録が行えます。
https://signup.heroku.com/login
次にHeroku CLIをインストールしてください。
ターミナル操作でデプロイを行うので必ずインストールしてください。
下記はmacの場合です。
※Homebrew がインストール済である必要があります。
brew tap heroku/brew && brew install heroku
インストールしたら確認のため、バージョンの確認を行ってください。
$ heroku --version
heroku/7.46.2 darwin-x64 node-v12.16.2
②「Procfile」 「system.properties」を作成
ProcfileというHeroku上で実行するコマンドを定義したファイルをルートディレクトリ配下に作成します。
これがないと、Herokuへデプロイをした時に「code=H14 desc="No web processes running”」という
エラーが発生し、アプリケーションを実行できません。
Procfileは「P」は大文字、拡張子は付けません。
筆者は、herokuのJavaサンプルプロジェクトを下記コマンドでクローンし、
それをルートディレクトリにおいて、内容を書き換えて利用しました。
git clone https://github.com/heroku/java-getting-started.git
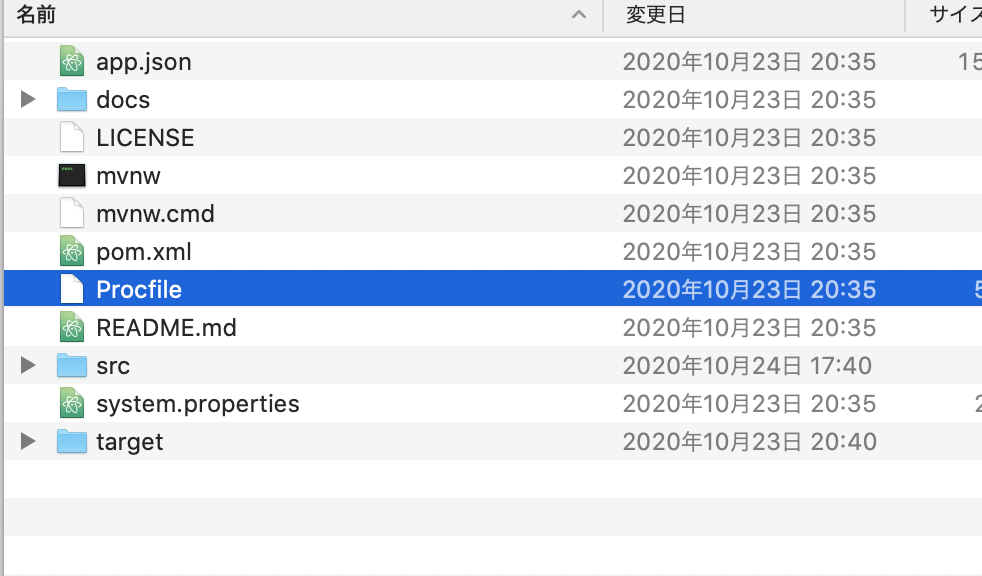
Procfileとは下図のこのファイルです。
例「herokuのJavaサンプルプロジェクト」

下記のようにProcfileの内容を書き込んでください
web: java -Dserver.port=$PORT -jar target/任意の文字列-0.0.1-SNAPSHOT.jar
左から順番に説明します。
その1「web」
こちらは「web」というプロセスタイプです。
Herokuアプリケーションは複数の仮想マシンを「別々の動かし方」で動かすのですが、
この動かし方について指定するのが「プロセスタイプ」というものです。
Procfileはプロセスタイプの設定を1行1つずつ記述します。
プロセスタイプの名称を記述し、:を挟み、続いてコマンドを記述することでそれぞれのプロセスタイプの設定をします。
プロセスタイプ「web」は必ず設定しましょう。設定しないと仮想マシンがHTTPリクエストを処理してくれません。
その2「java」
筆者もど忘れしていたのですが、「web:」より右は、javaでjarファイルを実行する際のコマンド「java -jar 〇〇.jar」ですね。
参考:https://teratail.com/questions/91621
その3「-D」
公式のドキュメントの「45. Heroku」によると、
SpringBoot「-D」引数をSpring Environment instanceからアクセス可能なプロパティーとして利用可能にする
という意味があるようです・・・
その4「server.port=$PORT」
サーバーHTTPポートを設定しています。$PORTにはHeroku PaaSによって割り当てられた環境変数が入ります。
その5「-jar target/任意の文字列-0.0.1-SNAPSHOT.jar」
後ほど説明しますが、maveビルドをするとルートディレクトリ直下の「target」フォルダに「任意の文字列-0.0.1-SNAPSHOT.jar」が作成されます。 「target/任意の文字列-0.0.1-SNAPSHOT.jar」は"「target」フォルダの中にある任意の文字列-0.0.1-SNAPSHOT.jar"ですね。
jarファイル名についてですが、これはpom.xmlのversionタグ、artifactIdタグ内に記載されている情報が当てはめられます。 上で「任意の文字列」としているのはartifactIdタグ内に記載した文字列です。
下の例ですと、「hoge-0.0.1-SNAPSHOT.jar」が作成されます。
Procfileに内容を作成するとき、任意の文字列にはartifactIdタグ内の文字列を記載してください。
<?xml version="1.0" encoding="UTF-8"?>
<project xmlns="http://maven.apache.org/POM/4.0.0" xmlns:xsi="http://www.w3.org/2001/XMLSchema-instance"
	xsi:schemaLocation="http://maven.apache.org/POM/4.0.0 https://maven.apache.org/xsd/maven-4.0.0.xsd">
	<modelVersion>4.0.0</modelVersion>

	<parent>
		<groupId>org.springframework.boot</groupId>
		<artifactId>spring-boot-starter-parent</artifactId>
		<version>2.3.3.RELEASE</version>
		<relativePath/> <!-- lookup parent from repository -->
	</parent>
	<groupId>com.example</groupId>

    <!-- 下の2行の情報がファイル名として反映される-->
	<artifactId>hoge</artifactId>
	<version>0.0.1-SNAPSHOT</version>

	<name>hoge</name>
	<description>Demo project for Spring Boot</description>

	<properties>
		<java.version>14</java.version>
	</properties>

	<dependencies>
		<dependency>
			<groupId>org.hamcrest</groupId>
			<artifactId>hamcrest</artifactId>
		</dependency>
続いて下記のように「system.properties」を作成してください。
このファイルにはjavaのバージョンについて明記します。
筆者はJDK14.0.1を使用しているので14と記載しています。
お使いのversionに合わせて書き換えてください。
java.runtime.version=14
「Procfile」と「system.properties」ルートディレクトリ直下に格納します。
root/
 ├system.properties
 ├Procfile
 ├mvnw
 ├mvnw.cmd
 ├pom.xml
 ├target/
 ├src/
 ├docs/
 └README.md
参考
公式ドキュメント(英語):https://docs.spring.io/spring-boot/docs/0.0.10.BUILD-SNAPSHOT/reference/htmlsingle/
公式ドキュメント(日本語) 「2.3. Heroku」:https://spring.pleiades.io/spring-boot/docs/current/reference/html/deployment.html
Profileについて:https://creepfablic.site/2019/06/15/heroku-procfile-matome/
「web」について:http://info-i.net/heroku-ps
③依存関係に「webapp-runner」と「maven-compiler-plugin」
pom.xmlに「webapp-runner」を追加します。
Webapp Runnerは内部的にTomcatを起動するランチャーアプリケーションです。Heroku上でアプリケーションを動作実行するのに必要となります。
<plugin>
       <groupId>org.apache.maven.plugins</groupId>
            <artifactId>maven-dependency-plugin</artifactId>
            <executions>
                <execution>
                    <phase>package</phase>
                    <goals><goal>copy</goal></goals>
                    <configuration>
                        <artifactItems>
                            <artifactItem>
                                <groupId>com.heroku</groupId>
                                <artifactId>webapp-runner</artifactId>
                                <version>9.0.30.0</version>
                                <destFileName>webapp-runner.jar</destFileName>
                            </artifactItem>
                        </artifactItems>
                    </configuration>
            	</execution>
            </executions>
</plugin>
pom.xmlに「maven-compiler-plugin」を追加します。
筆者の環境ではこれを追加しないと下記のようなエラーコードがデプロイ時に、Herokuのコンソールに出力されました。
これは「maven-compiler-plugin」で指定されたプロジェクトのJDKのバージョンよりも古いバージョンのJavaでmavenが動作させようとすると発生するエラーのようです。
バージョンの不一致が起きているという具合です。
Failed to execute goal org.apache.maven.plugins:maven-compiler-plugin:3.7.0:compile (default-compile) on project app: Fatal error compiling: invalid target release: 11 -> [Help 1]
sourceとtargetはコンパイル時のオプションですが、このタグ内で、jdkのバージョンを指定します。
ちなみに「source」は受け付けるソースコードのバージョンを指定し、「target」はコンパイル完了時に作成されるクラスファイルのjdkバージョンを指定しております。 「source」と「target」は「1.8」に設定しました。
試しに「14」にしてみたところエラーが続出し、解決策が見当たりませんでした、、、
「1.8」にするとなぜか問題なく作動、、、、今後究明の余地があります。
<build>
	    <plugins>
			<plugin>
	            <groupId>org.springframework.boot</groupId>
				<artifactId>spring-boot-maven-plugin</artifactId>
			</plugin>
			<plugin>
                <groupId>org.apache.maven.plugins</groupId>
                <artifactId>maven-compiler-plugin</artifactId>
                <configuration>
                    <source>1.8</source>
                    <target>1.8</target>
                </configuration>
            </plugin>
追加した依存関係をまとめると下記の通りです。
<build>
	    <plugins>
			<plugin>
	            <groupId>org.springframework.boot</groupId>
				<artifactId>spring-boot-maven-plugin</artifactId>
			</plugin>
			<plugin>
                <groupId>org.apache.maven.plugins</groupId>
                <artifactId>maven-compiler-plugin</artifactId>
                <configuration>
                    <source>1.8</source>
                    <target>1.8</target>
                </configuration>
            </plugin>
            <plugin>
            <groupId>org.apache.maven.plugins</groupId>
            <artifactId>maven-dependency-plugin</artifactId>
            <executions>
                <execution>
                    <phase>package</phase>
                    <goals><goal>copy</goal></goals>
                    <configuration>
                        <artifactItems>
                            <artifactItem>
                                <groupId>com.heroku</groupId>
                                <artifactId>webapp-runner</artifactId>
                                <version>9.0.30.0</version>
                                <destFileName>webapp-runner.jar</destFileName>
                            </artifactItem>
                        </artifactItems>
                    </configuration>
            	</execution>
            </executions>
        	</plugin>
		</plugins>
	</build>
プロジェエクトの更新をお忘れなく。
参考
「Webapp Runner」について:https://codezine.jp/article/detail/8187
「Webapp Runner」のバージョン:https://mvnrepository.com/artifact/com.heroku/webapp-runner
「Webapp Runner」について(公式ドキュメント):https://devcenter.heroku.com/articles/java-webapp-runner
「Failed to execute goal org.apache.maven.plugins:maven-compiler-plugin」について:
https://python5.com/q/laifarhi
「Fatal error compiling: invalid target release: x.x」について:
https://qiita.com/gishi_yama/items/67e4c12ae90ad34e652b
「ソース・オプションXは現在サポートされていません」について:
https://qiita.com/opengl-8080/items/bb32732f9aa5cb3495d2
「target」と「source」について:
http://dodododo.jp/java/javase_6_docs_ja/technotes/tools/solaris/javac.html
SpringBootで作成したアプリケーションをHerokuへデプロイ(公開)②に続く・・・
↓②へ
https://qiita.com/hiroki1994/items/72a52f2139c1088c623b