Ripple effectが付いたUIButtonを紹介します。

コード
タッチ発生時に座標を取り、円形のUIViewを拡大・うすめながら表示します。
import UIKit

class RippleButton: UIButton {
    override func touchesBegan(_ touches: Set<UITouch>, with event: UIEvent?) {
        super.touchesBegan(touches, with: event)
        drawRipple(touch: touches.first!)
    }
    private func drawRipple(touch: UITouch) {
        let rippleView = UIView(frame: CGRect(x: 0, y: 0, width: 200, height: 200))
        rippleView.layer.cornerRadius = 100
        rippleView.center = touch.location(in: self)
        rippleView.transform = CGAffineTransform(scaleX: 0.01, y: 0.01)
        rippleView.backgroundColor = UIColor(red: 0/255, green: 0/255, blue: 0/255, alpha: 0.4)
        addSubview(rippleView)
        UIView.animate(
            withDuration: 0.5,
            delay: 0.0,
            options: UIView.AnimationOptions.curveEaseIn,
            animations: {
                rippleView.transform = CGAffineTransform(scaleX: 1, y: 1)
                rippleView.backgroundColor = .clear
            },
            completion: { (finished: Bool) in
                rippleView.removeFromSuperview()
            }
        )
    }
}
使い方
RippleButtonを使うだけです。
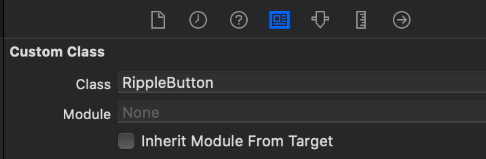
Storyboardから使う場合は、UIButtonを置いたあとにカスタムクラスを設定して下さい。
なお、以下のようにボタンを角丸などにする場合はclipsToBounds = trueを設定しないと波紋がはみ出ます。
