AWS CloudFormation(CFn) ことはじめ。(とりあえずシンプルなEC2インスタンスを立ててみる)
まえおき
- 世のはやりは Infrastructure as Code なのです (博士)
- AWS でもやって当然なのです (助手)
前提
- マネコン(WEB GUI)から EC2 インスタンスを作成できる
- Cloudformation とは
- コンセプト
- 仕組み
目的
- 趣味で AWS いじる範囲だと GUI で EC2 インスタンス建てるのに慣れてしまっていつしか EC2 インスタンスに必要な要素を忘れがちではないですか?
- セキュリティグループ
- デフォルトサブネット有無
- パブリック自動IP付与
- etc ...
- コード化の際にいろいろ気付きもあり、あとでコードを見返せば必要な要素を一覧することもできるという一挙両得
- ひとり適当運用で セキュリティグループ や キーペア ぐっちゃぐちゃに増えていってませんか?
(自分だけ?) - 運用をコード化しつつ見直して行きましょう
今回は CFn の練習がてら EC2 に以下の要素を盛り込んでいきます
- AMI
- Amazon Linux
- タイプ
- t2.micro
- 手元の作業PCのから SSH 接続出来るようにする
- サブネット
- パブリックIP自動付与
- キーペア
- サブネット
- セキュリティグループ
- 22 番ポートが開いている
- IAM プロファイル(適宜)
実行環境
- AWS CLI を利用します
- 適宜 pip 等でインストールして下さい
ref. https://github.com/aws/aws-cli
テンプレートを準備する
- JSON, YAML などで記載します
- 自分で使いやすい方を選びましょう
- JSON は(一般に)コメントが利用できないため、コメントを書き込みたい場合は YAML を選択しましょう
ref. http://docs.aws.amazon.com/ja_jp/AWSCloudFormation/latest/UserGuide/cfn-whatis-concepts.html
1. CFn の構文とプロパティ(EC2インスタンス)
ref. http://docs.aws.amazon.com/ja_jp/AWSCloudFormation/latest/UserGuide/template-formats.html
-
基本は以下の入れ子構造になります
-
Resources
- {リソース名}
- Type
- Properties
- {各プロパティ}
- {リソース名}
-
YAML の場合は以下 (注意: デフォルトサブネットを削除している場合などで以下のサンプルをそのまま使うと失敗します)
Resources:
        myec2instance:
                Type: "AWS::EC2::Instance"
                Properties:
                        ImageId: "ami-859bbfe2" #Amazon Linux AMI
                        InstanceType: "t2.micro"
- JSON の場合は以下のようになります (注意: デフォルトサブネットを削除している場合などで以下のサンプルをそのまま使うと失敗します)
{
"Resources" : {
	"myec2instance" : {
		"Type" : "AWS::EC2::Instance",
		"Properties" : {
			"ImageId" : "ami-859bbfe2",
			"InstanceType" : "t2.micro"
			}
		}
	}
}
2. 必要なプロパティを収集しましょう
| 必要な機能 | プロパティ名 | タイプ | 値 | 種別 |
|---|---|---|---|---|
| AMIイメージID | ImageId | String | ami-859bbfe2 | 既定値 |
| インスタンスタイプ | InstanceType | String | t2.micro | 既定値 |
| サブネットID | SubnetId | String | subnet-f7ea1081 | ユーザ個別 |
| キーペア | KeyName | String | aws-tokyo-default001 | ユーザ個別 |
| セキュリティグループ | SecurityGroupIds | List | sg-f9b58f9e | ユーザ個別 |
| IAMロール名 | IamInstanceProfile | String | ec2-001 | ユーザ個別 |
2-1. AWS CLI (と jq コマンド)を利用すると以下のように AMIイメージID を検索できます
ref. http://docs.aws.amazon.com/cli/latest/reference/ec2/describe-images.html
ref. http://docs.aws.amazon.com/ja_jp/AWSEC2/latest/UserGuide/finding-an-ami.html#finding-an-ami-aws-cli
% aws ec2 describe-images --owners amazon \
--filters "Name=name,Values=amzn-ami-hvm-2017*x86_64-gp2" \
| jq '.Images[] | { Name: .Name, ImageId: .ImageId }'
{
  "Name": "amzn-ami-hvm-2017.03.rc-1.20170327-x86_64-gp2",
  "ImageId": "ami-10207a77"
}
{
  "Name": "amzn-ami-hvm-2017.03.0.20170401-x86_64-gp2",
  "ImageId": "ami-859bbfe2"
}
{
  "Name": "amzn-ami-hvm-2017.03.rc-0.20170320-x86_64-gp2",
  "ImageId": "ami-be154bd9"
}
2-2. サブネットも同様に
ref. http://docs.aws.amazon.com/cli/latest/reference/ec2/describe-subnets.html
% aws ec2 describe-subnets \
| jq '.Subnets[] | { CIDR: .CidrBlock, PublicIPMapping: .MapPublicIpOnLaunch, SubnetId: .SubnetId }'
{
  "CIDR": "172.31.0.192/26",
  "PublicIPMapping": true,
  "SubnetId": "subnet-7bf8a60d"
}
{
  "CIDR": "172.31.0.128/26",
  "PublicIPMapping": true,
  "SubnetId": "subnet-f7ea1081"
}
2-3. キーペア名
ref. http://docs.aws.amazon.com/cli/latest/reference/ec2/describe-key-pairs.html
% aws ec2 describe-key-pairs \
> | jq '.KeyPairs[].KeyName'
"aws-tokyo-default001"
2-4. IAM (以下手抜き)
ref. http://docs.aws.amazon.com/cli/latest/reference/iam/list-roles.html
% aws iam list-roles | jq '.Roles[]'
2-5. セキュリティグループ
ref. http://docs.aws.amazon.com/cli/latest/reference/ec2/describe-security-groups.html
% aws ec2 describe-security-groups | jq '.SecurityGroups[]'
3. テンプレートを書きます
% cat cloudformation-study.json
{
	"Description" : "test template",
	"Resources" : {
		"myec2instance" : {
			"Type" : "AWS::EC2::Instance",
			"Properties" : {
				"ImageId" : "ami-859bbfe2",
				"InstanceType" : "t2.micro",
				"SubnetId" : "subnet-f7ea1081",
				"KeyName" : "aws-tokyo-default001",
				"SecurityGroupIds" : [ "sg-f9b58f9e" ],
				"IamInstanceProfile" : "ec2-001"
			}
		}
	}
}
% cat cloudformation-study.yaml
Resources:
        myec2instance:
                Type: "AWS::EC2::Instance"
                Properties:
                        ImageId: "ami-859bbfe2" #Amazon Linux AMI
                        InstanceType: "t2.micro"
                        SubnetId: "subnet-f7ea1081"
                        KeyName: "aws-tokyo-default001"
                        SecurityGroupIds: [ "sg-f9b58f9e" ]
                        IamInstanceProfile: "ec2-001"
4. では実行します
4-1. ユニークなスタック名を確認します
% aws cloudformation describe-stacks
{
    "Stacks": []
}
4-2. 実行
% aws cloudformation create-stack --stack-name create-ec2-001 --template-body file://cloudformation-study.json
{
    "StackId": "arn:aws:cloudformation:ap-northeast-1:942162428772:stack/create-ec2-001/1b059fa0-1dbc-11e7-9600-50a68a175ad2"
}
4-3. 実行ステータスはマネコン(WEB GUI)か、さきほど実行したコマンドで確認できます
- "StackStatus": "CREATE_COMPLETE" を確認
% aws cloudformation describe-stacks
{
    "Stacks": [
        {
            "StackId": "arn:aws:cloudformation:ap-northeast-1:942162428772:stack/create-ec2-001/1b059fa0-1dbc-11e7-9600-50a68a175ad2",
            "Description": "test template",
            "Tags": [],
            "CreationTime": "2017-04-10T07:05:40.261Z",
            "StackName": "create-ec2-001",
            "NotificationARNs": [],
            "StackStatus": "CREATE_COMPLETE",
            "DisableRollback": false
        }
    ]
}
4-4. EC2 インスタンスが作成されていて、SSH で接続可能なことを確認します
% aws ec2 describe-instances --filter "Name=instance-state-name,Values=running"
% ssh -i "aws-tokyo-default001.pem" ec2-user@ec2-hogehoge.ap-northeast-1.compute.amazonaws.com
5. テンプレートの更新
5-1. AMI イメージID を ami-0099bd67 に変更してみましょう
% aws cloudformation update-stack --stack-name create-ec2-001 --template-body file://cloudformation-study.json
{
    "StackId": "arn:aws:cloudformation:ap-northeast-1:942162428772:stack/create-ec2-001/1b059fa0-1dbc-11e7-9600-50a68a175ad2"
}
% aws cloudformation describe-stacks
{
    "Stacks": [
        {
            "StackId": "arn:aws:cloudformation:ap-northeast-1:942162428772:stack/create-ec2-001/1b059fa0-1dbc-11e7-9600-50a68a175ad2",
            "Description": "test template",
            "Tags": [],
            "CreationTime": "2017-04-10T07:05:40.261Z",
            "StackName": "create-ec2-001",
            "NotificationARNs": [],
            "StackStatus": "UPDATE_IN_PROGRESS",
            "DisableRollback": false,
            "LastUpdatedTime": "2017-04-10T07:20:37.436Z"
        }
    ]
}
5-2. 何が起こったか確認できましたか?
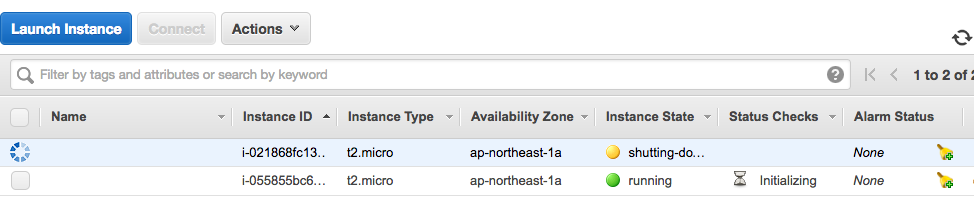
からの
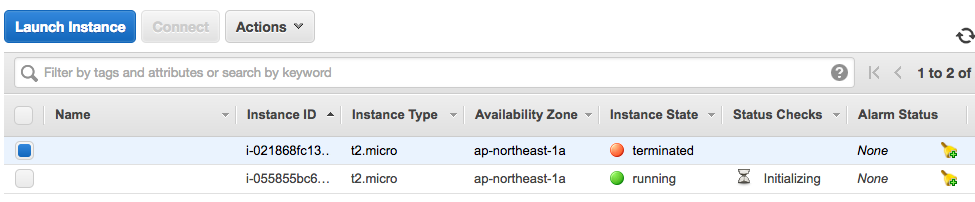
最初に作成した EC2インスタンス は自動シャットダウンからターミネートされ、あたらしい EC2インスタンス が起動しました
5-3. はい、そういうことですね
% aws cloudformation describe-stack-events --stack-name create-ec2-001 \
| jq '.StackEvents[] | { ResourceStatus: .ResourceStatus,Timestamp: .Timestamp }'

(snip)

{
  "ResourceStatus": "DELETE_COMPLETE",
  "Timestamp": "2017-04-10T07:22:47.470Z"
}
{
  "ResourceStatus": "DELETE_IN_PROGRESS",
  "Timestamp": "2017-04-10T07:21:40.963Z"
}

(snip)
6. おわり
7. おまけ
- コードですので github などに置いて差分管理するとなお良いかと
- 認証情報などをコード内に書かないように注意