はじめに
Blazorでレイトレーシングやってたじゃない?ということでBlazorのアドベントカレンダーを紹介していただいたので記事にさせていただきました。
この記事で作成するのは簡単なレイトレーシングにはなりますが、より作りこんでいけば重くなる処理ですのでBlazor WebAssemblyを使用するのが良さそうな分野なのではないかと思います。
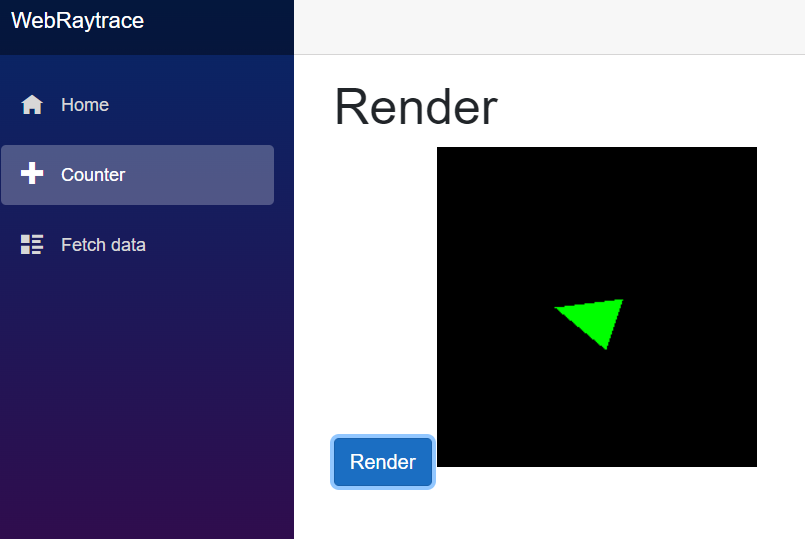
レンダリング結果:
なぜレイトレーシングを書こうかと思ったのかということですが、ディズニーアニメーションスタジオの作品を観ていたらテンションが上がってきたためでした。
今回は、レイトレーシング自体は一回の交差判定のみですのでレイトレーシングのトレーシング感が薄れてしまうかもしれませんが、スタート地点というように解釈していただければ幸いです。
レイトレーシング(Raytracing)とは?
コンピューターによって画像を生成する一つの方法ですが、基本的にはカメラ(目)に入る光をシミュレーションする手法になります。実際のプロダクションで使われるレンダラー(Renderer)は物体に当たった光の反射も含めてレイ(Ray)を追って(Trace)いきますので膨大な計算が必要になります。
この記事では単純にカメラからレイを放出して物体に一回レイが当たるところまでを書いてみます。
処理の流れ
- レンダリング開始のボタンを押すと処理が開始
- カメラから三角形に対してレイを飛ばして交差しているかチェックする
- 交差している場合は緑色で塗りつぶす。(実際にはそこから再度レイを飛ばしたりします)
- レイトレーシングの処理が終わったら、結果をCanvasに書き込む
レイトレーシングの計算
レンダリングを行うRendererクラスです。Renderメソッドで実際のレイと三角形の交差判定を行っています。
using System.Threading.Tasks;

namespace WebRaytrace
{
    public class Renderer
    {
        private Vector3DF[,] pixels;

        public uint[] UIntPixels
        {
            get
            {
                // RGBA
                uint[] uIntPixels = new uint[256 * 256 * (3 + 1)];

                int i = 0;
                for (int y = 0; y < 256; y++)
                {
                    for (int x = 0; x < 256; x++)
                    {
                        uIntPixels[i + 0] = (uint)(pixels[x, y].X * 255.0f);
                        uIntPixels[i + 1] = (uint)(pixels[x, y].Y * 255.0f);
                        uIntPixels[i + 2] = (uint)(pixels[x, y].Z * 255.0f);
                        uIntPixels[i + 3] = 255;
                        i += (3 + 1);
                    }
                }

                return uIntPixels;
            }
        }

        public Renderer()
        {
            pixels = null;
        }

        public void Render()
        {
            pixels = new Vector3DF[256, 256];

            Vector3DF camera = new Vector3DF(0.0f, 0.0f, 64.0f);

            for (int y = -128; y < 128; y++)
            {
                for (int x = -128; x < 128; x++)
                {
                    pixels[x + 128, y + 128] = new Vector3DF(0.0f, 0.0f, 0.0f);


                    Vector3DF screen = new Vector3DF(x, y, 0.0f);

                    Ray ray = new Ray();
                    ray.Direction = (screen - camera);
                    ray.Position = camera;

                    Vector3DF v1 = new Vector3DF(-50.0f, 0.0f, -30.0f);
                    Vector3DF v2 = new Vector3DF(10.0f, 50.0f, -30.0f);
                    Vector3DF v3 = new Vector3DF(30.0f, -10.0f, -30.0f);

                    Intersection intersection = ray.FindIntersectionWithTriangle(v1, v2, v3);
                    if (intersection.HasIntersection == true)
                    {
                        pixels[x + 128, y + 128] = new Vector3DF(0.0f, 1.0f, 0.0f);
                    }
                }
            }
        }
    }
}
レンダリングの処理の実行と結果を画面に表示
index.htmlにJavaScriptでCanvasにレンダリングが完了して受け取ったピクセルの色情報を書き込んでいくメソッドを追加します。
ピクセル情報は1次元の配列で渡していますので、画像のサイズ256x256に合わせて書き込みます。
    <!-- bodyのscriptタグの後などに -->
    <script>
        window.jsMethod = (pixels) => {

            var canvas = document.getElementById('canvas');
            ctx = canvas.getContext('2d');

            var width = 256;
            var height = 256;

            var imageData = ctx.createImageData(width, height);
            var data = imageData.data;

            for (var i = 0; i < data.length; i += 4) {
                data[i + 0] = pixels[i + 0];
                data[i + 1] = pixels[i + 1];
                data[i + 2] = pixels[i + 2];
                data[i + 3] = pixels[i + 3];
            }

            ctx.putImageData(imageData, 0, 0);
        };
    </script>
レンダリングを行うrazorファイルに記述していきます。
@inject IJSRuntime JS
レンダリング開始のボタンとレンダリング先になるCanvasタグを追加します。
<button class="btn btn-primary" @onclick="Render">Render</button>

<canvas id="canvas" width="256", height="256">
JavaScriptにピクセル情報(pixels)を渡しています。JSRuntimeのInvokeVoidAsyncを使用するとJavaScriptのメソッドを呼び出して値を渡すことができます。
@code {
    private async void Render()
    {
        Renderer renderer = new Renderer();
        renderer.Render();

        uint[] pixels = renderer.UIntPixels;
        await JS.InvokeVoidAsync("jsMethod", pixels);
    }
}
おわりに
いかがでしたでしょうか? テンションが上がってきた方はぜひ拡張して楽しんでいただけたらと思います!
(参考用)ベクトルと交差判定に関するコード
レイトレーシングに必要な最小限の(久しぶりに書いた)ベクトルの計算のコードになります。
using System;
using System.Collections.Generic;
using System.Linq;
using System.Threading.Tasks;

namespace WebRaytrace
{
    public struct Vector3DF
    {
        public float X { get; set; }
        public float Y { get; set; }
        public float Z { get; set; }

        public Vector3DF(float x, float y, float z)
        {
            this.X = x;
            this.Y = y;
            this.Z = z;
        }

        public Vector3DF Normalize {
            get
            {
                float length = Length;
                return new Vector3DF(X / length, Y / length, Z / length);
            }
        }

        public static Vector3DF operator +(Vector3DF a, Vector3DF b)
        {
            return new Vector3DF(a.X + b.X, a.Y + b.Y, a.Z + b.Z);
        }

        public static Vector3DF operator -(Vector3DF a, Vector3DF b)
        {
            return new Vector3DF(a.X - b.X, a.Y - b.Y, a.Z - b.Z);
        }

        public static Vector3DF operator *(Vector3DF a, float b)
        {
            return new Vector3DF(a.X * b, a.Y * b, a.Z * b);
        }

        public static Vector3DF operator /(Vector3DF a, float b)
        {
            return new Vector3DF(a.X / b, a.Y / b, a.Z / b);
        }

        public static float operator ^(Vector3DF a, Vector3DF b)
        {
            return (a.X * b.X) + (a.Y * b.Y) + (a.Z * b.Z);
        }

        // Cross Product
        public static Vector3DF operator %(Vector3DF a, Vector3DF b)
        {
            return new Vector3DF(a.Y * b.Z - a.Z * b.Y, a.Z * b.X + a.X * b.Z, a.X * b.Y - a.Y * b.X);
        }

        public float Length
        {
            get
            {
                return MathF.Sqrt(X * X + Y * Y + Z * Z);
            }
        }

        public float LengthPow2
        {
            get
            {
                return X * X + Y * Y + Z * Z;
            }
        }
    }
}
レイのクラスです。交差判定の結果を格納するIntersetionクラスも一緒に書いております。
using System;
using System.Collections.Generic;
using System.Linq;
using System.Threading.Tasks;

namespace WebRaytrace
{
    public struct Intersection
    {
        public bool HasIntersection { get; set; }
        public Vector3DF? Position { get; set; }

        public Intersection(bool hasIntersection, Vector3DF? position)
        {
            HasIntersection = hasIntersection;
            Position = position;
        }
    }
    public struct Ray
    {
        public Vector3DF Position { get; set; }
        public Vector3DF Direction { get; set; }

        public Intersection FindIntersectionWithTriangle(Vector3DF v1, Vector3DF v2, Vector3DF v3)
        {
            // Plane
            Vector3DF n = ((v2 - v1) % (v3 - v1)).Normalize;

            Vector3DF l = this.Direction.Normalize;
            float ln = l ^ n;

            if (ln == 0.0f)
            {
                return new Intersection(false, null);
            }

            float d = ((v1 - Position) ^ n) / ln;

            Vector3DF p = this.Position + (l * d);


            // 三角形の中に交点が存在しているかチェックする
            float triangleArea = ((v2 - v1) % (v3 - v1)).Length;
            float t1 = ((v1 - p) % (v2 - p)).Length;
            float t2 = ((v2 - p) % (v3 - p)).Length;
            float t3 = ((v3 - p) % (v1 - p)).Length;

            float area = triangleArea - (t1 + t2 + t3);

            if (Math.Abs(area) < 0.002f)
            {
                return new Intersection(true, p);
            }

            return new Intersection(false, null);
        }
    }
}