Webブラウザ上で
ファイルツリーを表示させれるものがないかな。。。
と探すと下記のものがヒットしたので使ってみました。
主役
jstree
https://www.jstree.com/
やりたいこと
- ファイルツリーを表示
- ajax で情報を取得する
ということでやっていきましょう。
調査
今回は Perl の Mojolicious を使って
webアプリ(cgi)で作っていきます。
まず jstree に情報を流し込むときに
どのようなデータを渡せばいいかというのを調査します。
Home > JSON data
https://www.jstree.com/docs/json/
上記ページにいろいろ書いてありますね。
ファイルから読み込む方法 や データを渡す方法・・・
今回は、データを渡して処理してもらう方法 にて対応します。
Using JSON > Using the alternative JSON format
$('#using_json_2').jstree({ 'core' : {
    'data' : [
       { "id" : "ajson1", "parent" : "#", "text" : "Simple root node" },
       { "id" : "ajson2", "parent" : "#", "text" : "Root node 2" },
       { "id" : "ajson3", "parent" : "ajson2", "text" : "Child 1" },
       { "id" : "ajson4", "parent" : "ajson2", "text" : "Child 2" },
    ]
} });
親子構造を作る関係で
id にはユニークな名前を付けてあげる。(ファイル名ではない)
parent に親の id を指定してあげる。
根本となるところ(root)には # を指定する。
text はファイル名を指定する。
使い方は、Overview あたりに書いてありますね。
https://www.jstree.com/
- jstreeのテーマを入れる(head > link(css))
- ツリーを表示させるところを作る(body > div)
- jQueryを入れる(head > script)
- jstreeを入れる(head > script)
- インスタンスをつくる(script)
コーディング
データ構造はperl側で作ります。
windows環境で作成しています。
事前準備
- perlをインストール
- Mojolicious の準備
- 下記のコマンドを実行
cpanm Mojolicious
- 参考
- 下記のコマンドを実行
実装
まずは、Mojolicius でサーバーサイドの動きを定義していきます。
# !perl
use strict;
use warnings;
use utf8;
use Mojolicious::Lite;
use lib qw(lib);

get '/' => sub {
    my $self = shift;
    $self->render;
} => 'index';

push @{app->static->paths}, 'public';

app->start;

__DATA__

@@index.html.ep
% layout 'default';
ここにコンテンツをいれる。
<div id="tree"></div>

@@ layouts/default.html.ep
<!doctype html>
<html lang="ja">
<head>
    <meta charset="UTF-8">
    <meta http-equiv="X-UA-Compatible" content="IE=edge"/>
    <%= stylesheet '/css/jstree/default/style.css' %>
    <%= javascript '/js/jquery-3.5.1.min.js' %>
    <%= javascript '/js/jstree.min.js' %>
    <title>ページタイトル</title>
</head>
<body>
<%== content %>
</body>
</html>
使うファイルを準備していきます。
- jstree
-
https://www.jstree.com/
- Download
-
https://www.jstree.com/
- jQuery
-
https://jquery.com/download/
- jQuery
Download the compressed, production jQuery *.*.*
- jQuery
-
https://jquery.com/download/
ファイル構造を読み取る先としてtestdataの中に適当なファイルをいれてます。
│  index.cgi
│
├─public
│  ├─css
│  │  │
│  │  └─jstree
│  │      ├─default
│  │      │      32px.png
│  │      │      40px.png
│  │      │      style.css
│  │      │      style.min.css
│  │      │      throbber.gif
│  │      │
│  │      └─default-dark
│  │              32px.png
│  │              40px.png
│  │              style.css
│  │              style.min.css
│  │              throbber.gif
│  │
│  └─js
│          jquery-3.5.1.min.js
│          jstree.min.js
│
└─testdata
    │  a.txt
    │  b.txt
    │
    └─hoge
        └─  c.txt
上記のファイルが準備できたら、準備は完了。
morbo index.cgi
でサーバーを立ち上げて、動くか見てみましょう。
$ morbo index.cgi
Web application available at http://127.0.0.1:3000
ブラウザで http://127.0.0.1:3000 にアクセスするとページが表示されます。
perl側でファイルの構造を作る。
※ここは好きな方法で取得してください
testdata に入れたファイル構造を jstree の data に形に変えていきます。
まずは小さなスクリプトとして動作を試してみます。
use strict;
use warnings;
use utf8;
use File::Find::Rule;
use Digest::SHA qw/sha256_hex/;
use Encode;
use Path::Tiny;
use JSON::PP;

my @files = File::Find::Rule->file()->in("testdata");

my $dirs = {};
my @data = ();

foreach my $file (map {path($_)} @files) {
    my $dir = $file->parent->stringify;
    if (not exists $dirs->{$dir}) {
        &add_dir_hash($dirs, $dir, \@data);
    }

    my $filepath = encode("cp932", $file->stringify);
    my $filename = $file->basename;
    my $id = substr sha256_hex($filepath), 0, 10;
    if ($dir eq "" or $dir eq ".") {
        push @data, {id => $id, parent => "#", text => $filename, icon => "jstree-file"};
    } else {
        push @data, {id => $id, parent => $dirs->{$dir}, text => $filename, icon => "jstree-file"};
    }
}
my $json = JSON::PP->new->pretty->canonical;
print $json->encode({data => \@data});

sub add_dir_hash {
    my $dirs = shift;
    my $dir  = shift;
    my $data = shift;

    return if $dir eq "" or $dir eq ".";

    if (exists $dirs->{$dir}) {
        return;
    }
    $dirs->{$dir} = substr sha256_hex(encode("cp932", $dir)), 0, 10;

    my $parent = path($dir)->parent->stringify;
    if ($parent eq ".") {
        push @$data, {id => $dirs->{$dir}, parent => "#", text => $dir};
        return;
    }

    if (not exists $dirs->{$parent}) {
        &add_dir_hash($dirs, $parent, $data);
    }
    push @$data, {id => $dirs->{$dir}, parent => $dirs->{$parent}, text => path($dir)->basename};
}
{
   "data" : [
      {
         "id" : "810ff2fb24",
         "parent" : "#",
         "text" : "testdata"
      },
      {
         "icon" : "jstree-file",
         "id" : "ba5f89d91f",
         "parent" : "810ff2fb24",
         "text" : "a.txt"
      },
      {
         "icon" : "jstree-file",
         "id" : "aa902bf366",
         "parent" : "810ff2fb24",
         "text" : "b.txt"
      },
      {
         "id" : "fa7f80ff87",
         "parent" : "810ff2fb24",
         "text" : "hoge"
      },
      {
         "icon" : "jstree-file",
         "id" : "e2df894515",
         "parent" : "fa7f80ff87",
         "text" : "c.txt"
      }
   ]
}
ファイルとなる部分に"icon" : "jstree-file"を入れています。
ディレクトリパスをハッシュに置き換えてユニークなidを作って
結び付けているという方法を取ってますが、この辺は好きな方法で。。。
ファイル構造が作れたので、あとはブラウザで受け取る側を作ります。
ページ送る時にデータ埋め込んでも送り返す方が簡単のですが、
あとでファイルの構造を書き換えたりしたいので、ajaxを作って非同期で取得します。
public/js/read_tree.js という自分が書いたものを入れていきます。
$(function () {
    $('#tree').jstree();

    // ページ読み込み後に実行
    $(document).ready(function () {
        redraw_tree();
    });
});

function redraw_tree(hash) {
    $.ajax({
        type: "get",
        url: "/get_files_data",
        dataType: "json",
        success: function (data) {
            // 通信成功時
            $('#tree').jstree(true).settings.core.data = data;
            $('#tree').jstree(true).refresh();
        },
        error: function () {
            // 通信失敗時
            alert("Server Error. Please try again later.");
        },
        complete: function () {
            // 通信終了時の処理
        }
    });
}
index.cgi に /js/read_tree.js を追加しておきます。
__DATA__

@@index.html.ep
% layout 'default';
ここにコンテンツをいれる。
<div id="tree"></div>

@@ layouts/default.html.ep
<!doctype html>
<html lang="ja">
<head>
    <meta charset="UTF-8">
    <meta http-equiv="X-UA-Compatible" content="IE=edge"/>
    <%= stylesheet '/css/jstree/default/style.css' %>
    <%= javascript '/js/jquery-3.5.1.min.js' %>
    <%= javascript '/js/jstree.min.js' %>
    <%= javascript '/js/read_tree.js' %>
    <title>ページタイトル</title>
</head>
<body>
<%== content %>
</body>
</html>
index.cgi に /get_files_data と先ほどの処理を追加します。
get '/get_files_data' => sub {
    my $self = shift;
    $self->render(json => get_files_data());
};

sub get_files_data {
    my @files = File::Find::Rule->file()->in("testdata");

    my $dirs = {};
    my @data = ();

    foreach my $file (map {path($_)} @files) {
        my $dir = $file->parent->stringify;
        if (not exists $dirs->{$dir}) {
            &add_dir_hash($dirs, $dir, \@data);
        }

        my $filepath = encode("cp932", $file->stringify);
        my $filename = $file->basename;
        my $id = substr sha256_hex($filepath), 0, 10;
        if ($dir eq "" or $dir eq ".") {
            push @data, {id => $id, parent => "#", text => $filename, icon => "jstree-file"};
        } else {
            push @data, {id => $id, parent => $dirs->{$dir}, text => $filename, icon => "jstree-file"};
        }
    }
    return \@data;
}

sub add_dir_hash {
    my $dirs = shift;
    my $dir  = shift;
    my $data = shift;

    return if $dir eq "" or $dir eq ".";

    if (exists $dirs->{$dir}) {
        return;
    }
    $dirs->{$dir} = substr sha256_hex(encode("cp932", $dir)), 0, 10;

    my $parent = path($dir)->parent->stringify;
    if ($parent eq ".") {
        push @$data, {id => $dirs->{$dir}, parent => "#", text => $dir};
        return;
    }

    if (not exists $dirs->{$parent}) {
        &add_dir_hash($dirs, $parent, $data);
    }
    push @$data, {id => $dirs->{$dir}, parent => $dirs->{$parent}, text => path($dir)->basename};
}
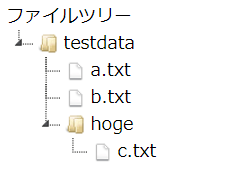
いい感じに表示できました。(ファイルツリーを展開した後)
上級者向け
詳細な説明を割愛しています。
チェックボックスを付ける
    $('#tree').jstree({
        "plugins" : [
            "checkbox",
        ]
    });
plugin 指定するだけで完了。
全チェック・解除
ボタン作ってイベントに処理をつける。
    $('#select_all_btn').click(function () {
        $("#tree").jstree(true).check_all();
        $("#tree").jstree(true).refresh();
    });

    $('#unselect_all_btn').click(function () {
        $("#tree").jstree(true).uncheck_all();
        $("#tree").jstree(true).refresh();
    });
選択したファイルパスを取得
ディレクトリパスは除いてます。
    var selectedElms = $('#tree').jstree("get_selected", true);
    var files = [];
    $.each(selectedElms, function(index, element){
        var path = [];
        if ($("#" + element.id).hasClass("jstree-leaf") == false) {
            // directory path
            return true;
        }

        path.push(element.text);
        $.each(element.parents, function (i, e) {
            if (e != "#") {
                path.push($("#" + e + "_anchor").text());
            }
        });
        files.push(path.reverse().join("/"));
    });
まとめ
簡単にきれいなファイルツリーが表示できました。
チェックボックスを付けて
選択された情報が取れるといろいろ幅が広がりそうですね。
またチャレンジしてみてくださいね。