1 はじめに
Code_Asterの並列化の手順を説明していきます。
以下のサイトを参考にしながら進めてきましたが、試行錯誤の末ようやくインストールできました。
同じ所でつまづいている方がいるかもしれないので、解決方法の一例を共有します。
・code_aster 14.4 parallel version with PETSc
・Code_Asterの並列化 12.6
2 環境
OS : Ubuntu18.04LTS
Python 3.6.9
3 準備
/optにインストールするので、/optをrootからログインユーザの所有に変えておきます。
$ sudo chown username /opt #usernameにユーザ名を入れる
次に並列版Code_Asterの構築に必要なパッケージをインストールしておきます。
$ sudo apt install gfortran g++ python-dev python-numpy liblapack-dev libblas-dev tcl tk zlib1g-dev bison flex checkinstall openmpi-bin libx11-dev cmake grace gettext libboost-all-dev swig libsuperlu-dev
次にソースからのビルドが必要なパッケージを以下のサイトからダウンロードして、適当なディレクトリ(~/software)内に置いておきます。
| パッケージ | バージョン | ダウンロード先 |
|---|---|---|
| Code_Aster | aster-full-src-14.4.0-1.noarch.tar.gz | https://www.code-aster.org |
| OpenBLAS | OpenBLAS-0.2.20.tar.gz | https://github.com/xianyi/OpenBLAS/ |
| ScaLAPACK | scalapack_installer.tgz | http://www.netlib.org/scalapack/#_scalapack_installer_for_linux |
| Parmetis | parmetis-4.0.3.tar.gz | http://glaros.dtc.umn.edu/gkhome/metis/parmetis/download |
| Petsc | petsc-3.9.4.tar.gz | https://www.mcs.anl.gov/petsc/download/index.html |
4 OpenBLAS
まずは解凍してインストールしていきます。
$ cd ~/software
$ tar xvzf OpenBLAS-0.2.20.tar.gz
$ cd OpenBLAS-0.2.20
$ make NO_AFFINITY=1 USE_OPENMP=1
$ make PREFIX=/opt/OpenBLAS install
共有ライブラリの検索パスにOpenBLASを追加しておきます。
$ echo /opt/OpenBLAS/lib | sudo tee -a /etc/ld.so.conf.d/openblas.conf
$ sudo ldconfig
5 Code_Aster with OpenBLAS
Code_Asterを並列化するためには、先に通常版をインストールする必要があります。
まずは解凍します。
$ cd ~/software
$ tar xvzf aster-full-src-14.4.0-1.noarch.tar.gz
$ cd aster-full-src-14.4.0
次にsetup.cfgファイルの中身を編集します。
PREFER_COMPILERをGNUからGNU_without_MATHに変更し、さらにMATHLIBに対して先ほどインストールしたOpenBLASを指定します。
$ sed -i "s:PREFER_COMPILER\ =\ 'GNU':PREFER_COMPILER\ =\'GNU_without_MATH'\nMATHLIB=\ '/opt/OpenBLAS/lib/libopenblas.a':g" setup.cfg
/opt/asterにインストールします。
$ python3 setup.py install –-prefix=/opt/aster
途中で色々と質問されますが、全てyesにします。
インストール完了後、動作確認をします。
$ /opt/aster/bin/as_run --vers=14.4 --test forma01a
エラーが出なければOKです。
並列計算用のホストファイルを作成しておきます。別のマシンとクラスターを組む場合は、同様の書式で追加していくと良いそうです。
$ echo "$HOSTNAME cpu=$(cat /proc/cpuinfo | grep processor | wc -l)" > /opt/aster/etc/codeaster/mpi_hostfile
TIPS
setup.pyの実行中に[FAILED]が表示される
筆者の環境では、既にpipを使ってnumpyをインストール済みの場合に発生しているようでした。
その時はpip3 uninstall numpyでnumpyを一旦完全に削除⇒sudo apt install python-numpyでnumpyをインストール⇒Code_Asterのインストール実行、で試してみてください。
6 ScaLAPACK
解凍してインストールしていきます。
$ cd ~/software
$ tar xvzf scalapack_installer.tgz
$ cd scalapack_installer
$ ./setup.py --lapacklib=/opt/OpenBLAS/lib/libopenblas.a --mpicc=mpicc --mpif90=mpif90 --mpiincdir=/usr/lib/x86_64-linux-gnu/openmpi/include --ldflags_c=-fopenmp --ldflags_fc=-fopenmp --prefix=/opt/scalapack
ログの最後に
BLACS: error running BLACS test routines xCbtest
BLACS: Command  -np 4 ./xCbtest
stderr:
**************************************
/bin/sh: 1: -np: not found
**************************************
と表示されますが、/opt/scalapack/lib/libscalapack.a のファイルが作成されていれば成功です。
TIPS
scalapackのダウンロードに失敗する場合
- 公式サイトからscalapack-2.0.0.tgzをダウンロード
- ~/software/scalapack_installer/build/ に scalapack.tgz と名前を変更して配置 ⇒ 再度 setup.py を実行してください。
7 Parmetis
まずは解凍します。
$ cd ~/software
$ tar xvzf parmetis-4.0.3.tar.gz
$ cd parmetis-4.0.3
次に metis/include/metis.h のファイルの一部を書き換えて、64bitモードでコンパイルするように変更します。
$ sed -i -e 's/#define IDXTYPEWIDTH 32/#define IDXTYPEWIDTH 64/' metis/include/metis.h
インストールします。
$ make config prefix=/opt/parmetis-4.0.3
$ make
$ make install
次に動作確認をしてみます。
$ cd Graphs
$ mpirun -np 4 /opt/parmetis-4.0.3/bin/parmetis rotor.graph 1 6 1 1 6 1
エラーが出なければ成功です。
8 Scotch
まず、~/software/aster-full-src-14.4.0/SRC に含まれているscotch-6.0.4-aster7.tar.gz を/opt に移動して解凍します。
$ cp ~/software/aster-full-src-14.4.0/SRC/scotch-6.0.4-aster7.tar.gz /opt
$ cd /opt
$ tar xvzf scotch-6.0.4-aster7.tar.gz
$ cd scotch-6.0.4/src
次に src/ に含まれている Makefile.inc を以下のように編集します。
**Makefile.inc**(クリックして表示)
EXE		=
LIB		= .a
OBJ		= .o

MAKE	= make
AR		= ar
ARFLAGS	= -ruv
CAT		= cat
CCS		= gcc
CCP		= mpicc
CCD		= gcc
CFLAGS	= -O3 -fPIC -DINTSIZE64 -DCOMMON_FILE_COMPRESS_GZ -DCOMMON_PTHREAD -DCOMMON_RANDOM_FIXED_SEED -DSCOTCH_RENAME -DSCOTCH_RENAME_PARSER -Drestrict=__restrict
CLIBFLAGS	=
LDFLAGS	= -fPIC -lz -lm -pthread -lrt
CP		= cp
LEX		= flex -Pscotchyy -olex.yy.c
LN		= ln
MKDIR	= mkdir
MV		= mv
RANLIB	= ranlib
YACC	= bison -pscotchyy -y -b y
ビルドして動作確認をします。
$ make scotch esmumps ptscotch ptesmumps CCD=mpicc
$ make check
$ make ptcheck
9 MUMPS
これについても、~/software/aster-full-src-14.4.0/SRC に含まれている mumps-5.1.2-aster6.tar.gz を/opt に移動して解凍します。
$ cp ~/software/aster-full-src-14.4.0/SRC/mumps-5.1.2-aster6.tar.gz /opt
$ cd /opt
$ tar xvzf mumps-5.1.2-aster6.tar.gz
$ cd mumps-5.1.2
Makefile.inc を環境に合わせて編集します。
基になるファイルが Makefile.inc/ ディレクトリに準備されていますのでコピーします。
$ cp Make.inc/Makefile.debian.PAR ./Makefile.inc
ライブラリの指定などを環境に合わせて修正します。
**Makefile.inc**(クリックして表示)
#  This file is part of MUMPS 5.1.2, released
#  on Mon Oct  2 07:37:01 UTC 2017
# These settings for a PC under Debian/linux with standard packages :
# metis (parmetis), scotch (ptscotch), openmpi, gfortran
# packages installation :
# apt-get install libmetis-dev libparmetis-dev libscotch-dev libptscotch-dev libatlas-base-dev openmpi-bin libopenmpi-dev lapack-dev

# Begin orderings
LSCOTCHDIR = /opt/scotch-6.0.4/lib/
ISCOTCH    = -I/opt/aster/public/metis-5.1.0/include -I/opt/parmetis-4.0.3/include -I/opt/scotch-6.0.4/include
LSCOTCH   = -L$(LSCOTCHDIR) -lptesmumps -lptscotch -lscotch -lptscotcherr -lptscotcherrexit -lptscotchparmetis

LPORDDIR = $(topdir)/PORD/lib/
IPORD    = -I$(topdir)/PORD/include/
LPORD    = -L$(LPORDDIR) -lpord

LMETISDIR = /opt/parmetis-4.0.3/lib/
IMETIS    = -I/opt/parmetis-4.0.3/include/
LMETIS    = -L$(LMETISDIR) -L/opt/aster/public/metis-5.1.0/lib -lparmetis -lmetis

# Corresponding variables reused later
ORDERINGSF = -Dmetis -Dpord -Dparmetis -Dscotch -Dptscotch
ORDERINGSC  = $(ORDERINGSF)

LORDERINGS = $(LMETIS) $(LPORD) $(LSCOTCH)
IORDERINGSF = $(ISCOTCH)
IORDERINGSC = $(IMETIS) $(IPORD) $(ISCOTCH)
# End orderings
################################################################################
PLAT    =
LIBEXT  = .a
OUTC    = -o
OUTF    = -o
RM = /bin/rm -f
CC = mpicc
FC = mpif90
FL = mpif90
AR = ar vr
RANLIB = echo
LAPACK = /opt/OpenBLAS/lib/libopenblas.a
SCALAP = /opt/scalapack/lib/libscalapack.a
INCPAR = -I/usr/lib/x86_64-linux-gnu/openmpi/include
LIBPAR = $(SCALAP) $(LAPACK) -L/usr/lib/x86_64-linux-gnu/openmpi/lib -lmpi
INCSEQ = -I$(topdir)/libseq
LIBSEQ  = $(LAPACK) -L$(topdir)/libseq -lmpiseq
LIBBLAS = -L/opt/OpenBLAS/lib -lopenblas
LIBOTHERS = -L/usr/lib/x86_64-linux-gnu -lpthread -lutil -ldl

# Preprocessor defs for calling Fortran from C (-DAdd_ or -DAdd__ or -DUPPER)
CDEFS   = -DAdd_

# Begin Optimized options
# uncomment -fopenmp in lines below to benefit from OpenMP
OPTF    = -O -fPIC -DPORD_INTSIZE64 -fopenmp
OPTL    = -O -fopenmp
OPTC    = -O -fPIC -fopenmp
# End Optimized options

INCS = $(INCPAR)
LIBS = $(LIBPAR)
LIBSEQNEEDED =
ビルドして動作確認を行います。
$ make all
$ cd examples
$ mpirun -np 4 ./ssimpletest < input_simpletest_real
エラーが出なければOKです。
10 Petsc
まずは /opt で解凍します。
$ cd /opt
$ tar xvzf ~/software/petsc-3.9.4.tar.gz
$ cd petsc-3.9.4
次に/opt/petsc-3.9.4/config/BuildSystem/config/packages にある metis.py ファイルを開き、43~48行目をコメントアウトします。
以下の部分になります。
def configureLibrary(self):
    config.package.Package.configureLibrary(self)
    oldFlags = self.compilers.CPPFLAGS
    self.compilers.CPPFLAGS += ' '+self.headers.toString(self.include)
#    if not self.checkCompile('#include "metis.h"', '#if (IDXTYPEWIDTH != '+ str(self.getDefaultIndexSize())+')\n#error incompatible IDXTYPEWIDTH\n#endif'):
#      if self.defaultIndexSize == 64:
#        msg= '--with-64-bit-indices option requires a metis build with IDXTYPEWIDTH=64.\n'
#      else:
#        msg= 'IDXTYPEWIDTH=64 metis build appears to be specified for a default 32-bit-indices build of PETSc.\n'
#      raise RuntimeError('Metis specified is incompatible!\n'+msg+'Suggest using --download-metis for a compatible metis')

    self.compilers.CPPFLAGS = oldFlags
    return
さらにOpenMPIのライブラリをLD_LIBRARY_PATHに登録してから、configure を実行します。
$ export LD_LIBRARY_PATH=/usr/lib/x86_64-linux-gnu/openmpi/lib/:$LD_LIBRARY_PATH
$./configure --with-debugging=0 COPTFLAGS=-O CXXOPTFLAGS=-O FOPTFLAGS=-O --with-shared-libraries=0 --with-scalapack-dir=/opt/scalapack --PETSC_ARCH=linux-metis-mumps --with-metis-dir=/opt/aster/public/metis-5.1.0 --with-parmetis-dir=/opt/parmetis-4.0.3 --with-ptscotch-dir=/opt/scotch-6.0.4 --LIBS="-lgomp" --with-mumps-dir=/opt/mumps-5.1.2 -with-x=0 --with-blas-lapack-lib=[/opt/OpenBLAS/lib/libopenblas.a] --download-hypre=yes --download-ml=yes
TIPS
hypre のダウンロードが上手くいかない場合
-
ダウンロード先であるgithubのURLを教えてくれますが、そのリポジトリは存在していない模様...
-
Ubuntuのlaunchpadに登録されてありますので、そちらからダウンロードできます(ファイル名:hypre_2.14.0.orig.tar.gz)。
hypre 2.14.0-5build1 source package in Ubuntu -
ダウンロードしたら、/opt に置いておきます。
-
その後、
--download-hypre=yesの部分を--download-hypre=/opt/hypre_2.14.0.orig.tar.gzに変更して再度 configure を実行してみて下さい。
ml のダウンロードが上手くいかない場合
-
こちらは指定されたURLからのダウンロードは可能です。ダウンロードして/optに配置します。(ファイル名:petsc-pkg-ml-e5040d11aa07.zip)
bitbucket pkg-ml -
hypre と同様で、
--download-ml=yesの部分を--download-ml=/opt/petsc-pkg-ml-e5040d11aa07.zipに変更して再度 configure を実行します。
無事に configure が完了したら、make を実行します。
$ make PETSC_DIR=/opt/petsc-3.9.4 PETSC_ARCH=linux-metis-mumps all
$ make PETSC_DIR=/opt/petsc-3.9.4 PETSC_ARCH=linux-metis-mumps check
11 並列版Code_Aster
/opt/aster/etc/codeaster/asrunをテキストエディタで開いて、mpi_get_procid_cmdの部分を書き換えます。
mpi_get_procid_cmd : echo $OMPI_COMM_WORLD_RANK
Code_Aster のソースファイル内に並列版Code_Aster のソースファイルがありますので、まずは解凍します。
$ cd ~/software/aster-full-src-14.4.0/SRC
$ tar xfvz aster-14.4.0.tgz
$ cd aster-14.4.0
上記のディレクトリ内の waftools/mathematics.py の362~364行目をコメントアウトします。
以下の部分になります。
# program testing a blacs call, output is 0 and 1
blacs_fragment = r"""
program test_blacs
    integer iam, nprocs
#    call blacs_pinfo (iam, nprocs)
#    print *,iam
#    print *,nprocs
end program test_blacs
"""
次に、Ubuntu_gnu_mpi.py と Ubuntu_gnu.py を作成して、現在のディレクトリ内(~/software/aster-full-src-14.4.0/SRC/aster-14.4.0)に配置します。
**Ubuntu_gnu_mpi.py**(クリックして表示)
# encoding: utf-8

"""
Fichier de configuration WAF pour version parallティle sur Ubuntu 13.6 :
- Compilateur : GNU
- MPI         : systティme (OpenMPI, Ubuntu 13.6)
- BLAS        : OpenBLAS
- Scalapack   : systティme (Ubuntu 13.6)
- PETSc       :
"""

import Ubuntu_gnu

def configure(self):
    opts = self.options
    Ubuntu_gnu.configure(self)

    self.env.prepend_value('LIBPATH', [
        '/opt/petsc-3.9.4/linux-metis-mumps/lib',
        '/opt/parmetis-4.0.3/lib',
        '/opt/mumps-5.1.2/lib',])

    self.env.prepend_value('INCLUDES', [
        '/opt/petsc-3.9.4/linux-metis-mumps/include',
        '/opt/petsc-3.9.4/include',
        '/usr/include/superlu',
        '/opt/parmetis-4.0.3/include',
        '/opt/mumps-5.1.2/include',])

    self.env.append_value('LIB', ('X11',))

    opts.parallel = True

    opts.enable_mumps  = True
    opts.mumps_version = '5.1.2'
    opts.mumps_libs = 'dmumps zmumps smumps cmumps mumps_common pord metis scalapack openblas esmumps scotch scotcherr'
#    opts.embed_mumps = True

    opts.enable_petsc = True
    opts.petsc_libs='petsc HYPRE ml'
#    opts.petsc_libs='petsc'
#    opts.embed_petsc = True

#    opts.enable_parmetis  = True
    self.env.append_value('LIB_METIS', ('parmetis'))
    self.env.append_value('LIB_SCOTCH', ('ptscotch','ptscotcherr','ptscotcherrexit','ptesmumps'))
**Ubuntu_gnu.py**(クリックして表示)
# encoding: utf-8

"""
Fichier de configuration WAF pour version sテゥquentielle sur Ubuntu 13.6 :
- Compilateur : GNU
- BLAS        : OpenBLAS
"""
import os

def configure(self):
    opts = self.options

    # mfront path
#    self.env.TFELHOME = '/opt/tfel-3.2.0'

    self.env.append_value('LIBPATH', [
        '/opt/aster/public/hdf5-1.10.3/lib',
        '/opt/aster/public/med-4.0.0/lib',
        '/opt/aster/public/metis-5.1.0/lib',
        '/opt/scotch-6.0.4/lib',
        '/opt/OpenBLAS/lib',
        '/opt/scalapack/lib',])
#        '/opt/tfel-3.2.0/lib',

    self.env.append_value('INCLUDES', [
        '/opt/aster/public/hdf5-1.10.3/include',
        '/opt/aster/public/med-4.0.0/include',
        '/opt/aster/public/metis-5.1.0/include',
        '/opt/scotch-6.0.4/include',
        '/opt/OpenBLAS/include',
        '/opt/scalapack/include',])
#        '/opt/tfel-3.2.0/include',

    opts.maths_libs = 'openblas superlu'
#    opts.embed_math = True

    opts.enable_hdf5 = True
    opts.hdf5_libs  = 'hdf5 z'
#    opts.embed_hdf5 = True

    opts.enable_med = True
    opts.med_libs  = 'med stdc++'
#    opts.embed_med  = True

    opts.enable_mfront = False

    opts.enable_scotch = True
#    opts.embed_scotch  = True

    opts.enable_homard = True
#    opts.embed_aster    = True
#    opts.embed_fermetur = True

    # add paths for external programs
#    os.environ['METISDIR'] = '/opt/aster/public/metis-5.1.0'
#    os.environ['GMSH_BIN_DIR'] = '/opt/aster/public/gmsh-3.0.6-Linux/bin'
    os.environ['HOMARD_ASTER_ROOT_DIR'] = '/opt/aster/public/homard-11.12'

    opts.with_prog_metis = True
#    opts.with_prog_gmsh = True
    # salome: only required by few testcases
    # europlexus: not available on all platforms
#    opts.with_prog_miss3d = True
    opts.with_prog_homard = True
#    opts.with_prog_ecrevisse = True
    opts.with_prog_xmgrace = True
準備ができたらインストールしていきます。
$ export ASTER_ROOT=/opt/aster
$ export PYTHONPATH=/$ASTER_ROOT/lib/python3.6/site-packages/:$PYTHONPATH
$ ./waf configure --use-config-dir=$ASTER_ROOT/14.4/share/aster --use-config=Ubuntu_gnu_mpi --prefix=$ASTER_ROOT/PAR14.4MUPT
$ ./waf install -p --jobs=1
完了したら、ASTKで並列版Code_Asterが使用できるように14.4MUPTという名前で登録します。
/opt/aster/etc/codeaster/ に aster というファイルがありますので、それの最後の行に以下のように追加します。
# Code_Aster versions
# versions can be absolute paths or relative to ASTER_ROOT
# examples : NEW11, /usr/lib/codeaster/NEW11

# default version (overridden by --vers option)
default_vers : stable

# available versions
# DO NOT EDIT FOLLOWING LINE !
# ?vers : VVV?
vers : stable:/opt/aster/14.4/share/aster
vers : 14.4MUPT:/opt/aster/PAR14.4MUPT/share/aster
以上で全て完了です。
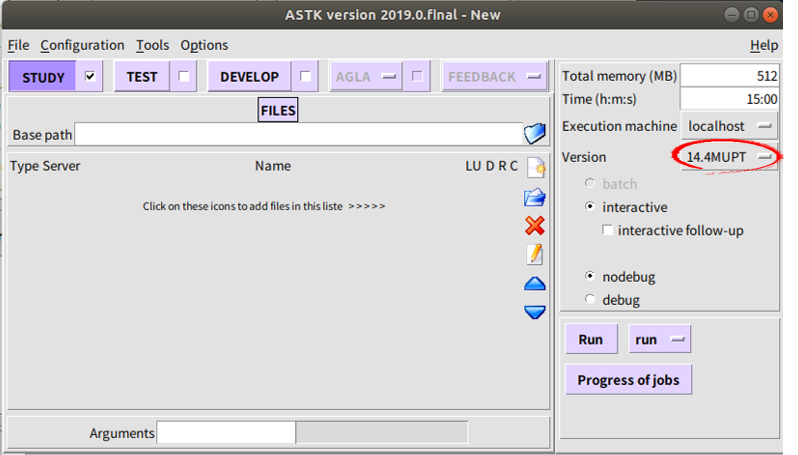
ASTKを起動すると、Version タブの中に14.4MUPTが新たに追加されて選択できるようになります。
お疲れさまでした!
情報を公開してくれている方、ありがとうございました。