この記事でやろうとしていること
タイトルの通りですが、Amazon LinuxインスタンスにRails6.0.3をインストールするまでの流れです。
なぜRails6.0.3か?というのは、おなじみ「Railsチュートリアル」の第6版で指定されているバージョンだから、というだけです。
RailsチュートリアルではAWSの統合開発環境 (IDE)「Cloud9」の利用を前提としています。Cloud9はRailsをインストールする上での前提パッケージが既に入っているので、
$ gem install rails -v 6.0.3
と叩くだけですんなりRailsが入ってくれますが、一歩cloud9という温室から外に出るとそうはいきません。
というわけで、何番煎じかはわかりませんが、少なくとも筆者はいろいろググって何とか解決したので、需要はあるはず。さっそく解説に入っていきます。
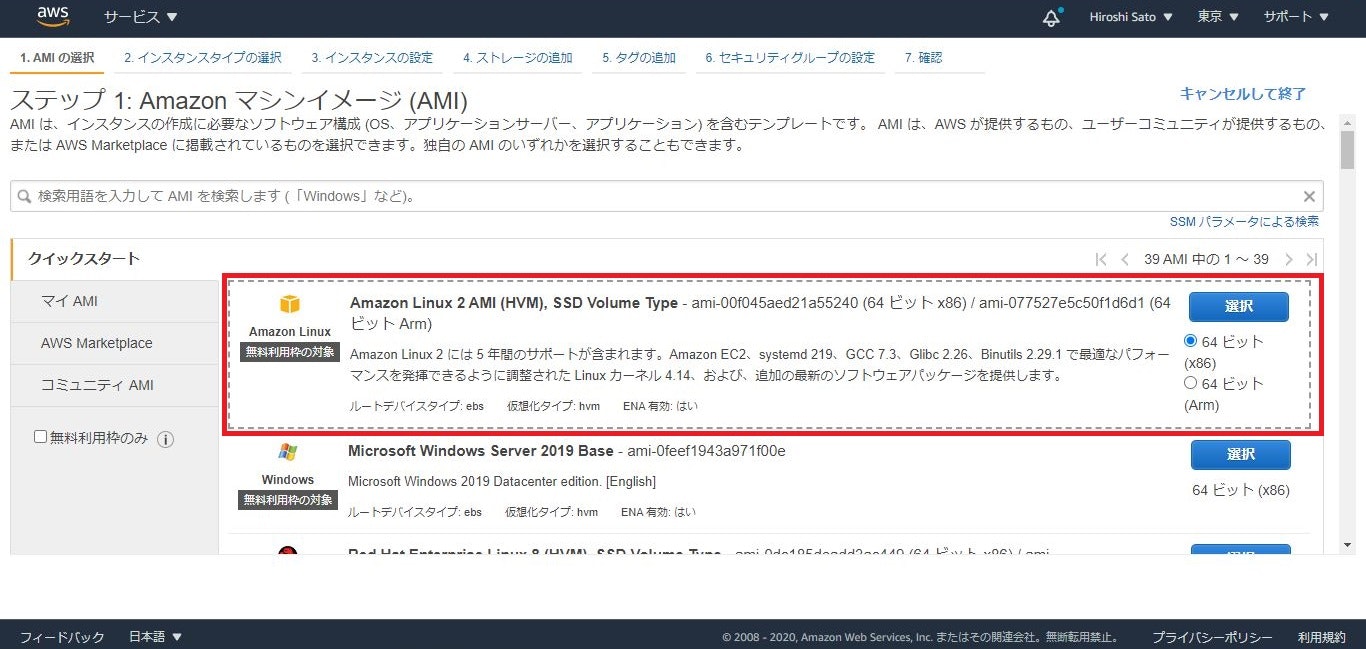
まず、Amazon Linuxインスタンスの詳細は↓の通り。普通にEC2インスタンスをデプロイする際の一番最初に出てくるやつです。
Gitインストール
まずはGitをインストールする必要があります。
後述の手順で、Gitレポジトリをクローンしていろいろとインストールするためです。
ここは特に迷いなく、
# yum install git
でOKです。
rbenvインストール
rbenvとは、複数のRubyのバージョンを管理し、プロジェクトごとにRubyのバージョンを指定して使うことを可能としてくれるツールです。
また、(本記事においてはここが重要なのですが)Rubyのインストールもサポートしてくれます。
基本的にはGitHubのrbenvレポジトリのREADMEに書いている通りに従う流れですが、
Gitレポジトリをクローン
# git clone https://github.com/rbenv/rbenv.git ~/.rbenv
ディレクトリ移動後、ソースからインストール
# cd ~/.rbenv && src/configure && make -C src
warning: gcc not found; using CC=cc
aborted: compiler not found: cc
と、gccがインストールされていないとコケてしまいますので、
# yum install gcc
でインストールしてから、再度ソースインストールしましょう。
# cd ~/.rbenv && src/configure && make -C src
rbenvインストール完了後も引き続きREADMEに従って、
# echo 'export PATH="$HOME/.rbenv/bin:$PATH"' >> ~/.bash_profile
とパスを通してから、rbenv init コマンドで初期設定します。
# ~/.rbenv/bin/rbenv init
# Load rbenv automatically by appending
# the following to ~/.bash_profile:

eval "$(rbenv init -)"
と出るので、従いましょう。
# eval "$(rbenv init -)"
パスがしっかり通っていることも確認して、
# source ~/.bash_profile
# echo $PATH
/root/.rbenv/shims:/root/.rbenv/bin:/usr/local/sbin:/usr/local/bin:/usr/sbin:/usr/bin:/root/bin
renv-doctorスクリプトを使用して、rbenvが正しく設定されていることを確認します。
# curl -fsSL https://github.com/rbenv/rbenv-installer/raw/master/bin/rbenv-doctor | bash
Checking for `rbenv' in PATH: /root/.rbenv/bin/rbenv
Checking for rbenv shims in PATH: OK
Checking `rbenv install' support: not found
Unless you plan to add Ruby versions manually, you should install ruby-build.
Please refer to https://github.com/rbenv/ruby-build#installation

Counting installed Ruby versions: none
  There aren't any Ruby versions installed under `/root/.rbenv/versions'.
  You can install Ruby versions like so: rbenv install 2.2.4
Checking RubyGems settings: OK
Auditing installed plugins: OK
出力結果の3行目に「Checking `rbenv install' support: not found」と出力されています。
これが使えないと最新版のRubyをrbenvでインストールできないので、ここからはruby-buildをインストールします。
ruby-buildインストール
ここからは、GitHubのruby-buildレポジトリのREADMEに書いている通りに従っていきます。
rbenvのディレクトリに「plugins」ディレクトリを作って、レポジトリをクローンしてプルするだけです。
# mkdir -p "$(rbenv root)"/plugins
# git clone https://github.com/rbenv/ruby-build.git "$(rbenv root)"/plugins/ruby-build
# git -C "$(rbenv root)"/plugins/ruby-build pull
Rubyインストール
さあ、これで晴れてrbenvを使ってRubyインストールが出来るようになりました。
まずはインストール可能なRubyのバージョンを確認しましょう。
# rbenv install --list
2.5.8
2.6.6
2.7.2
jruby-9.2.13.0
maglev-1.0.0
mruby-2.1.2
rbx-5.0
truffleruby-20.3.0
truffleruby+graalvm-20.3.0

Only latest stable releases for each Ruby implementation are shown.
Use 'rbenv install --list-all' to show all local versions.
ここでは最新版の「2.7.2」をインストールすることとします。
# rbenv install 2.7.2
Downloading ruby-2.7.2.tar.bz2...
-> https://cache.ruby-lang.org/pub/ruby/2.7/ruby-2.7.2.tar.bz2
Installing ruby-2.7.2...

BUILD FAILED (Amazon Linux 2 using ruby-build 20201118)

Inspect or clean up the working tree at /tmp/ruby-build.20201128132117.3587.qONaMm
Results logged to /tmp/ruby-build.20201128132117.3587.log

Last 10 log lines:
        from ./tool/rbinstall.rb:846:in `block (2 levels) in install_default_gem'
        from ./tool/rbinstall.rb:279:in `open_for_install'
        from ./tool/rbinstall.rb:845:in `block in install_default_gem'
        from ./tool/rbinstall.rb:835:in `each'
        from ./tool/rbinstall.rb:835:in `install_default_gem'
        from ./tool/rbinstall.rb:799:in `block in <main>'
        from ./tool/rbinstall.rb:950:in `block in <main>'
        from ./tool/rbinstall.rb:947:in `each'
        from ./tool/rbinstall.rb:947:in `<main>'
make: *** [do-install-all] Error 1
おや、makeでコケていますね。
結論としては「openssl-devel」パッケージが必要なところ、インストールされていなかったことが原因です。
私は正直、ここで小1時間あれやこれや調べて、当てずっぽうで問題解決に至ったのですが、じつは↓にruby-buildに必要な前提パッケージが説明されていました。
公式に勝る情報はないですね。
https://github.com/rbenv/ruby-build/wiki#suggested-build-environment
openssl-develはサクっとyumでインストールしましょう。
# yum install -y openssl-devel
その後、
# rbenv install 2.7.2
で無事にrubyの最新版をインストールすることに成功しました。
rubyのパスが2つある件(未解決)
ここまでの手順でrubyをインストール完了しましたが、パスが通っていません。
ruby本体の在り処を探してみますと・・・
# ll ~/.rbenv/shims/ruby
-rwxr-xr-x 1 root root 385 Nov 28 13:53 /root/.rbenv/shims/ruby

# ll ~/.rbenv/versions/2.7.2/bin/ruby
-rwxr-xr-x 1 root root 184688 Nov 28 13:52 /root/.rbenv/versions/2.7.2/bin/ruby
あれ。2箇所にある。別にシンボリックリンクってわけでもないし。ファイルサイズがかなり違う…
以下のように、どちらもrubyコマンドとして実行できます。
# ~/.rbenv/shims/ruby -v
ruby 2.7.2p137 (2020-10-01 revision 5445e04352) [x86_64-linux]

# ~/.rbenv/versions/2.7.2/bin/ruby -v
ruby 2.7.2p137 (2020-10-01 revision 5445e04352) [x86_64-linux]
ちょっとこの点、ちゃんと調べられていないのですが、rbenvで確認すると後者のパスで認識してるっぽいので、筆者の場合はそちらでパスを通し、Rubyインストールを終了としました。
# rbenv versions
* 2.7.2 (set by /root/.rbenv/version)

# echo 'export PATH="$HOME/.rbenv/versions/2.7.2/bin:$PATH"' >> ~/.bash_profile
# source ~/.bash_profile
Railsインストール
お膳立ては整いましたので、あとはRailsチュートリアルの通り、Rails6.0.3をインストールするだけです。
# gem install rails -v 6.0.3
# rails -v
Rails 6.0.3
お疲れ様でした。