環境
注)) ローカル環境で動作確認するための実装です。
Ruby 2.6.5
Rails 5.2.3
mysql 5.7.28
gem sorcery
gem font-awesome-sass
gem config
mkcert
credentials
実装
Sorceryの導入、email・パスワードログイン機能は実装済みであることが前提です。
gemのbundleを済ませておいて下さい。
- Facebook For Developersの設定
- ローカル環境の設定
2つに分けて実装していきます。
Facebook for developersの設定
1.Facebookアカウント作成
2.Facebook For Developersに登録・アプリ作成
下記資料を参考にしました。
参考資料:Fantastech!!
アプリID、app secretは後ほど使用しますので記載場所を確認しておいて下さい。
マイアプリ→設定→ベーシックに記載されています。
3.Facebookログインの設定
ダッシュボード上にあるFacebookログインの設定をクリック。
設定のクライアントOAuth設定の下記部分を確認。
・クライアントOAuthログイン→はい
・ウェブOAuthログイン→はい
・リダイレクトURIに制限モードを使用→はい
・有効なOAuthリダイレクトURI→https://localhost:3000/oauth/callback?provider=facebook
リダイレクトURIにはHTTPSが強制になるので後ほどローカル環境をSSL化します。
設定 → ベーシック → プライバシーポリシーのURLの指定。
プライバシーポリシーとは、収集した情報をこれこれこういう目的で使いますよという旨が書かれた文書のことです。とりあえず開発時にはアクセスできるサイトであればなんでもよいです。アプリケーションを公開する段階になったら、忘れずに自分のアプリケーション内にプライバシーポリシーを載せたページを作り、それを指定しましょう。
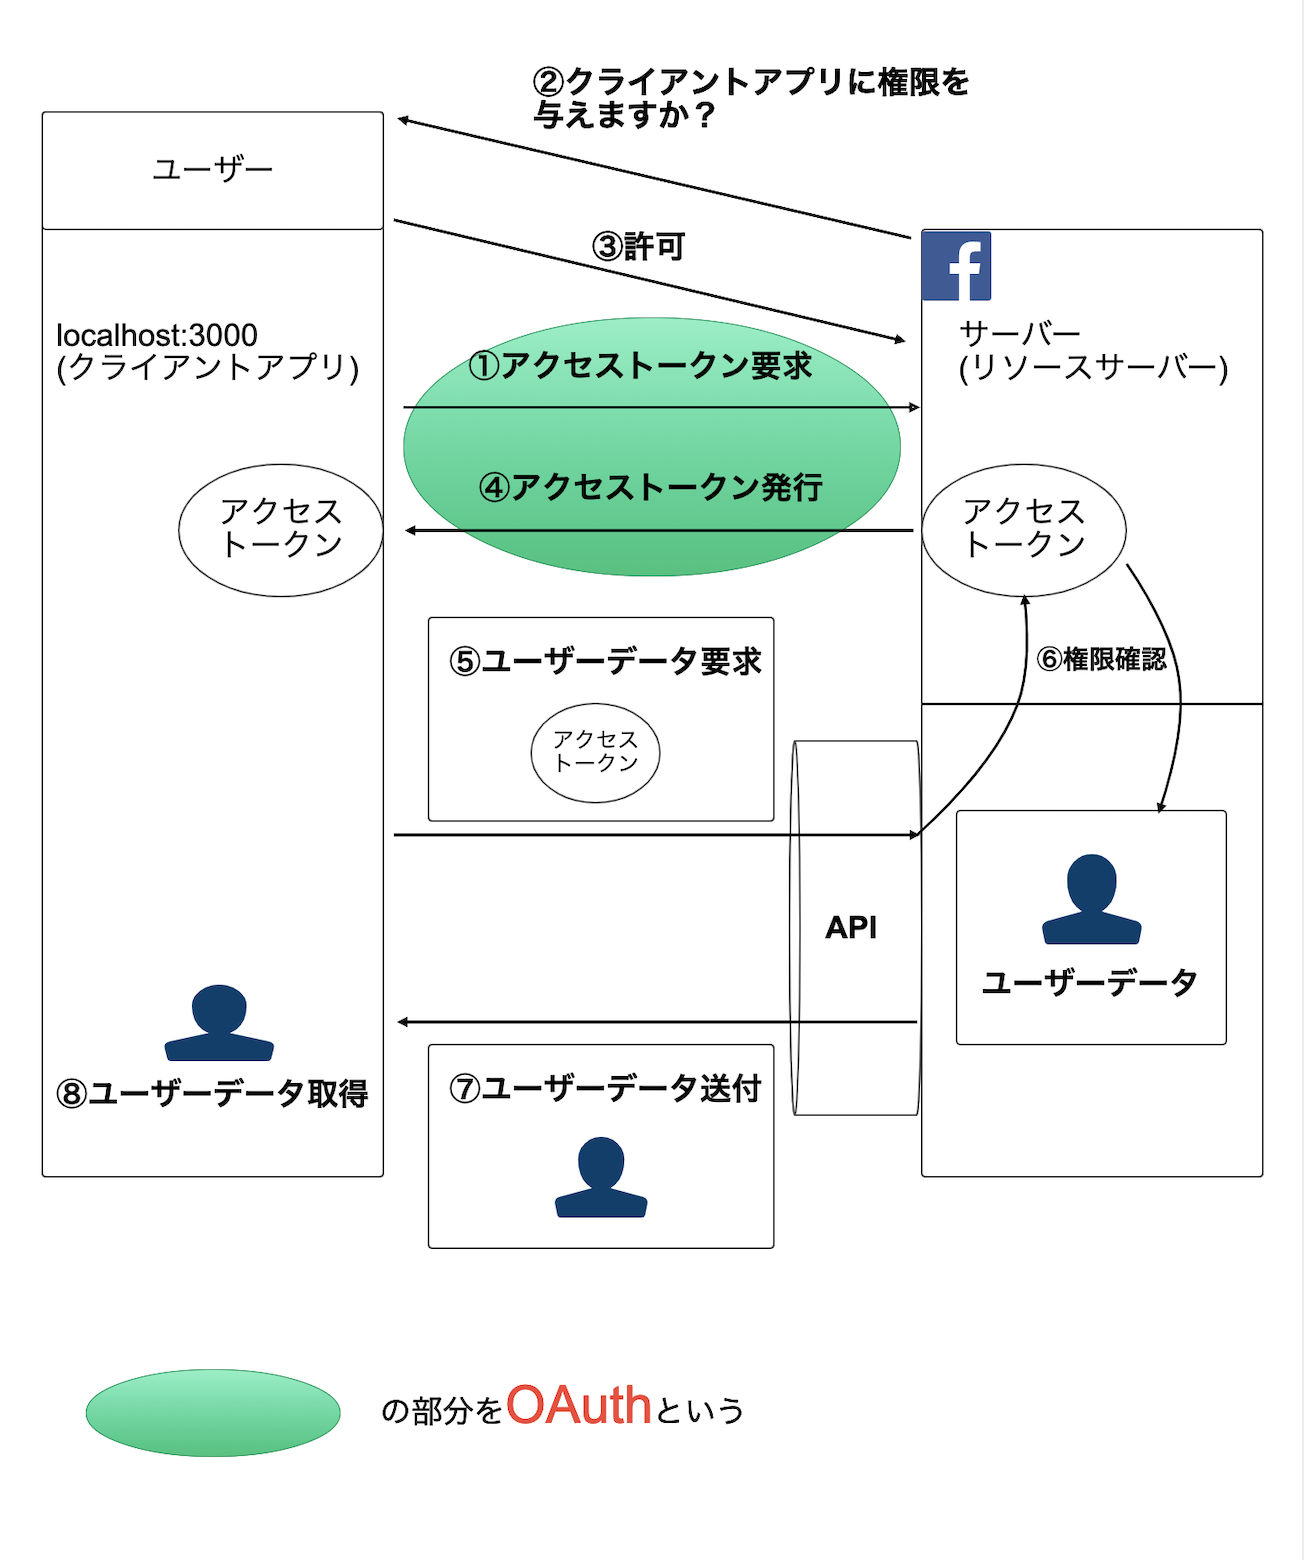
OAuthとは
この図は自分用にまとめたものです。
OAuthに関しては一番分かりやすい OAuth の説明が最強です。
ローカル環境の設定
基本はwikiに沿って進めていきますが、流れを意識して記述するので順番が前後します。
1.externalインストール、DB反映
externalをインストール
$ rails g sorcery:install external --only-submodules
migrationファイルが生成されるので
class SorceryExternal < ActiveRecord::Migration
  def change
    create_table :authentications do |t|
      t.integer :user_id, null: false
      t.string :provider, :uid, null: false

      t.timestamps
    end

    add_index :authentications, [:provider, :uid, :user_id]
  end
end
外部キーのuser_idにindex張るのを忘れないように追加しておきましょう。
$ rails db:migrate
2.Authenticationモデルの生成
authenticationsテーブルにはFacebook認証ログインしたユーザーデータが入ります。
$ rails g model Authentication --migration=false
アソシエーション
UserモデルとAuthenticationモデルの関連付けを行います。
class User < ActiveRecord::Base
  has_many :authentications, dependent: :destroy
  accepts_nested_attributes_for :authentications
end
class Authentication < ActiveRecord::Base
  belongs_to :user
end
3.oauthsコントローラー作成
$ rails g controller Oauths oauth callback --skip-template-engine
--skip-template-engine → viewファイルスキップ
class OauthsController < ApplicationController
  skip_before_action :require_login

  def oauth
    login_at(params[:provider])
  end

  def callback
    provider = params[:provider]
    if (@user = login_from(provider))
      redirect_to root_path, success: 'フェイスブックでログインしました'
    else
      begin
        @user = create_from(provider)
        reset_session
        auto_login(@user)
        redirect_to root_path, success: 'フェイスブックでログインしました'
      rescue StandardError
        redirect_to root_path, danger: 'ログインに失敗しました'
      end
    end
  end
end
ほぼwiki通りですがフラッシュメッセージにBootstrapを使用していますのでgemをいれてない方はwiki通りに進めて下さい。
4.ルーティング設定
post 'oauth/callback', to: 'oauths#callback'
get 'oauth/callback', to: 'oauths#callback'
get 'oauth/:provider', to: 'oauths#oauth', as: :auth_at_provider
5.viewにFacebook認証ボタン配置
ボタンを表示させたい場所へ記述して下さい。
<%= link_to auth_at_provider_path(provider: :facebook), class: 'facebook-btn' do %>
  <i class="fab fa-facebook-f"></i> Facebookログイン
<% end %>
6.サブモジュール(external)と設定の追加
その前にやるべきことがあります。
・ローカル環境でSSL暗号化通信を可能にするためmkcertを使用する
・keyとsecretの暗号化のためにcredentialsに記述
・keyとsecretを定数管理するためconfigを使用する
SSL暗号化通信以外は設定しなくても動作しますが、設定することをおすすめします。
mkcertでSSL暗号化通信を可能にする
SSL暗号化通信についてはこちらにまとめましたのであやふやな人はのぞいてみてください。
mkcertの使い方は下記資料の中にある手順で進めます。
やることはmkcertを使用してSSL証明書を発行して、httpsでアクセスできるように設定します。
【Rails】Facebookでユーザー認証する
一部修正。
開発環境下でのみhttpsアクセスできるよう制限をかけます。
if Rails.env.development?
  ssl_bind "0.0.0.0", "3000", {
    cert: "config/certs/localhost.pem",
    key:  "config/certs/localhost-key.pem"
  }
end
credentialsを使用してkeyとsecretを暗号化
$ EDITOR=vim bin/rails credentials:edit
credentials.yml.encがvimで開くので
# 追記
facebook_key: facebook for developersから 'アプリID' を参照して記述
facebook_secret: facebook for developersから 'app secret' を参照して記述
保存して再起動。
configを使用してkeyとsecretを定数管理
facebook:
  key: <%= Rails.application.credentials.facebook_key %>
  secret: <%= Rails.application.credentials.facebook_secret %>
  callback_url: "https://localhost:3000/oauth/callback?provider=facebook"
ポイントはcredentialsを呼び出す際にerb記法で記述すること。<%%>で囲まないと動作しません。
これで3つの準備が終わったのでサブモジュールと設定の追加をしていきます。
サブモジュール(external)の追加
Rails.application.config.sorcery.submodules = %i[external]
設定の追加
Rails.application.config.sorcery.configure do |config|
...
 config.external_providers = [:facebook]
...
  config.facebook.key = Settings.facebook.key
  config.facebook.secret = Settings.facebook.secret
  config.facebook.callback_url = Settings.facebook.callback_url
  config.facebook.user_info_mapping = {
    email: 'email', first_name: 'first_name', last_name: 'last_name'
  }
  config.facebook.user_info_path = 'me?fields=email,first_name,last_name'
  config.facebook.display = 'page'
  config.facebook.api_version = 'v2.3'
...
 config.user_config do |user|
...
  user.authentications_class = Authentication
ここの設定でFacebookからどんなユーザー情報が欲しいのかなど設定します。
実装終了。
まとめ
wiki通り動かないとしんどい 笑
Deviseとの比較:Rails でアカウントロジックを扱うなら sorcery が良いかも
