今回は無線通信が可能なESP32マイコンを使ってROS2との通信を実装する。環境は以下の通り。
- ROS2Humble
- Ubuntu22.04
- ESP32 DEVKIT V1
ArduinoIDEのインストール
公式サイトからLinux用ArduinoIDE(今回はver2.1.0)のZIPファイルをダウンロードして解凍する。解凍したフォルダの中にarduino-ideというものがあるのでダブルクリックして開く。
左上からFile>Preferences...とクリックして環境設定を開く。

Additional boards manager URLs:の欄に以下のURLを貼り付けて,ArduinoIDEにESP32マイコンの情報を追加する。
https://raw.githubusercontent.com/espressif/arduino-esp32/gh-pages/package_esp32_index.json
ついでに僕のような英語弱者はLanguage:日本語とすると良いだろう。
OKを選択して設定画面を閉じる。
次にツール>ボード>ボードマネージャ...からボードマネージャを開き,esp32で検索する。表示された物をインストールしておく。

とりあえずLチカ(余興)
LEDをpin10(GPIO32)に繋げる。

コードをこのように変更する。
#define LED 32

void setup() {
  pinMode(LED, OUTPUT);
}

void loop() {
  digitalWrite(LED, HIGH);
  delay(500);
  digitalWrite(LED, LOW);
  delay(500);
}
上の方のボード選択からDOIT ESP32 DEVKIT V1を選び,左上のチェックマーク✓を選択してコンパイル。

このようなエラーが出た。自分の場合はPython3がPythonにリンクされていないことが原因であったようだ。ターミナルを開いて以下の操作を行う。
$ which python3
/usr/bin/python3
$ sudo ln -s /usr/bin/python3 /usr/bin/python
再びコンパイルを行うと別のエラーメッセージが出た。

どうやらpyserialというライブラリが入っていない事が原因らしい。
$ sudo apt install python3-pip
$ pip install pyserial
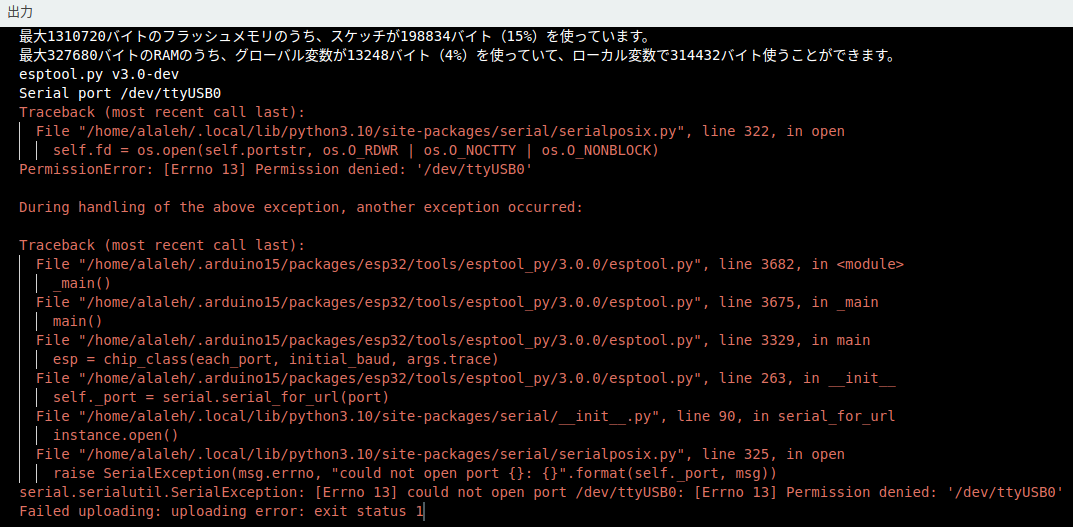
再びコンパイルを行うとようやくうまく行った。早速書き込んでみる......とエラーが出た。

これはUSBポートへのアクセス権限がないことが原因らしい。
$ sudo nano /lib/udev/rules.d/50-udev-default.rules
以下の行を探して修正する。
KERNEL=="tty[A-Z]*[0-9]|pppox[0-9]*|ircomm[0-9]*|noz[0-9]*|rfcomm[0-9]*", GROUP="dialout"
   ↓    ↓    ↓    ↓    ↓
KERNEL=="tty[A-Z]*[0-9]|pppox[0-9]*|ircomm[0-9]*|noz[0-9]*|rfcomm[0-9]*", GROUP="dialout", MODE="0777"
Ctrl+Sで保存,Ctrl+Xで終了。
PCにつながっているUSBケーブルを挿し直して,再び書き込んでみる。

LEDがチカチカした。
micro-ROS関連
閑話休題。
先ずArduinoIDEにmicro-ROS for Arduinoを導入する。
このリンクからmicro-ROS for Arduinoのzipファイルをダウンロードする。
ArduinoIDEを開き,左上のスケッチ>ライブラリをインクルード>.ZIP形式のライブラリをインストール...を順に選択。
先ほどダウンロードしたZIPファイルを選択して開く。
コンソールにLibrary installedと表示されれば成功。
次にmicro-ROS-Agentを導入する。これは簡単に言えばマイコンからのメッセージをROS2で認識可能にする役割を持っている。
以下のコマンドを順に実行する。
$ cd ~/ros2_ws (ROS2のワークスペースに移動する)
$ source /opt/ros/humble/setup.bash
$ git clone -b humble https://github.com/micro-ROS/micro_ros_setup.git src/micro_ros_setup
$ rosdep update && rosdep install --from-paths src --ignore-src -y
$ colcon build
$ source install/local_setup.bash
$ ros2 run micro_ros_setup create_agent_ws.sh
$ ros2 run micro_ros_setup build_agent.sh
ここで下の画像のような警告が出た場合はここからZIPファイルをダウンロードして解凍する。
フォルダ名をtinyxml2に変更してホーム下に配置して,colcon buildを行う。

Agentが動作するか確認してみる。
$ source install/local_setup.sh
$ ros2 run micro_ros_agent micro_ros_agent udp4 --port 8888

こんな感じになっていればうまく行っていると思われる。
実際に使ってみる
ポテンショメータの値を読み込んで,それをWiFi経由でPC上のROS2に送ってみる事にする。
それぞれいい感じに配線する(適当)。

今回はアナログ・デジタル変換(ADC)にADC1_CH6(pin12)を使う。ちなみにADC2はWiFiドライバで使用されており、WiFiドライバが動作していないときしか使えないらしいので注意が必要だ。
ArduinoIDEを開き,以下のコードをコピペする。基本的にはmicro_ros_arduinoのmicro-ros_publisher_wifiというスケッチ例に準拠している。
#include <micro_ros_arduino.h>

#include <stdio.h>
#include <rcl/rcl.h>
#include <rcl/error_handling.h>
#include <rclc/rclc.h>
#include <rclc/executor.h>
#include <std_msgs/msg/int32.h>

#if !defined(ESP32) && !defined(TARGET_PORTENTA_H7_M7) && !defined(ARDUINO_NANO_RP2040_CONNECT) && !defined(ARDUINO_WIO_TERMINAL)
#error This example is only avaible for Arduino Portenta, Arduino Nano RP2040 Connect, ESP32 Dev module and Wio Terminal
#endif

#define LED_PIN 2 //マイコン上の青いLEDを指定
#define AD_PIN 34 //ADCのピンを指定

//エラーハンドリング用のマクロ
#define RCCHECK(fn) { rcl_ret_t temp_rc = fn; if((temp_rc != RCL_RET_OK)){error_loop();}}
#define RCSOFTCHECK(fn) { rcl_ret_t temp_rc = fn; if((temp_rc != RCL_RET_OK)){}}

//micro-ROS関連で必要となる変数を宣言しておく
rcl_publisher_t publisher;
std_msgs__msg__Int32 msg;
rcl_init_options_t init_options;
rclc_support_t support;
rcl_allocator_t allocator;
rcl_node_t node;

//micro-ROS関連でエラーが出るとマイコン上の青色LEDが点滅するように設定している
void error_loop(){
  while(1){
    digitalWrite(LED_PIN, !digitalRead(LED_PIN));
    delay(100);
  }
}

void setup() {
  /*
  wifiの設定を行う。
  マイコンが接続すべきWiFi(つまりmicro_ros_agentを立ち上げるPCが接続されているWiFi)のSSID,
  そのWiFiのパスワード,micro_ros_agentを立ち上げているPCのIPアドレス,port番号を
  指定する必要がある。PCのIPは事前に固定しておいた方が良い。
  */
  set_microros_wifi_transports("WIFI_SSID", "PASSWORD", "192.168.0.xxx", 8888);

  //LEDの設定
  pinMode(LED_PIN, OUTPUT);
  //ADCの設定
  analogSetAttenuation(ADC_6db); //追加
  pinMode(AD_PIN, ANALOG); //追加

  delay(2000);

  //micro-ROSの設定
  allocator = rcl_get_default_allocator();
  init_options = rcl_get_zero_initialized_init_options();
  //初期化オプションの作成
  RCCHECK(rcl_init_options_init(&init_options, allocator));
  RCCHECK(rcl_init_options_set_domain_id(&init_options, 123)); //ROS_DOMAIN_IDを設定できる。今回は123としている。
  RCCHECK(rclc_support_init_with_options(&support, 0, NULL, &init_options, &allocator));
  //ノードの作成
  RCCHECK(rclc_node_init_default(&node, "micro_ros_arduino_wifi_node", "", &support));
  //publisherの作成
  RCCHECK(rclc_publisher_init_best_effort(
    &publisher,
    &node,
    ROSIDL_GET_MSG_TYPE_SUPPORT(std_msgs, msg, Int32),
    "/ADC_data"));

  msg.data = 0;
  //セットアップが完了するとLEDが点灯する
  digitalWrite(LED_PIN, HIGH);
}

void loop() {
  msg.data = analogReadMilliVolts(AD_PIN);
  RCSOFTCHECK(rcl_publish(&publisher, &msg, NULL));
}
普通のC++版のROS2のようにpublisherはtimerで実行することもできるが,今回はこのような形としている。
上のボード選択からDOIT ESP32 DEVKIT V1を選択してから,コンパイル(✓)して書き込む(→)。

ターミナルを開いてAgentを起動する。
$ ros2 run micro_ros_agent micro_ros_agent udp4 --port 8888
マイコンボード上のENスイッチを押して,すでに書き込んであるコードを再度読み込むとAgentにmicro-ROSが認識される。

マイコンからデータが送られてきている事がわかる。

rqtでもしっかり認識されている。
終わり
今回はpublisherのみの実装だったのでexecutorを使いませんでしたが,使う場合にはrclc_executor_init関数の第三引数が登録したいコールバック関数の個数を表していることに注意してください。また2023年9月現在,micro-ROSでサービスサーバーを二つ以上設定するのは難しいようですので,そのことにも注意してください。
また,カスタムメッセージの実装についてはこちらのサイトが分かりやすいのですが,自分の環境ではビルドターゲットを指定するとライブラリの生成に失敗したので,同様の現象が発生している人はビルドターゲットを指定せずにビルドを行うとよいかもしれません。
sudo docker run -it --rm -v $(pwd):/project --env MICROROS_LIBRARY_FOLDER=extras microros/micro_ros_static_library_builder:humble
以上です。
