はじめに
ある日、アプリの制作にカレンダーを使用したくなりました。
「Unity カレンダー」で先生に尋ねてもあまり自分の用途に合った記事が出てこない…
あまりというかほぼ出てこない…なんで?カレンダーになんか恨みあるの?
というわけで適当にパパっと作ってみました。
意外に詰まったので同じ境遇の方がいれば参考にしていただければ幸いです。
こんな感じのです。
ボタンを並べる
カレンダー自体は、GameObjectにプレハブのButtonを7*6の42個配置していてそこに数字を入れている感じなのでまずはButtonのプレハブを作成します。
作成方法はこちらなど参考にしてください。
大きさなどはGameObjectでそろえるので適当で大丈夫ですがデフォルトの画像だと集合体恐怖症さんが発狂してしまうので無地の画像を適当に作成し、使用したほうがいいと思います。

作るのめんどい人はどうぞ。
そしてPanelを新規作成し好みの大きさに合わせて、その子として新規オブジェクトを配置します。
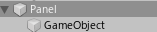
このGameObjectにグリットレイアウトグループコンポーネントを追加します。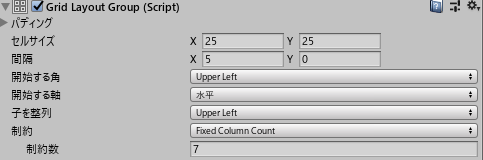
これをすることでこのオブジェクトに配置されたボタンがサイズを合わせて並ぶようになります。
そして、オブジェクトを配置するスクリプトを書いていきます。
using System.Collections;
using System.Collections.Generic;
using UnityEngine;
using UnityEngine.UI;
using System;
public class Calendar : MonoBehaviour
{
    public GameObject canvas;//エディタから指定
    public GameObject prefab;//エディタから指定

    void Start()
    {
        for (int i = 0; i < 42; i++)
        {
            GameObject button = Instantiate(prefab, canvas.transform);
            button.GetComponent<Button>();
        }
    }
}
これをGameObjectに追加し、プレハブにはボタンのプレハブをCanvasにはGameObjectを追加してください。この状態で一度再生してみます。

ボタンが白のため死ぬほど見づらいですが42個配置されました。ちゃんと確認したい場合はプレハブのボタンの画像を変更してみてください。GameObjectの幅が狭いと横に7個配置されない場合があるので適宜調整してください。
日付を入れる
このままでは白いボタンが42個配置されただけなのでここに日付を入力していきます。先ほど作ったCalendar.csに以下を追加してみてください。
public static DateTime SelectDate;
private DateTime D_Date;
private int startday;

 private void CalendarController()
    {
        int days = 1;
        int overday = 1;

        D_Date = new DateTime(SelectDate.Year, SelectDate.Month, 1);  //SelectDateの月の最初の日付
        int year = SelectDate.Year; //年
        int month = SelectDate.Month; //月
        int day = SelectDate.Day; //日
        //最初の日付の曜日を取得
        DayOfWeek firstDate = D_Date.DayOfWeek;
        //何日まであるか
        int monthEnd = DateTime.DaysInMonth(year, month);
        //前月が何日まであるか
        SelectDate = SelectDate.AddMonths(-1);
        month = SelectDate.Month;
        SelectDate = SelectDate.AddMonths(1);
        int lastmonth = DateTime.DaysInMonth(year, month);
        switch (firstDate)
        {
            case DayOfWeek.Sunday:
                startday = 0;
                break;
            case DayOfWeek.Monday:
                startday = 1;
                break;
            case DayOfWeek.Tuesday:
                startday = 2;
                break;
            case DayOfWeek.Wednesday:
                startday = 3;
                break;
            case DayOfWeek.Thursday:
                startday = 4;
                break;
            case DayOfWeek.Friday:
                startday = 5;
                break;
            case DayOfWeek.Saturday:
                startday = 6;
                break;
        }
        int lastmonthdays = lastmonth - startday + 1;

        for (int i = 0; i < 42; i++)
        {
            if (i >= startday)
            {
                if (days <= monthEnd)
                {
                    //文字を入れる
                    Transform DAY = GameObject.Find("GameObject").transform.GetChild(i);
                    DateTime tmp = D_Date;//一時変数
                    DayOfWeek num = tmp.DayOfWeek;
                    //土曜日青・日曜日赤
                    switch (num)
                    {
                        case DayOfWeek.Sunday:
                            DAY.GetChild(0).GetComponent<Text>().color = Color.red;
                            break;
                        case DayOfWeek.Saturday:
                            DAY.GetChild(0).GetComponent<Text>().color = Color.blue;
                            break;
                        default:
                            DAY.GetChild(0).GetComponent<Text>().color = Color.black;
                            break;

                    }
                    DAY.GetChild(0).GetComponent<Text>().text = D_Date.Day.ToString();
                    D_Date = D_Date.AddDays(1);
                    days++;
                }
                else
                {
                    Transform DAY = GameObject.Find("GameObject").transform.GetChild(i);
                    DAY.GetChild(0).GetComponent<Text>().color = Color.gray;
                    DAY.GetChild(0).GetComponent<Text>().text = overday.ToString();
                    GameObject button = GameObject.Find("GameObject").transform.GetChild(i).gameObject;
                    button.GetComponent<Button>().onClick.RemoveAllListeners();
                    overday++;
                }
            }
            else
            {
                Transform DAY = GameObject.Find("GameObject").transform.GetChild(i);
                DAY.GetChild(0).GetComponent<Text>().color = Color.gray;
                DAY.GetChild(0).GetComponent<Text>().text = lastmonthdays.ToString();
                GameObject button = GameObject.Find("GameObject").transform.GetChild(i).gameObject;
                button.GetComponent<Button>().onClick.RemoveAllListeners();
                lastmonthdays++;
            }
        }
    }
死ぬほど見づらいコードだしなんか気持ち悪い箇所もあるかと思うのですが備忘録として書いているのものなのでお手柔らかにお願いします。(白目)
そしてvoid Start()に
SelectDate = DateTime.Now;
CalendarController();
をさらに追記し実行してみます。

はい、日付が登録されました。SelectDateをDateTime.Nowにしているので実行した月のカレンダーができていると思います。ここを変更すれば変更した月のカレンダーが表示されます。
カレンダーを表示したいだけの方はこれにて完了になります。
ボタン押下時に値を保存する
自分はカレンダーで選択した値を使いたかったのでボタンを押した際の処理を追記していきます。
上のコードのFor分を以下に変更し、関数も追加してください。
for (int i = 0; i < 42; i++)
        {
            if (i >= startday)
            {
                if (days <= monthEnd)
                {
                    //文字を入れる
                    Transform DAY = GameObject.Find("GameObject").transform.GetChild(i);
                    DateTime tmp = D_Date;//一時変数
                    DayOfWeek num = tmp.DayOfWeek;
                    //土曜日青・日曜日赤
                    switch (num)
                    {
                        case DayOfWeek.Sunday:
                            DAY.GetChild(0).GetComponent<Text>().color = Color.red;
                            break;
                        case DayOfWeek.Saturday:
                            DAY.GetChild(0).GetComponent<Text>().color = Color.blue;
                            break;
                        default:
                            DAY.GetChild(0).GetComponent<Text>().color = Color.black;
                            break;

                    }
                    DAY.GetChild(0).GetComponent<Text>().text = D_Date.Day.ToString();
                    //以下3行追加
                    GameObject button = GameObject.Find("GameObject").transform.GetChild(i).gameObject;
                    button.GetComponent<Button>().onClick.RemoveAllListeners();
                    button.GetComponent<Button>().onClick.AddListener(() => { set_Date(tmp); });
                    D_Date = D_Date.AddDays(1);
                    days++;
                }
                else
                {
                    Transform DAY = GameObject.Find("GameObject").transform.GetChild(i);
                    DAY.GetChild(0).GetComponent<Text>().color = Color.gray;
                    DAY.GetChild(0).GetComponent<Text>().text = overday.ToString();
                    GameObject button = GameObject.Find("GameObject").transform.GetChild(i).gameObject;
                    button.GetComponent<Button>().onClick.RemoveAllListeners();
                    overday++;
                }
            }
            else
            {
                Transform DAY = GameObject.Find("GameObject").transform.GetChild(i);
                DAY.GetChild(0).GetComponent<Text>().color = Color.gray;
                DAY.GetChild(0).GetComponent<Text>().text = lastmonthdays.ToString();
                GameObject button = GameObject.Find("GameObject").transform.GetChild(i).gameObject;
                button.GetComponent<Button>().onClick.RemoveAllListeners();
                lastmonthdays++;
            }
        }

    void set_Date(DateTime date)
    {
        Debug.Log(date);
        //値を保存する処理など
    }
これで実行してみます。
自分はわかりやすいようにテキストで表示していますが上のコードだとログで表示されるはずです。
以上になります。わかりづらいかもしれませんがお役に立てたら幸いです。