このテーマは、ボタンをサクッと作るためのテンプレートです。
外部からサクッと制御するためには、ボタンを張り付けたアプリを作成するのが手っ取り早い。
適当な6のラベルのボタンを作ってみよう。このボタンは、トグルになっていてonされると色が変わる仕組みを追加してある。Check Bottonみたいな動作する。

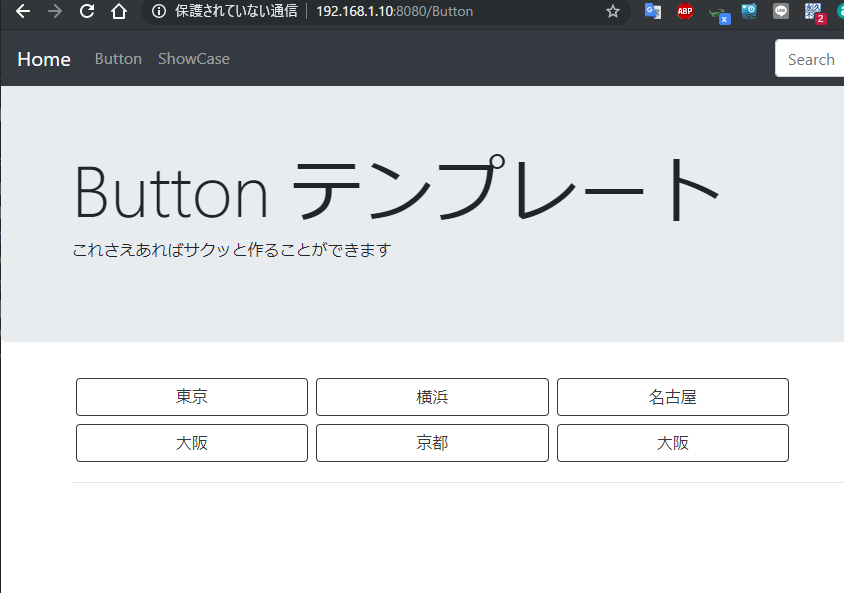
東京と京都が押された状態です。
では、ソースを見ていこう。
ex11.py
from bottle import *
import json,os
save=None
# HTML デコレーション(Bootstrap4)
def Html(title,css=""):
    html='''
        <!DOCTYPE html>
            <html lang="ja">
            <head>
                <meta charset="utf-8" />
                <title>%s</title>
                <link rel="stylesheet" type="text/css" href="/static/content/bootstrap.min.css" />
	            <link href="static/content/jumbotron.css" rel="stylesheet" />
                <link rel="stylesheet" type="text/css" href="/static/content/site.css" />
                <script src="/static/scripts/modernizr-2.6.2.js"></script>
                <script src="/static/scripts/jquery-1.10.2.min.js"></script>
                <script src="/static/scripts/bootstrap.min.js"></script>
                <script src="/static/scripts/respond.min.js"></script>
	            <script src="/static/scripts/mindmup-editabletable.js"></script>
                <script src="/static/scripts/jquery.redirect.js"></script>
            %s
                </head>

            <body>
            %s
            </body>
            </html>'''
    def f0(f):
        def f1(*a,**b):
            return html%(title,css,f(*a,**b))
        return f1
    return f0
def Body():
    def f0(f):
        def f1(*a,**b):
            return '<div class="container body-content">%s</div>'%f(*a,**b)
        return f1
    return f0
def Navi(menu):
    nav='''<nav class="navbar navbar-expand-md navbar-dark fixed-top bg-dark">
            <a class="navbar-brand" href="/">%s</a>
            <button class="navbar-toggler" type="button" data-toggle="collapse" data-target="#navbarsExampleDefault" aria-controls="navbarsExampleDefault" aria-expanded="false" aria-label="Toggle navigation">
            <span class="navbar-toggler-icon"></span>
            </button>
            <div class="collapse navbar-collapse" id="navbarsExampleDefault">
            <ul class="navbar-nav mr-auto">
                %s
            </ul>
            <form class="form-inline my-2 my-lg-0">
                <input class="form-control mr-sm-2" type="text" placeholder="Search" aria-label="Search">
                <button class="btn btn-outline-success my-2 my-sm-0" type="submit">Search</button>
            </form>
            </div>
     </nav>%s'''
    def f0(f):
        def f1(*a,**b):
            nm=''.join(['<li class="nav-item"><a class="nav-link" href="/%s">%s</a></li>'%(x,x)
                       for x in menu[1:]])
            return nav%(menu[0],nm,f(*a,**b))
        return f1
    return f0
def routes(menu):
    def f0(f):
        route('/','GET',f)
        [route("/%s"%x,'GET',f) for x in menu]
        def f1(*a,**b):
            return f(*a,**b)
        return f1
    return f0
# JOMBOTRON デコレーション
def Jumbotron(title,paragraph):
    jumbo='''<div class="jumbotron">
        <div class="container">
          <h1 class="display-3">%s</h1>
          <p>%s</p>
        </div>
      </div>%s'''
    def f0(f):
        def f1(*a,**b):
            return jumbo%(title,paragraph,f(*a,**b))
        return f1
    return f0
# script デコレーション
def script(js):
    def f0(f):
        def f1(*a,**b):
            return f(*a,**b)+js
        return f1
    return f0
def style(css):
    def f0(f):
        def f1(*a,**b):
            return css+f(*a,**b)
        return f1
    return f0
js='''
<script>
$(function () {
 $('.btn').click(function(){
    $.post('/click',{js:$(this).attr('id')})
    .done(function(obj){
    Object.keys(obj).forEach(function (key) {
     clss=obj[key]? 'btn-primary':'btn-outline-dark';
     $("#"+key).removeClass('btn-primary btn-outline-dark');
     $("#"+key).addClass(clss);
    });
   });
 });
});
</script>'''
jsx='''
<script>
$(function () {
 $('.h').click(function(){
    tg=$(this).text();
    $('.b').each(function(i,e){
        $(this).html('<'+tg+'>'+$(this).text()+'</'+tg+'.>');
    });
 });
 $('.c').click(function(){
    t=$(this).text();
    console.log('class:',t);
    $('.b').each(function(i,e){
        $(this).removeClass('c100 c150 c200 c250 c300 c350');
        $(this).addClass(t);
    });
 });
  $('.b').click(function(){
    id=$(this).attr('id');
    $.post('/click0',{id:id,text:$(this).text()});
 });
});
</script>'''
# Button デコレーション
def Button_(btn,clas,margin=0,h='h1',id='id'):
    Hn="<%s>{0}</%s>"%(h,h)
    return "".join(["<button class='{0}' style='margin:{1}em;' id='{4}{3}'>{2}</button>"
                    .format(clas,margin,Hn.format(x),i,id) for i,x in enumerate(btn)])

def Button(btn,clas,margin=0,h='h1',id='id'):
    bx=Button_(btn,clas,margin,h)
    def f0(f):
        def f1(*a,**b):
            return bx+f(*a,**b)
        return f1
    return f0

menu='Home,Button,ShowCase'.split(',')

css="<style>\n.w100{ width:100px; }\n%s</style>"%"".join(['.c%s { width:%spx; height:%spx; } \n'%(x,x,x)
                                                          for x in range(100,400,50) ])
print(css)
@route('/showcase')
@Html('ShowCase')
@Navi(menu)
@Jumbotron('ShowCase テンプレート','これさえあればサクッと作ることができます')
@Body()
@style(css)
@script(jsx)
def ShowCase():
    nm='primary,secondary,success,danger,warning,info,light,dark,link'.split(',')
    hxx='H1,H2,H3,H4,H5,H6,H7,H8'.split(',')
    cx="c100,c150,c200,c300".split(',')
    hx='h8'
    b="".join([
            "".join([Button_([x],'h btn btn-outline-primary rounded-circle p-3 c100',0.25,'h1') for x in hxx]),
            "<hr/>","".join([Button_(['c'+str(x)],'c btn btn-outline-primary rounded-circle p-3 c150',0.25,'h1')
                             for x in range(100,400,50)]),
            "<hr/>","".join([Button_([x.capitalize()],'b btn btn-%s w100'%x,0.25,hx,'ida') for x in nm]),
            "<hr/>","".join([Button_([x.capitalize()],'b btn btn-%s rounded-circle p-3 c300'%x,0.25,hx,'idb') for x in nm]),
            ])
    return b
@routes(menu)
@Html('Buttons')
@Navi(menu)
@Jumbotron('Button テンプレート','これさえあればサクッと作ることができます')
@Body()
@Button('東京,横浜,名古屋,大阪,京都,大阪'.split(','),'btn btn-outline-dark w-25',0.25,'h8')
@script(js)
def Home():
    global save
    p=request.urlparts[2]
    if p=='/ShowCase':
        redirect('/showcase')
    return "<hr/>"


btx={}
@route('/click',method='POST')
def click():
    global btx
    id=request.params.decode().js
    btx[id]=not btx[id] if id in btx else True
    return  btx
bt0={}
@route('/click0',method='POST')
def click0():
    global bt0
    id=request.params.decode().id
    text=request.params.decode().text
    print(id,text)
    bt0[id]=not bt0[id] if id in btx else True
    return  bt0

# faviconの読み込み
@route('/favicon.ico')
def favcon():
    return static_file('favicon.ico', root='./static')
# staic ファイルの読み込み
@route('/static/<filepath:path>')
def server_static(filepath):
    return static_file(filepath, root='./static')
# web server のhost portの設定
HOST,PORT='0.0.0.0',8080
if __name__ =='__main__':
    run(host=HOST,port=PORT)
css js 用のデコレーションを追加してある。皆さんがどうかわからないが、プログラム作成時にあっちこっちのファイル開いてコーディングするのが嫌い。せっかくpythonで書いているんだから・・・
@Button('東京,横浜,名古屋,大阪,京都,大阪'.split(','),'btn btn-outline-dark w-25',0.25,'h8')
ボタンデコレーションは、ボタンのラベル(東京,横浜,名古屋,大阪,京都,大阪)を定義している。
'btn btn-outline-dark w-25'
bootstrap4 用のボタンの色と幅を定義している。
0.25は、ボタンのmargin を0.25emを定義し、ボタンの文字をh8サイズに指定している。

こんな具合です。
ボタンが押された時の動作は、scriptデコレーションのjsに定義してあります。
<script>
$(function () {
 $('.btn').click(function(){
    $.post('/click',{js:$(this).attr('id')})
    .done(function(obj){
    Object.keys(obj).forEach(function (key) {
     clss=obj[key]? 'btn-primary':'btn-outline-dark';
     $("#"+key).removeClass('btn-primary btn-outline-dark');
     $("#"+key).addClass(clss);
    });
   });
 });
});
</script>
button class がクリックされると/clickに対して押されたボタンidをポストします。
btx={}
@route('/click',method='POST')
def click():
    global btx
    id=request.params.decode().js
    btx[id]=not btx[id] if id in btx else True
    return  btx
btxは、ボタンidをkeyにした辞書タイプのボタンフラグです。
btxをフラグとして制御すれば簡単にホームコントロール制御に応用できます。
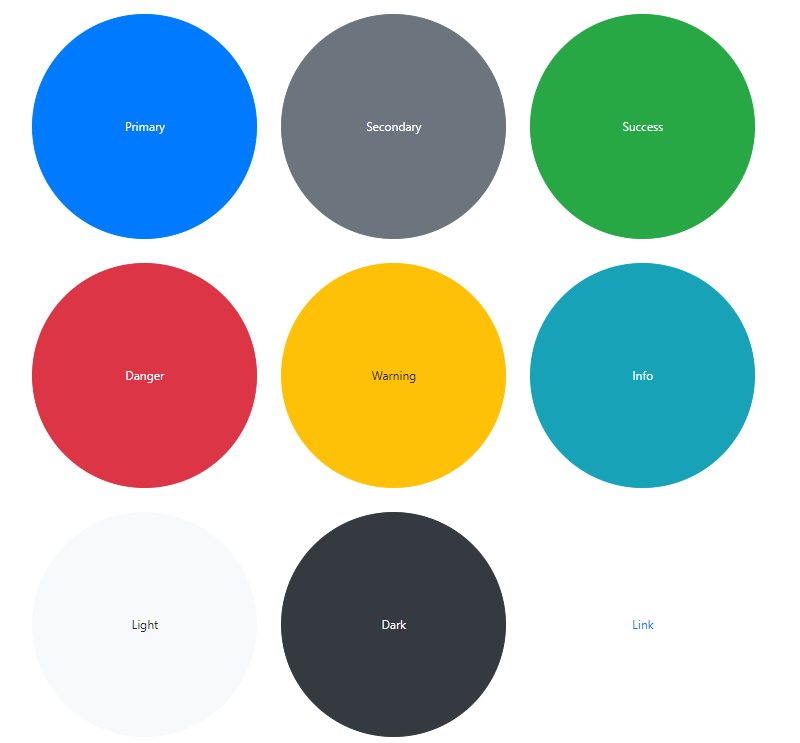
最近流行の丸ボタンについて
Bootstrap4を使うと簡単に丸ボタンを作成できます。
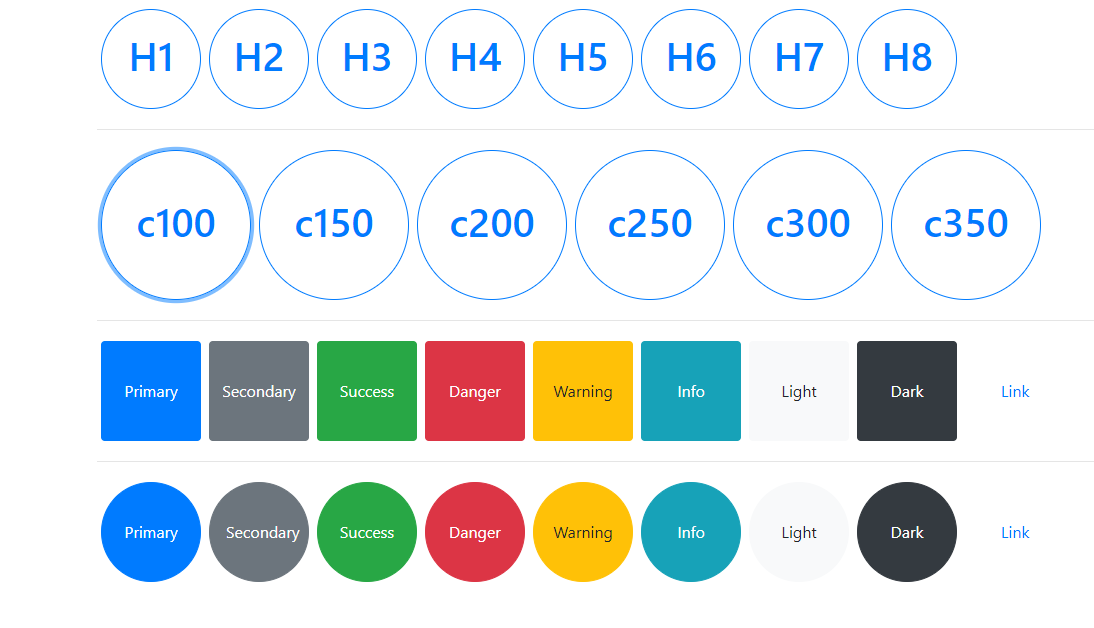
円形ボタンを表示するためには、高さと幅を定義します。
css="<style>\n.w100{ width:100px; }\n%s</style>"%"".join(['.c%s { width:%spx; height:%spx; } \n'%(x,x,x)
                              for x in range(100,400,50) ])

# 上記のスニペットで書きのcssを作成します。
<style>
.w100{ width:100px; }
.c100 { width:100px; height:100px; }
.c150 { width:150px; height:150px; }
.c200 { width:200px; height:200px; }
.c250 { width:250px; height:250px; }
.c300 { width:300px; height:300px; }
.c350 { width:350px; height:350px; }
</style>
このcssを@style(css)デコレーションに渡します。
"".join([Button_([x.capitalize()],'b btn btn-%s rounded-circle c300'%x,0.25,hx,'idb')
                                    for x in nm])
rounded-circle c300のclassの定義で丸ボタンを実現しています。