小型 Wi-Fi 開発ボード Wio Node と MQTT で Publish/Subscribe してみました。
前回の「はじめての Wio Node - 設定からNode-REDで制御まで」で Wio Node を試しましたが、
今回はその続きです。
Wio Node は、接続するGroveモジュールをモバイルアプリで設定しますが、
それだと MQTT 使えないし、接続できる Grove モジュールも限られてしまいます。
なので、今回は Wio Node を Arduino 化して MQTT します。
構成
Wio Node → MQTT Broker → Node-RED → Browser
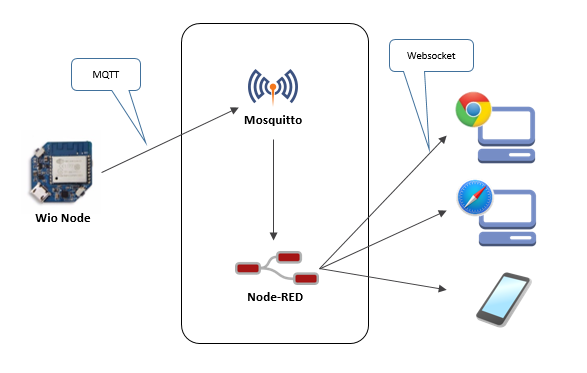
とりあえず MQTT Broker と Node-RED は Mac で動かします。
使用したセンサは VL6180X 赤外線近接距離センサモジュール です。
MQTT Broker
MQTT Broker はインストールが簡単な Mosquitto を使います。
Mac では Homebrew で、あっという間にインストールできます。
$ brew install mosquitto
MQTT の動作確認
一緒にインストールされた MQTT クライアントを使って動作確認してみます。
1.MQTT Broker の起動 (ターミナル #1)
$ /usr/local/sbin/mosquitto
1487245872: mosquitto version 1.4.10 (build date 2016-12-24 19:38:46-0800) starting
1487245872: Using default config.
1487245872: Opening ipv4 listen socket on port 1883.
1487245872: Opening ipv6 listen socket on port 1883.
2.Subscriber (ターミナル #2)
トピック topic/test を購読
$ mosquitto_sub -t "topic/test"
3.Publisher (ターミナル #3)
トピック topic/test にメッセージを発行
$ mosquitto_pub -t "topic/test" -m "Hello mosquitto"
4.Subscriber (ターミナル #2)
Publisher が発行したメッセージ(Hello mosquitto)が、Subscriber(ターミナル #2) に表示されれば成功です。
$ mosquitto_sub -t "topic/test"
Hello mosquitto
Node-RED
Node-RED のインストールもとても簡単です。
$ sudo npm install -g --unsafe-perm node-red
今回のフローはとてもシンプルです。
データを MQTT Broker から受信して、Websocket で送信するだけです。
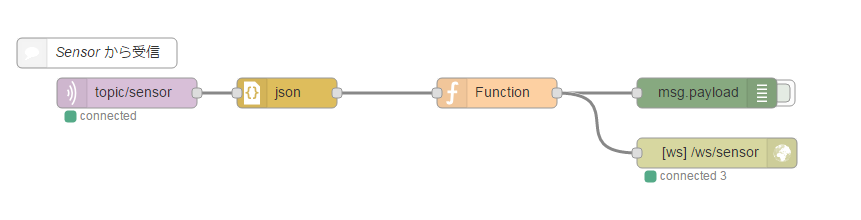
今回は Function で何も行っていませんが、データの加工やフィルタリングなどをするつもりです。
Wio Node
Arduino 化
Wio Node を Arduino 化するには USBシリアル変換アダプターが必要です。
私は FTDI USBシリアル変換アダプター Rev.2 を使用しました。
Arduino 化する方法はこちらのブログで詳しく説明されていますので助かりました。
MQTT ライブラリ
Wio Node は ESP8266 を搭載しているので、これに対応していて簡単に利用できる Adafruit MQTT Library をArduino IDE にインストールします。
「スケッチ」>「ライブラリをインクルード」>「ライブラリを管理…」で Adafruit MQTT Library を検索して最新版(0.17.0)をインストールしました。
プログラミング
Adafruit MQTT Library のサンプルスケッチ(mqtt_esp8266)をベースにしました。
コードを載せちゃいます。
# include <ESP8266WiFi.h>
# include <Wire.h>
# include <VL6180X.h>
# include "Adafruit_MQTT.h"
# include "Adafruit_MQTT_Client.h"

/************************* WiFi Access Point *********************************/

# define WLAN_SSID       "...your SSID..."
# define WLAN_PASS       "...your password..."

/************************* Adafruit.io Setup *********************************/

# define MQTT_SERVER      "xxx.xxx.xxx.xxx"
# define MQTT_SERVERPORT  1883                   // use 8883 for SSL
# define DEVICE_ID        1

/************ Global State (you don't need to change this!) ******************/

// Create an ESP8266 WiFiClient class to connect to the MQTT server.
WiFiClient client;
// or... use WiFiFlientSecure for SSL
//WiFiClientSecure client;

// Setup the MQTT client class by passing in the WiFi client and MQTT server.
Adafruit_MQTT_Client mqtt(&client, MQTT_SERVER, MQTT_SERVERPORT);

/****************************** topic ***************************************/

// センサの値を発行するためのトピックを設定
Adafruit_MQTT_Publish sensor = Adafruit_MQTT_Publish(&mqtt, "topic/sensor");

/*************************** Sketch Code ************************************/

void MQTT_connect();

// Sensor
VL6180X vl6180x;

void setup() {
  Serial.begin(115200);

  // 15 pin を HIGH にする(Wio Node を Arduino 化した時は必ず必要)
  pinMode(15, OUTPUT);
  digitalWrite(15,HIGH);

  delay(10);

  // Connect to WiFi access point.
  Serial.println(); Serial.println();
  Serial.print("Connecting to ");
  Serial.println(WLAN_SSID);

  WiFi.begin(WLAN_SSID, WLAN_PASS);
  while (WiFi.status() != WL_CONNECTED) {
    delay(500);
    Serial.print(".");
  }
  Serial.println();

  Serial.println("WiFi connected");
  Serial.println("IP address: "); Serial.println(WiFi.localIP());

  /*
   * Sensor 初期化
   */
  Wire.begin();
  vl6180x.init();
  vl6180x.configureDefault();

  // Reduce range max convergence time and ALS integration
  // time to 30 ms and 50 ms, respectively, to allow 10 Hz
  // operation (as suggested by Table 6 ("Interleaved mode
  // limits (10 Hz operation)") in the datasheet).
  vl6180x.writeReg(VL6180X::SYSRANGE__MAX_CONVERGENCE_TIME, 30);
  vl6180x.writeReg16Bit(VL6180X::SYSALS__INTEGRATION_PERIOD, 50);
  vl6180x.setTimeout(500);

   // stop continuous mode if already active
  vl6180x.stopContinuous();
  // in case stopContinuous() triggered a single-shot
  // measurement, wait for it to complete
  delay(300);
  // start interleaved continuous mode with period of 100 ms
  vl6180x.startInterleavedContinuous(100);
}

void loop() {
  // MQTT サーバへ接続
  MQTT_connect();

  /*
   * センサから値を取得
   */
  // ambient light measurement
  uint16_t ambient = vl6180x.readAmbientContinuous();
  bool ambientTimeout = vl6180x.timeoutOccurred();

  // distance
  uint16_t distance = vl6180x.readRangeContinuousMillimeters();
  bool diatanceTimeout = vl6180x.timeoutOccurred();

  /*
   * メッセージ生成
   * {
   *   id: デバイスID,
   *   sensor: {
   *     ambient:  環境光,
   *     distance: 距離 mm
   *   }
   * }
   */
  String json = "{";
  json += "\"id\":" + String(DEVICE_ID) + ",";
  json += "\"sensor\": {";

  // ambient light measurement
  json += "\"ambient\":";
  if (!ambientTimeout) {
    json += ambient;
  }
  else {
    json += -1;
  }
  json += ",";

  // distance
  json += "\"distance\":";
  if (!diatanceTimeout) {
    json += distance;
  }
  else {
    json += -1;
  }

  json += "}}";

  Serial.print(json);

  // publish!
  if (! sensor.publish(const_cast<char*>(json.c_str()))) {
    Serial.print(F("    Failed"));
  }
  Serial.println();

  delay(200);
}

// Function to connect and reconnect as necessary to the MQTT server.
// Should be called in the loop function and it will take care if connecting.
void MQTT_connect() {
  int8_t ret;

  // Stop if already connected.
  if (mqtt.connected()) {
    return;
  }

  Serial.print("Connecting to MQTT... ");

  uint8_t retries = 3;
  while ((ret = mqtt.connect()) != 0) { // connect will return 0 for connected
       Serial.println(mqtt.connectErrorString(ret));
       Serial.println("Retrying MQTT connection in 5 seconds...");
       mqtt.disconnect();
       delay(5000);  // wait 5 seconds
       retries--;
       if (retries == 0) {
         // basically die and wait for WDT to reset me
         while (1);
       }
  }
  Serial.println("MQTT Connected!");
}
1点だけ Wio Node を Arduino 化したときに注意点があります。
15 Pin を HIGH にしないと接続したセンサが使用できませんでした。
// 15 pin を HIGH にする(Wio Node を Arduino 化した時は必ず必要)
pinMode(15, OUTPUT);
digitalWrite(15, HIGH);
動作確認
センサからは 環境光 と 距離 を送信しましたが、画面には距離のみを表示しました。
箱とセンサの距離が近いと円が大きくなります。
Websocket を使用したので、ほぼ同時に値が更新されるはずですが。。。

スマートフォンがちょっと遅いですねぇ。
通常は 変化があったとき とか、閾値を超えたとき だけ通知や画面更新すると思うので、
まったく問題ないと思います。
まとめ
Wio Node も Arduino 化してしまえば色々できますね。
値段も安いし、ESP8266 を搭載しているので手軽に開発できます。
MQTT での Pub/Sub もライブラリを使えば簡単です。
ただ、セキュリティ面やサービス品質などをちゃんとやろうと思ったら、
もっと調べないとダメだなと思いました。(他のライブラリの方がいいかも)
でも MQTT + Node-RED は結構使いやすいなぁと思ったので、今後も使ってみると思います。