目次
0_前置き
1_基本の使用方法
2_条件分岐
3_human in the loop
4_multi agent
5_まとめ
6_おまけ 会話履歴の保存
0_前置き
PydanticAIは12月に発表されたばかりのAI Agentフレームワークです。
依存性注入によって、Agentとクラスや状態、他のAgent等を少ないコードで結びつけることができるため、FastAPIで依存性注入を仕込むような感覚で、カスタマイズがすごく簡単にできます。
この書き心地が非常に楽で、すっかりハマってしまいました。
公式のサンプルコードは結構凝っていて、雑に試すのが難しいと思いますので、いくつかのシンプルな例をもとに、紹介したいと思います。
1_基本の使用方法
初期設定
pydantic-aiをインストールします。
ログを可視化するために、Logfireを登録して使用することをお勧めします。
10 million span / 月までフリーで利用できます。
pip install pydantic-ai logfire
import os
from google.colab import userdata
os.environ["LOGFIRE_TOKEN"]=userdata.get('LOGFIRE_TOKEN')
Agent
Agentクラスを呼び出して、モデル名を指定します。
次のいずれかの関数でAgentの処理を実行します。
- run_sync(同期処理) *
- run(非同期処理)
- run_stream(ストリーミング)
from pydantic_ai import Agent

agent = Agent("openai:gpt-4o-mini")
result = await agent.run("hello")
print(result.data)

# Hello! How can I assist you today?
Tools
デコレータを使って、関数をAgentが利用可能なツールにすることができます。
@agent.tool
デコレータを用いたツールのAgentへの渡し方は、以下の2つがあります。- @agent.tool
- @agent.tool_plain
Dependency(依存性注入)を利用する関数の場合は、@agent.toolを使います。
この場合、第一引数に、RunContextが要求されます。*
from pydantic_ai import Agent

agent = Agent("openai:gpt-4o-mini")

@agent.tool_plain
async def add(a: int, b: int) -> int:
    return a + b

@agent.tool_plain
async def subtract(a: int, b: int) -> int:
    return a - b

@agent.tool_plain
async def multiply(a: int, b: int) -> int:
    return a * b

question = "太郎は既にいくらか貯金していました。太郎は1週間に1度バイトをして、5000円の報酬を即日受け取っていました。8週間後の太郎の貯金が全部で10万円になっていたとしたら、太郎は最初、少なくともいくら持っていましたか?"
result = await agent.run(question)
print(result.data)

# 太郎が最初に持っていた貯金は少なくとも60,000円でした。
関数を直接エージェントに渡すこともできます。
from pydantic_ai import Agent, Tool

async def add(a: int, b: int) -> int:
    return a + b

...(中略)...

agent = Agent("openai:gpt-4o-mini", tools=[Tool(add), Tool(subtract), Tool(multiply)])
Dependency
system_prompt、tool、result_validatorに対して、RunContextを第一引数に渡すことで、依存性注入を使用することができます。(FastAPIのDependsのような感じです。)
以下の例では、簡易的なデータベース操作を行う UserDatabase クラスを用意し、このクラスを依存関係としてAgentに渡してみました。
class UserDatabase:
    users = {
        "user1": {"name": "John Doe", "age": 18},
        "user2": {"name": "Tom Smith", "age": 21},
    }

    @classmethod
    def get_user_names(cls) -> list[dict]:
        user_names = []
        for user_id, user in cls.users.items():
            user_names.append({"id": user_id, "name": user["name"]})
        return user_names

    @classmethod
    def get_user(cls, user_id) -> dict:
        return cls.users.get(user_id)

    @classmethod
    def upsert_user(cls, user_id, name, age) -> None:
        cls.users[user_id] = {"name": name, "age": age}
このクラスを用いて、ツールに依存性注入を設定します。
from pydantic_ai import Agent, RunContext

agent = Agent("openai:gpt-4o-mini", deps_type=UserDatabase)


@agent.tool
async def get_user_names(ctx: RunContext[UserDatabase]) -> list[str]:
    return ctx.deps.get_user_names()


@agent.tool
async def get_user(ctx: RunContext[UserDatabase], user_id: str) -> dict:
    return ctx.deps.get_user(user_id)


@agent.tool
async def upsert_user(ctx: RunContext[UserDatabase], user_id: str, name: str, age: int) -> None:
    ctx.deps.upsert_user(user_id, name, age)


result = agent.run_sync(
    "Tomは何歳になっていますか?本当は22歳でした。間違っていたら修正・更新してください。",
    deps=UserDatabase,
)
print(UserDatabase.get_user("user2"))

# {'name': 'Tom Smith', 'age': 22}
依存性注入によって、AgentがUserDatabaseを操作できるようになり、Agentの動作を通じて、UserDatabaseのクラス変数に設定されたデータが更新されました。
2_条件分岐
Toolにprepareパラメータを設定すると、ツールの使用可否を動的に変更することができます。
これとDependencyを組み合わせることで、様々な条件分岐を設けることができます。
@agent.tool(prepare=check_authorization)
prepareに設定する関数の返り値は、ToolDefinition か Noneになります。
条件を満たす場合は、ToolDefinition(ツールの定義)を返すことで、Agentがツールを使えるようになり、満たさない場合は、ツールが使えません。
async def check_authorization(ctx: RunContext[bool], tool_def: ToolDefinition):
    if ctx.deps:
        return tool_def
以下の例では、依存関係としてbool変数を持つAgentに、deps=Trueを渡すことで、ツールを使用可能にしました。
(前略)
pip install tavily-python
from google.colab import userdata
os.environ["TAVILY_API_KEY"] = userdata.get('TAVILY_API_KEY')
from pydantic_ai.tools import ToolDefinition
from tavily import AsyncTavilyClient

agent = Agent(
    "openai:gpt-4o-mini",
    deps_type=bool,
)

async def check_authorization(ctx: RunContext[bool], tool_def: ToolDefinition):
    if ctx.deps:
        return tool_def

@agent.tool(prepare=check_authorization)
async def tavily_websearch(ctx: RunContext, question) -> str:
    """Search the web for the answer to the question."""
    api_key = os.getenv("Tavily_API_KEY")
    tavily_client = AsyncTavilyClient(api_key)
    answer = await tavily_client.qna_search(query=question)
    return answer


result = await agent.run("What is the 47th US president's name?", deps=True)
print(result.data)

# The 47th President of the United States is Donald Trump.
AgentはTavily Searchを利用できるようになるので、正しく第47代アメリカ大統領を答えることができます。
デコレータを利用しない場合
result = await agent.run("What is the 47th US president's name?", deps=True, tools=[Tool(tavily_websearch, prepare=check_authorization)])
3_human_in_the_loop
先ほどのコードを少しいじることで、簡易的なhuman in the loopを構築することもできます。
async def check_authorization(ctx: RunContext[bool], tool_def: ToolDefinition) -> ToolDefinition | None:
    if ctx.deps:
        return tool_def

    human_input = input("Do you authorize the use of the Tavily API? (y/n): ")
    if human_input.lower() == "y":
        ctx.deps = True
        return tool_def
check_authorizationにinput()を仕込みました。
これで、Agentがツールを呼び出す前に、人に許可の入力を求めることようになります。

人がyを入力すれば、depsにTrueの値が入り、Agentはツールを利用して検索することができるようになります。
画像はnを入力した場合です。Agentは検索ツールが利用できず、言い訳を返します。

4_multi_agent
Dependencyを使うことで、ツールを用いてエージェントを呼び出して実行することもできます。
これを利用して、各専門家エージェントに人物プロファイルを分析させて、その結果を集約するオーケストレーターエージェントを簡易的に作成してみました。
① AgentFactory
from pydantic import BaseModel, Field
from pydantic_ai import Agent


class AgentFactory(BaseModel):
    agents: dict = Field(default_factory=dict)

    def get_agent_names(self) -> list[str]:
        return list(self.agents.keys())

    async def run_agent(self, name: str, instruction: str, deps) -> str:
        agent = self.agents.get(name)
        if agent:
            response = await agent.run(instruction, deps=deps)
            print(response)
            return response.data
        return "Agent not found"
② オーケストレーター
DepsにAgentFactoryを渡すことで、オーケストレーターがAgent名のリストの取得や、Agentの実行をできるようにします。
また、Agent間で対象の人物プロファイルを受け渡すため、profileフィールドを設けました。
from dataclasses import dataclass, field

@dataclass
class Deps:
  profile: str
  factory: AgentFactory = field(default_factory=AgentFactory)

orchestrator = Agent("openai:gpt-4o", deps_type=Deps)


@orchestrator.tool
def get_agent_names(ctx: RunContext[Deps]) -> list[str]:
    return ctx.deps.factory.get_agent_names()


@orchestrator.tool
async def run_agent(ctx: RunContext[Deps], agent_name: str, instruction: str) -> str:
    return await ctx.deps.factory.run_agent(agent_name, instruction, ctx.deps.profile)
③ 各専門家エージェント
オーケストレーターに渡すエージェントを設定します。
エージェントがprofileをDepsから受け取れるようにするための簡易的なツールを渡します。
async def get_profile(ctx: RunContext[str]) -> str:
    return ctx.deps
agents = {
    "psycologist": Agent(
        "openai:gpt-4o",
        deps_type=str,
        system_prompt=["あなたは心理学者です。与えられた人物プロフィールから、人物の性格や価値観を予測してください。"],
        tools=[Tool(get_profile)]
    ),
    "economist": Agent(
        "openai:gpt-4o",
        deps_type=str,
        system_prompt=["あなたは経済学者です。与えられた人物プロフィールから、その人物の意思決定の特徴を分析してください。"],
        tools=[Tool(get_profile)]
    ),
    "political_scientist": Agent(
        "openai:gpt-4o",
        deps_type=str,
        system_prompt=["あなたは政治学者です。与えられた人物プロフィールから、その人物の社会観や政治的傾向を予測してください。"],
        tools=[Tool(get_profile)]
    ),
    "demographer": Agent(
        "openai:gpt-4o",
        deps_type=str,
        system_prompt=["あなたは人口統計学者です。与えられた人物プロフィールから、その背景的特徴を分析してください。"],
        tools=[Tool(get_profile)]
    ),
}
④ オーケストレーターの実行
サンプルプロファイル
ChatGPTに出力させた人物プロファイル例を使いました。sample_profile = {
"名前": "アリス",
"年齢": 30,
"職業": "ソフトウェアエンジニア",
"居住地": "東京都",
"趣味": ["読書", "ハイキング", "ヨガ"],
"家族構成": "一人暮らし",
"年収": "750万円",
"最近あった出来事": "職場で新しいプロジェクトのリーダーに選ばれた",
"最近買って良かったもの": "ノイズキャンセリングヘッドホン(3万円)",
"ここ1年間で一番の出費": "海外旅行(約25万円)",
"ECサイトの利用頻度": "週1〜2回",
"平均購入金額": "5000円",
"主な購入カテゴリ": ["書籍", "アウトドア用品", "ガジェット"],
"購入履歴": [
{"商品名": "登山用リュック", "価格": 12000, "購入日": "2024-03-15"},
{"商品名": "技術書『Clean Code』", "価格": 4500, "購入日": "2024-04-10"},
{"商品名": "Bluetoothイヤホン", "価格": 8500, "購入日": "2024-05-01"},
{"商品名": "ヨガマット", "価格": 3000, "購入日": "2024-07-22"},
],
"ウィッシュリスト": [
"ハイエンドノートPC",
"トレッキングシューズ",
"電子書籍リーダー"
],
"デバイス利用傾向": {
"PC": "主に情報収集やレビュー確認に使用",
"スマートフォン": "ECサイトでの購入に使用",
},
"広告の反応": {
"SNS広告": "興味を持つが、即購入はしない",
"メールマーケティング": "個別オファーに興味を示す",
},
"生活スタイル": {
"平日": "仕事が中心で、自炊と読書の時間を大切にする",
"週末": "アウトドア活動や友人との交流を重視",
},
"関心キーワード": ["自己成長", "ワークライフバランス", "持続可能性"],
"チャレンジしたいこと": "新しいプログラミング言語の習得とトレイルランニング",
}
エージェントとサンプルプロファイルをオーケストレーターに渡して実行します。
result = await orchestrator.run(
    f"""
    与えられた人物プロファイルについて、4人の専門家エージェントの意見を日本語で集約して、購買動機と購買心理を推測してください。
    出力には、各エージェントの見解を箇条書きにして追加してください。

    # サンプルプロファイル:
    {sample_profile}
    """,
    deps=AgentFactory(agents=agents),
)
print(result.data)
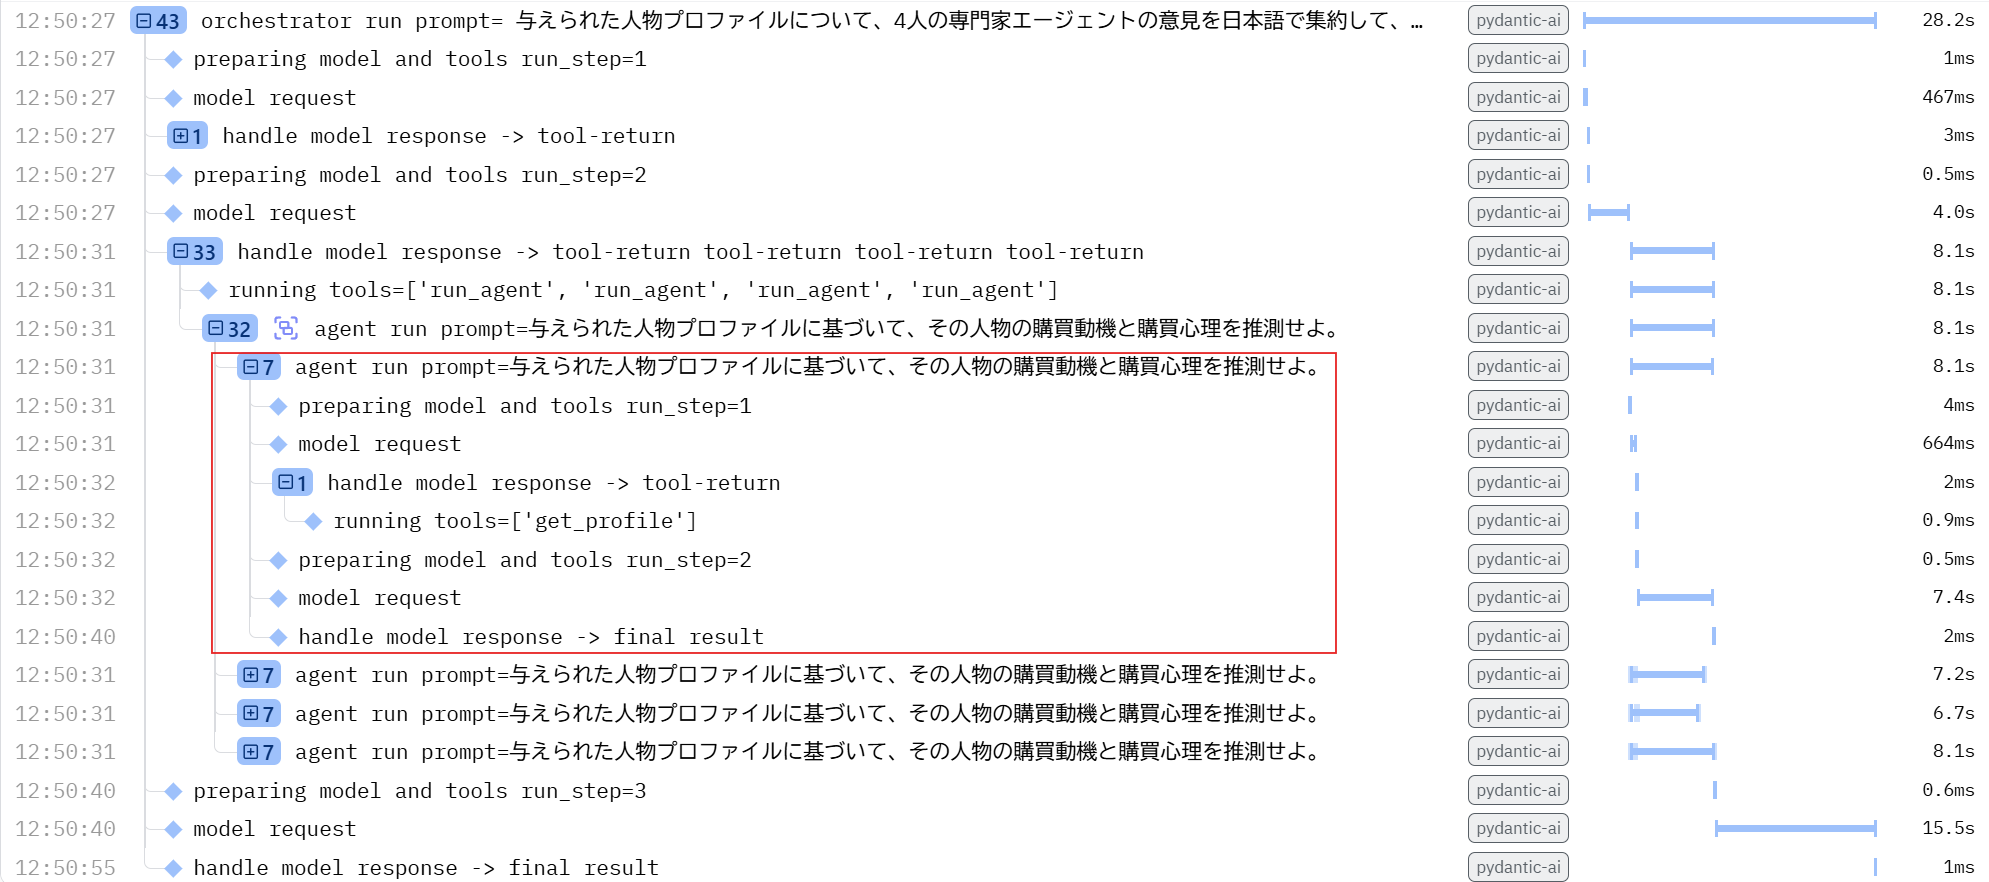
実行すると、以下のようにオーケストレーターが各専門家エージェントに指示プロンプトを渡して実行します。
専門家エージェントはツールを実行して、サンプルプロファイルを取得し、それに基づいて分析した結果を出力します。
5_まとめ
AI AgentフレームワークPydanticAIを用いて、いくつかの例を紹介してみました。
ここで紹介したコードはあくまでも自分が試したコードなだけなので、色んな実装の方法があると思います。
(それくらいPydanticAIはシンプルで柔軟に構成できるフレームワークです)
PydanticAIはいいぞ!
6_おまけ_会話履歴の保存
PydanticAIは、詳細な実行ログをjsonで保存、読み取りすることができます。
また、その実行ログを次の実行時に渡しさえすれば、それが会話履歴としてLLMに渡されます。
そのため、実行ログをJSONフォーマットに変換して、jsonb形式でデータベースに保存しておけば、そのまま会話を再開することができるようになります。めっちゃ楽です。
from pydantic_ai.messages import ModelMessage, ModelMessagesTypeAdapter

# save
message_history = result.all_messages()
message_history_json = ModelMessagesTypeAdapter.dump_json(message_history)
# (アプリケーションでは、このmessage_history_jsonをデータベースに保存しておく)

# read
retrieved_message_history = ModelMessagesTypeAdapter.validate_json(message_history_json)

# 会話履歴をAgentに渡して再開
result = await agent.run("前の会話を要約してください。", message_history=retrieved_message_history )


