※本記事は、一般に公開されている情報を元に作成しています
※図は WWDC 2016 の Advanced Notifications より引用しています
WWDC2016 での大きな発表の1つに Notification の変化があります。
新しく User Notifications Framework が追加され、Local Notification と Remote Notification を扱うクラスが結合される、配信できる情報がリッチになるなど様々な変更が発表されました。
変更の概要については以下の記事が詳しいのでご参考ください。
Notification に画像や動画をつけられるようになった
いろいろな変更の中でも、自分が気になったのは Notification に画像や動画をつけられることです。
モバイルアプリではプッシュ通知戦略は非常に大事とされていますが、この変更によりさらにユーザー体験をあげることができると思います。
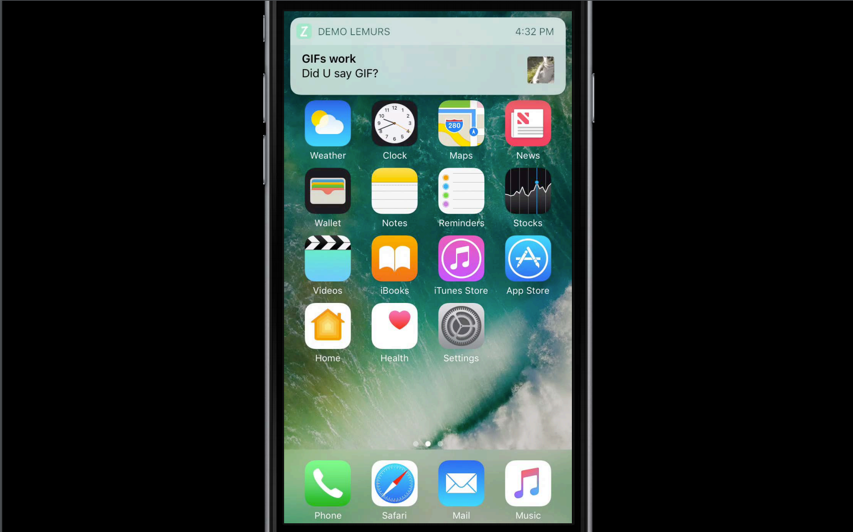
Attachment つきの Notification を受け取ると、上の図のように、Notification の右端に画像や動画のサムネイルが表示されます。そして、通知を 3D Touch すると画像が大きく表示されます。
画像つき Remote Notification の配信方法
実際に画像つきの Notification を送る方法について書きます。
概要
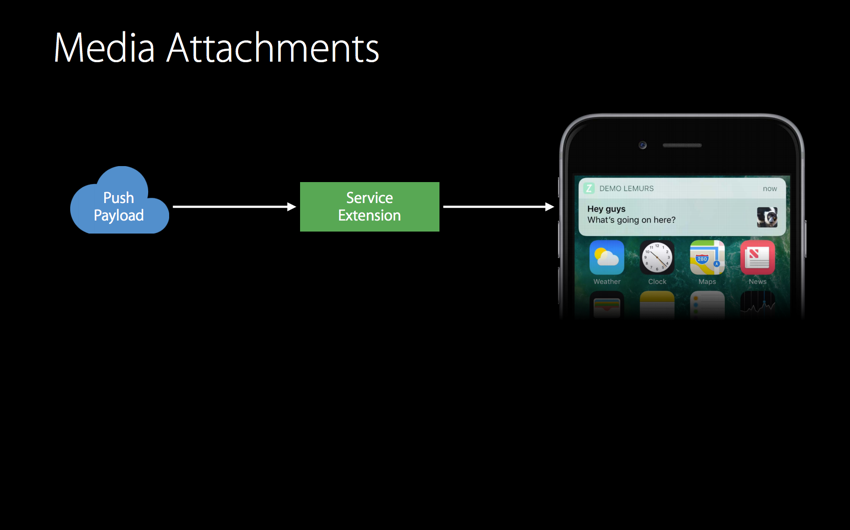
APNs から配信する Remote Notification で画像をつけるには、iOS 10 から追加された Notification Service Extension を使います。
- プッシュ通知の Payload に画像URLを指定しておいて、
- Notification Service Extension で画像のダウンロードを行い、
- 端末に通知される
という流れになります。順にみていきましょう。
プッシュ通知のPayload
APNs で配信するプッシュ通知の payload は以下のようになります。
{
	"aps": {
		"alert": {
			"title": "Title",
			"subtitle": "SubTitle",
			"body": "Body"
		},
		"badge": 1,
		"mutable-content": 1
	},
	"image_url": "http://img.tiqav.com/3om.th.jpg"
}
ここで重要なのは "mutable-content": 1 の指定です。
これまでも Silent Notification を使う際に "content-available": 1と指定していましたが、Notification Service Extension でハンドリングするには同じように mutable-content を 1 にします。
また、"image-url"という名前で画像のURLを指定しています。
(このkey名はなんでも良くて、今回はたまたま"image-url"としています)
Notification Service Extension
続いて Notification Service Extension の中身を実装します。
Notification Service Extension の追加
まずは Extension を追加します。やり方はこれまでの他の Extension と同じように、
- Xcode の File > New > Target
- 左のバーで iOS > Application Extension を選択し、Notification Service を選んで Next
- Target名などを指定して Finish
とすれば追加できます。
ここで、NotificationService.swiftというファイルが生成されており、以下のメソッドが宣言されています。
override func didReceive(_ request: UNNotificationRequest, withContentHandler contentHandler:(UNNotificationContent) -> Void) {
  ...
}
このメソッドの中身を拡張していきます。
通知をハンドリングするための実装を行う
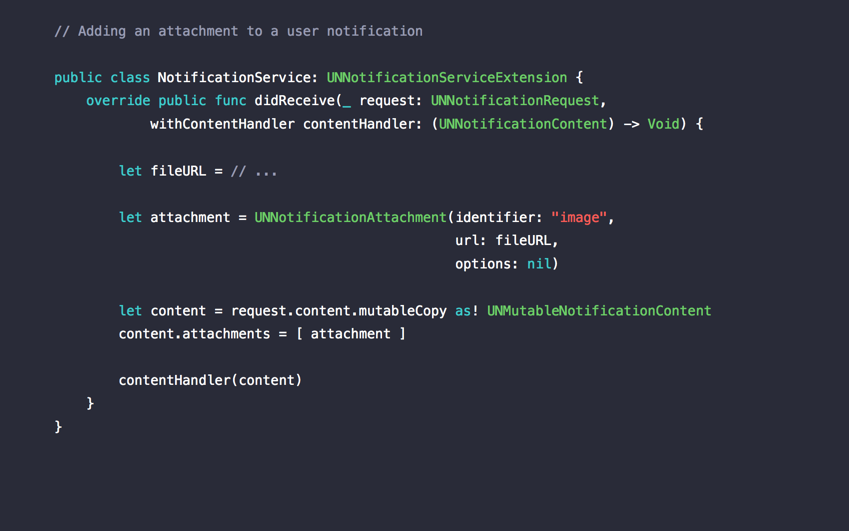
先に全体の流れをみていくと、requestパラメータの中身をみて画像URLを取得し、NSURLSessionなどの方法を使って画像を保存します。
保存した画像のパス(fileURL)をもとにUNNotificationAttachmentクラスのインスタンスを生成し、それを通知の中身にあたるcontentにセットして、最後にハンドラに渡せば通知が端末に届けられます。
具体的には以下のようなコードで実装できます。
override func didReceive(_ request: UNNotificationRequest, withContentHandler contentHandler:(UNNotificationContent) -> Void) {
    self.contentHandler = contentHandler
    bestAttemptContent = (request.content.mutableCopy() as? UNMutableNotificationContent)

    if let imageUrl = request.content.userInfo["image-url"] as? String {
        let session = URLSession(configuration: URLSessionConfiguration.default())
        let task = session.dataTask(with: URL(string: imageUrl)!, completionHandler: { (data, response, error) in
            do {
                if let writePath = NSURL(fileURLWithPath:NSTemporaryDirectory())
                    .appendingPathComponent("tmp.jpg") {
                    try data?.write(to: writePath)

                    if let bestAttemptContent = self.bestAttemptContent {
                        bestAttemptContent.title = "\(bestAttemptContent.title) [modified]"
                        let attachment = try UNNotificationAttachment(identifier: "tiqav", url: writePath, options: nil)
                        bestAttemptContent.attachments = [attachment]
                        contentHandler(bestAttemptContent)
                    }
                } else {
                    // error: writePath is not URL
                    if let bestAttemptContent = self.bestAttemptContent {
                        contentHandler(bestAttemptContent)
                    }
                }
            } catch _ {
                // error: data write error or create UNNotificationAttachment error
                if let bestAttemptContent = self.bestAttemptContent {
                    contentHandler(bestAttemptContent)
                }
            }
        })
        task.resume()
    } else {
        if let bestAttemptContent = self.bestAttemptContent {
            bestAttemptContent.title = "\(bestAttemptContent.title) [modified]"
            contentHandler(bestAttemptContent)
        }
    }
}
このように実装することで、Payload の中のimage-urlから画像をダウンロードし、通知に attachment することができます。
ちなみにtitleに[modified]と追加しているのはデバッグのためであまり意味はありません。
Service Extension には時間切れがある
didReceiveのメソッドで画像のダウンロードや動画のダウンロードなどを行うわけですが、実行できる時間には限りがあります。明確な時間の値は発表されていなかったと思いますが、あまり重いコンテンツを扱わないように注意しましょう。
もし時間切れとなった場合は、UNNotificationServiceExtensionクラスのserviceExtensionTimeWillExpire() というメソッドが呼ばれます。
適切にハンドラを実行するなどして、通知が届かないなんてことがないようにしましょう。
override func serviceExtensionTimeWillExpire() {
    if let contentHandler = contentHandler, let bestAttemptContent =  bestAttemptContent {
        contentHandler(bestAttemptContent)
    }
}
その他
この記事では Notification Service Extension で画像つき Notification を配信する方法について書きました。
通知関連で追加されたもう一つのExtensionである Notification Content Extension を使えば通知の詳細画面(通知を3D Touchした画面)をカスタムすることができます。

こちらについてはまた別の記事で書く予定ですが、詳しく知りたい方は Advanced Notifications のセッションを見てみてください。
参考
WWDC
- Introduction to Notifications - WWDC 2016 - Videos - Apple Developer
- Advanced Notifications - WWDC 2016 - Videos - Apple Developer
ドキュメント
- UserNotifications - Apple Developer Documentation
- UserNotificationsUI - Apple Developer Documentation
解説