
はじめに
FLAMLは、Microsoft 製のAutoML。
少ない計算リソースで、最適な機械学習モデルの選択、ハイパーパラメータ最適化を自動的にすばやく実行してくれるPython ライブラリです。
実行するとわかりますが、ほんと爆速です。
FLAMLのサイトのExamplesで公開されているコードの実行で基本的にはこと足りますが、GoogleColabで分類・回帰のタスクを切り替えられるようにし、分類ならば混同行列、回帰ならば真値と予測値を可視化しました。
実行条件など
-Google colabで実行
-任意のデータセットとsklearn等のデータセットを読み出せるようにしています。
実行
ライブラリのインストール
Python
#@title **Install Library**
!pip install flaml
Python
#@title Import
import pandas as pd # 基本ライブラリ
import numpy as np # 基本ライブラリ
import matplotlib.pyplot as plt # グラフ描画用
import seaborn as sns; sns.set() # グラフ描画用
import warnings
warnings.filterwarnings('ignore')
データセットとデータセットタイプ(分類か回帰)選択のフォームセット
Python
#@title **Select_Dataset** { run: "auto" }
dataset = 'Breast_cancer :binary' #@param ['Boston_housing :regression', 'Diabetes :regression', 'Breast_cancer :binary','Titanic :binary', 'Loan_prediction :binary', 'Upload']

#@title **Classification**(分類)or **Regression**(回帰)
dataset_type = 'Classification' #@param ["Classification", "Regression"]
GoogleColabのセルは以下のフォーム表示になります。

データセット読み込み→データセットのインフォと先頭5行表示
Python
#@title **Load Dataset**
if dataset =='Upload':
from google.colab import files
uploaded = files.upload()#Upload
target = list(uploaded.keys())[0]
df = pd.read_csv(target)
elif dataset == "Diabetes :regression":
from sklearn.datasets import load_diabetes
dataset = load_diabetes()
df = pd.DataFrame(dataset.data, columns=dataset.feature_names)
df["target"] = dataset.target
elif dataset == "Breast_cancer :binary":
from sklearn.datasets import load_breast_cancer
dataset = load_breast_cancer()
df = pd.DataFrame(dataset.data, columns=dataset.feature_names)
df["target"] = dataset.target
elif dataset == "Titanic :binary":
data_url = "https://raw.githubusercontent.com/datasciencedojo/datasets/master/titanic.csv"
df = pd.read_csv(data_url)
X = df.drop(['Survived'], axis=1) # 目的変数を除いたデータ
y = df['Survived'] # 目的変数
df = pd.concat([X, y], axis=1)
elif dataset == "Loan_prediction :binary":
data_url = "https://github.com/shrikant-temburwar/Loan-Prediction-Dataset/raw/master/train.csv"
df = pd.read_csv(data_url)
else:
from sklearn.datasets import load_boston
dataset = load_boston()
df = pd.DataFrame(dataset.data, columns=dataset.feature_names)
df["target"] = dataset.target
#X = pd.DataFrame(dataset.data, columns=dataset.feature_names)
#y = pd.Series(dataset.target, name='target')
source = df.copy()
FEATURES = df.columns[:-1]
TARGET = df.columns[-1]
X = df.loc[:, FEATURES]
y = df.loc[:, TARGET]
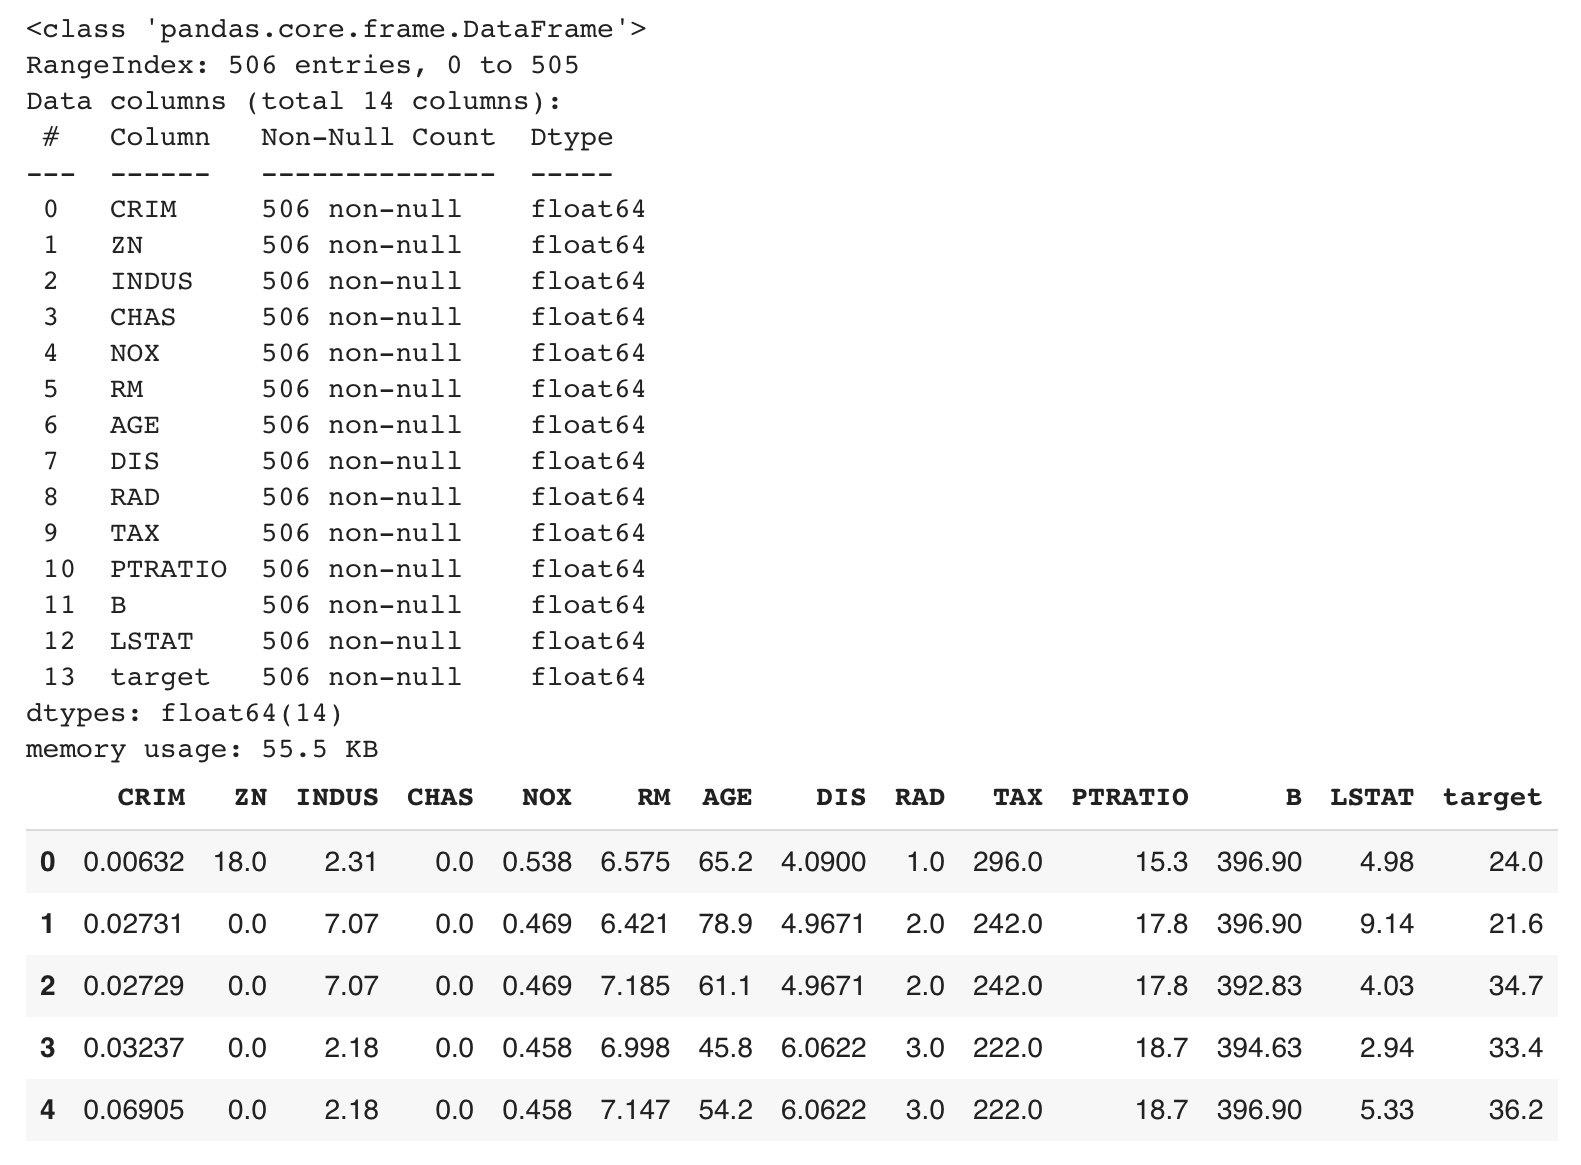
df.info()
df.head()
以下は、BostonHousingデータセット(回帰)で実行した結果です。
FLAMLセッティングフォームセットと学習
time_budget (探索時間:秒)とtest_size(テストデータ分割比)をスライドバーで切り替えられるようにし、分類はaccuracy、回帰はr2を指標に自動実行させています。
Python
#@title FLAML Setting → Run

time_budget = 50 #@param {type:"slider", min:20, max:300, step:10}
test_size = 0.2 #@param {type:"slider", min:0.1, max:0.9, step:0.1}

from flaml import AutoML

automl = AutoML()

if dataset_type =='Classification':
  automl_settings = {
      "time_budget": time_budget,
      "metric": 'accuracy',
      "task": 'classification',
      "log_file_name": "Classfication.log",
}

else:
  automl_settings = {
      "time_budget": time_budget,
      "metric": 'r2',
      "task": 'regression',
      "log_file_name": "Regression.log",
}

from sklearn.model_selection import train_test_split

if dataset_type =='Classification':
  X_train, X_test, y_train, y_test = train_test_split(X, y, test_size=test_size, random_state=42, stratify=y)

else:
  X_train, X_test, y_train, y_test = train_test_split(X, y, test_size=test_size, random_state=42)

automl.fit(X_train=X_train, y_train=y_train, **automl_settings)
実行すると、以下のように学習ログが表示されます。

最適モデル、ハイパーパラメータ、精度、学習時間表示
Python
#@title Best model
print('✓ Best ML leaner:', automl.best_estimator)
print('✓ Best hyperparmeter config:', automl.best_config)
print('✓ Best accuracy on validation data: {0:.4g}'.format(1-automl.best_loss))
print('✓ Training duration of best run: {0:.4g} s'.format(automl.best_config_train_time))
#print(automl.model.estimator)
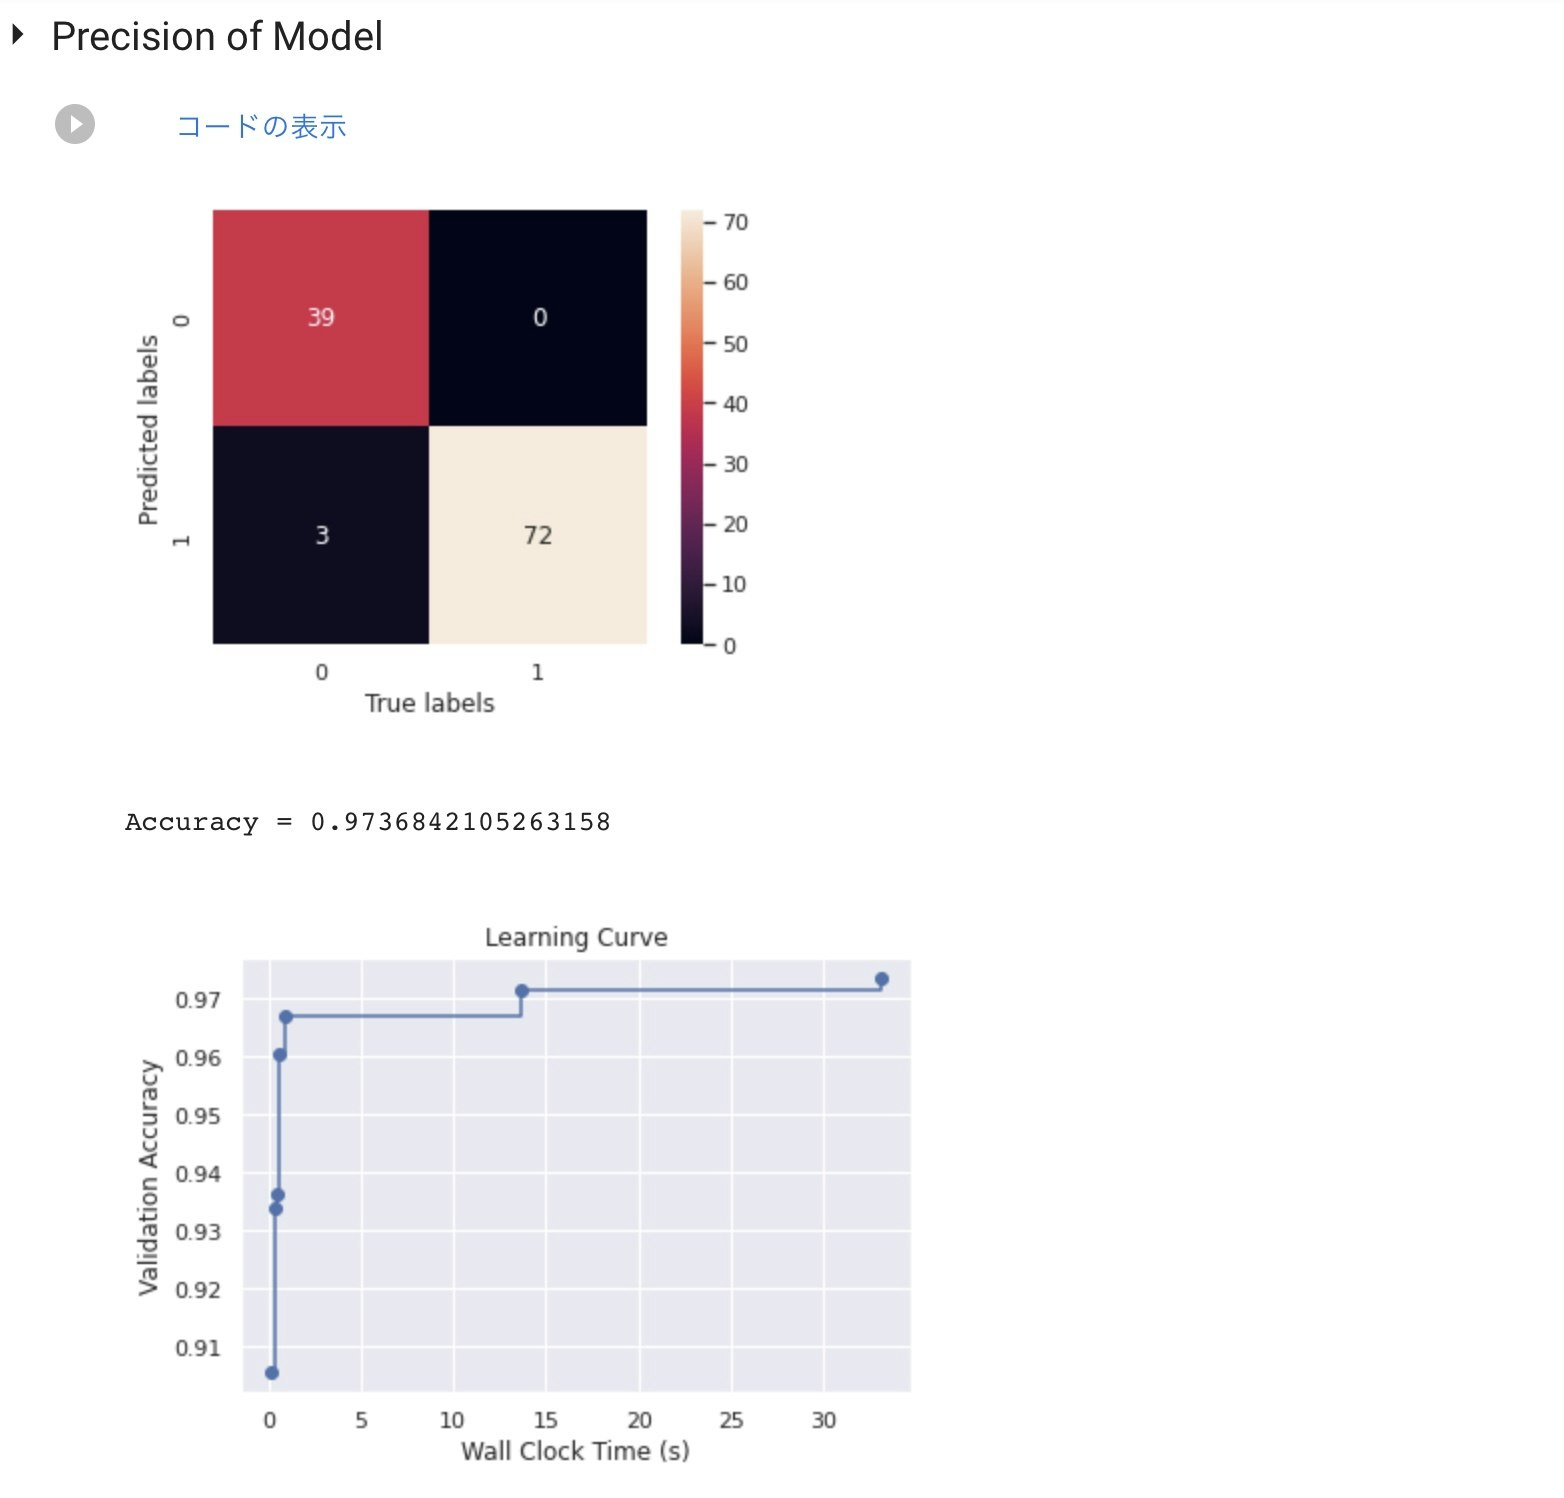
以下は、BreastCancerデータセット(分類)で実行した結果です。

モデル評価(可視化)と学習曲線表示
Python
#@title Precision of Model
from flaml.ml import sklearn_metric_loss_score

if dataset_type =='Classification':
  from sklearn.metrics import confusion_matrix
  y_pred = automl.predict(X_test)
  matrix = confusion_matrix(y_test, y_pred)
  sns.heatmap(matrix.T, square=True,annot=True)
  plt.xlabel('True labels')
  plt.ylabel('Predicted labels')
  plt.show()
  print('\n')
  print('Accuracy', '=', 1 - sklearn_metric_loss_score('accuracy', y_pred, y_test))

else:
  y_pred = automl.predict(X_test)
  plt.figure(figsize = (5,5))
  plt.title('Prediction Accuracy')
  ax = plt.subplot(111)
  ax.scatter(y_test, y_pred,alpha=0.9)
  ax.set_xlabel('True labels')
  ax.set_ylabel('Predicted labels')
  ax.plot(y_test,y_test,color='red',alpha =0.5)
  plt.show()
  print('\n')
  print('✓ R2', '=', 1 - sklearn_metric_loss_score('r2', y_pred, y_test))
  print('✓ RMSE', '=', sklearn_metric_loss_score('rmse', y_pred, y_test))

#print('Predicted labels', y_pred)
#print('True labels', y_test)

print('\n')

import matplotlib.pyplot as plt
import numpy as np
from flaml.data import get_output_from_log

time_history, best_valid_loss_history, valid_loss_history, config_history, train_loss_history = get_output_from_log(filename=automl_settings['log_file_name'], time_budget=60)

plt.title('Learning Curve')
plt.xlabel('Wall Clock Time (s)')
plt.ylabel('Validation Accuracy')
plt.scatter(time_history, 1 - np.array(valid_loss_history))
plt.step(time_history, 1 - np.array(best_valid_loss_history), where='post')
plt.show()
以下は、BreastCancerデータセット(分類)で実行した結果です。
以下は、BostonHousingデータセット(回帰)で実行した結果です。

最後に
この記事では、分類と回帰タスクをFLAMLで実行しましたが、FLAMLのサイトのExamplesにある通り、その他さまざまなタスクに対応しています。
とにかく軽いし、速いし、高い精度も得られています。
謳い文句の通り、機械学習モデルの選択とハイパーパラメータ調整から開放してくれます。
試す価値ありです。
参考