はじめに
テキストデータに含まれる語句の出現頻度からテキストデータの内容を探る代表的なツールに、WordCloudがあります。
例えば、テキストデータが「ポジティブ」と「ネガティブ」というクラスでカテゴリー表現されている場合、ポジティブデータとネガティブデータでWordCloudを描き、両者を比較することもあります。
これはこれでクラスの違いを把握する一つの方法かと思いますが、クラスの違いが一目で見られるとよりよいのではないでしょうか?
そんな時に有効なツールのひとつが scattertext です。
散布図で文字をプロット・・・と耳にすると、ちょっと散らかってみにくいような印象を持つ方もおられるかもしれませんが、scattertextは 表示語句が他のラベルやプロットと重ならないように選択的にラベル付けされ、シンプルかつ美しく視覚化できる文字の散布図です。
scattertextについて
以下の図は、positiveとnegativeでカテゴリー区分されたテキストデータを、Y軸:positiveとX軸:negativeで描いたscattertextです。
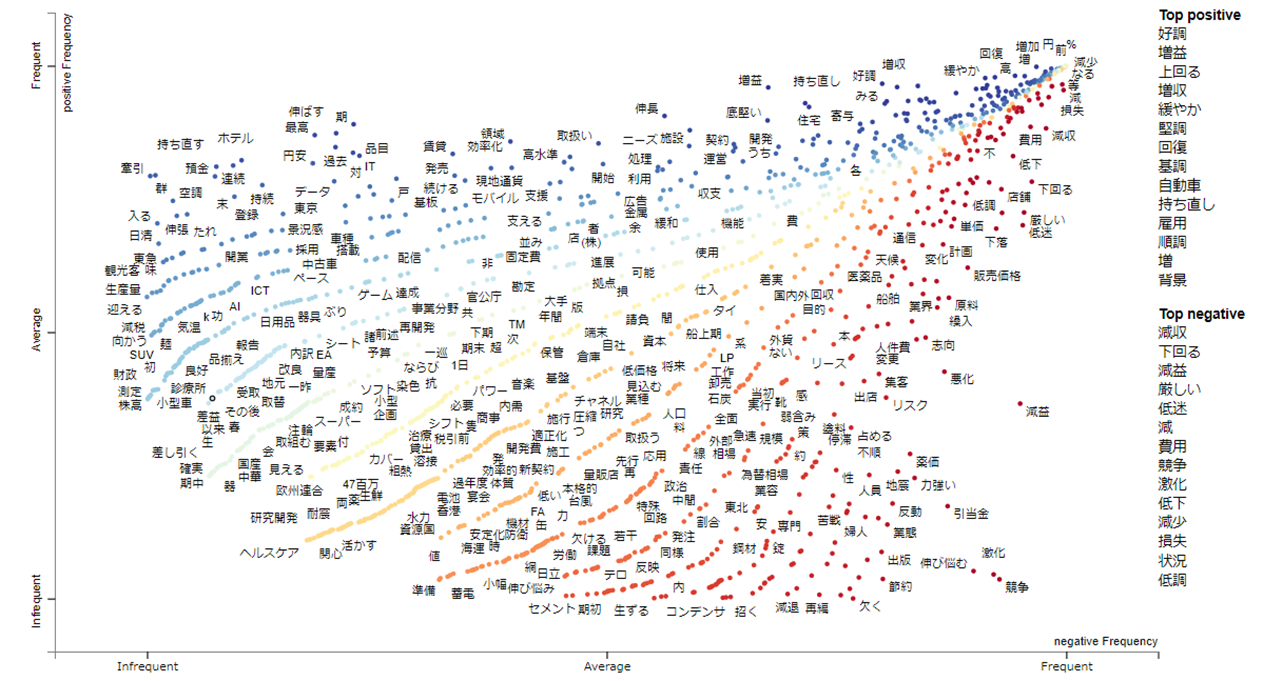
scattertextのプロットは、語句の出現頻度から導き出されたXY座標です。
この例の場合は、Y軸は positiveクラスを、X軸は negativeクラスを表し、Y軸の場合は上に行くほど、X軸の場合は下に行くほど頻度が多い語句が配置されます。
scattertext を見る醍醐味は、テキストデータに含まれる語句でクラス毎の特徴の違いを把握する ことにあります。
まずは、クラス毎の特徴の違いがscattertextにどのよう様にあらわれるかを知っておかないといけません。
先のscattertextの例からわかる通り、
positiveクラスは青色、negativeクラスは赤色で表現されますので、クラスの違いや positiveクラス、negativeクラスそれぞれにおいて出現頻度が高い語句にどのようなものがあるだろうか?というのは簡単に把握することができます。
ただ、出現頻度が高い語を把握するだけならWordCloud等で十分です。
scattertextの醍醐味は、クラス毎の特徴の違いを把握することにありますから、scatterplotのどこにどのような傾向があらわれるかを知ることが大事です。
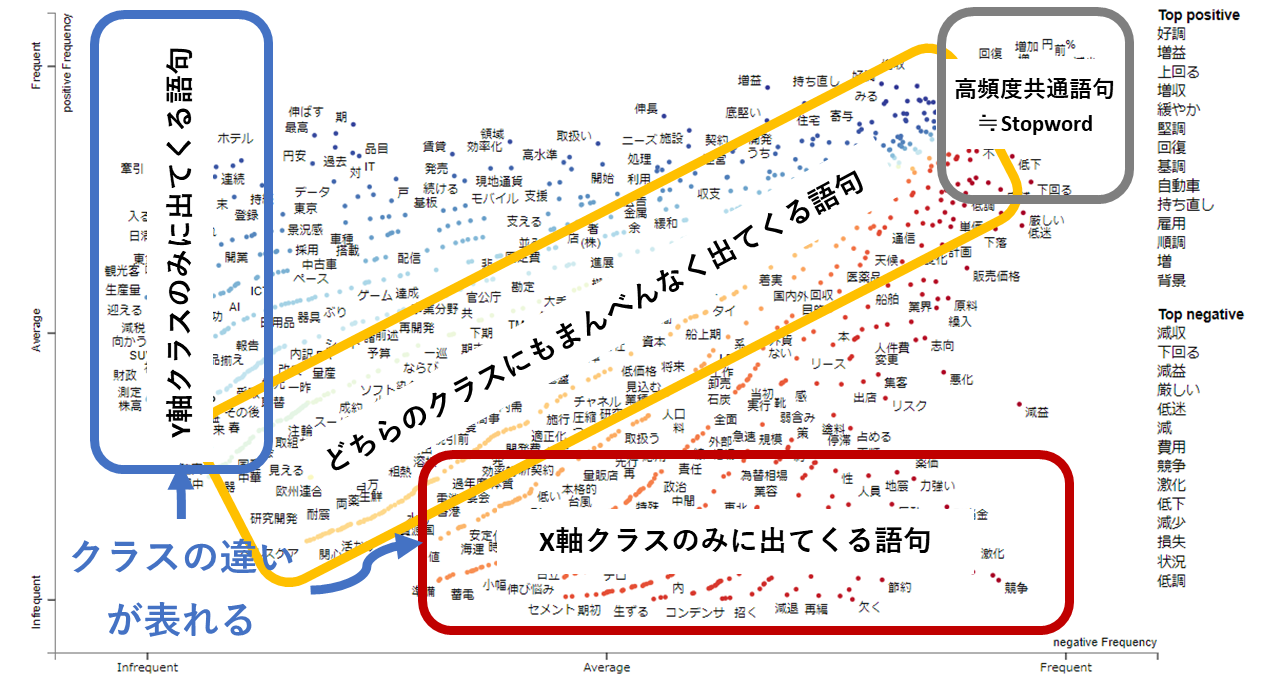
まず、右上(グレー枠) から見てみます。
この位置には、positiveクラスにおいても、negativeクラスにおいても出現頻度の高い語句が配置されます。
この例では、テキスト処理の段階で品詞を絞っていますので、いわゆる不要語はそれほど多くはないですが、不要語(=stopword)が出やすい場所です。どんなテキストでも普通に出てきやすい語句が主となりますので、ここの語句はクラスの違いを見るうえで重視する必要はありません。
つぎにscattertextの**対角線上の範囲(黄色枠)**を見てみます。
この範囲には、黄色やオレンジ色のプロットが数多く配置されています。この範囲には、2つのクラスに共通する語句が配置され、グラフの右上に行くほど頻繁に共通する語句となります。
つぎに scattertextの左端に位置する青枠の範囲を見てみましょう。
この範囲には、positiveランクのみにあらわれる語句が配置されます。
上に行くほど頻度が高い語句となりますので、どのような語句がpositiveランクのテキストで使われているかを把握することができます。
最後にscattertextの下端に位置する赤枠の範囲を見てみましょう。
この範囲には、negativeランクのみにあらわれる語句が配置されます。
右に行くほど頻度が高い語句となりますので、どのような語句が negativeランクのテキストで使われているかを把握することができます。
以上のように、ランクの特徴をあらわす語句は左端と下端にあらわれますので、ランクの違いは左端と下端の語句の違いで把握することができるというものになっています。
テキスト分析を行なう場合は、前処理が重要と言われますが、scattertext はこのように語句を配置してくれますので、細かいことを気にかける前に、まずはざっと全体感を掴む際に利用してもよいのかもしれません。
実行条件など
-Google colabで実行
-chABSA-dataset をダウンロード、ネガポジを示す値をpositive/negativeの二値に変換したデータでscattertextを描いています。
実行
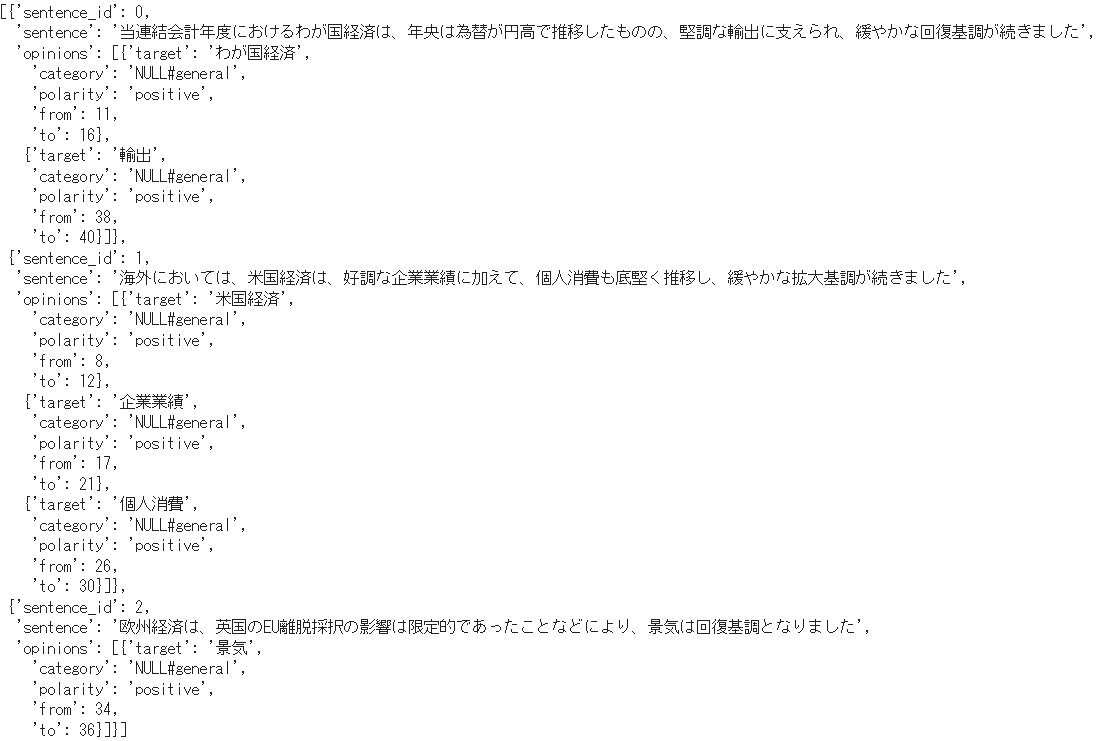
以下は、chABSA-dataset(上場企業の有価証券報告書(2016年度)をベースに作成されたデータセット)の先頭3データです。
sentenceがテキストデータ、targetはテキストにおける特徴的な語句のようです。
targetである特徴的な語句毎にpositiveであるかnegativeであるかが、porlarityで示されています。
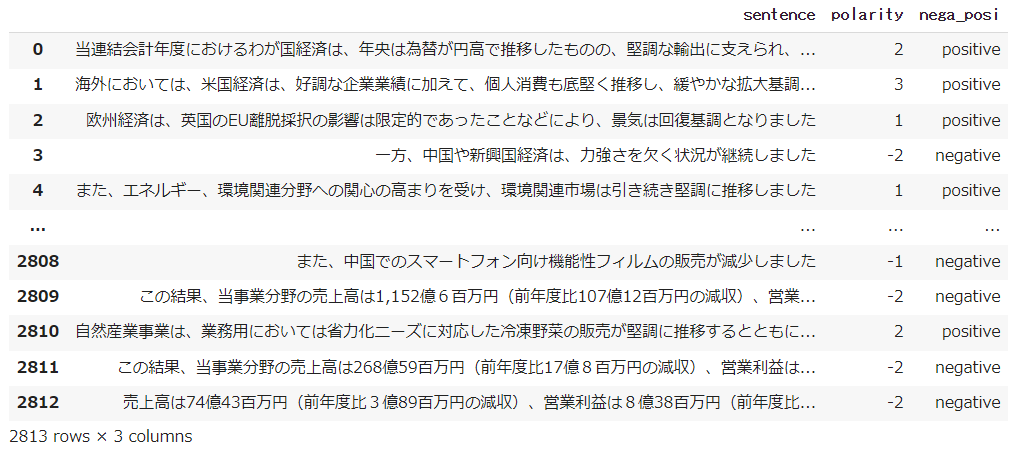
chABSA-dataset をダウンロード後、各sentenceのpolarityを確認し、positiveならば「1」、negativeならば「-1」とし、その総和がプラスならば「positive」、マイナスならば「negative」に二値変換しデータフレームに格納しました。
テキスト処理は、Ginzaを使用。最低限の前処理を行い、名詞・固有名詞・動詞・形容詞のみを抽出しました。
scattertextに適用するcopasは、テキストとカテゴリーデータを格納したデータフレームカラムを指定して処理する必要があります。

※当初、ja_gsdluw(国語研長単位モデル)を使用しましたが、このデータで処理に20分程度要しましたので、ja_ginzaで実行(約2分)しています。
copas処理後、scattertext を描かせるためには、カテゴリーデータのカテゴリー名(クラス名)を指定する必要があります。
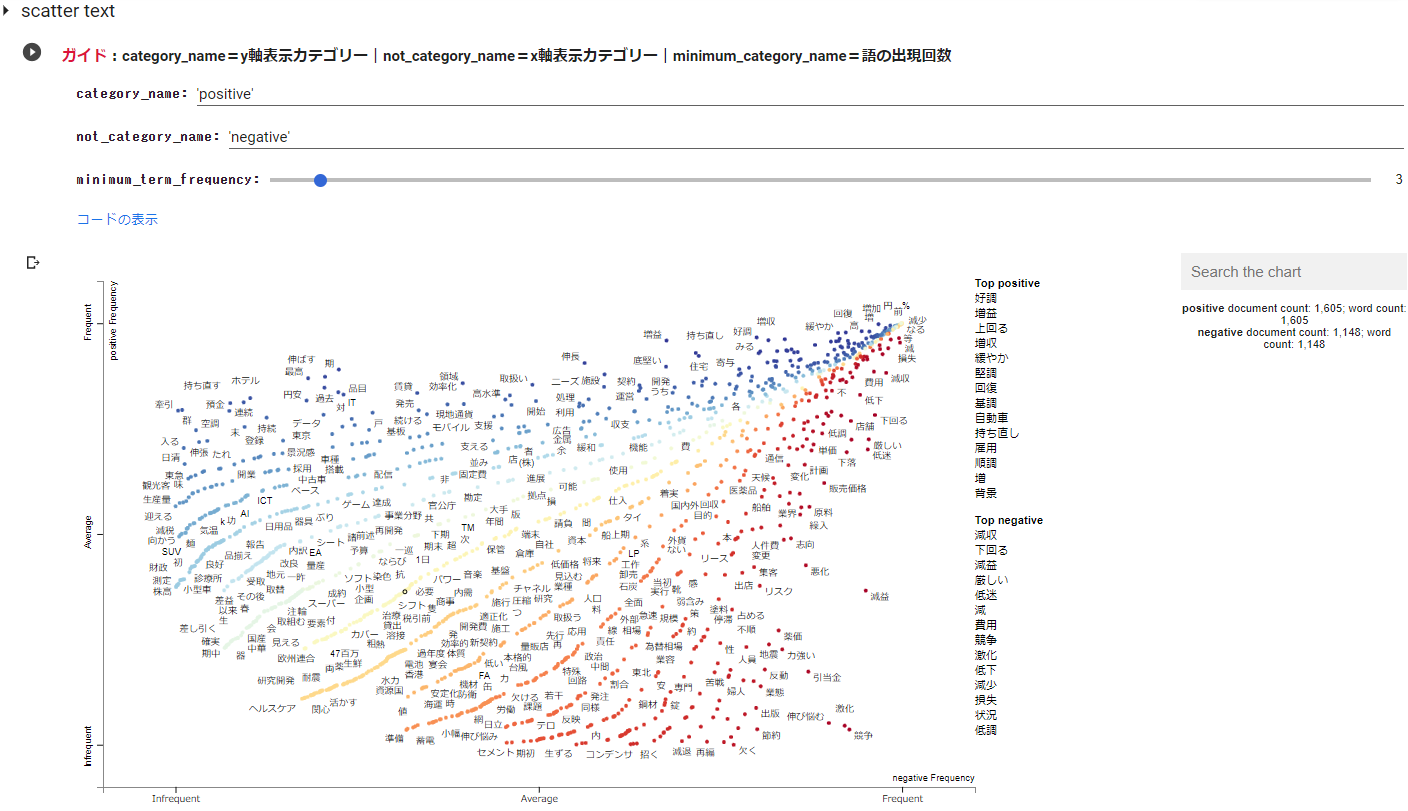
今回のデータは、positiveとnegativeとなりますので、category_nameにpositiveを、not_category_nameにnegativeを入力しています。
※Y軸、X軸のラベル名も指定することができます。Y軸はcategory_nameに、X軸はnot_category_nameと対応しており、今回はY軸:category_name=positive=Y軸ラベル名、X軸:not_category_name=negative=X軸ラベル名としています。
また、語句の最低出現回数である minimum_term_frequency を指定することができます。
上記のscattertextは、minimum_term_frequency=3で描いたものです。
実行コード
!pip install scattertext
!pip install ginza

# GiNZAインストール後にランタイム再起動しなくて済むようにする
import pkg_resources, imp
imp.reload(pkg_resources)
!pip install https://github.com/megagonlabs/UD_Japanese-GSD/releases/download/r2.9-NE/ja_gsdluw-3.2.0-py3-none-any.whl
!pip install ja-ginza==5.1.0
#ライブラリのインストール
import re
import json
import glob
import numpy as np
from sklearn.model_selection import train_test_split
import pandas as pd
import tqdm as tq
from tqdm import tqdm
import warnings
warnings.simplefilter('ignore')
#@title chABSA-datasetダウンロード
!wget https://s3-ap-northeast-1.amazonaws.com/dev.tech-sketch.jp/chakki/public/chABSA-dataset.zip
!unzip chABSA-dataset.zip
!rm chABSA-dataset.zip

# ファイルパスリスト
path_list = glob.glob("chABSA-dataset/*.json")

# ファイル読込み
with open(path_list[0], "br") as f:
    j =  json.load(f)
sentences = j["sentences"]
display(sentences[0:3])
#@title データフレーム格納
def create_rating(sentences):
    rating = []
    for obj in sentences:
        s = obj["sentence"]
        op = obj["opinions"]
        polarity = 0
        for num in op:
            nega_posi = num["polarity"]
            if nega_posi == "positive":
                polarity += 1
            elif nega_posi == "negative":
                polarity -= 1
        if polarity !=0 :
            rating.append((s, polarity, nega_posi))
    return rating

#全ファイルからratingと文章を抽出
rating = []
for nega_posi in path_list:
    with open(nega_posi, "br") as f:
        j =  json.load(f)
    s = j["sentences"]
    rating += create_rating(s)

#先頭3データチェック
#print(rating[0:2])

# データフレームに変換
df = pd.DataFrame(rating, columns = ['sentence','polarity','nega_posi'])
display(df)
#@title  テキスト処理

#@markdown  **<font color= "Crimson">ガイド</font>:テキストカラム名をtext_colで指定|カテゴリーデータカラムをcategory_colで指定**
text_col = 'sentence' #@param {type:"raw"}
category_col = 'nega_posi' #@param {type:"raw"}

import scattertext as st
import spacy
from collections import Counter
from itertools import chain
from IPython.display import HTML
import warnings
warnings.simplefilter('ignore')


# テキストに含まれている空行を削除
df[text_col] = df[text_col].replace('\n+', '\n', regex=True)
df.dropna(subset=[text_col], inplace=True)

# テキストデータの前処理
def text_preprocessing(text):
   # 改行コード、タブ、スペース削除
   text = ''.join(text.split())
   # URLの削除
   text = re.sub(r'https?://[\w/:%#\$&\?\(\)~\.=\+\-]+', '', text)
   # メンション除去
   text = re.sub(r'@([A-Za-z0-9_]+)', '', text)
   # 記号の削除
   text = re.sub(r'[!"#$%&\'\\\\()*+,-./:;<=>?@[\\]^_`{|}~「」〔〕“”〈〉『』【】&*・()$#@。、?!`+¥]', '', text)

   return text

df[text_col] = df[text_col].map(text_preprocessing)


# 品詞を絞りこみつつ、unigramの出現回数を集計(品詞は、名詞・固有名詞・動詞・形容詞とした)
class UnigramSelectedPos(st.FeatsFromSpacyDoc):

    def __init__(self,use_pos=['NOUN', 'PROPN', 'VERB', 'ADJ']):
        super().__init__()
        self._use_pos = use_pos

    def get_feats(self, doc):
        return Counter([c.lemma_ for c in doc if c.pos_ in self._use_pos])

#nlp = spacy.load('ja_ginza')  #ja_ginza
#nlp = spacy.load("ja_gsdluw")  #国語研長単位モデル

# Corpusの作成
corpus = (st.CorpusFromPandas(df,
                              category_col = category_col,
                              text_col = text_col,
                              nlp = spacy.load('ja_ginza'), #国語研モデルならば ja_gsdluw に
                              feats_from_spacy_doc = UnigramSelectedPos()
                              )
          .build())
#@title  scatter text

#@markdown  **<font color= "Crimson">ガイド</font>:category_name=y軸表示カテゴリー|not_category_name=x軸表示カテゴリー|minimum_category_name=語の出現回数**
category_name = 'positive' #@param {type:"raw"}
not_category_name = 'negative' #@param {type:"raw"}
minimum_term_frequency = 3 #@param {type:"slider", min:1, max:50, step:1}

import warnings
warnings.simplefilter('ignore')

html = st.produce_scattertext_explorer(
          corpus,
          category = category_name,
          not_categories = [not_category_name], # 複数選択可
          category_name = category_name,
          not_category_name = not_category_name ,
          asian_mode=True,
          width_in_pixels=1000,
          minimum_term_frequency=minimum_term_frequency, # 語句の出現回数のmin指定
          max_terms=4000, # 最大プロット数
          metadata = df[text_col]
          )

# scattertext表示
HTML(html)
参考
