何度も言いますが、Windowsユーザー向け のVSCodeに少し変わった$\LaTeX$導入する方法です。
前回
今回で最後です。もう少しなので頑張りましょう。
.latexmkrcの作成
.latexmkrcとは、latexmkを使うときにどのようなソフト(uplatex,platex,biber,upmendexなど)を使うか制御するためのものである。
.latexmkrcは、.texが置いてあるところにおいてもいいが、わざわざ新しい.texを作るたびに位置を変えるのは面倒なので、C:\Users\usernameのところに置くのがふつうである。
1. C:\Users\usernameの位置に移動する。(私の場合、hikoz)
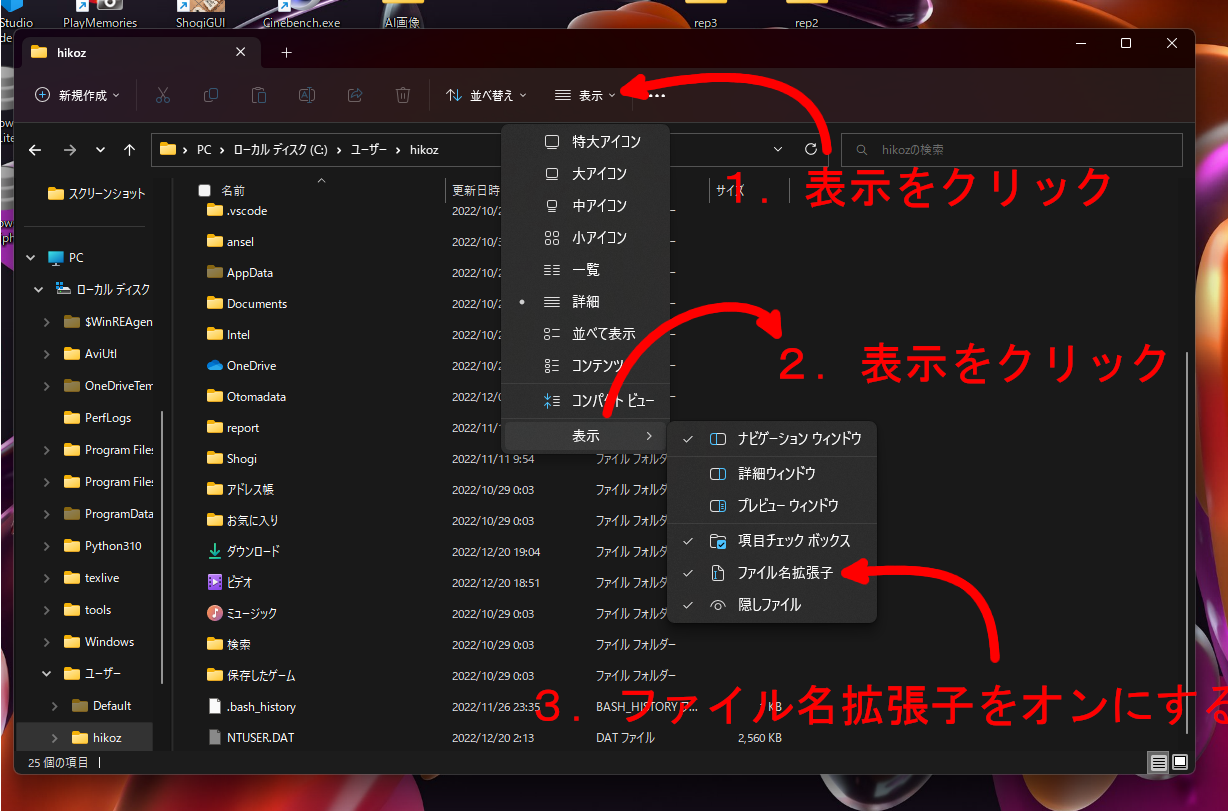
2. 拡張子を見えるようにする。(おせっかいかもしれないけど、拡張子が見えないと怖くないですか?)
3. textファイルを作って、.latexmkrcに名前を変える。
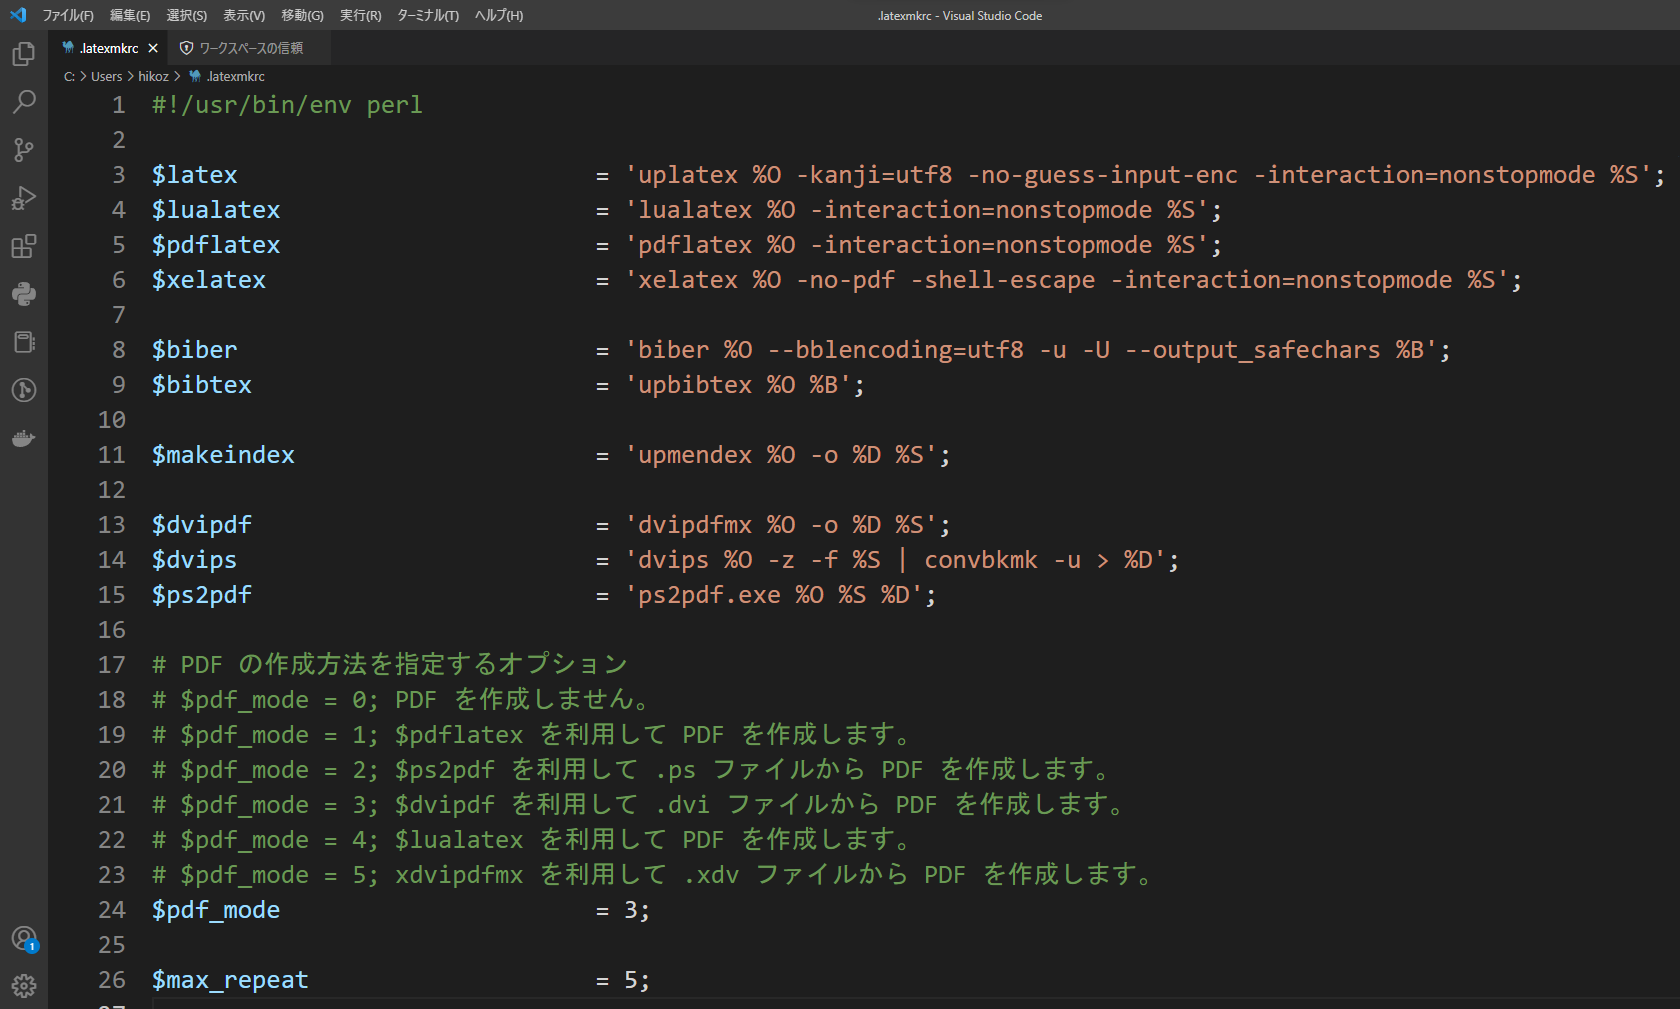
4. .latexmkrcに以下のものを張り付ける
#!/usr/bin/env perl

$latex                         = 'uplatex %O -kanji=utf8 -no-guess-input-enc -interaction=nonstopmode %S';
$lualatex                      = 'lualatex %O -interaction=nonstopmode %S';
$pdflatex                      = 'pdflatex %O -interaction=nonstopmode %S';
$xelatex                       = 'xelatex %O -no-pdf -shell-escape -interaction=nonstopmode %S';

$biber                         = 'biber %O --bblencoding=utf8 -u -U --output_safechars %B';
$bibtex                        = 'upbibtex %O %B';

$makeindex                     = 'upmendex %O -o %D %S';

$dvipdf                        = 'dvipdfmx %O -o %D %S';
$dvips                         = 'dvips %O -z -f %S | convbkmk -u > %D';
$ps2pdf                        = 'ps2pdf.exe %O %S %D';

# PDF の作成方法を指定するオプション
# $pdf_mode = 0; PDF を作成しません。
# $pdf_mode = 1; $pdflatex を利用して PDF を作成します。
# $pdf_mode = 2; $ps2pdf を利用して .ps ファイルから PDF を作成します。
# $pdf_mode = 3; $dvipdf を利用して .dvi ファイルから PDF を作成します。
# $pdf_mode = 4; $lualatex を利用して PDF を作成します。
# $pdf_mode = 5; xdvipdfmx を利用して .xdv ファイルから PDF を作成します。
$pdf_mode                      = 3;

$max_repeat                    = 5;
これで絶対必要な設定は完了です。やったね!!
スぺニット登録をしよう
latexを書いているときによく使う表現がある。
例えば、画像を張り付けるための
\begin{figure}[H]
  \centering
  \includegraphics[keepaspectratio, width=105mm]{画像名}
\end{figure}
はたくさん使うため、できるだけ書くのを減らすためテンプレートを作りたい。
それに役に立つのは、ユーザースぺニットである。
ユーザースぺニットをどんどん増やしていって、快適な$\LaTeX$ライフを過ごせるようにしましょう。
方法
1. ユーザースぺニットを開き、latex.jsonを開く。
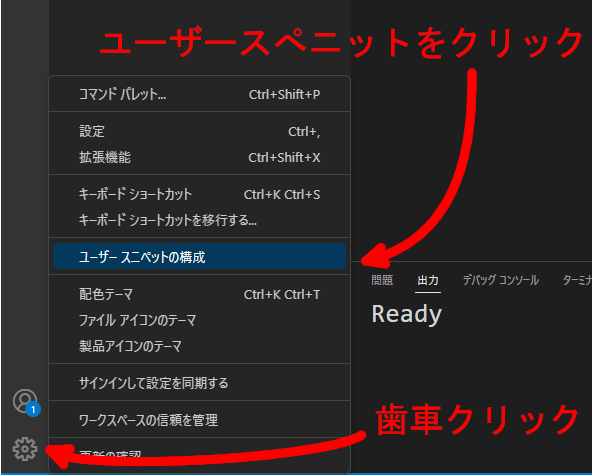
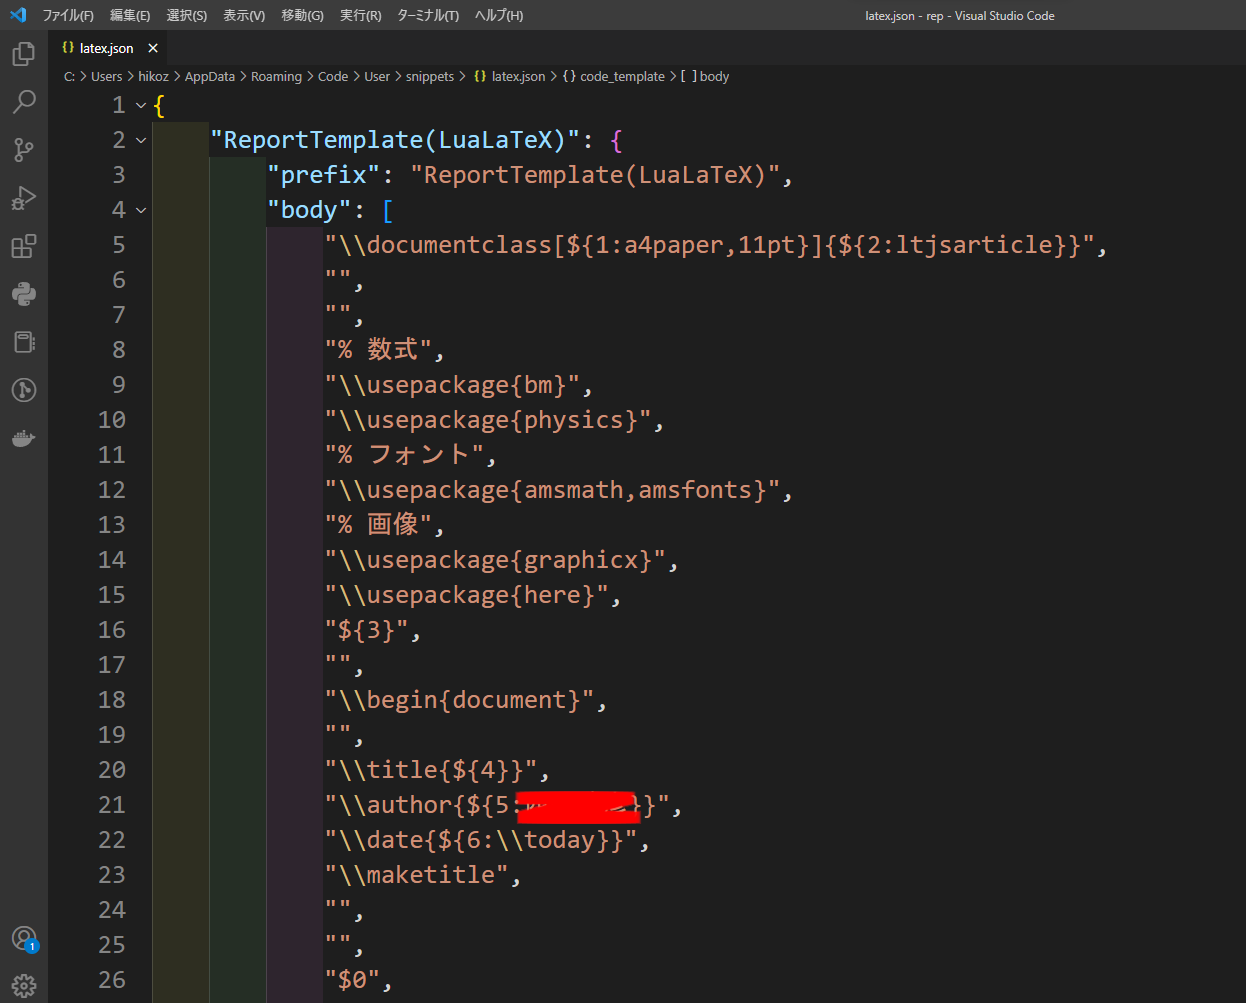
2. 次のものを張り付ける。(これは、私の場合なので完璧同じにする必要はない)
{
    "ReportTemplate(LuaLaTeX)": {
        "prefix": "ReportTemplate(LuaLaTeX)",
        "body": [
            "\\documentclass[${1:a4paper,11pt}]{${2:ltjsarticle}}",
            "",
            "",
            "% 数式",
            "\\usepackage{bm}",
            "\\usepackage{physics}",
            "% フォント",
            "\\usepackage{amsmath,amsfonts}",
            "% 画像",
            "\\usepackage{graphicx}",
            "\\usepackage{here}",
            "${3}",
            "",
            "\\begin{document}",
            "",
            "\\title{${4}}",
            "\\author{${5}}",
            "\\date{${6:\\today}}",
            "\\maketitle",
            "",
            "",
            "$0",
            "",
            "",
            "\\end{document}"
        ],
        "description": "授業レポート用テンプレート(LuaLaTeX)"
    },
    "ReportTemplate(upLaTeX)": {
        "prefix": "ReportTemplate(upLaTeX)",
        "body": [
            "\\documentclass[${1:a4paper,11pt,uplatex}]{${2:jsarticle}}",
            "",
            "",
            "% 数式",
            "\\usepackage{amsmath,amsfonts}",
            "\\usepackage{bm}",
            "% 画像",
            "\\usepackage[dvipdfmx]{graphicx,hyperref}",
            "\\usepackage{here}",
            "${3}",
            "",
            "\\begin{document}",
            "",
            "\\title{${4}}",
            "\\author{${5}}",
            "\\date{${6:\\today}}",
            "\\maketitle",
            "",
            "",
            "$0",
            "",
            "",
            "\\end{document}"
        ],
        "description": "授業レポート用テンプレート(upLaTeX)"
    },
    "MinipageTemplate": {
        "prefix": "MinipageTemplate",
        "body": [
            "\\begin{figure}[H]",
            "\t\\begin{minipage}[b]{0.45\\linewidth}",
            "\t\t\\centering",
            "\t\t\\label{$1}",
            "\t\t\\caption{$2}",
            "\t\t$3",
            "\t\\end{minipage}",
            "",
            "\t\\begin{minipage}[b]{0.45\\linewidth}",
            "\t\t\\centering",
            "\t\t\\label{$4}",
            "\t\t\\caption{$5}",
            "\t\t$6",
            "\t\\end{minipage}",
            "\\end{figure}",
        ],
        "description": "授業レポート用テンプレート"
    },
    "FigureTemplate": {
        "prefix": "FigureTemplate",
        "body": [
            "\\begin{figure}[H]",
            "\t\\centering",
            "\t\\caption{$1}",
            "\t\\label{fig:$2}",
            "\t\\includegraphics[keepaspectratio, width=135mm]{$3}",
            "\\end{figure}"
        ],
        "description": "画像貼り付け用"
    },
    "TableTemplate": {
        "prefix": "TableTemplate",
        "body": [
            "\\begin{table}[H]",
            "\t\\begin{center}",
            "\t\t\\caption{$1}",
            "\t\t\\label{tab:$2}",
            "\t\t\\scalebox{1}[1]{",
            "\t\t\t%ここにtabulerを入れる",
            "\t\t\t$3",
            "\t\t}",
            "\t\\end{center}",
            "\\end{table}"
        ],
        "description": "tableのテンプレート"
    },
    "code_template": {
        "prefix": "CodeTemplate",
        "body": [
            "% ソースコード",
            "\\usepackage{listings,jvlisting}",
            "\\lstset{",
            "\tbasicstyle={\\ttfamily},",
            "\tidentifierstyle={\\small},",
            "\tcommentstyle={\\smallitshape},",
            "\tkeywordstyle={\\small\\bfseries},",
            "\tndkeywordstyle={\\small},",
            "\tstringstyle={\\small\\ttfamily},",
            "\tframe={tb},",
            "\tbreaklines=true,",
            "\tcolumns=[l]{fullflexible},",
            "\tnumbers=left,",
            "\txrightmargin=6mm,",
            "\txleftmargin=6mm,",
            "\tnumberstyle={\\scriptsize},",
            "\tstepnumber=1,",
            "\tnumbersep=0mm,",
            "\tlineskip=-0.5ex",
            "}",
        ],
        "description": "きれいなソースコードを書く"
    },
    "Formula_template": {
        "prefix": "TransparentTemplate",
        "body": [
            "\\documentclass{article}",
            "\\usepackage{amsmath}",
            "\\usepackage{mathtools}",
            "\\usepackage{bm}",
            "\\usepackage{physics}",
            "",
            "\\pagestyle{empty}",
            "\\begin{document}",
            "\\begin{center}",
            "\t\\begin{align*}",
            "\t\t$1",
            "\t\\end{align*}",
            "\\end{center}",
            "\\end{document}",
        ],
        "description": "数式を透過png出力"
    },
}
\author{${5:自分の名前}}ってすると、名前打たなくていいので楽になります
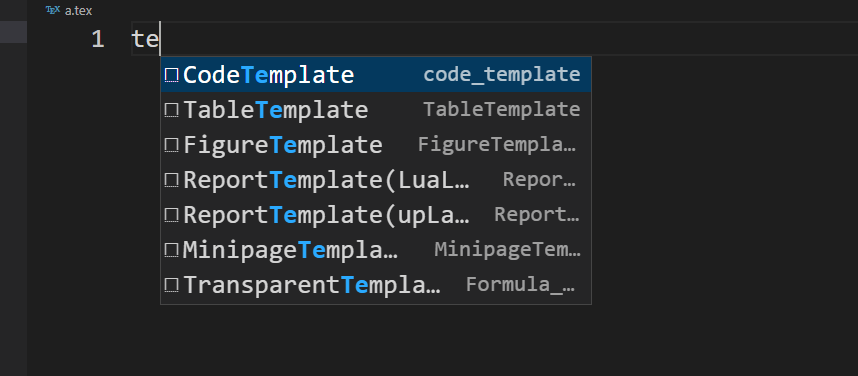
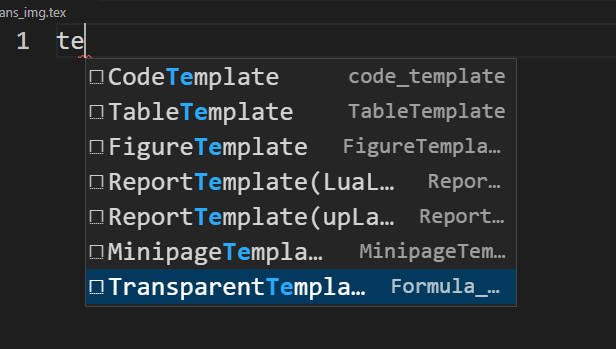
ユーザースぺニットの実際の使い方は、.texでtemと入力すると検索候補が出てくるはずなので、それをクリックすれば入力できます。
LuaLaTeXが動くか確認
ちゃんと動くか確認するため、サンプルコードを与えます。
適当な画像を1枚用意して、適当なファイルに次のような.tex, .bibファイルを作成する。
\documentclass[a4paper,11pt]{ltjsarticle}

% 数式
\usepackage{bm}
\usepackage{physics}
% フォント
\usepackage{amsmath,amsfonts}
% 画像
\usepackage{graphicx}
\usepackage{here}

\begin{document}

\title{Lua\LaTeX の使い方}
\author{\TeX Taro}
\date{\today}
\maketitle


\section{序論}
\LaTeX の使い方を軽く学ぼう。

\subsection{画像を表示してみよう}
\begin{figure}[H]
  \centering
  \includegraphics[keepaspectratio, width=105mm]{%%%%%%%%%%%%%%%%%%%%%%%%ここに画像を入れる(私の場合、DSC00781.JPG)%%%%%%%%%%%}
\end{figure}

\subsection{数式を書いてみよう}
マクスウェル方程式
\begin{eqnarray}
  \div \bm{D}(t,\bm{x}) &=& \rho(t,\bm{x}) \\
  \div \bm{B}(t,\bm{x}) &=& 0 \\
  \curl \bm{E}(t,\bm{x}) &=& -\pdv{\bm{B}(t,\bm{x})}{t} \\
  \curl \bm{H}(t,\bm{x}) &=& \bm{j}(t,\bm{x}) + \pdv{\bm{D}(t,\bm{x})}{t}
\end{eqnarray}

\subsection{bibtexで引用してみよう}
これはいま世界を圧巻しているTransformer\cite{Transformer}の論文です。
これは神本\cite{LaTeX}です

% bibtex
\bibliography{reference} %reference.bib
\bibliographystyle{junsrt} %参考文献出力スタイル

\end{document}
\documentclass[a4paper,11pt,uplatex]{jsarticle}

% 数式
\usepackage{amsmath,amsfonts}
\usepackage{bm}
\usepackage{physics}
% 画像
\usepackage[dvipdfmx]{graphicx}
\usepackage{here}

\begin{document}

\title{up\LaTeX の使い方}
\author{\TeX Taro}
\date{\today}
\maketitle


\section{序論}
\LaTeX の使い方を軽く学ぼう。

\subsection{画像を表示してみよう}
\begin{figure}[H]
  \centering
  \includegraphics[keepaspectratio, width=105mm]{%%%%%%%%%%%%%%%%%%%%%%%%ここに画像を入れる(私の場合、DSC00781.JPG)%%%%%%%%%%%}
\end{figure}

\subsection{数式を書いてみよう}
マクスウェル方程式
\begin{eqnarray}
  \div \bm{D}(t,\bm{x}) &=& \rho(t,\bm{x}) \\
  \div \bm{B}(t,\bm{x}) &=& 0 \\
  \curl \bm{E}(t,\bm{x}) &=& -\pdv{\bm{B}(t,\bm{x})}{t} \\
  \curl \bm{H}(t,\bm{x}) &=& \bm{j}(t,\bm{x}) + \pdv{\bm{D}(t,\bm{x})}{t}
\end{eqnarray}

\subsection{bibtexで引用してみよう}
これはいま世界を圧巻しているTransformer\cite{Transformer}の論文です。
これは神本\cite{LaTeX}です

% bibtex
\bibliography{reference} %reference.bib
\bibliographystyle{junsrt} %参考文献出力スタイル

\end{document}
@article{Transformer,
doi = {10.48550/ARXIV.1706.03762},
url = {https://arxiv.org/abs/1706.03762},
author = {Vaswani, Ashish and Shazeer, Noam and Parmar, Niki and Uszkoreit, Jakob and Jones, Llion and Gomez, Aidan N. and Kaiser, Lukasz and Polosukhin, Illia},
keywords = {Computation and Language (cs.CL), Machine Learning (cs.LG), FOS: Computer and information sciences, FOS: Computer and information sciences},
title = {Attention Is All You Need},
publisher = {arXiv},
year = {2017},
copyright = {arXiv.org perpetual, non-exclusive license}
}

@article{DELLE2,
doi = {10.48550/ARXIV.2204.06125},
url = {https://arxiv.org/abs/2204.06125},
author = {Ramesh, Aditya and Dhariwal, Prafulla and Nichol, Alex and Chu, Casey and Chen, Mark},
keywords = {Computer Vision and Pattern Recognition (cs.CV), FOS: Computer and information sciences, FOS: Computer and information sciences},
title = {Hierarchical Text-Conditional Image Generation with CLIP Latents},
publisher = {arXiv},
year = {2022},
copyright = {Creative Commons Attribution 4.0 International}
}

@book{LaTeX,
  author         = {奥村晴彦,黒木裕介},
  editor         = {},
  publisher      = {株式会社技術評論社},
  title          = {[改訂第8版]LaTeX2ε美文書作成入門},
  year           = {2020}
}
\includegraphicsに、画像の名前をしっかりと入れてください。
では、最初にlua_report.texから実行してみましょう。
lua_report.tex
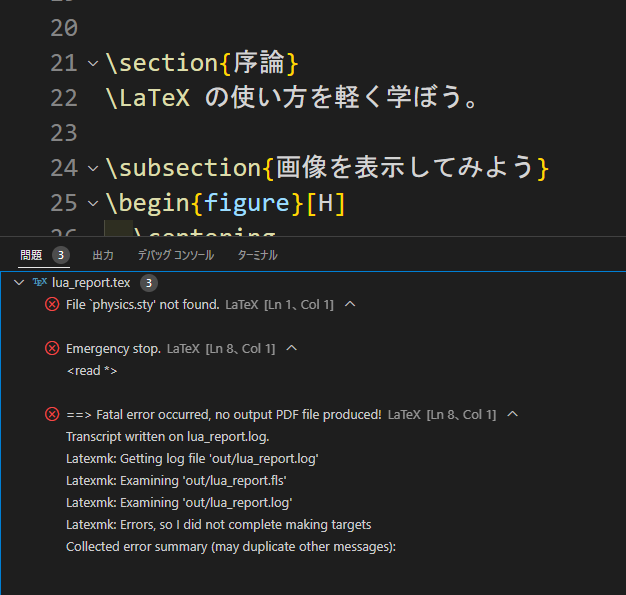
エラーが出てきました。
一つ目は、physicsのパッケージがないということらしいです。
ほかのエラーはよくわかりません。
わかるところからやってみましょう。
管理者権限で、ターミナル開いて次のように書きましょう。
tlmgr install physics
もう一度実行してみると、hereのパッケージがないとのことで
tlmgr install here
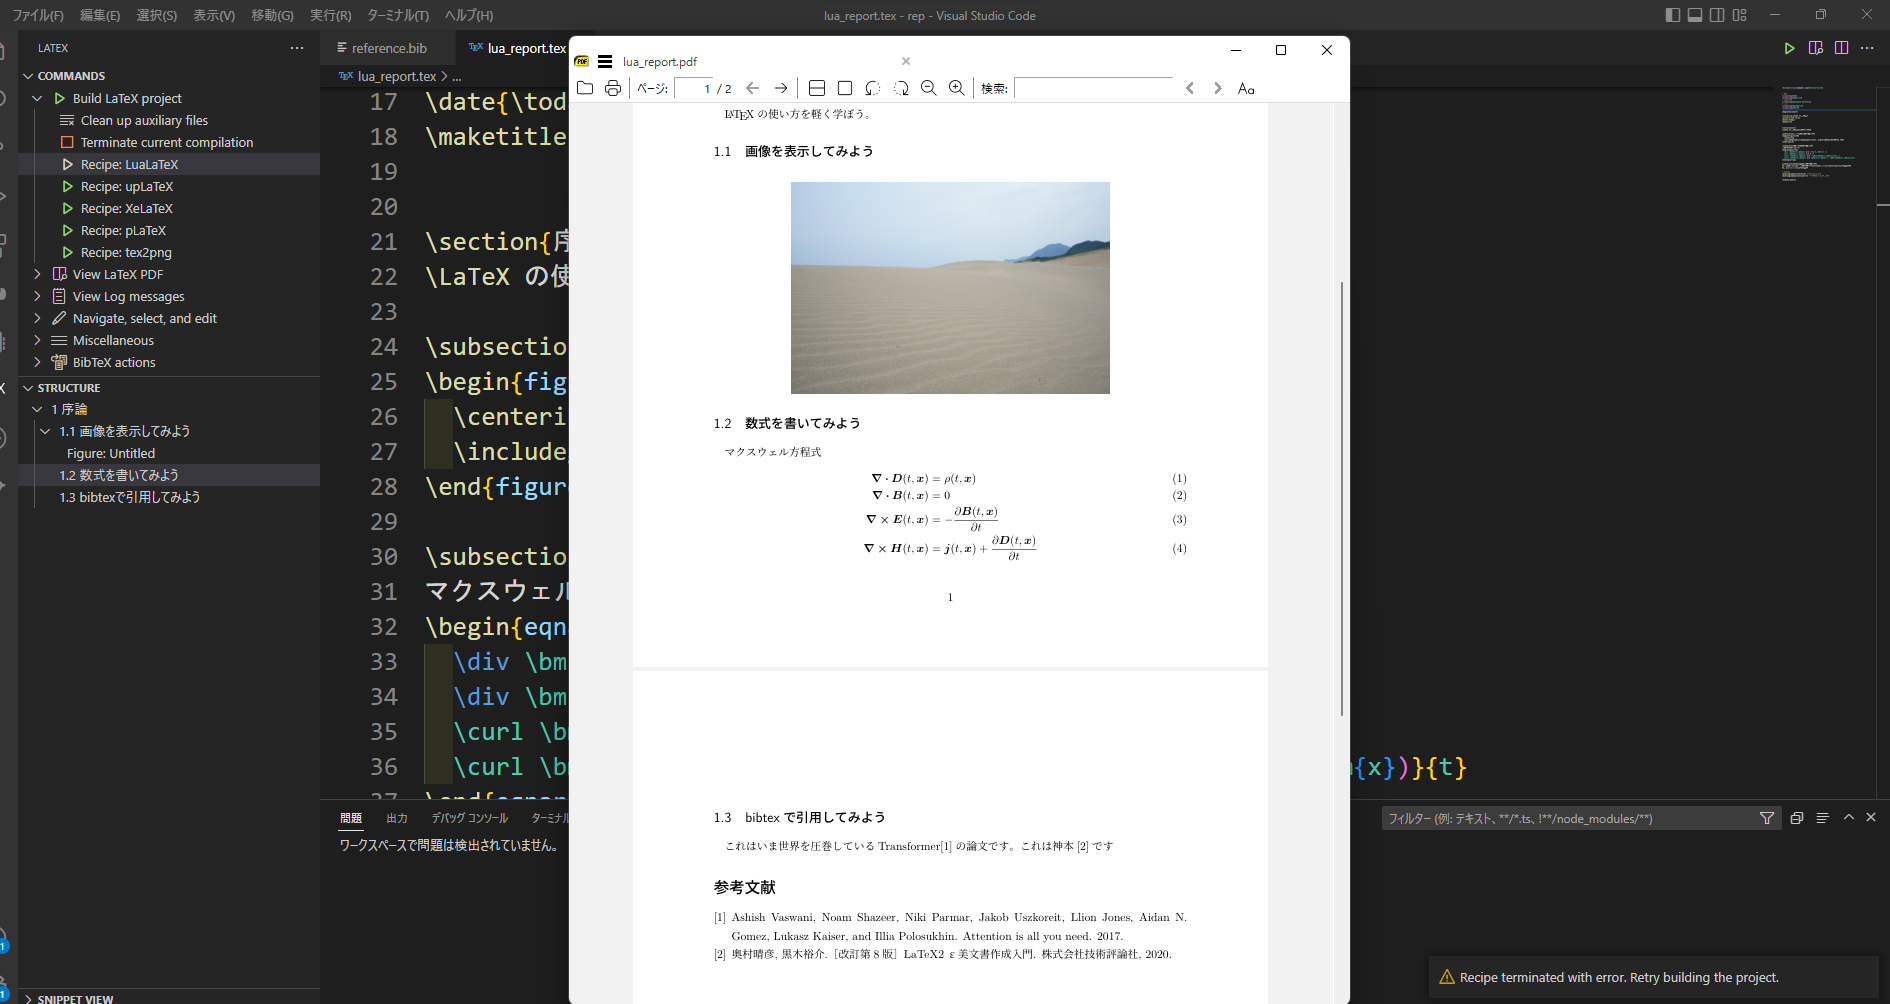
floatもないとのことで、同様にやると実行できました。
up_report.tex
upLaTeXのレシピをクリックすると、必要なパッケージが入っていたので実行できました。
今回、再現に失敗しましたがファイル名が日本語の場合文字化けを起こして、エラーが出ることがあります。
outファイルの.logのところに文字化けがあったら、日本語のファイルがないか調べて英語で書くようにしましょう。
今回の記事書くために、いろいろいじりまくったのでいつもなら簡単に起こるはずなのにエラーが起きませんでした。
何か知っている人いますでしょうか?
TeXclipもどきのことをしよう
第二回で、「tex2pngは、TeXclipのような透過された数式の画像ができるものである。」と言いました。
しかし、今のままでは使えません。
      // 透過された画像用のpdfのトリミング
      {
        "name": "pdftrimming",
        "command": "pdfcrop",
        "args": [
          "%DOC%.pdf", "%DOC%.pdf",
        ]
      },
      // pdfを透過された画像に変換
      {
        "name": "pdf2png",
        "command": "pdftocairo",
        "args": [
          "-png", "-r", "300", "-transp", "%DOC%.pdf"
        ]
      },
なぜなら、pdfcropやpdftocairoというソフトを持っていないからです。
ではインストールをしていきましょう。
1. pdfcropをダウンロードするため、管理者権限で以下のコマンドを打つ。
tlmgr install pdfcrop
2. Popplerのpdftocairoをダウンロードするため、管理者権限で以下のコマンドを打つ。
choco install poppler -y
2. VSCodeで適当な.texを作り、TransparentTemplateを使う。
4. Recipe:tex2pngを実行する
LaTeX Error: File `mathtools.sty' not found.と出たのでtlmgrでインストール
私の場合、まさかの別のソフトで文字化けのエラーが起こったので、日本語のないファイルに移る。
そうしたら、実行できました。
最後に
いろいろな環境構築をやってきたけど、一番難しいのは$\LaTeX$で間違いないです。
できるだけ、図を多めにしてわかりやすいつもりだと思っていますが、わからないことや間違っていることがあったらコメントしてください。
この記事で、一人でも多く$\LaTeX$を使ってもらえたら嬉しいです。
