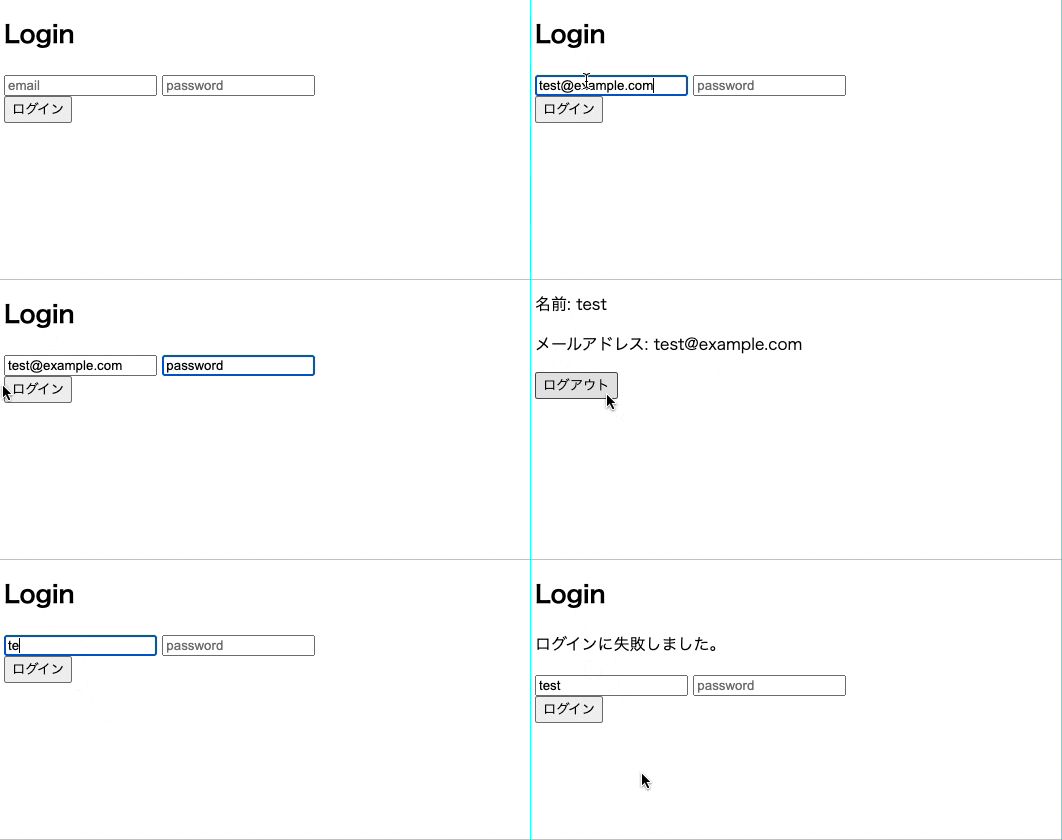
概要
筆者はエンジニア歴がまだ1年も経っていませんが、主にphpをメインとしたシステムエンジニアをしております。
普段の実務ではLaravelは使用しておらず、個人的に勉強するべくLaravelを用いたSPA開発において、認証サービスにSanctumを使用するため自分向けにまとめておきます。
Laravelには他の認証サービスも備わっているため、その辺の違いや実装方法もいずれまとめていきたいと考えています。
基本的にはドキュメント通りに進めているだけなので、下記のドキュメントを参考にしていただければと思います。
それに付随して、自分に起きたエラーの解決方法等も共有していきたいと思います。
環境
PHP 7.3.11
Laravel Framework 8.33.1
Sanctumインストール
メモリ確保エラーを回避も含めて、以下のコマンドを実行します。
$ COMPOSER_MEMORY_LIMIT=-1 composer require laravel/sanctum
$ php artisan vendor:publish --provider="Laravel\Sanctum\SanctumServiceProvider"
$ php artisan migrate
設定
app/Http/Kernel.phpにsanctumのミドルウェアを追加します。
use Laravel\Sanctum\Http\Middleware\EnsureFrontendRequestsAreStateful;

'api' => [
    EnsureFrontendRequestsAreStateful::class,
    'throttle:api',
    \Illuminate\Routing\Middleware\SubstituteBindings::class,
],
ドキュメントに下記の記述がされているので、config/sanctum.phpに認証を維持するドメインを設定します。
各環境に合わせて設定してください。また、.envファイルでSANCTUM_STATEFUL_DOMAINSで定義して利用することも可能だと思います。
First, you should configure which domains your SPA will be making requests from. You may configure these domains using the stateful configuration option in your sanctum configuration file. This configuration setting determines which domains will maintain "stateful" authentication using Laravel session cookies when making requests to your API.
'stateful' => explode(',', env(
    'SANCTUM_STATEFUL_DOMAINS',
    'localhost,localhost:3000,127.0.0.1,127.0.0.1:8000,::1,localhost:8000'
)),
ユーザー作成
DBにユーザーが登録されていないと認証機能をテストできないため、登録する必要があります。
tinkerで作成するのが手っ取り早い気がします...。
$ php artisan tinker
>>> App\Models\User::factory()->create(['name' => 'test', 'email' => 'test@example.com', 'password' => bcrypt('password')]);
機能実装
次にログイン機能を実装します。
<?php

namespace App\Http\Controllers;

use Illuminate\Http\Request;
use Illuminate\Support\Facades\Auth;

class LoginController extends Controller
{

    public function login(Request $request)
    {
        $credentials = $request->validate([
            'email' => 'required|email',
            'password' => 'required'
        ]);

        if(Auth::attempt($credentials)){
            return response()->json(['status_code' => 200,'message' => 'success'],200);
        } else {
            return response()->json(['status_code' => 500,'message' => 'Unauthorized'],200);
        }
    }

    public function logout()
    {
        Auth::logout();
        return response()->json(['status_code' => 200,'message' => 'Logged out'], 200);
    }

}
上記の実装したログイン機能と認証が必要なAPIルートにsanctum認証ガードを設定します。
Route::middleware('auth:sanctum')->get('/user', function (Request $request) {
    return $request->user();
});

Route::post('/login',[App\Http\Controllers\LoginController::class, 'login']);
Route::post('/logout',[App\Http\Controllers\LoginController::class, 'logout']);
最終的なルートは下記のようになっています。
$ php artisan route:list
+--------+----------+---------------------+------+------------------------------------------------------------+------------------------------------------+
| Domain | Method   | URI                 | Name | Action                                                     | Middleware                               |
+--------+----------+---------------------+------+------------------------------------------------------------+------------------------------------------+
|        | GET|HEAD | /                   |      | Closure                                                    | web                                      |
|        | POST     | api/login           |      | App\Http\Controllers\LoginController@login                 | api                                      |
|        | POST     | api/logout          |      | App\Http\Controllers\LoginController@logout                | api                                      |
|        | GET|HEAD | api/user            |      | Closure                                                    | api                                      |
|        |          |                     |      |                                                            | App\Http\Middleware\Authenticate:sanctum |
|        | GET|HEAD | sanctum/csrf-cookie |      | Laravel\Sanctum\Http\Controllers\CsrfCookieController@show | web                                      |
|        | GET|HEAD | {any}               |      | Closure                                                    | web                                      |
+--------+----------+---------------------+------+------------------------------------------------------------+------------------------------------------+
ログイン画面の実装
Vue.jsを利用したログイン画面を実装します。
筆者はほとんどVue.jsは触れたことがなく、今回の認証のために試行錯誤して作成している箇所もあるためご了承ください...。
まずSPAの土台となるテンプレートを作成します。
<!doctype html>
<html lang="ja">

<head>
    <meta charset="UTF-8">
    <title>Sanctumテスト</title>
    <script src="{{ asset('js/app.js') }}" defer></script>
</head>

<body>
    <div id="app">
        <router-view />
    </div>
</body>

</html>
vue-routerで設定したルーティングを読み込むのに、該当ファイルを作成、変更します。
Route::get('{any}', function () {
    return view('index');
})->where('any', '.*');
require('./bootstrap');

window.Vue = require('vue').default;
import router from "./router";

const app = new Vue({
    el: '#app',
    router: router
});
import Vue from "vue";
import VueRouter from "vue-router";

Vue.use(VueRouter);

import Login from "./components/Login.vue";
import About from "./components/About.vue";

const router = new VueRouter({
    mode: "history",
    routes: [
        {
            path: "/login",
            name: "Login",
            component: Login,
        },
        {
            path: "/about",
            name: "About",
            component: About,
        }
    ]
});

export default router;
router.jsをコンパイルするのに下記も変更します。
mix.js('resources/js/app.js', 'public/js')
    .js("resources/js/router.js", "public/js")
    .vue()
    .sass('resources/sass/app.scss', 'public/css');
そして、LoginおよびAboutコンポーネントを作成します。
<template>
    <div>
        <h2>Login</h2>
        <p class="mt-2 text-danger">{{ getUserMessage }}</p>
        <form @submit.prevent="login">
            <label><input v-model="email" placeholder="email"></label>
            <label><input v-model="pass" placeholder="password"></label>
            <br>
            <button type="submit">ログイン</button>
        </form>
    </div>
</template>
<script>
export default {
    data() {
        return {
            email: '',
            pass: '',
            error: false,
            getUserMessage: ""
        };
    },
    methods: {
        login() {
            axios.get('/sanctum/csrf-cookie')
                .then((res) => {
                    axios.post('/api/login', {
                        email: this.email,
                        password: this.pass,
                    })
                    .then((res) => {
                        if( res.data.status_code == 200 ) {
                            this.$router.push("/about");
                        }
                        this.getUserMessage = 'ログインに失敗しました。'
                    })
                    .catch((err) => {
                        console.log(err);
                        this.getUserMessage = 'ログインに失敗しました。'
                    })
                })
                .catch((err) => {
                //
                })
        }
    }
};
</script>
<template>
    <div>
        <p>名前: {{ user.name }}</p>
        <p>メールアドレス: {{ user.email }}</p>
        <button type="button" @click="logout">ログアウト</button>
    </div>
</template>

<script>
export default {
    data() {
        return {
            user: ""
        };
    },
    mounted() {
        axios.get("/api/user").then(response => {
            this.user = response.data;
        });
    },
    methods: {
        logout() {
            axios.post("api/logout")
                .then(response => {
                    console.log(response);
                    this.$router.push("/login");
                })
                .catch(error => {
                    console.log(error);
                });
        }
    }
};
</script>
動作確認
おわりに
普段実務ではLaravelとVue.jsは触れないことから、個人的に勉強するのに認証処理はしっかり理解しておこうと考え、未熟ながらもまとめさせて頂きました。
そのため、不備等があれば教えて頂けると幸いです。
